ASTM B756-00
(Specification)Standard Specification for Nickel-Chromium-Molybdenum-Tungsten Alloy (UNS N06110) Rod and Bar
Standard Specification for Nickel-Chromium-Molybdenum-Tungsten Alloy (UNS N06110) Rod and Bar
SCOPE
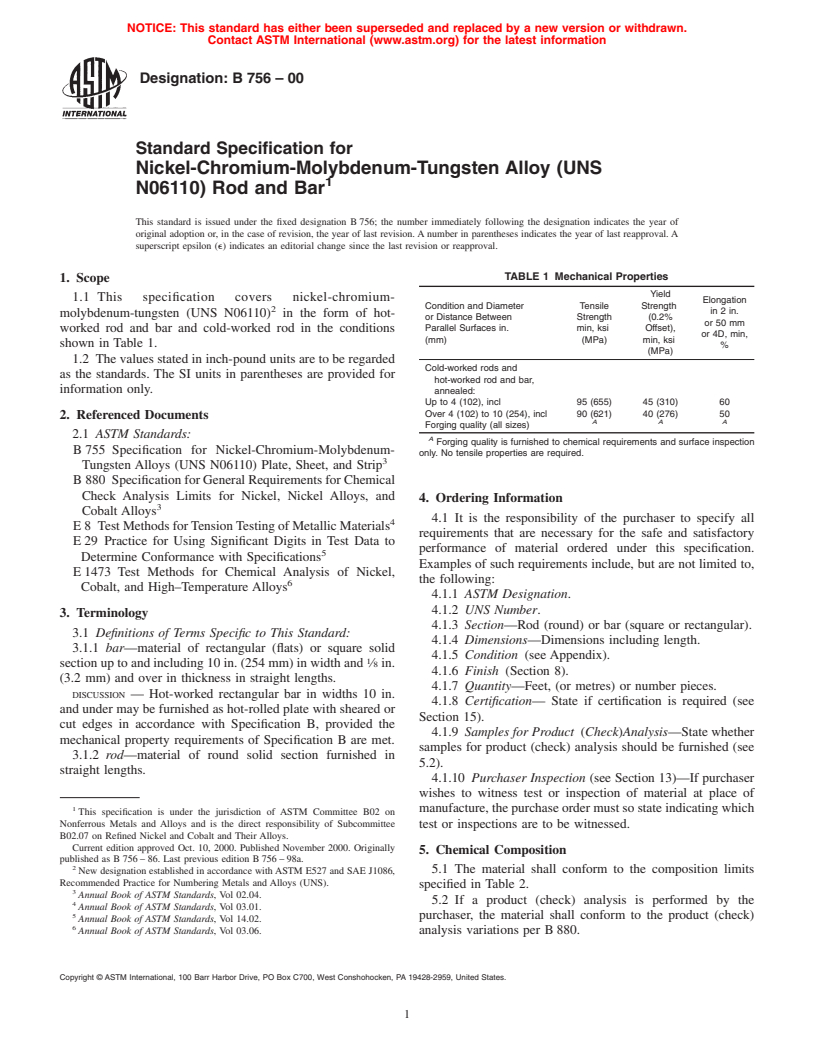
1.1 This specification covers nickel-chromium-molybdenum-tungsten (UNS N06110) in the form of hot-worked rod and bar and cold-worked rod in the conditions shown in Table 1.
1.2 The values stated in inch-pound units are to be regarded as the standards. The SI units in parentheses are provided for information only.
General Information
Relations
Standards Content (Sample)
NOTICE: This standard has either been superseded and replaced by a new version or withdrawn.
Contact ASTM International (www.astm.org) for the latest information
Designation: B 756 – 00
Standard Specification for
Nickel-Chromium-Molybdenum-Tungsten Alloy (UNS
N06110) Rod and Bar
This standard is issued under the fixed designation B 756; the number immediately following the designation indicates the year of
original adoption or, in the case of revision, the year of last revision. A number in parentheses indicates the year of last reapproval. A
superscript epsilon (e) indicates an editorial change since the last revision or reapproval.
TABLE 1 Mechanical Properties
1. Scope
Yield
1.1 This specification covers nickel-chromium-
Elongation
Condition and Diameter Tensile Strength
in2in.
molybdenum-tungsten (UNS N06110) in the form of hot-
or Distance Between Strength (0.2%
or 50 mm
worked rod and bar and cold-worked rod in the conditions Parallel Surfaces in. min, ksi Offset),
or 4D, min,
(mm) (MPa) min, ksi
shown in Table 1.
%
(MPa)
1.2 The values stated in inch-pound units are to be regarded
Cold-worked rods and
as the standards. The SI units in parentheses are provided for
hot-worked rod and bar,
information only.
annealed:
Up to 4 (102), incl 95 (655) 45 (310) 60
Over 4 (102) to 10 (254), incl 90 (621) 40 (276) 50
2. Referenced Documents
AA A
Forging quality (all sizes)
2.1 ASTM Standards:
A
Forging quality is furnished to chemical requirements and surface inspection
B 755 Specification for Nickel-Chromium-Molybdenum-
only. No tensile properties are required.
Tungsten Alloys (UNS N06110) Plate, Sheet, and Strip
B 880 Specification for General Requirements for Chemical
Check Analysis Limits for Nickel, Nickel Alloys, and
4. Ordering Information
Cobalt Alloys
4.1 It is the responsibility of the purchaser to specify all
E 8 Test Methods forTensionTesting of Metallic Materials
requirements that are necessary for the safe and satisfactory
E 29 Practice for Using Significant Digits in Test Data to
performance of material ordered under this specification.
Determine Conformance with Specifications
Examples of such requirements include, but are not limited to,
E 1473 Test Methods for Chemical Analysis of Nickel,
the following:
Cobalt, and High–Temperature Alloys
4.1.1 ASTM Designation.
4.1.2 UNS Number.
3. Terminology
4.1.3 Section—Rod (round) or bar (square or rectangular).
3.1 Definitions of Terms Specific to This Standard:
4.1.4 Dimensions—Dimensions including length.
3.1.1 bar—material of rectangular (flats) or square solid
4.1.5 Condition (see Appendix).
section up to and including 10 in. (254 mm) in width and ⁄8 in.
4.1.6 Finish (Section 8).
(3.2 mm) and over in thickness in straight lengths.
4.1.7 Quantity—Feet, (or metres) or number pieces.
DISCUSSION — Hot-worked rectangular bar in widths 10 in.
4.1.8 Certification— State if certification is required (see
and under may be furnished as hot-rolled plate with sheared or
Section 15).
cut edges in accordance with Specification B, provided the
4.1.9 Samples for Product (Check)Analysis—State whether
mechanical property requirements of Specification B are met.
samples for product (check) analysis should be furnished (see
3.1.2 rod—material of round solid section furnished in
5.2).
straight lengths.
4.1.10 Purchaser Inspection (see Section 13)—If purchaser
wishes to witness test or inspection of material at place of
manufacture, the purchase order must so state indicating which
This specification is under the jurisdiction of ASTM Committee B02 on
Nonferrous Metals and Alloys and is the direct responsibility of Subcommittee
test or inspections are to be witnessed.
B02.07 on Refined Nickel and Cobalt and Their Alloys.
Current edition approved Oct. 10, 2000. Published November 2000. Originally
5. Chemical Composition
published as B 756 – 86. Last previous edition B 756 – 98a.
5.1 The material shall conform to the composition limits
New designation established in accordance with ASTM E527 and SAE J1086,
Recommended Practice for Numbering Metals and Alloys (UNS).
specified in Table 2.
Annual Book of ASTM Standards, Vol 02.04.
5.2 If a product (check) analysis is performed by the
Annual Book of ASTM Standards, Vol 03.01.
purchaser, the material shall conform to the product (check)
Annual Book of ASTM Standards, Vol 14.02.
Annual Book of ASTM Standards, Vol 03.06. analysis variations per B 880.
Copyright © ASTM International, 100 Barr Harbor Drive, PO Box C700, West Conshohocken, PA 19428-2959, United States.
B 756
TABLE 2 Chemical Requirements TABLE 4 Permissible Variations in Diameter or Distance
Between Parallel Surfaces of Hot-Worked Rod and Bar
Composition
Element Limits,
Permissible Variations from
% A
Specified Dimensions, in. (mm)
Specified Dimension, in. (mm)
C 0.15 max
+−
Mn 1.0 max
Rod and bar, hot-worked:
Si 1.0 max
1 (25.4) and under 0.016 (0.41) 0.016 (0.41)
P 0.015 max
Over 1 (25.4) to 2 (50.8), incl 0.031 (0.79) 0.016 (0.41)
S 0.015 max
Over 2 (50.8) to 4 (101.6), incl 0.047 (1.19) 0.031 (0.79)
Cr 28.0 min
Over 4 (101.6) 0.125 (3.18) 0.063 (1.60)
33.0 max
Rod, rough-turned or ground:
Cb 1.0 max
Under 1 (25.4) 0.005 (0.13) 0.005 (0.13)
Co (if determined) 1.0 max
1 (25.4) and over 0.031 (0.79) 0
Mo 9.0 min
B
Forging quantity rod:
12.0 max
Under 1 (25.4) 0.005 (0.13) 0.005 (0.13)
Fe 1.0 max
1 (25.4) and over 0.031 (0.79) 0
Al 1.0 max
A
Ti 1.0 max
Dimensionsapplytodiameterofrods,todistancebetweenparallelsurfacesof
W 1.0 min squares, and separately to width and thickness of rectangles.
B
4.0 max
Spot grinding is permitted to remove minor surface imperfections. The depth
A
Ni 51.0 min of these spot ground areas shall not exceed 3 % of the diameter of the rod.
Cu 0.50 max
A
Element shall be determined arithmetically by difference.
7.5 Straightness:
7.5.1 The permissible variations in straightness of cold-
6. Mechanical and Other Properties worked rod as determined by the departure from straightness
shall be as prescribed in Table 7.
6.1 Mechanical Properties—The material shall conform to
7.5.2 The permissible variations in straightness of hot-
the mechanical properties specified in Table 1.
worked rod and bar as determined by the departure from
straightness shall be as specified in Table 8.
7. Dimensions and Permissible Variations
7.1 Diameter, Thickness, or Width—The permissible varia-
8. Workmanship, Finish, and Appearance
tionsfromthespecifieddimensionsofcoldworkedrodshallbe
8.1 The material shall be uniform in quality and condition,
as prescribed in Table 3, and of hot-worked rod and bar as
smooth, commercially straight or flat, and free of injurious
prescribed in Table 4.
imperfections.
7.2 Out-of-Round— Hot-worked rods and cold-worked rods
(except forging quality) all sizes, in straight lengths, shall not
9. Sampling
be out-of-round by more than one half the total permissible
9.1 Lot Definition:
variations in diameter shown inTable 3 andTable 4, except for
9.1.1 A lot for chemical analysis shall consist of one heat.
hot-worked rods ⁄2 in. (12.7 mm) in diameter and under, which
9.1.2 Alot for mechanical properties testing shall consist of
may be out-of-round by the total permissible variations in
all material from the same heat, nominal diameter or thickness,
diameter shown in Table 4.
and condition.
7.3 Machining Allowances for Hot-Worked Materials—
9.1.2.1 Where material cannot be identified by heat, a lot
When the surfaces of hot-worked products are to be machined,
shall consist of not more than 500 lb (227 kg) of material in the
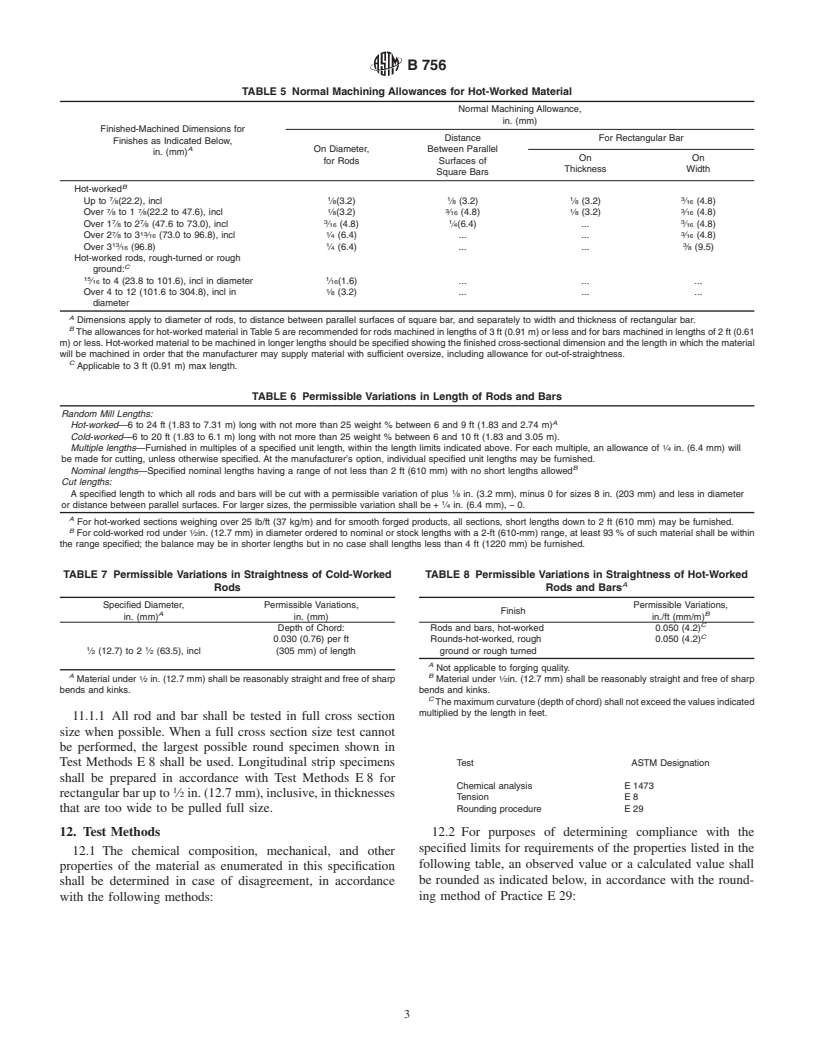
the allowances prescribed in Table 5 are recommended for
same size and condition except that a single piece weighing
normal machining operations.
over 500 lb shall be considered as one lot.
7.4 Length—The permissible variations in length of cold-
9.2 Test Material Selection:
worked and hot-worked rod and bar shall be as prescribed in
9.2.1 Chemical Analysis—Representative samples from
Table 6.
each lot shall be taken during pouring or subsequent process-
7.4.1 Rods and bars ordered to random or nominal lengths
ing.
will be furnished with either cropped or saw-cut ends; material
9.2.1.1 Product (check) analysis shall be wholly the respon-
ordered to cut lengths will be furnished with square saw-cut or
sibility of the purchaser.
machined ends.
9.2.2 Mechanical Properties—Samples of the material to
provide test specimens for mechanical properties shall be taken
TABLE 3 Permissible Variations in Diameter of Cold-Worked Rod
from such locations in each lot as to be representative of that
Permissible Variations from Specified
lot.
Specified Dimensions,
Dimension, in. (mm)
in. (mm)
+−
10. Number of Tests
1 3
⁄16 (1.6) to ⁄16 (4.8), excl 0 0.002 (0.05)
10.1 Chemical Analysis—One test per lot.
3 1
⁄16 (4.8) to ⁄2 (12.7), excl 0 0.003 (0.08)
10.2 Tension—One test per lot.
1 15
⁄2 (12.7) to ⁄16 (23.8), incl 0.001 (0.03) 0.002 (0.05)
15 15
Over ⁄16(23.8) to 1 ⁄16(49.2), 0.0015 (0.04) 0.003 (0.08)
incl 11. Specimen Preparation
15 1
Over 1 ⁄16 (49.2) to 2 ⁄2(63.5), 0.002 (0.05) 0.004 (0.10)
11.1 Tension test specimens shall be taken from material in
incl
the final condition and tested in the direction of fabrication.
B 756
TABLE 5 Normal Machining Allowances for Hot-Worked Material
Normal Machining Allowance,
in. (mm)
Finished-Machined Dimensions for
Distance For Rectangular Bar
Finishes as Indicated Below,
A
On Diameter, Between Parallel
in. (mm)
On On
for R
...


Questions, Comments and Discussion
Ask us and Technical Secretary will try to provide an answer. You can facilitate discussion about the standard in here.