ASTM B566-04a(2011)
(Specification)Standard Specification for Copper-Clad Aluminum Wire
Standard Specification for Copper-Clad Aluminum Wire
ABSTRACT
This specification covers bare round copper-clad aluminum wire for electrical applications. Four classes of copper-clad aluminum wire are covered such as Class 10A, Class 15A, Class 10H, Class 15H. The wire shall consist of a core of aluminum with a continuous outer cladding of copper throughly bonded to the core throughout and shall be of such quality as to meet the requirements of this specification. The copper-clad aluminum wire shall conform to the tensile strength and elongation requirements. The electrical resistivity shall be measured. The copper-clad aluminum wire, when tested shall be free from seams or splits. They shall be free from cladding delamination. The finished wire shall contain no joints or splices. The density of the wire shall be taken for calculating mass/unit length, cross section and so forth.
SCOPE
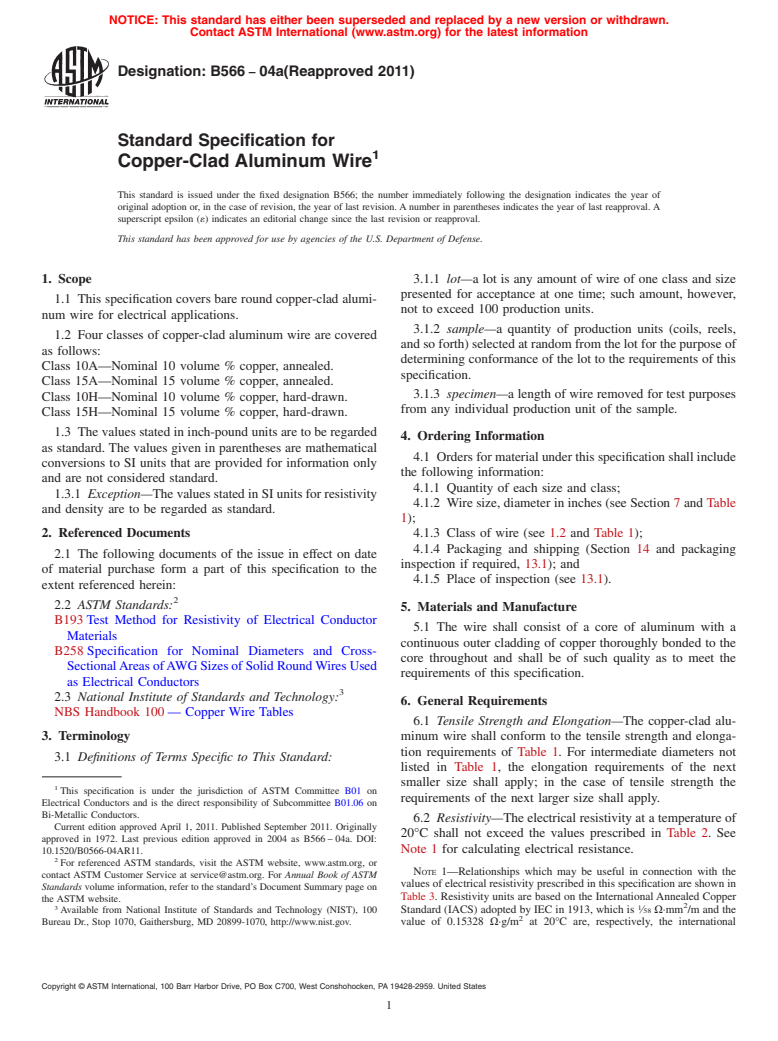
1.1 This specification covers bare round copper-clad aluminum wire for electrical applications.
1.2 Four classes of copper-clad aluminum wire are covered as follows:
Class 10ANominal 10 volume % copper, annealed.
Class 15ANominal 15 volume % copper, annealed.
Class 10HNominal 10 volume % copper, hard-drawn.
Class 15HNominal 15 volume % copper, hard-drawn.
1.3 The values stated in inch-pound units are to be regarded as standard. The values given in parentheses are mathematical conversions to SI units that are provided for information only and are not considered standard.
1.3.1 Exception—The values stated in SI units for resistivity and density are to be regarded as standard.
General Information
Relations
Standards Content (Sample)
NOTICE: This standard has either been superseded and replaced by a new version or withdrawn.
Contact ASTM International (www.astm.org) for the latest information
Designation:B566 −04a(Reapproved 2011)
Standard Specification for
Copper-Clad Aluminum Wire
This standard is issued under the fixed designation B566; the number immediately following the designation indicates the year of
original adoption or, in the case of revision, the year of last revision.Anumber in parentheses indicates the year of last reapproval.A
superscript epsilon (´) indicates an editorial change since the last revision or reapproval.
This standard has been approved for use by agencies of the U.S. Department of Defense.
1. Scope 3.1.1 lot—a lot is any amount of wire of one class and size
presented for acceptance at one time; such amount, however,
1.1 This specification covers bare round copper-clad alumi-
not to exceed 100 production units.
num wire for electrical applications.
3.1.2 sample—a quantity of production units (coils, reels,
1.2 Four classes of copper-clad aluminum wire are covered
andsoforth)selectedatrandomfromthelotforthepurposeof
as follows:
determining conformance of the lot to the requirements of this
Class 10A—Nominal 10 volume % copper, annealed.
specification.
Class 15A—Nominal 15 volume % copper, annealed.
3.1.3 specimen—a length of wire removed for test purposes
Class 10H—Nominal 10 volume % copper, hard-drawn.
from any individual production unit of the sample.
Class 15H—Nominal 15 volume % copper, hard-drawn.
1.3 The values stated in inch-pound units are to be regarded
4. Ordering Information
as standard. The values given in parentheses are mathematical
4.1 Ordersformaterialunderthisspecificationshallinclude
conversions to SI units that are provided for information only
the following information:
and are not considered standard.
4.1.1 Quantity of each size and class;
1.3.1 Exception—ThevaluesstatedinSIunitsforresistivity
4.1.2 Wire size, diameter in inches (see Section 7 and Table
and density are to be regarded as standard.
1);
2. Referenced Documents 4.1.3 Class of wire (see 1.2 and Table 1);
4.1.4 Packaging and shipping (Section 14 and packaging
2.1 The following documents of the issue in effect on date
inspection if required, 13.1); and
of material purchase form a part of this specification to the
4.1.5 Place of inspection (see 13.1).
extent referenced herein:
2.2 ASTM Standards:
5. Materials and Manufacture
B193Test Method for Resistivity of Electrical Conductor
5.1 The wire shall consist of a core of aluminum with a
Materials
continuous outer cladding of copper thoroughly bonded to the
B258 Specification for Nominal Diameters and Cross-
core throughout and shall be of such quality as to meet the
SectionalAreasofAWGSizesofSolidRoundWiresUsed
requirements of this specification.
as Electrical Conductors
2.3 National Institute of Standards and Technology:
6. General Requirements
NBS Handbook 100— Copper Wire Tables
6.1 Tensile Strength and Elongation—The copper-clad alu-
3. Terminology minum wire shall conform to the tensile strength and elonga-
tion requirements of Table 1. For intermediate diameters not
3.1 Definitions of Terms Specific to This Standard:
listed in Table 1, the elongation requirements of the next
smaller size shall apply; in the case of tensile strength the
This specification is under the jurisdiction of ASTM Committee B01 on
requirements of the next larger size shall apply.
Electrical Conductors and is the direct responsibility of Subcommittee B01.06 on
Bi-Metallic Conductors.
6.2 Resistivity—The electrical resistivity at a temperature of
Current edition approved April 1, 2011. Published September 2011. Originally
20°C shall not exceed the values prescribed in Table 2. See
approved in 1972. Last previous edition approved in 2004 as B566–04a. DOI:
10.1520/B0566-04AR11. Note 1 for calculating electrical resistance.
For referenced ASTM standards, visit the ASTM website, www.astm.org, or
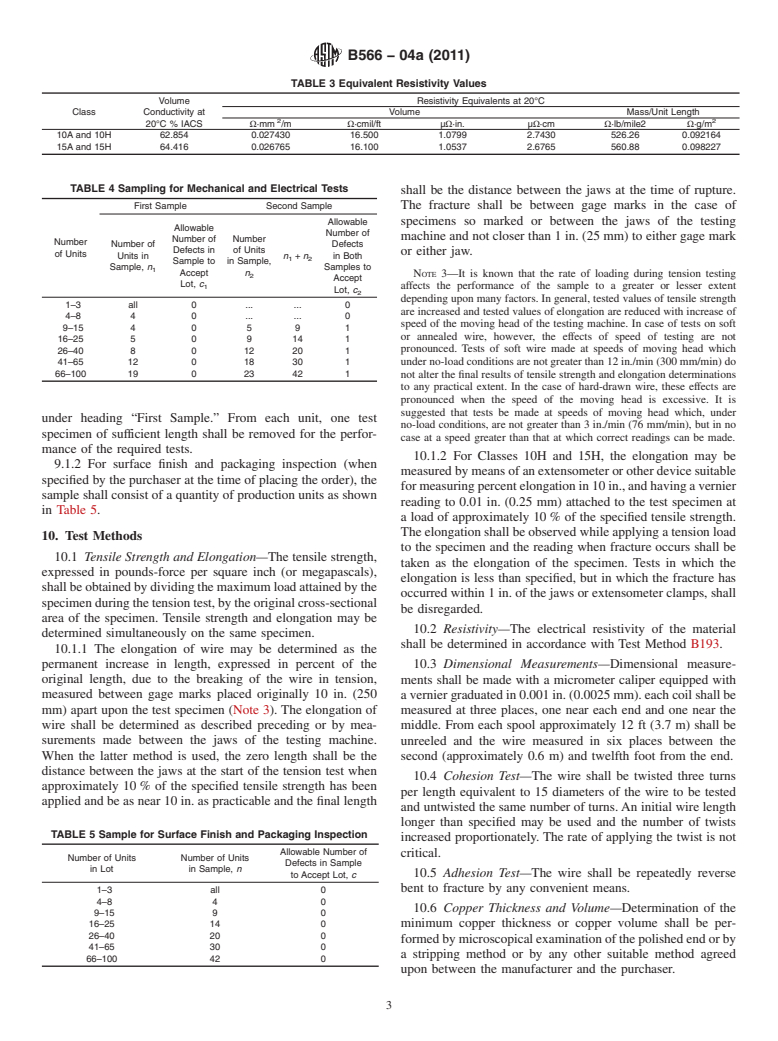
NOTE 1—Relationships which may be useful in connection with the
contact ASTM Customer Service at service@astm.org. For Annual Book of ASTM
values of electrical resistivity prescribed in this specification are shown in
Standards volume information, refer to the standard’s Document Summary page on
Table 3. Resistivity units are based on the InternationalAnnealed Copper
the ASTM website.
Available from National Institute of Standards and Technology (NIST), 100 Standard (IACS) adopted by IEC in 1913, which is ⁄58Ω·mm /m and the
Bureau Dr., Stop 1070, Gaithersburg, MD 20899-1070, http://www.nist.gov. value of 0.15328 Ω·g/m at 20°C are, respectively, the international
Copyright © ASTM International, 100 Barr Harbor Drive, PO Box C700, West Conshohocken, PA 19428-2959. United States
B566−04a (2011)
TABLE 1 Tensile and Elongation Requirements for Copper-Clad
6.3 Cohesion—The copper-clad aluminum wire, when
Aluminum Wire
tested in accordance with 10.4, shall be free from seams or
Elongation, min,
splits.Examinationofthewireshallbemadeatamagnification
Nominal
Tensile Strength %in10in.
Diameter
not to exceed 10×.
(or 250 mm)
Minimum All Maximum All 6.4 Adhesion—The copper-clad aluminum wire, when
All H All A
H Classes A Classes
in. (mm)
tested in accordance with 10.5, shall be free from cladding
Classes Classes
ksi (MPa) ksi (MPa)
delamination. Examination of the wire shall be made at a
0.3249 8.252 16 110 20 138 1.5 15
magnification not to exceed 10×.
0.2893 7.348 16 110 20 138 1.5 15
0.2576 6.543 18 124 20 138 1.5 15
6.5 Joints—The finished wire shall contain no joints or
0.2294 5.827 20 138 20 138 1.5 15
splices.
0.2043 5.189 22 152 20 138 1.5 15
6.6 Copper Thickness—The minimum copper thickness,
0.1819 4.620 23 159 20 138 1.5 15
when tested in accordance with 10.6, shall be not less than the
0.1620 4.115 24 166 20 138 1.5 15
0.1443 3.665 25 172 20 138 1.5 15 following:
6.6.1 Class 10A and 10H wire shall have a minimum
0.1285 3.264 26 179 20 138 1.0 15
thickness of not less than 3.5% of the wire radius.
0.1144 2.906 27 186 20 138 1.0 15
0.1019 2.588 28 193 20 138 1.0 15 6.6.2 Class 15A and 15H wire shall have a minimum
0.0907 2.30 29 200 20 138 1.0 15
thickness of not less than 5.0% of the wire radius.
0.0808 2.05 30 207 20 138 1.0 15
6.7 Copper Volume (Area)—The copper volume (area) per
0.0720 1.83 30 207 20 138 1.0 15
class, when tested in accordance with 10.6, shall meet the
0.0641 1.63 30 207 20 138 1.0 15
following tolerances:
0.0571 1.45 30 207 20 138 1.0 15
6.7.1 Class 10A and 10H wire shall contain not less than
0.0508 1.29 30 207 20 138 1.0 15
8% and not more than 12% copper by volume (area).
0.0453 1.15 30 207 20 138 1.0 15
6.7.2 Class 15A and 15H wire shall contain not less than
0.0403 1.02 30 207 20 138 1.0 15
0.0359 0.912 30 207 20 138 1.0 15
13% and not more than 17% copper by volume (area).
0.0320 0.813 30 207 20 138 1.0 15
7. Dimensions, Mass and Permissible Variations
0.0285 0.724 30 207 20 138 1.0 15
0.0253 0.643 30 207 20 138 1.0 15
7.1 The wire size shall be expressed as the diameter of the
0.0226 0.574 30 207 25 172 1.0 10
wire in decimal fractions of an inch to the nearest 0.0001 in.
0.0201 0.511 30 207 25 172 1.0 10
(0.003 mm) (Note 2). For diameters under 0.0100 in. (0.254
0.0179 0.455 30 207 25 172 1.0 10
mm), the wire shall not vary from the specified diameter by
0.0159 0.404 30 207 25 172 1.0 10
more than 60.0001 in. (60.003 mm) and for diameters of
0.0142 0.361 30 207 25 172 1.0 10
0.0100 in. (0.254 mm) and over, the wire shall not vary from
0.0126 0.320 30 207 25 172 1.0 5
the specified diameter by more than 61%, expressed to the
0.0113 0.287 30 207 25 172 1.0 5
nearest 0.0001 in. (0.003 mm).
0.0100 0.254 30 207 25 172 1.0 5
0.0089 0.226 30 207 25 172 1.0 5
NOTE 2—The values of the wire diameters in Table 1 are given to the
nearest 0.0001 in. (0.003 mm) and correspond to the standard sizes given
0.0080 0.203 30 207 25 172 1.0 5
0.0071 0.180 30 207 25 172 1.0 5
inSpecificationB258.Theuseofgagenumberstospecifywiresizesisnot
0.0063 0.160 30 207 25 172 1.0 5
recognized in this specification because of the possibility of confusion.A
0.0056 0.142 30 207 25 172 1.0 5
discussionofwiregagesandrelatedsubjectsiscontainedin“CopperWire
0.0050 0.127 30 207 25 172 1.0 5
Tables,” NBS Handbook 100.
8. Workmanship, Finish, and Appearance
TABLE 2 Resistivity
8.1 The wire, when tested in accordance with 8.2, shall be
Resistivity, max, at 20°C
free from pits, slivers, exposed aluminum, or other imperfec-
Class of Wire Ω·mm /m
tions not consistent with good commercial practice.
10A and 10H 0.02743
15A and 15H 0.02676 8.2 For wire diameters of 0.0720 in. (1.829 mm) and larger,
surface finish inspection shall be made with the unaided eye
(normal spectacles excepted), and for wire diameters smaller
equivalent of volume and weight resistivity of annealed copper equal to
than 0.0720 in., surface finish inspection shall be made at a
100%conductivity.Thelatertermmeansthatacopperwire1minlength
magnification not to exceed 10×.
andweighing1gwouldhavearesistanceof0.15328Ω.Thisisequivalent
toaresistivityvalueof875.20Ω·lb/mile ,whichsignifiestheresistanceof
9. Sampling
a copper wire 1 mile in length weighing 1 lb. It is also equivalent, for
example,to1.7241µΩ/cmoflengthofacopperbar1cm incrosssection.
9.1 The number of production units in a sample shall be as
Acomplete discussion of this subject is contained in NBS Handbook 100.
follows:
The use of five significant figures in expressing resistivity does not imply
9.1.1 For tensile strength, elongation, resistivity, adhesion,
the need for greater accuracy of measurement than that specified in Test
cohesion, and dimensional measurements, the sample shall
Method B193. The use of five significant figures is required for complete
reversible conversion from one set of resistivity units to another. consist of a quantity of production units shown in Table 4
B566−04a (2011)
TABLE 3 Equivalent Resistivity Values
Volume Resistivity Equivalents at 20°C
Class Conductivity at Volume Mass/Unit Length
2 2
20°C % IACS Ω·mm /m Ω·cmil/ft µΩ·in. µΩ·cm Ω·lb/mile2 Ω·g/m
10A and 10H 62.854 0.027430 16.500 1.0799 2.7430 526.26 0.092164
15A and 15H 64.416 0.026765 16.100 1.0537 2.6765 560.88 0.098227
TABLE 4 Sampling for Mechanical and Electrical Tests
shall be the distance between the jaws at the time of rupture.
First Sample Second Sample The fracture shall be between gage marks in the case of
specimens so marked or between the jaws of the testing
Allowable
Allowable
Number of
machine and not closer than 1 in. (25 mm) to either gage mark
Number of Number
Number
Number of Defects
Defects in of Units
...


Questions, Comments and Discussion
Ask us and Technical Secretary will try to provide an answer. You can facilitate discussion about the standard in here.