ASTM F2220-02(2009)
(Specification)Standard Specification for Headforms
Standard Specification for Headforms
ABSTRACT
This specification covers the materials, sizing, and manufacturing details of test headforms for use in the testing of protective headgear. This specification identifies the requirements for five test headform size codes: A, E, J, M, and O. All datum levels shall be quoted relative to the reference plane. The headforms shall be symmetrical about the midsagittal plane. Internal geometry may be defined to satisfy the requirements of the individual test specifications. The impact headforms shall be made of K1A-F magnesium, with the prescribed zirconium and magnesium composition, and shall conform to the specified requirements for: external dimensions, performance (resonant frequency), mass, and center of gravity. All impact headforms shall be marked with: headform size, basic plane, reference plane, and midsagittal (longitudinal) and coronal (transverse) planes through the vertical axis. Other headforms shall be made of material of sufficient strength and stiffness to maintain their geometry during testing and shall comply to the external dimension requirements.
SCOPE
1.1 This standard specifies the materials, sizing, and manufacturing details of test headforms for use in the testing of protective headgear. Details of the exterior dimension of the headforms are included.
1.2 The values stated in SI units are to be regarded as standard. No other units of measurement are included in this standard.
General Information
Relations
Standards Content (Sample)
NOTICE: This standard has either been superseded and replaced by a new version or withdrawn.
Contact ASTM International (www.astm.org) for the latest information
An American National Standard
Designation: F2220 – 02 (Reapproved 2009)
Standard Specification for
Headforms
This standard is issued under the fixed designation F2220; the number immediately following the designation indicates the year of
original adoption or, in the case of revision, the year of last revision. A number in parentheses indicates the year of last reapproval. A
superscript epsilon (´) indicates an editorial change since the last revision or reapproval.
INTRODUCTION
This specification identifies the headforms used for testing protective headgear in individualASTM
International test methods and performance standards (standard specifications).This specification was
closely based on the ISO DIS 6220 that is no longer available (having been replaced by EN 960). It
isnotpossibleforASTMInternationalprotectiveheadgearstandardstoreferenceEN 960becausethis
standard makes no provisions for ASTM International impact headforms.
1. Scope
1.1 This standard specifies the materials, sizing, and manu-
facturing details of test headforms for use in the testing of
protective headgear. Details of the exterior dimension of the
headforms are included.
1.2 The values stated in SI units are to be regarded as
standard. No other units of measurement are included in this
standard.
2. Referenced Documents
2.1 ASTM Standards:
B92/B92M Specification for Unalloyed Magnesium Ingot
and Stick For Remelting
2.2 Other Standards:
EN 960 Headforms for Use in the Testing of Protective
Helmets
3. Terminology
3.1 Definitions:
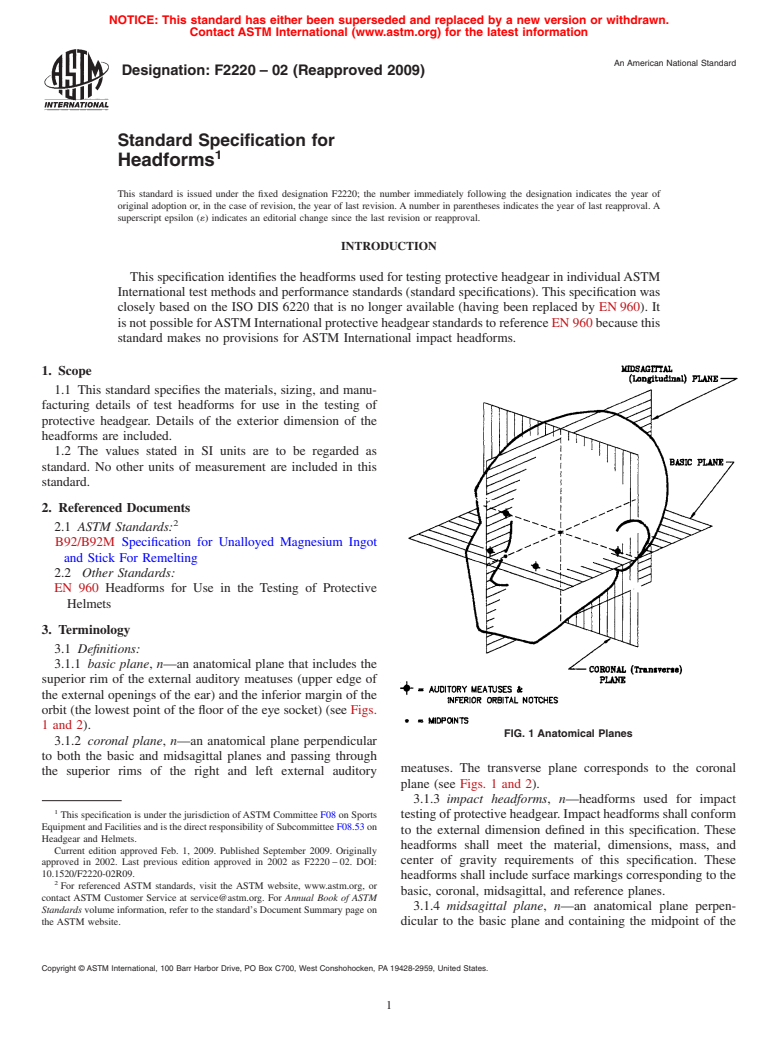
3.1.1 basic plane, n—an anatomical plane that includes the
superior rim of the external auditory meatuses (upper edge of
the external openings of the ear) and the inferior margin of the
orbit (the lowest point of the floor of the eye socket) (see Figs.
1 and 2).
FIG. 1 Anatomical Planes
3.1.2 coronal plane, n—an anatomical plane perpendicular
to both the basic and midsagittal planes and passing through
meatuses. The transverse plane corresponds to the coronal
the superior rims of the right and left external auditory
plane (see Figs. 1 and 2).
3.1.3 impact headforms, n—headforms used for impact
This specification is under the jurisdiction ofASTM Committee F08 on Sports
testingofprotectiveheadgear.Impactheadformsshallconform
Equipment and Facilities and is the direct responsibility of Subcommittee F08.53 on
to the external dimension defined in this specification. These
Headgear and Helmets.
headforms shall meet the material, dimensions, mass, and
Current edition approved Feb. 1, 2009. Published September 2009. Originally
center of gravity requirements of this specification. These
approved in 2002. Last previous edition approved in 2002 as F2220 – 02. DOI:
10.1520/F2220-02R09.
headforms shall include surface markings corresponding to the
For referenced ASTM standards, visit the ASTM website, www.astm.org, or
basic, coronal, midsagittal, and reference planes.
contact ASTM Customer Service at service@astm.org. For Annual Book of ASTM
3.1.4 midsagittal plane, n—an anatomical plane perpen-
Standards volume information, refer to the standard’s Document Summary page on
the ASTM website. dicular to the basic plane and containing the midpoint of the
Copyright © ASTM International, 100 Barr Harbor Drive, PO Box C700, West Conshohocken, PA 19428-2959, United States.
F2220 – 02 (2009)
TABLE 1 Measurement for Headform Size
Nominal Inside Circumference
Headform Size
of Helmet (mm)
A 500
E 540
J 570
M 600
O 620
6. Impact Headforms
6.1 Materials and Manufacture—The impact headforms
shall be made of K1A-F magnesium (nominal composition
0.7 % Zr, balance Mg; Specification B92/B92M, Grade
9980A).
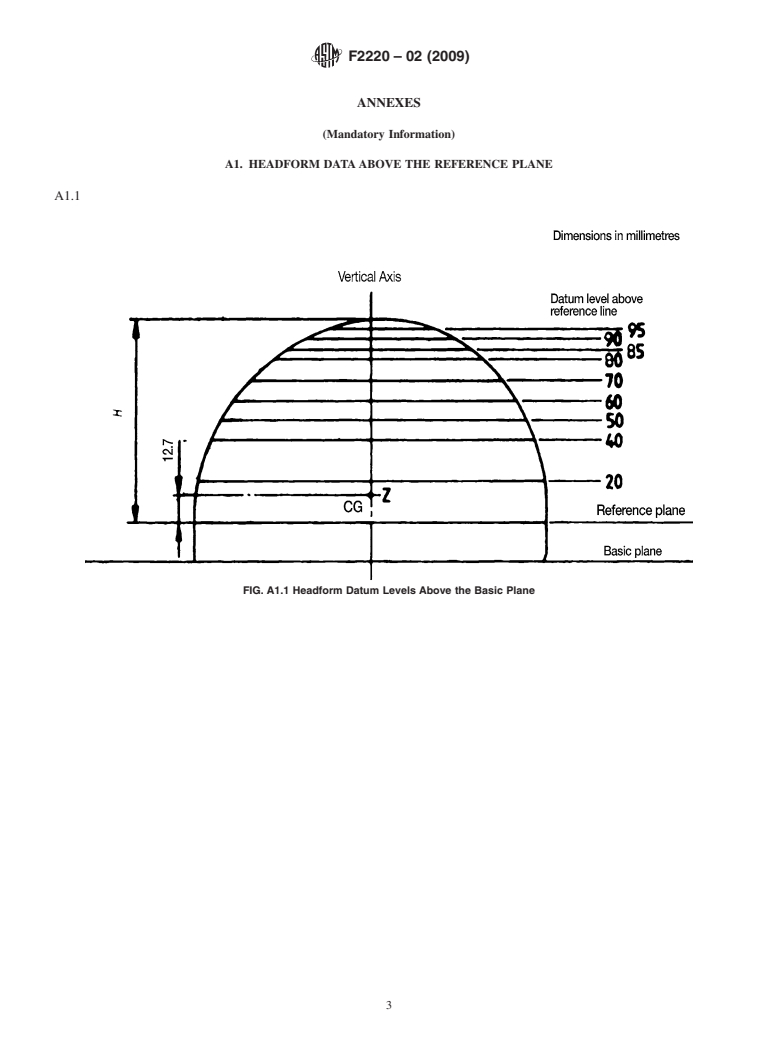
6.2 External Dimensions—Impact headforms shall comply
with the exterior dimensions given in Annex A1. The polar
coordinates of the horizontal half-sections at each datum level
FIG. 2 Impact Headform—Basic, Reference, Midsagittal Planes
above the reference plane are given.
6.3 Performance Requirements—The impact headforms
line connecting the notches of the right and left inferior orbital
shall not have resonant frequencies below 2000 Hz.
ridgesandthemidpointofthelineconnectingthesuperiorrims
6.4 Mass—The total mass of the drop assembly (including
of the right and left external auditory meatuses (see Figs. 1 and
the instrumented headform and supporting assembly) shall be
2).
described in the specific test method for evaluating protective
3.1.5 other (reference) headforms, n—headforms used for
headgear.The mass of the impact headform may be adjusted to
other testing, other than impact, of protective headgear. They
accommodate the specific test method requirements.
shall conform to the external dimension requirements of each
6.5 Center of Gravity—The center of gravity of the impact
particular headform size, as specified in this specification.
headform shall lie at a point on the central vertical axis, 12.7
Reference headforms shall be made of material of sufficient
mm above the reference plane.
strengthandstiffnesstomaintaintheirgeometryduringtesting.
6.6 Product Marking—All impact headforms shall be
Full-chin headforms will be used as necessary. Reference
marked with:
headforms shall include surface markings corresponding to the
6.6.1 Headform size;
basic, coronal, midsagittal, and reference planes and the vision
6.6.2 Basic plane;
points.
6.6.3 Reference plane; and
3.1.6 reference plane, n—a plane marked on the headforms
6.6.4 Midsagittal (longitudinal) and coronal (transverse)
ataspecifieddistanceaboveandparalleltothebasicplane(see
planes through the vertical axis.
Fig. 2).
7. Other (Reference) Headforms
4. Classification
7.1 Materials and Manufacture—Other headforms shall be
4.1 This specification identifies the requirements for five
made of material of sufficient strength and stiffness to maintain
test headform sizes:A, E, J, M, and O. The size codes used for
their geometry during testing.
headforms relate to the nominal inside circumference of
7.2 External Dimensions—Other headforms shall comply
helmets (see Table 1). The nominal inside circumference
with the external dimensions given in Annex A1 and Annex
values refer to the internal circumference of the helmet
A2. The polar coordinates of the horizontal half-sections at
measured at a datum level 12.7 mm above the reference plane.
each datum level are given.
7.2.1 Product Marking—All headforms shall be marked
5. Dimensions
with:
5.1 Datum Levels—All datum levels are quoted relative to
7.2.1.1 Headform size;
the reference plane (“0” level) and are given in mm.
7.2.1.2 Basic plane;
5.2 Dimensions—The external dimensions that the head-
7.2.1.3 Reference plane;
forms must conform to are identified in Annex A1 and Annex
7.2.1.4 Midsagittal (longitudinal) and coronal (transverse)
A2. The headforms shall be symmetrical about the midsagittal
planes through the vertical axis; and
plane. Internal geometry may be defined to satisfy the require-
7.2.1.5 Twopointslocatedonthebasicplaneequallyspaced
ments of the individual test specifications. The resulting
31 mm each side of the point defined by the intersection of the
headform must still comply with the other requirements of this
basic and midsagittal planes at the front of the headform.
specification.
8. Keywords
5.3 Tolerances—The tolerance on all linear dimensions is
60.25 mm. 8.1 headform(s); helmet(s); protective headgear
F2220 – 02 (2009)
ANNEXES
(Mandatory Information)
A1. HEADFORM DATAABOVE THE REFERENCE PLANE
A1.1
FIG. A1.1 Headform Datum Levels Above the Basic Plane
F2220 – 02 (2009)
FIG. A1.2 Horizontal Half-Sections at Datum Levels
F2220 – 02 (2009)
TABLE A1.1 Polar Coordinates of Horizontal Half-Sections for Size A Headform
0° 180°
Angle 15° 30° 45° 60° 75° 90° 105° 120° 135° 150° 165°
Front Back
Height above
Radius (mm)
reference plane (mm)
0.0 88.0 86.5 83.0 75.5 70.0 67.0 66.5 69.5 73.5 78.5 84.0 87.0 88.0
20.0 85.5 84.5 82.5 75.5 70.0 67.0 66.5 69.5 73.5 78.5 84.0 87.0 87.0
40.0 80.0 79.5 79.0 72.0 67.5 65.0 64.5 67.0 71.0 76.0 80.5 82.0 81.5
50.0 75.0 75.0 74.5 68.5 63.5 61.0 60.5 63.5 67.0 72.0 76.0 77.0 77.0
60.0 68.0 68.0 67.5 62.5 57.5 55.5 55.0 58.0 61.5 66.0 70.0 70.0 70.5
70.0 56.0 56.0 56.5 53.0 49.5 47.0 47.0 49.0 53.0 57.0 61.5 61.0 61.0
80.0 37.0 37.5 37.0 36.5 35.5 34.0 34.0 36.0 39.5 44.5 49.0 49.0 48.5
85.0 23.0 24.0 23.0 22.0 22.0 23.0 24.0 24.5 29.5 33.5 36.0 36.5 37.0
Dimension H: 89.7 mm, Depth to Basic Plane: -24.0 mm.
TABLE A1.2 Polar Coordinates of Horizontal Half-Sections for Size E Headform
0° 180°
Angle 15° 30° 45° 60° 75° 90° 105° 120° 135° 150° 165°
Front Back
Height above
Radius (mm)
reference plane (mm)
0.0 94.5 93.0 90.0 82.0 76.5 73.5 79.0 76.0 80.0 85.0 91.0 94.0 94.5
20.0 92.5 91.5 89.0 82.0 76.5 73.5 79.0 76.0 80.0 85.0 90.5 93.5 94.0
40.0 87.0 87.5 85.0 79.5 74.0 71.0 71.5 74.0 77.5 82.5 88.0 89.0 89.0
50.0 82.5 83.0 81.0 76.0 71.0 68.0 68.0 70.5 74.0 79.5 83.5 84.5 84.5
60.0 76.5 76.5 75.5 71.0 66.5 63.5 63.5 66.0 69.5 74.0 78.5 79.0 79.0
70.0 66.5 66.5 66.5 63.0 59.0 56.5 56.5 58.5 62.0 66.5 70.5 71.0 71.0
80.0 52.0 52.0 52.0 50.0 47.5 46.0 46.5 48.0 51.0 56.0 59.5 60.0 60.0
85.0 41.5 42.5 41.5 40.5 39.5 39.0 39.5 41.0 44.0 48.0 51.5 58.0 52.0
90.0 28.0 28.0 28.5 28.5 28.5 29.0 30.0 31.0 34.0 37.5 41.5 42.0 42.0
95.0 10.0 10.0 10.0 10.0 10.0 10.5 11.0 12.0 13.5 15.0 16.0 16.0 16.0
Dimension H: 96.0 mm, Depth to Basic Plane: -26.0 mm.
TABLE A1.3 Polar Coordinates of Horizontal Half-Sections for Size J Headform
0° 180°
Angle 15° 30° 45° 60° 75° 90° 105° 120° 135° 150° 165°
Front Back
Height above
Radius (mm)
reference plane (mm)
0.0 101.0 99.5 95.5 87.5 82.5 79.5 79.5 82.0 86.0 92.0 97.0 100.5 101.0
20.0 99.0 97.0 93.5 87.5 82.0 79.5 79.5 82.0 86.0 92.0 96.5 99.5 100.5
40.0 93.0 92.5 90.0 85.5 80.0 77.5 77.0 80.5 84.0 89.0 93.0 95.5 95.5
50.0 90.0 89.0 87.0 83.0 77.0 74.5 75.0 77.5 81.0 86.0 90.0 91.5 91.5
60.0 84.0 83.0 81.5 77.0 73.0 70.0 71.0 73.0
...


Questions, Comments and Discussion
Ask us and Technical Secretary will try to provide an answer. You can facilitate discussion about the standard in here.