ASTM F521-83(2004)
(Test Method)Standard Test Methods for Bond Integrity of Transparent Laminates
Standard Test Methods for Bond Integrity of Transparent Laminates
SIGNIFICANCE AND USE
These test methods provide a means to measure quantitatively the bond integrity between the outer layers of the transparency and the interlayer, or to measure the cohesive properties of the interlayer, under various loading conditions.
These test methods provide empirical results useful for control purposes, correlation with service results, and as quality control tests for acceptance of production parts.
Test results obtained on small, laboratory-size samples shown herein should be considered indicative of full-size part capability, but not necessarily usable for design purposes.
SCOPE
1.1 These test methods cover determination of the bond integrity of transparent laminates. The laminates are usually made of two or more glass or hard plastic sheets held together by an elastomeric material. These test methods are intended to provide a means of determining the strength of the bond between the glass or plastic and the elastomeric interlayer under various mechanical or thermal loading conditions.
1.2 The test methods appear as follows:Test MethodsSectionsTest Method A-Flatwise Bond Tensile StrengthTest Method B-Interlaminar Shear StrengthTest Method C-Creep RuptureTest Method D-Thermal Exposure
1.3 This standard does not purport to address all of the safety concerns, if any, associated with its use. It is the responsibility of the user of this standard to establish appropriate safety and health practices and determine the applicability of regulatory limitations prior to use.
General Information
Relations
Standards Content (Sample)
NOTICE: This standard has either been superseded and replaced by a new version or withdrawn.
Contact ASTM International (www.astm.org) for the latest information.
Designation:F521–83 (Reapproved 2004)
Standard Test Methods for
1
Bond Integrity of Transparent Laminates
ThisstandardisissuedunderthefixeddesignationF521;thenumberimmediatelyfollowingthedesignationindicatestheyearoforiginal
adoption or, in the case of revision, the year of last revision.Anumber in parentheses indicates the year of last reapproval.Asuperscript
epsilon (´) indicates an editorial change since the last revision or reapproval.
1. Scope 3.1.2 face plies—transparent glass or plastic outer materials
joined together with an interlayer.
1.1 These test methods cover determination of the bond
3.1.3 interlayer—transparent material used as the bonding
integrity of transparent laminates. The laminates are usually
agent between two or more hard, transparent materials.
made of two or more glass or hard plastic sheets held together
3.2 Definitions of Terms Specific to This Standard:
by an elastomeric material. These test methods are intended to
3.2.1 number of plies—a three-ply laminate is one having
provide a means of determining the strength of the bond
two transparent glass or plastic plies and one interlayer ply. A
between the glass or plastic and the elastomeric interlayer
five-ply laminate has three glass or plastic plies and two
under various mechanical or thermal loading conditions.
interlayer plies.
1.2 The test methods appear as follows:
Test Methods Sections
4. Significance and Use
Test MethodA—Flatwise Bond Tensile Strength 5-11
Test Method B—Interlaminar Shear Strength 12-17
4.1 These test methods provide a means to measure quan-
Test Method C—Creep Rupture 18-25
titatively the bond integrity between the outer layers of the
Test Method D—Thermal Exposure 26-30
transparency and the interlayer, or to measure the cohesive
1.3 This standard does not purport to address all of the
properties of the interlayer, under various loading conditions.
safety concerns, if any, associated with its use. It is the
4.2 These test methods provide empirical results useful for
responsibility of the user of this standard to establish appro-
control purposes, correlation with service results, and as
priate safety and health practices and determine the applica-
quality control tests for acceptance of production parts.
bility of regulatory limitations prior to use.
4.3 Test results obtained on small, laboratory-size samples
shown herein should be considered indicative of full-size part
2. Referenced Documents
capability, but not necessarily usable for design purposes.
2
2.1 ASTM Standards:
TEST METHOD A—FLATWISE BOND TENSILE
D952 Test Method for Bond or Cohesive Strength of Sheet
Plastics and Electrical Insulating Materials STRENGTH
2.2 ANSI Standard:
3 5. Summary of Test Method
B1.1 Standard for Unified Screw Threads
5.1 Thebondissubjectedtoamechanicalloadinadirection
3. Terminology
perpendicular to the plane of the bond. The adhesive or
3.1 Definitions: cohesive strength between the interlayer and the outer layers
3.1.1 delamination—a visible separation between two lay- (flatwisetensilestrength)isdetermined,andexpressedinterms
ers of bonded material. of pascals (or pounds-force per square inch).
6. Apparatus
6.1 Metal Blocks—A pair of 50-mm (2-in.) square metal
1
These test methods are under the jurisdiction of ASTM Committee F07 on
blocks of 24 ST aluminum alloy, each having a maximum
Aerospace andAircraft and are the direct responsibility of Subcommittee F07.08 on
Transparent Enclosures and Materials.
height of 50 mm (2 in.). Each block shall have in one end a
Current edition approved Oct. 1, 2004. Published October 2004. Originally 7
hole (see Fig. 1) tapped 22.2 mm ( ⁄8 in.) in accordance with
approved in 1977. Last previous edition approved in 1997 as F521 – 83 (1997).
7
ANSI B1.1, to accommodate threaded 22.2-mm ( ⁄8-in.) studs
DOI: 10.1520/F0521-83R04.
2
of convenient length (see Test Method D952). Alternative
For referenced ASTM standards, visit the ASTM website, www.astm.org, or
contact ASTM Customer Service at service@astm.org. For Annual Book of ASTM
metal blocks may be made using an aluminum “T” section, cut
Standards volume information, refer to the standard’s Document Summary page on
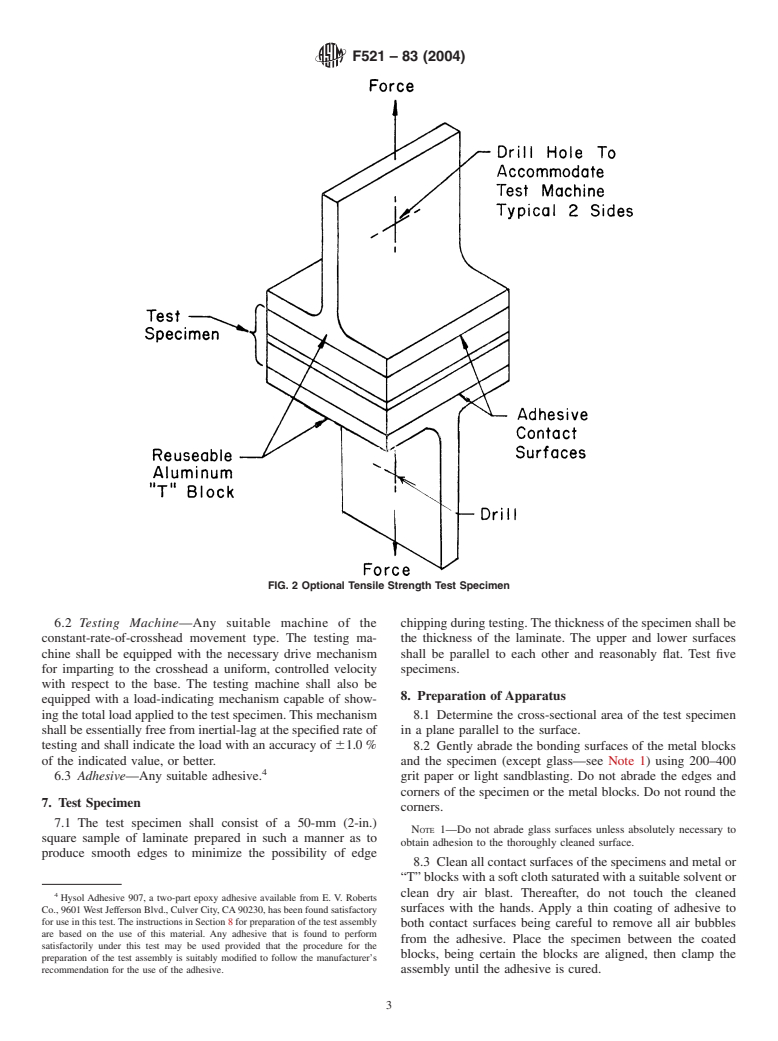
to 50 mm (2 in.) square. A hole shall be drilled in the upright
the ASTM website.
3 section of each “T” block (see Fig. 2) to accommodate a metal
Available fromAmerican National Standards Institute (ANSI), 25 W. 43rd St.,
4th Floor, New York, NY 10036. pin or holding device compatible with the test machine used.
Copyright ©ASTM International, 100 Barr Harbor Drive, PO Box C700, West Conshohocken, PA19428-2959, United States.
1
---------------------- Page: 1 ----------------------
F521–83 (2004)
FIG. 1 Test Assembly for Flatwise Tensile Strength Test
2
---------------------- Page: 2 ----------------------
F521–83 (2004)
FIG. 2 Optional Tensile Strength Test Specime
...


Questions, Comments and Discussion
Ask us and Technical Secretary will try to provide an answer. You can facilitate discussion about the standard in here.