ASTM C965-96(2012)
(Practice)Standard Practice for Measuring Viscosity of Glass Above the Softening Point
Standard Practice for Measuring Viscosity of Glass Above the Softening Point
SIGNIFICANCE AND USE
This practice is useful in determining the viscosity-temperature relationships for glasses and corresponding useful working ranges. See Terminology C162.
SCOPE
1.1 This practice covers the determination of the viscosity of glass above the softening point through the use of a platinum alloy spindle immersed in a crucible of molten glass. Spindle torque, developed by differential angular velocity between crucible and spindle, is measured and used to calculate viscosity. Generally, data are taken as a function of temperature to describe the viscosity curve for the glass, usually in the range from 1 to 106 Pa·s.
1.2 Two procedures with comparable precision and accuracy are described and differ in the manner for developing spindle torque. Procedure A employs a stationary crucible and a rotated spindle. Procedure B uses a rotating crucible in combination with a fixed spindle.
1.3 This standard does not purport to address all of the safety concerns, if any, associated with its use. It is the responsibility of the user of this standard to establish appropriate safety and health practices and determine the applicability of regulatory limitations prior to use.
General Information
Relations
Standards Content (Sample)
NOTICE: This standard has either been superseded and replaced by a new version or withdrawn.
Contact ASTM International (www.astm.org) for the latest information
Designation: C965 − 96 (Reapproved 2012)
Standard Practice for
Measuring Viscosity of Glass Above the Softening Point
This standard is issued under the fixed designation C965; the number immediately following the designation indicates the year of
original adoption or, in the case of revision, the year of last revision.Anumber in parentheses indicates the year of last reapproval.A
superscript epsilon (´) indicates an editorial change since the last revision or reapproval.
1. Scope measuring equipment, a platinum alloy spindle, a crucible, a
device to rotate spindle or crucible, and equipment to measure
1.1 This practice covers the determination of the viscosity
torque.
ofglassabovethesofteningpointthroughtheuseofaplatinum
alloy spindle immersed in a crucible of molten glass. Spindle
NOTE 1—Spindles and crucibles manufactured from 90% Pt–10% Rh
or 80% Pt–20% Rh alloys have been found satisfactory for this purpose.
torque, developed by differential angular velocity between
crucible and spindle, is measured and used to calculate
4.1.1 Procedure A employs an electrically heated tube-type
viscosity.Generally,dataaretakenasafunctionoftemperature
furnace with a fixed support for the crucible as shown in Fig.
to describe the viscosity curve for the glass, usually in the
1. A platinum alloy resistance-heated crucible also may be
range from 1 to 10 Pa·s.
used.
1.2 Two procedures with comparable precision and accu- 4.1.2 Procedure B employs a similar furnace but with a
removable, rotatable crucible support as shown in Fig. 2.
racy are described and differ in the manner for developing
spindle torque. ProcedureAemploys a stationary crucible and 4.1.3 Furnaces other than resistance-wound muffle types
a rotated spindle. Procedure B uses a rotating crucible in may be used provided they give uniform and stable tempera-
combination with a fixed spindle. ture conditions. Temperature differences greater than 3°C
within the crucible (in glass) are excessive for high precision
1.3 This standard does not purport to address all of the
measurements.
safety concerns, if any, associated with its use. It is the
4.1.4 A temperature controller shall be provided for main-
responsibility of the user of this standard to establish appro-
taining the glass temperature within 62°C of a specified
priate safety and health practices and determine the applica-
temperature.
bility of regulatory limitations prior to use.
4.1.5 Temperatures shall be measured with Type R or S
2. Referenced Documents
thermocouples calibrated in accordance with Test Method
E220 in conjunction with a calibrated potentiometer or solid
2.1 ASTM Standards:
stateinstrumentationcapableof0.5°Caccuracy.Animmersion
C162Terminology of Glass and Glass Products
thermocouple is recommended but a thermocouple in air may
E220Test Method for Calibration of Thermocouples By
be used provided measurements show equivalency.
Comparison Techniques
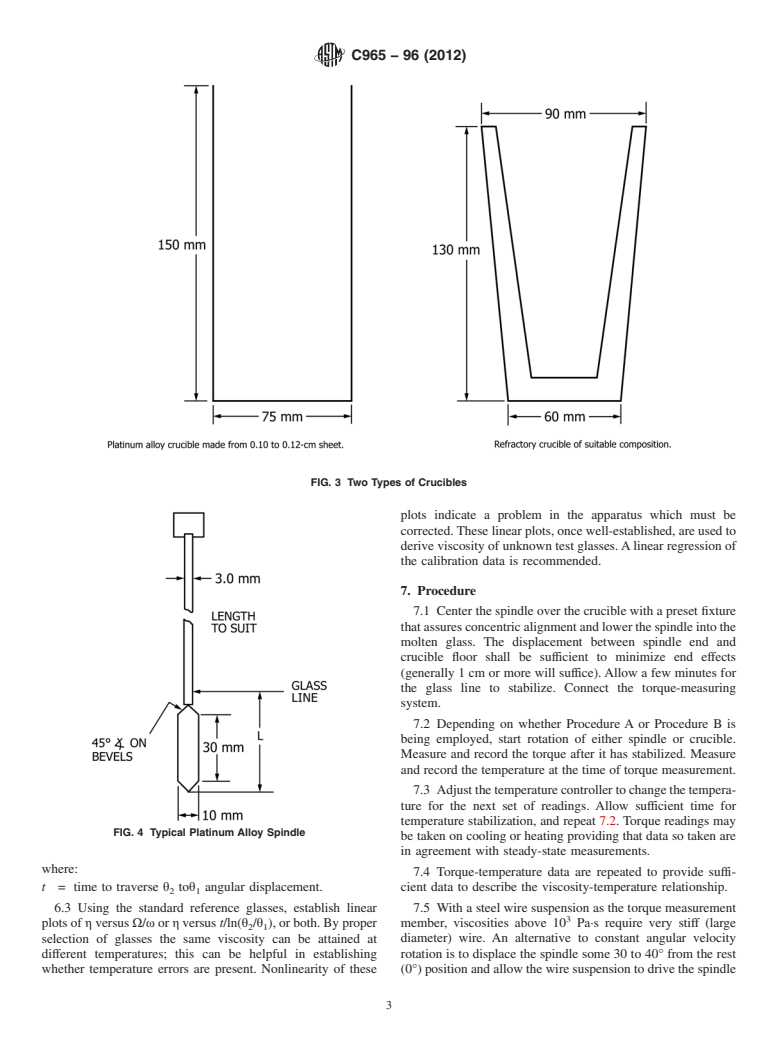
4.1.6 Acrucible to contain the glass similar to those shown
3. Significance and Use
in Fig. 3 preferably shall be fabricated from a platinum alloy,
but a refractory material may be used provided it does not
3.1 This practice is useful in determining the viscosity-
contaminate the glass.
temperature relationships for glasses and corresponding useful
4.1.7 Aplatinum alloy spindle with the geometry shown in
working ranges. See Terminology C162.
Fig. 4 is recommended. An alternative design has a hollow
4. Apparatus
shaft to house the thermocouple (junction at the center of the
large diameter portion) which has the advantage of proximity,
4.1 The apparatus shall consist of an electrically heated
butthedisadvantageofpossibleelectricaldisconnectionduring
furnace equipped with a temperature controller, temperature
torque measurement.
4.1.8 A measurement system is necessary for measurement
This practice is under the jurisdiction ofASTM Committee C14 on Glass and
of spindle torque to an accuracy of 1%.
Glass Products and is the direct responsibility of Subcommittee C14.04 on Physical
and Mechanical Properties.
Current edition approved March 1, 2012. Published March 2012. Originally
5. Preparation of Test Glass
approvedin1981.Lastpreviouseditionapprovedin2007asC965–96(2007).DOI:
10.1520/C0965-96R12.
5.1 Select a mass of glass that is free of foreign material.
For referenced ASTM standards, visit the ASTM website, www.astm.org, or
Breakorcutglassintopieces,eachweighingabout10to50g,
contact ASTM Customer Service at service@astm.org. For Annual Book of ASTM
and place the correct quantity into the crucible that will make
Standards volume information, refer to the standard’s Document Summary page on
the ASTM website. the molten charge reach a level at some fixed distance (several
Copyright © ASTM International, 100 Barr Harbor Drive, PO Box C700, West Conshohocken, PA 19428-2959. United States
C965 − 96 (2012)
1—Furnace Winding
2—Crucible
3—Spindle
4—Shaft
5—Viscometer (providing both rotation and torque measurement)
6—Thermocouple
FIG. 1 General Arrangement for Rotating Spindle, Fixed Crucible
Scheme (Procedure A)
NOTE 1—Details are the same as in Fig. 1 except that the viscometer is
millimetres) above the point where the spindle narrows down.
replaced by a torque measuring device, and the crucible is mounted on a
Theweightofglassrequiredcanbeapproximatedsatisfactorily
removable rotatable stand.
with the following expression for a cylindrical crucible:
FIG. 2 General Apparatus Arrangement for Rotating Crucible
Scheme (Procedure B)
W 5 @πd L1h /4 2 V #ρ 1 20.0007α (1)
~ ! ~ !
T s
where:
6. Calibration and Viscosity Determination
h = distance between crucible floor and spindle tip, mm
(generally greater than 10 mm to avoid end effects)
6.1 The use of several standard reference glasses (see
W = glass charge weight at room temperature, g,
Appendix X1), available from the National Institute of Stan-
T
d = inside diameter of crucible, mm,
dards and Technology, is recommended. These provide a wide
L = immersed portion of spindle, mm,
range of temperatures and viscosities for calibration.
V = volume of immersed portion of spindle, mm ,
s
6.2 For constant angular velocity rotation:
ρ = density of glass at room temperature, g/cm , and
α = 0 to 300°C thermal expansion coefficient, cm/cm·°C
η}Ω/ω (2)
(× 10 ).
where:
Avoid very small pieces of glass in the charge as they tend
η = viscosity,
to make the molten glass seedy.
Ω = torque, and
5.2 Placethefilledcrucibleinproperpositioninthefurnace
ω = angular velocity
and heat to a temperature that lowers the viscosity of glass
For aperiodic return:
sufficiently to allow trapped air bubbles to be released. This
η}t/ln~θ /θ ! (3)
2 1
temperature should be below the original melting temperature
to avoid reboil. If reboil occurs, allow additional time for the
glass to clear. Hold at this temperature at least 20 min before 3
See NIST Special Publication 260, NIST Standard Reference Materials,
starting measurements. National Instit
...


Questions, Comments and Discussion
Ask us and Technical Secretary will try to provide an answer. You can facilitate discussion about the standard in here.