ASTM B446-00e1
(Specification)Standard Specification for Nickel-Chromium-Molybdenum-Columbium Alloy (UNS N06625), Nickel-Chromium-Molybdenum-Silicon Alloy (UNS N06219), and Nickel-Chromium-Molybdenum-Tungsten Alloy (UNS N06650)* Rod and Bar
Standard Specification for Nickel-Chromium-Molybdenum-Columbium Alloy (UNS N06625), Nickel-Chromium-Molybdenum-Silicon Alloy (UNS N06219), and Nickel-Chromium-Molybdenum-Tungsten Alloy (UNS N06650)* Rod and Bar
SCOPE
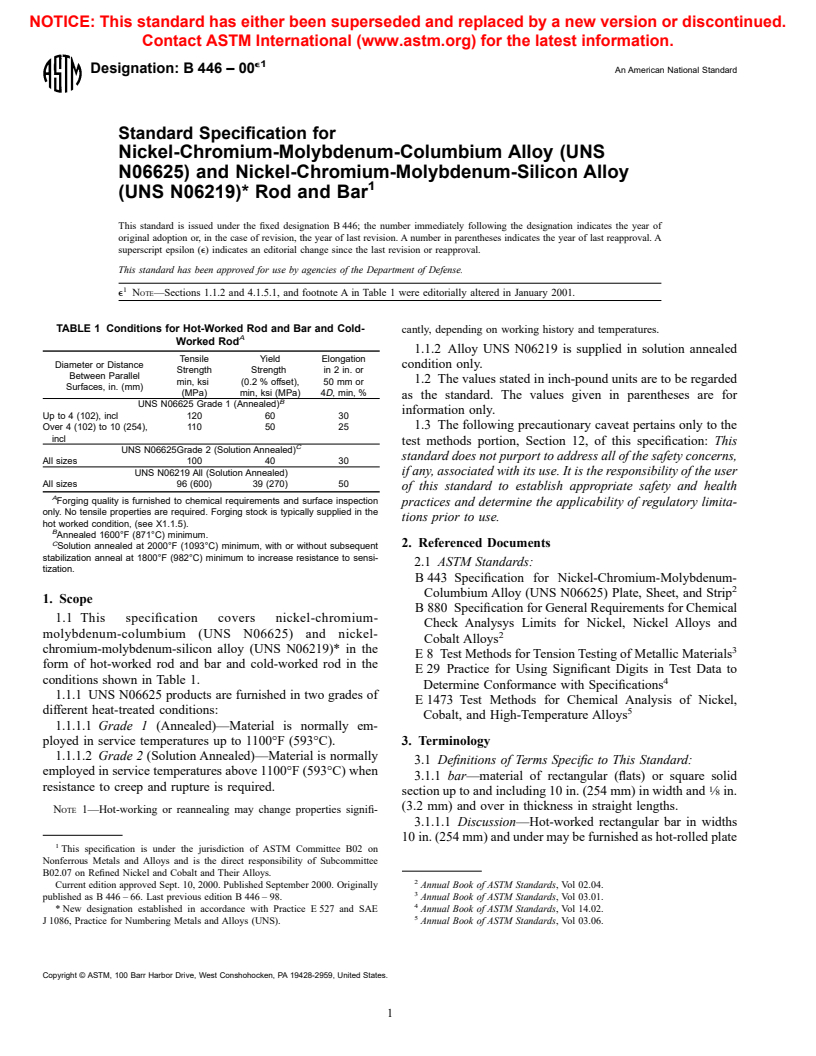
1.1 This specification covers nickel-chromium-molybdenum-columbium (UNS N06625), nickel-chromium-molybdenum-silicon alloy (UNS N06219), and Nickel-Chromium-Molybdenum-Tungsten Alloy (UNS N06650)* in the form of hot-worked rod and bar and cold-worked rod in the conditions shown in Table 1.
1.1.1 UNS N06625 products are furnished in two grades of different heat-treated conditions:
Grade 1 (Annealed)—Material is normally employed in service temperatures up to 1100°F (593°C).
Grade 2 (Solution Annealed)—Material is normally employed in service temperatures above 1100°F (593°C) when resistance to creep and rupture is required.
Note 1—Hot-working or reannealing may change properties significantly, depending on working history and temperatures.
1.1.2 Alloys UNS N06219 and UNS N06650 are supplied in solution annealed condition only.
1.2 The values stated in inch-pound units are to be regarded as the standard. The values given in parentheses are for information only.
1.3 The following precautionary caveat pertains only to the test methods portion, Section 12, of this specification: This standard does not purport to address all of the safety concerns, if any, associated with its use. It is the responsibility of the user of this standard to become familiar with all hazards including those identified in the appropriate Material Safety Data Sheet for this product/material as provided by the manufacturer, to establish appropriate safety and health practices, and determine the applicability of regulatory limitations prior to use.
General Information
Relations
Buy Standard
Standards Content (Sample)
NOTICE: This standard has either been superseded and replaced by a new version or discontinued.
Contact ASTM International (www.astm.org) for the latest information.
e1
Designation: B 446 – 00 An American National Standard
Standard Specification for
Nickel-Chromium-Molybdenum-Columbium Alloy (UNS
N06625) and Nickel-Chromium-Molybdenum-Silicon Alloy
(UNS N06219)* Rod and Bar
This standard is issued under the fixed designation B 446; the number immediately following the designation indicates the year of
original adoption or, in the case of revision, the year of last revision. A number in parentheses indicates the year of last reapproval. A
superscript epsilon (e) indicates an editorial change since the last revision or reapproval.
This standard has been approved for use by agencies of the Department of Defense.
e NOTE—Sections 1.1.2 and 4.1.5.1, and footnote A in Table 1 were editorially altered in January 2001.
TABLE 1 Conditions for Hot-Worked Rod and Bar and Cold- cantly, depending on working history and temperatures.
A
Worked Rod
1.1.2 Alloy UNS N06219 is supplied in solution annealed
Tensile Yield Elongation
Diameter or Distance
condition only.
Strength Strength in 2 in. or
Between Parallel
1.2 The values stated in inch-pound units are to be regarded
min, ksi (0.2 % offset), 50 mm or
Surfaces, in. (mm)
(MPa) min, ksi (MPa) 4D, min, %
as the standard. The values given in parentheses are for
B
UNS N06625 Grade 1 (Annealed)
information only.
Up to 4 (102), incl 120 60 30
1.3 The following precautionary caveat pertains only to the
Over 4 (102) to 10 (254), 110 50 25
incl
test methods portion, Section 12, of this specification: This
C
UNS N06625Grade 2 (Solution Annealed)
standard does not purport to address all of the safety concerns,
All sizes 100 40 30
UNS N06219 All (Solution Annealed) if any, associated with its use. It is the responsibility of the user
All sizes 96 (600) 39 (270) 50
of this standard to establish appropriate safety and health
A
Forging quality is furnished to chemical requirements and surface inspection
practices and determine the applicability of regulatory limita-
only. No tensile properties are required. Forging stock is typically supplied in the
tions prior to use.
hot worked condition, (see X1.1.5).
B
Annealed 1600°F (871°C) minimum.
C
2. Referenced Documents
Solution annealed at 2000°F (1093°C) minimum, with or without subsequent
stabilization anneal at 1800°F (982°C) minimum to increase resistance to sensi-
2.1 ASTM Standards:
tization.
B 443 Specification for Nickel-Chromium-Molybdenum-
Columbium Alloy (UNS N06625) Plate, Sheet, and Strip
1. Scope
B 880 Specification for General Requirements for Chemical
1.1 This specification covers nickel-chromium-
Check Analysys Limits for Nickel, Nickel Alloys and
molybdenum-columbium (UNS N06625) and nickel- 2
Cobalt Alloys
chromium-molybdenum-silicon alloy (UNS N06219)* in the 3
E 8 Test Methods for Tension Testing of Metallic Materials
form of hot-worked rod and bar and cold-worked rod in the
E 29 Practice for Using Significant Digits in Test Data to
conditions shown in Table 1. 4
Determine Conformance with Specifications
1.1.1 UNS N06625 products are furnished in two grades of
E 1473 Test Methods for Chemical Analysis of Nickel,
different heat-treated conditions: 5
Cobalt, and High-Temperature Alloys
1.1.1.1 Grade 1 (Annealed)—Material is normally em-
ployed in service temperatures up to 1100°F (593°C). 3. Terminology
1.1.1.2 Grade 2 (Solution Annealed)—Material is normally
3.1 Definitions of Terms Specific to This Standard:
employed in service temperatures above 1100°F (593°C) when
3.1.1 bar—material of rectangular (flats) or square solid
resistance to creep and rupture is required. 1
section up to and including 10 in. (254 mm) in width and ⁄8 in.
(3.2 mm) and over in thickness in straight lengths.
NOTE 1—Hot-working or reannealing may change properties signifi-
3.1.1.1 Discussion—Hot-worked rectangular bar in widths
10 in. (254 mm) and under may be furnished as hot-rolled plate
This specification is under the jurisdiction of ASTM Committee B02 on
Nonferrous Metals and Alloys and is the direct responsibility of Subcommittee
B02.07 on Refined Nickel and Cobalt and Their Alloys.
Current edition approved Sept. 10, 2000. Published September 2000. Originally Annual Book of ASTM Standards, Vol 02.04.
published as B 446 – 66. Last previous edition B 446 – 98. Annual Book of ASTM Standards, Vol 03.01.
* New designation established in accordance with Practice E 527 and SAE Annual Book of ASTM Standards, Vol 14.02.
J 1086, Practice for Numbering Metals and Alloys (UNS). Annual Book of ASTM Standards, Vol 03.06.
Copyright © ASTM, 100 Barr Harbor Drive, West Conshohocken, PA 19428-2959, United States.
B 446
with sheared or cut edges in accordance with Specification 6. Mechanical Properties and Other Requirements
B 443, provided the mechanical property requirements of this
6.1 Mechanical Properties—The material shall conform to
specification are met.
the heat treatment and room temperature tensile properties
3.1.2 rod—material of round solid section furnished in
prescribed in Table 1.
straight lengths.
7. Dimensions and Permissible Variations
4. Ordering Information
7.1 Diameter, Thickness, or Width—The permissible varia-
4.1 It is the responsibility of the purchaser to specify all
tions from the specified dimensions of cold-worked rod shall
requirements that are necessary for the safe and satisfactory
be as prescribed in Table 3, and of hot-worked rod and bar as
performance of material ordered under this specification.
prescribed in Table 4.
Examples of such requirements include, but are not limited to,
7.2 Out-of-Round— Hot-worked rods and cold-worked rods
the following:
(except “forging quality”) all sizes, in straight lengths, shall not
4.1.1 ASTM designation,
be out-of-round by more than one half the total permissible
4.1.2 UNS number,
variadions in diameter shown in Tables 3 and 4, except for
4.1.3 Section—Rod (round) or bar (square or rectangular),
hot-worked rods ⁄2 in. (12.7 mm) in diameter and under, which
4.1.4 Dimensions, including length,
may be out-of-round by the total permissible variations in
4.1.5 Condition (see 1.1.1, 1.1.2, and appendix),
diameter shown in Table 4.
4.1.5.1 If neither grade of N06625 is specified, Grade 1 will
7.3 Machining Allowances for Hot-Worked Materials—
be supplied,
When the surfaces of hot-worked products are to be machined,
4.1.6 Finish (Section 8),
the allowances prescribed in Table 5 are recommended for
4.1.7 Quantity—Feet (or metres) or number of pieces,
normal machining operations.
4.1.8 Certification— State if certification is required (see
7.4 Length—The permissible variations in length of cold-
Section 15),
worked and hot-worked rod and bar shall be as prescribed in
4.1.9 Samples for Product (Check) Analysis—State whether
Table 6.
samples for product (check) analysis should be furnished (see
7.4.1 Rods and bars ordered to random or nominal lengths
5.2), and
will be furnished with either cropped or saw-cut ends; material
4.1.10 Product Marking (see Section 16)—State product
ordered to cut lengths will be furnished with square saw-cut or
marking requirements.
machined ends.
4.1.11 Purchaser Inspection (see Section 13)—If purchaser
7.5 Straightness:
wishes to witness tests or inspection of material at place of
7.5.1 The permissible variations in straightness of cold-
manufacture, the purchase order must so state, indicating
worked rod as determined by the departure from straightness
which test or inspections are to be witnessed.
shall be as prescribed in Table 7.
7.5.2 The permissible variations in straightness of hot-
5. Chemical Composition
worked rod and bar as determined by the departure from
5.1 The material shall conform to the composition limits straightness shall be as specified in Table 8.
specified in Table 2.
8. Workmanship, Finish and Appearance
5.2 If a product (check) analysis is performed by the
8.1 The material shall be uniform in quality and condition,
purchaser, the material shall conform to the product (check)
smooth, commercially straight or flat, and free of injurious
analysis variations in Specification B 880.
imperfections.
TABLE 2 Chemical Requirements
9. Sampling
Composition
9.1 Lot—Definition:
Limits, %
Element
9.1.1 A lot for chemical analysis shall consist of one heat.
N06625 N06219
9.1.2 A lot for mechanical properties testing shall consist of
Carbon 0.10 max 0.05 max
all material from the same heat, nominal diameter or thickness,
Manganese 0.50 max 0.50 max
and condition.
Silicon 0.50 max 0.70-1.10
Phosphorus 0.015 max 0.020 max 9.1.2.1 Where material cannot be identified by heat, a lot
Sulfur 0.015 max 0.010 max
shall consist of not more than 500 lb (227 kg) of material in the
Chromium 20.0 min 18.0-22.0
23.0 max .
Columbium + tantalum 3.15 min . TABLE 3 Permissible Variations in Diameter of Cold-Worked Rod
4.15 max .
Permissible Variations from Specified
Cobalt (if determined) 1.0 max 1.0 max
Specified Dimension,
Dimension, in. (mm)
Molybdenum 8.0 min 7.0-9.0
in. (mm)
Plus Minus
10.0 max .
Iron 5.0 max 2.0-4.0
1 3
⁄16 (1.6) to ⁄16 (4.8), excl 0 0.002 (0.05)
Aluminum 0.40 max 0.50 max
3 1
⁄16 (4.8) to ⁄2 (12.7), excl 0 0.003 (0.08)
Titanium 0.40 max 0.50 max
1 15
⁄2(12.7) to ⁄16 (23.8), incl 0.001 (0.03) 0.002 (0.05)
Copper . 0.50 max
15 15
Over ⁄16 (23.8) to 1- ⁄16(49.2), incl 0.0015 (0.04) 0.003 (0.08)
A
Nickel 58.0 min Bal.
15 1
Over 1 ⁄16 (49.2) to 2 ⁄2(63.5), incl 0.002 (0.05) 0.004 (0.10)
A
Element shall be determined arithmetically by difference.
B 446
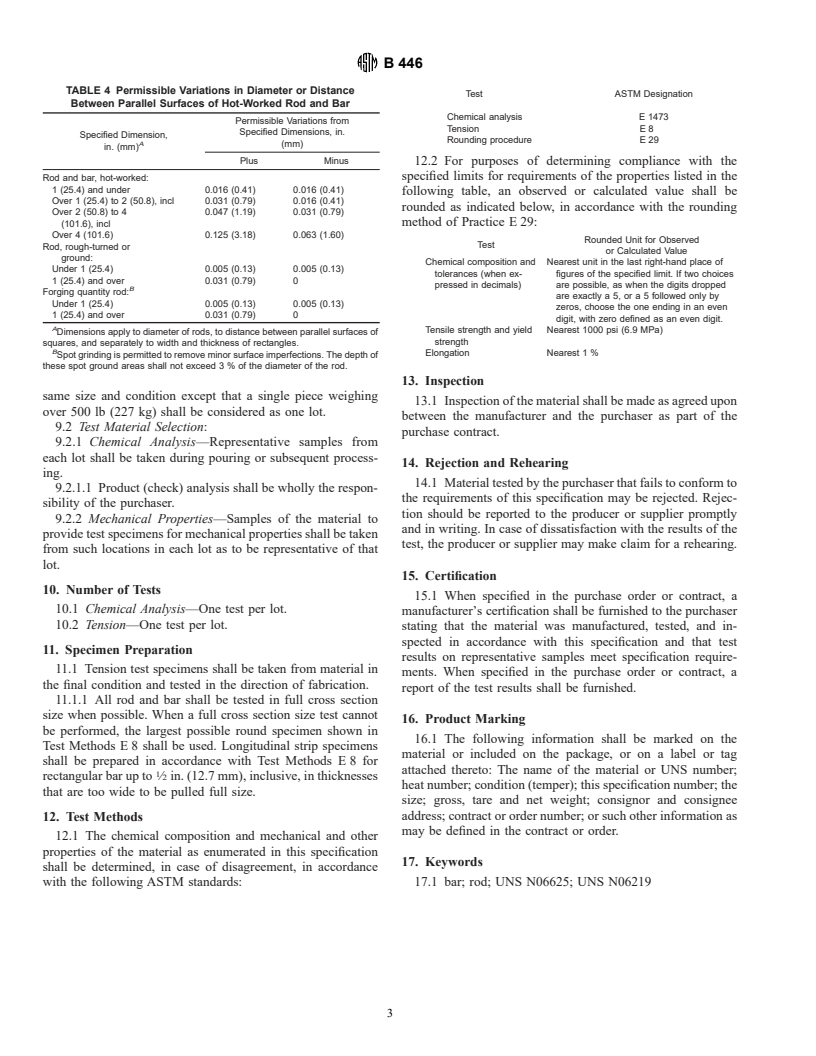
TABLE 4 Permissible Variations in Diameter or Distance
Test ASTM Designation
Between Parallel Surfaces of Hot-Worked Rod and Bar
Chemical analysis E 1473
Permissible Variations from
Tension E 8
Specified Dimensions, in.
Specified Dimension,
Rounding procedure E 29
A (mm)
in. (mm)
Plus Minus
12.2 For purposes of determining compliance with the
Rod and bar, hot-worked: specified limits for requirements of the properties listed in the
1 (25.4) and under 0.016 (0.41) 0.016 (0.41)
following table, an observed or calculated value shall be
Over 1 (25.4) to 2 (50.8), incl 0.031 (0.79) 0.016 (0.41)
rounded as indicated below, in accordance with the rounding
Over 2 (50.8) to 4 0.047 (1.19) 0.031 (0.79)
method of Practice E 29:
(101.6), incl
Over 4 (101.6) 0.125 (3.18) 0.063 (1.60)
Rounded Unit for Observed
Test
Rod, rough-turned or
or Calculated Value
ground:
Chemical composition and Nearest unit in the last right-hand place of
Under 1 (25.4) 0.005 (0.13) 0.005 (0.13)
tolerances (when ex- figures of the specified limit. If two choices
1 (25.4) and o
...


Questions, Comments and Discussion
Ask us and Technical Secretary will try to provide an answer. You can facilitate discussion about the standard in here.