ASTM F1914-07(2011)
(Test Method)Standard Test Methods for Short-Term Indentation and Residual Indentation of Resilient Floor Covering
Standard Test Methods for Short-Term Indentation and Residual Indentation of Resilient Floor Covering
SIGNIFICANCE AND USE
The indentation and the residual indentation of resilient floor covering is important since the resistance and recovery from indentation reflects on the ability of the resilient floor covering to perform properly after installation.
The indentation of a resilient floor covering shall be measured using a specified type of indentor, flat or spherical, under a specified load and time.
The residual indentation of a resilient floor covering shall be measured after a specified recovery time.
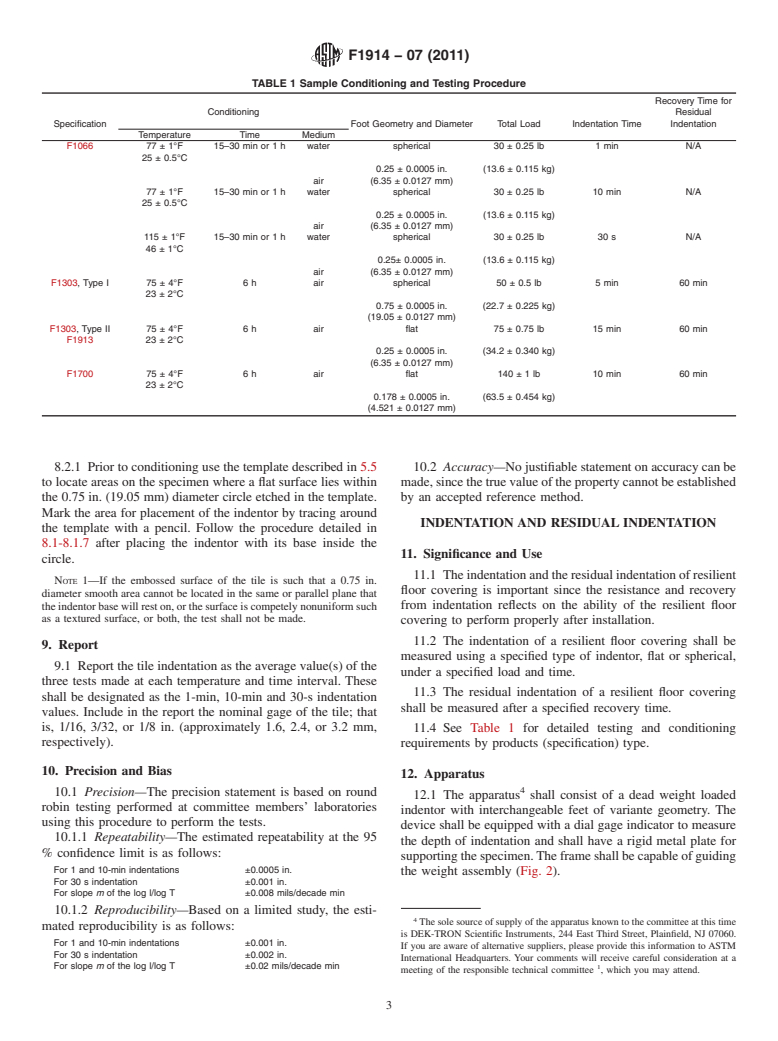
See Table 1 for detailed testing and conditioning requirements by products (specification) type.
SCOPE
1.1 This test method covers procedures to determine short-term indentation and residual indentation of resilient flooring, when subjected to concentrated loads.
1.2 The test methods appear in the following order:
Section Indentation by McBurney Test 4 to 10 Indentation and Residual Indentation 11 to 15
1.3 There are two procedures with their respective apparatus. The first (McBurney Test) is described in Sections 4 to 10 and is restricted to a spherical foot. It is only used for initial indentation measurements of VCT. The second is described in Sections 11 to 15 and has interchangeable feet with variable geometry. It is used to measure initial and residual indentation.
1.4 The values stated in inch-pound units are to be regarded as standard. The values given in parentheses are mathematical conversions to SI units that are provided for information only and are not considered standard.
1.5 This standard does not purport to address all of the safety concerns, if any, associated with its use. It is the responsibility of the user of this standard to establish appropriate safety and health practices and determine the applicability of regulatory limitations prior to use.
General Information
Relations
Standards Content (Sample)
NOTICE: This standard has either been superseded and replaced by a new version or withdrawn.
Contact ASTM International (www.astm.org) for the latest information
Designation: F1914 − 07 (Reapproved 2011)
Standard Test Methods for
Short-Term Indentation and Residual Indentation of
Resilient Floor Covering
This standard is issued under the fixed designation F1914; the number immediately following the designation indicates the year of
original adoption or, in the case of revision, the year of last revision. A number in parentheses indicates the year of last reapproval. A
superscript epsilon (´) indicates an editorial change since the last revision or reapproval.
1. Scope Determine the Precision of a Test Method
E2251 Specification for Liquid-in-Glass ASTM Thermom-
1.1 This test method covers procedures to determine short-
eters with Low-Hazard Precision Liquids
term indentation and residual indentation of resilient flooring,
F141 Terminology Relating to Resilient Floor Coverings
when subjected to concentrated loads.
F1066 Specification for Vinyl Composition Floor Tile
1.2 The test methods appear in the following order:
F1303 Specification for Sheet Vinyl Floor Covering with
Backing
Section
F1700 Specification for Solid Vinyl Floor Tile
Indentation by McBurney Test 4 to 10
F1913 Specification forVinyl Sheet Floor CoveringWithout
Indentation and Residual Indentation 11 to 15
Backing
1.3 There are two procedures with their respective appara-
tus. The first (McBurney Test) is described in Sections 4 to 10
3. Terminology
and is restricted to a spherical foot. It is only used for initial
indentation measurements of VCT. The second is described in
3.1 Definitions—For definitions of terms used in this test
Sections 11 to 15 and has interchangeable feet with variable
method, refer to Terminology F141.
geometry. It is used to measure initial and residual indentation.
INITIAL INDENTATION MEASUREMENTS OF VCT
1.4 The values stated in inch-pound units are to be regarded
(MCBURNEY TEST)
as standard. The values given in parentheses are mathematical
conversions to SI units that are provided for information only
4. Significance and Use
and are not considered standard.
4.1 This test method measures short-term indentation of
1.5 This standard does not purport to address all of the
resilient flooring and is useful as a predictor of performance in
safety concerns, if any, associated with its use. It is the
actual installations over time.
responsibility of the user of this standard to establish appro-
priate safety and health practices and determine the applica-
4.2 The slope, m, of a log-log plot indentation (I) versus
bility of regulatory limitations prior to use.
time (T), is related to the indentation of tile in service. The
115°F (46°C) indentation is a measure of the tendency of the
2. Referenced Documents
tile to indent at temperatures above 77°F (25°C).
2.1 ASTM Standards:
E691 Practice for Conducting an Interlaboratory Study to 5. Apparatus
5.1 Apparatus —The indentation tester is a spherical foot
device consisting essentially of a rigidly mounted indentor
ThistestmethodisunderthejurisdictionofASTMCommitteeF06onResilient
acting under an initial load of 2.00 6 0.02 lbf (8.90 6 0.09 N)
Floor Coverings and is the direct responsibility of Subcommittee F06.30 on Test
Methods - Performance.
and a total deadweight load of 30.00 lbf 6 0.25 lbf (133.45 6
Current edition approved Nov. 1, 2011. Published November 2011. Originally
1.11 N) with a suitable dial indicator, calibrated in 0.0005 in.
approved in 1998. Last previous edition approved in 2007 as F1914–07. DOI:
(0.01 mm) increments. The spherical foot shall be 0.250 6
10.1520/F1914-07R11.
0.0005 in. (6.35 6 0.01 mm) in diameter.Asuitable apparatus
The sole source of supply of the McBurney Indentation Tester known to the
committee at this time is Frazier Precision Co, Gaithersburg, MD. If you are aware
is shown in Fig. 1.
of alternative suppliers, please provide this information to ASTM International
Headquarters.Your comments will receive careful consideration at a meeting of the 5.2 Flat Glass Plate, of 0.25 in. (6.35 mm) minimum
responsible technical committee , which you may attend.
thickness for supporting the specimen and tester during test.
For referenced ASTM standards, visit the ASTM website, www.astm.org, or
contact ASTM Customer Service at service@astm.org. For Annual Book of ASTM
5.3 Timing Device that will indicate the time in seconds.
Standards volume information, refer to the standard’s Document Summary page on
the ASTM website. 5.4 Thermometer, calibrated as in Specification E2251.
Copyright © ASTM International, 100 Barr Harbor Drive, PO Box C700, West Conshohocken, PA 19428-2959. United States
F1914 − 07 (2011)
FIG. 1 Apparatus for Measuring Indentation: McBurney
5.5 Circular Plexiglas Template, 3.50 in. (88.9 mm) in 8.1.2 Place the indentor on the specimen. Be sure the
diameter, 0.25 in. (6.35 mm) thick and having a 0.3125 in. indentor tip is retracted into the base when the instrument is
(7.94 mm) diameter hole drilled in the center and a 0.75 in. placed on the specimen and when being moved to another test
(19.05 mm) diameter concentric circle etched on the face. location.
8.1.3 Apply the initial 2-lbf (8.9-N) load (shaft assembly) to
5.6 Water Baths, or air atmosphere maintained at 77 6
the specimen surface.
0.9°F (25 6 0.5°C) or 115 6 1°F (46 6 0.5°C).
8.1.3.1 Position the 28-lbf (124.5-N) load on the specimen
by holding down with the thumb the 2-lbf (8.9-N) shaft cross
6. Test Specimens
bar to proper load.
6.1 Thetestspecimenshallbeafulltile,usually12by12in.
8.1.3.2 Gently lower the load to force the shaft cross bar
(approximately 305 by 305 mm) or 9 by 9 in. (approximately
upward until there is no clearance between the shaft and the
230 by 230 mm). Larger tiles shall be cut to one of the above
upper wear plate. This will ensure proper 2-lbf (8.9-N) loading
sizes.
and positioning of the 28-lbf (124.5-N) load.
8.1.4 Set the dial gage at zero.
7. Conditioning
8.1.5 Release the 28-lbf (124.5-N) load and start the timing
7.1 Fortestinginair,conditionthespecimen(s)for1hatthe
device. (Steps 8.1.3-8.1.5 should not exceed a total of 5 s.)
test temperature.
Load release should be smooth and as mechanical as possible.
7.2 Fortestinginwater,conditionthespecimen(s)atthetest
Turn the collar at least one-half turn beyond release to allow
temperature for 15 min minimum and 30 min maximum (see
sufficient travel for indentation. Do not hold the collar handle
Table 1).
after the load is released as this may tilt the instrument from
vertical.
7.3 Condition the indentation tester and glass plate in the
8.1.6 Record the depth of indentation at 1 min 6 1 s and 10
same medium and for at least the same time period as the
min 6 1 s to the nearest 0.0001 in. (0.0025 mm) for 77°F
specimen(s).
(25°C) testing and at 30 6 1 s for 114.8°F (46°C) testing.
8.1.7 Perform three of the required tests at randomly se-
8. Procedures
lected locations on the specimens. Record the three individual
8.1 Nonembossed Surfaces:
readings and the average for each time period.
8.1.1 Place the specimen on the glass plate with the wearing
surface up. 8.2 Embossed Surfaces:
F1914 − 07 (2011)
TABLE 1 Sample Conditioning and Testing Procedure
Recovery Time for
Conditioning Residual
Specification Foot Geometry and Diameter Total Load Indentation Time Indentation
Temperature Time Medium
F1066 77 ± 1°F 15–30 min or 1 h water spherical 30 ± 0.25 lb 1 min N/A
25 ± 0.5°C
0.25 ± 0.0005 in. (13.6 ± 0.115 kg)
air (6.35 ± 0.0127 mm)
77 ± 1°F 15–30 min or 1 h water spherical 30 ± 0.25 lb 10 min N/A
25 ± 0.5°C
0.25 ± 0.0005 in. (13.6 ± 0.115 kg)
air (6.35 ± 0.0127 mm)
115 ± 1°F 15–30 min or 1 h water spherical 30 ± 0.25 lb 30 s N/A
46 ± 1°C
0.25± 0.0005 in. (13.6 ± 0.115 kg)
air (6.35 ± 0.0127 mm)
F1303, Type I 75 ± 4°F 6 h air spherical 50 ± 0.5 lb 5 min 60 min
23 ± 2°C
0.75 ± 0.0005 in. (22.7 ± 0.225 kg)
(19.05 ± 0.0127 mm)
F1303, Type II 75 ± 4°F 6 h air flat 75 ± 0.75 lb 15 min 60 min
F1913 23 ± 2°C
0.25 ± 0.0005 in. (34.2 ± 0.340 kg)
(6.35 ± 0.0127 mm)
F1700 75 ± 4°F 6h air flat 140±1lb 10min 60min
23 ± 2°C
0.178 ± 0.0005 in. (63.5 ± 0.454 kg)
(4.521 ± 0.0127 mm)
8.2.1 Prior to conditioning use the template described in 5.5 10.2 Accuracy—No justifiable statement on accuracy can be
to locate areas on the specimen where a flat surface lies within made,sincethetruevalueofthepropertycannotbeestablished
the 0.75 in. (19.05 mm) diameter circle etched in the template. by an accepted reference method.
Mark the area for placement of the indentor by tracing around
INDENTATION AND RESIDUAL INDENTATION
the template with a pencil. Follow the procedure detailed in
8.1-8.1.7 after placing the indentor with its base inside the
11. Significance and Use
circle.
11.1 Theindentationandtheresidualindentationofresilient
NOTE 1—If the embossed surface of the tile is such that a 0.75 in.
floor covering is important since the resistance and recovery
diameter smooth area cannot be located in the same or parallel plane that
theindentorbasewillreston,orthesurfaceiscompetelynonuniformsuch from indentation reflects on the ability of the resilien
...


Questions, Comments and Discussion
Ask us and Technical Secretary will try to provide an answer. You can facilitate discussion about the standard in here.