ASTM A1047/A1047M-05(2014)
(Test Method)Standard Test Method for Pneumatic Leak Testing of Tubing
Standard Test Method for Pneumatic Leak Testing of Tubing
SIGNIFICANCE AND USE
5.1 When permitted by a specification or the order, this test method may be used for detecting leaks in tubing in lieu of the air underwater pressure test.
SCOPE
1.1 This test method provides procedures for the leak testing of tubing using pneumatic pressure. This test method involves measuring the change in pressure inside the tubing over time. There are three procedures that may be used, all of which are intended to be equivalent. It is a qualitative not a quantitative test method. Any of the three procedures are intended to be capable of leak detection and, as such, are intended to be equivalent for that purpose.
1.2 The procedures will produce consistent results upon which acceptance standards can be based. This test may be performed in accordance with the Pressure Differential (Procedure A), the Pressure Decay (Procedure B), or the Vacuum Decay (Procedure C) method.
1.3 The values stated in either SI units or inch-pound units are to be regarded separately as standard. The values stated in each system may not be exact equivalents; therefore, each system shall be used independently of the other. Combining values from the two systems may result in non-conformance with the standard.
1.3.1 Within the text, the SI units are shown in brackets.
1.4 This standard does not purport to address all of the safety concerns, if any, associated with its use. It is the responsibility of the user of this standard to establish appropriate safety and health practices and determine the applicability of regulatory limitations prior to use.
General Information
Relations
Standards Content (Sample)
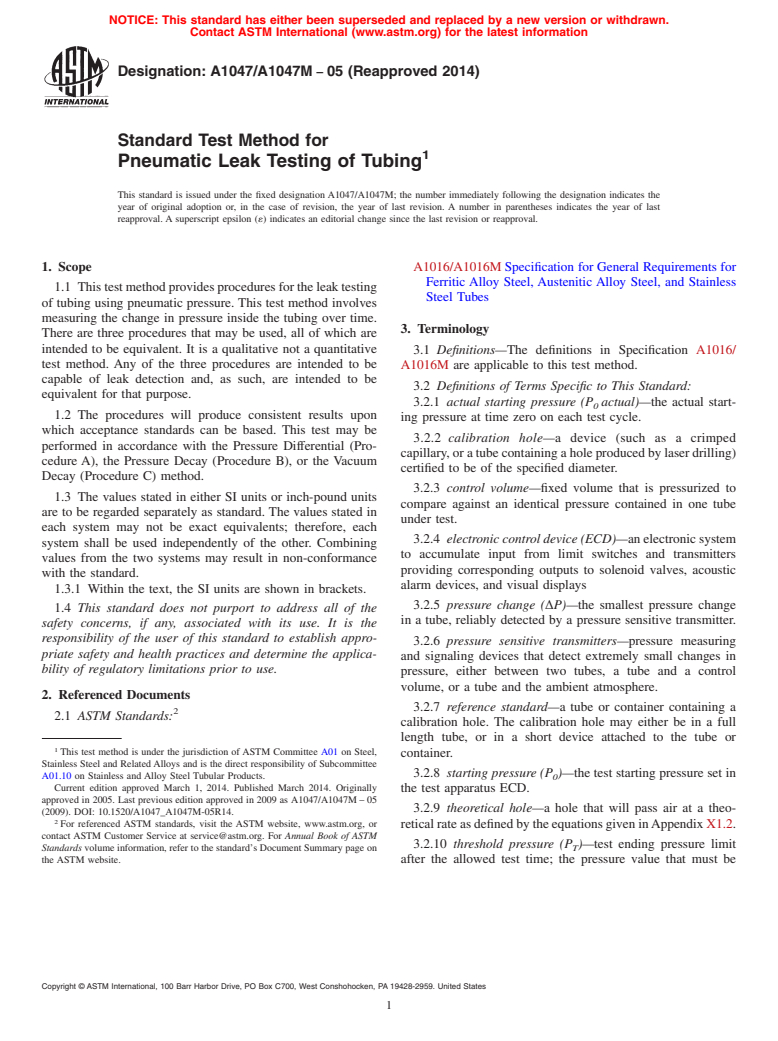
NOTICE: This standard has either been superseded and replaced by a new version or withdrawn.
Contact ASTM International (www.astm.org) for the latest information
Designation: A1047/A1047M − 05 (Reapproved 2014)
Standard Test Method for
Pneumatic Leak Testing of Tubing
This standard is issued under the fixed designation A1047/A1047M; the number immediately following the designation indicates the
year of original adoption or, in the case of revision, the year of last revision. A number in parentheses indicates the year of last
reapproval. A superscript epsilon (´) indicates an editorial change since the last revision or reapproval.
1. Scope A1016/A1016M Specification for General Requirements for
Ferritic Alloy Steel, Austenitic Alloy Steel, and Stainless
1.1 Thistestmethodprovidesproceduresfortheleaktesting
Steel Tubes
of tubing using pneumatic pressure. This test method involves
measuring the change in pressure inside the tubing over time.
3. Terminology
There are three procedures that may be used, all of which are
intended to be equivalent. It is a qualitative not a quantitative
3.1 Definitions—The definitions in Specification A1016/
test method. Any of the three procedures are intended to be
A1016M are applicable to this test method.
capable of leak detection and, as such, are intended to be
3.2 Definitions of Terms Specific to This Standard:
equivalent for that purpose.
3.2.1 actual starting pressure (P actual)—the actual start-
1.2 The procedures will produce consistent results upon
ing pressure at time zero on each test cycle.
which acceptance standards can be based. This test may be
3.2.2 calibration hole—a device (such as a crimped
performed in accordance with the Pressure Differential (Pro-
capillary,oratubecontainingaholeproducedbylaserdrilling)
cedure A), the Pressure Decay (Procedure B), or the Vacuum
certified to be of the specified diameter.
Decay (Procedure C) method.
3.2.3 control volume—fixed volume that is pressurized to
1.3 The values stated in either SI units or inch-pound units
compare against an identical pressure contained in one tube
are to be regarded separately as standard. The values stated in
under test.
each system may not be exact equivalents; therefore, each
3.2.4 electronic control device (ECD)—anelectronicsystem
system shall be used independently of the other. Combining
to accumulate input from limit switches and transmitters
values from the two systems may result in non-conformance
providing corresponding outputs to solenoid valves, acoustic
with the standard.
alarm devices, and visual displays
1.3.1 Within the text, the SI units are shown in brackets.
3.2.5 pressure change (∆P)—the smallest pressure change
1.4 This standard does not purport to address all of the
in a tube, reliably detected by a pressure sensitive transmitter.
safety concerns, if any, associated with its use. It is the
responsibility of the user of this standard to establish appro-
3.2.6 pressure sensitive transmitters—pressure measuring
priate safety and health practices and determine the applica-
and signaling devices that detect extremely small changes in
bility of regulatory limitations prior to use.
pressure, either between two tubes, a tube and a control
volume, or a tube and the ambient atmosphere.
2. Referenced Documents
3.2.7 reference standard—a tube or container containing a
2.1 ASTM Standards:
calibration hole. The calibration hole may either be in a full
length tube, or in a short device attached to the tube or
This test method is under the jurisdiction of ASTM Committee A01 on Steel,
container.
Stainless Steel and Related Alloys and is the direct responsibility of Subcommittee
3.2.8 starting pressure (P )—the test starting pressure set in
A01.10 on Stainless and Alloy Steel Tubular Products. 0
Current edition approved March 1, 2014. Published March 2014. Originally the test apparatus ECD.
approved in 2005. Last previous edition approved in 2009 as A1047/A1047M – 05
3.2.9 theoretical hole—a hole that will pass air at a theo-
(2009). DOI: 10.1520/A1047_A1047M-05R14.
For referenced ASTM standards, visit the ASTM website, www.astm.org, or reticalrateasdefinedbytheequationsgiveninAppendixX1.2.
contact ASTM Customer Service at service@astm.org. For Annual Book of ASTM
3.2.10 threshold pressure (P )—test ending pressure limit
T
Standards volume information, refer to the standard’s Document Summary page on
after the allowed test time; the pressure value that must be
the ASTM website.
Copyright © ASTM International, 100 Barr Harbor Drive, PO Box C700, West Conshohocken, PA 19428-2959. United States
A1047/A1047M − 05 (2014)
crossed to determine reject status. P = P actual – ∆P for Appendix X1. Actual test time may be longer than the
T 0
pressure decay, and P = P actual + ∆P for vacuum decay. calculated value and shall be adjusted as necessary for the
T 0
apparatus to cross the threshold pressure and cause the system
4. Summary of Test Method
to automatically shut down.
4.1 Procedure A, Pressure Differential,measuresthedropin
8.2 Verify that all failure lights are illuminated during the
pressure over time as a result of air escaping from inside one
calibration.
tubewhencomparedtoanothertubeatanidenticalpressure,or
8.3 Unless otherwise specified, apparatus calibration shall
one tube against a control volume at identical pressure. (See
be made at twelve month intervals maximum.
Refs (1) and (2).)
8.4 Recalibrate the test apparatus prior to use whenever any
4.2 Procedure B, Pressure Decay, measures the drop in
pressure sensing component is replaced or modified.
pressure over time as a result of air escaping from the tube.
8.5 Calibrate the calibration hole at twelve month intervals
4.3 Procedure C, Vacuum Decay, involves evacuating the
maximum. It is recommended that the device containing the
tubing to suitably low pressure and measuring the increase in
calibration hole be stored in an inert atmosphere and cleaned
pressure caused by gas entering the tubing.
with high pressure nitrogen.
5. Significance and Use
8.6 Calibrate all pressure gauges and pressure transducersat
5.1 When permitted by a specification or the order, this test
twelve month intervals maximum.
method may be used for detecting leaks in tubing in lieu of the
8.7 Unless otherwise agreed to by producer and purchaser,
air underwater pressure test.
the minimum calibration hole size in the reference standard
shall be 0.003-in. diameter. Calibration with smaller holes may
6. Apparatus
not be repeatable due to fouling and plugging. (See Ref (3).)
6.1 An electronic control device (ECD) controls all opera-
tionsofthetestmethodbyacceptinginputsfromlimitswitches
9. Procedure
and transmitters, and by providing corresponding pass/fail
9.1 Perform pneumatic leak testing after all process
outputs to solenoid valves, acoustic alarm devices, and visual
operations, including cold work, heat treatment, and straight-
displays.The pass/fail determination is achieved by a compari-
ening.
son of the data input from pressure transducers with a standard
accept/reject criterion measured over the set test time.
9.2 Clean and dry the tubes before testing. Remove loose
scale from the inside and outside surfaces of the tubes.
6.2 The test apparatus may have the capability for single- or
multi-tube testing. It shall be designed to detect a small
9.3 Actual test time is calculated in accordance with the
predetermined pressure change during the testing cycle. It is
parameters of the test using the appropriate equation in X1.2.
intended that the apparatus be fully automated and equipped
9.4 Test Cycle for Procedure A, Pressure Differential:
with suitable instrumentation for the purpose of the test. This
9.4.1 Pressurize the tubes in pairs, or a single tube and a
instrumentation may include, but is not limited to the follow-
known control volume, to a pressure greater than 33 psia with
ing:
clean and dry compressed air.
6.2.1 Internal transducers for calibration tests,
9.4.2 Allow the system to stabilize and measure the actual
6.2.2 Differential pressure and leak rate diagnosis,
StartingPressure(P actual). P actualmustbewithin10 %of
6.2.3 Control panel display for reporting digital or analog 0 0
P for a valid test.
outputs, 0
9.4.3 The apparatus is to calculate and set the Threshold
6.2.4 Absolute or differential pressure transducers, or both,
Pressure where P = P actual – ∆P.
6.2.5 Internal timing device, T 0
9.4.4 Isolate the tubes in pairs or a single tube and a known
6.2.6 Failure lamps, and
control volume.
6.2.7 A
...


Questions, Comments and Discussion
Ask us and Technical Secretary will try to provide an answer. You can facilitate discussion about the standard in here.