ASTM D5161-96
(Guide)Standard Guide for Specifying Inspection Requirements for Coating and Lining Work (Metal Substrates)
Standard Guide for Specifying Inspection Requirements for Coating and Lining Work (Metal Substrates)
SCOPE
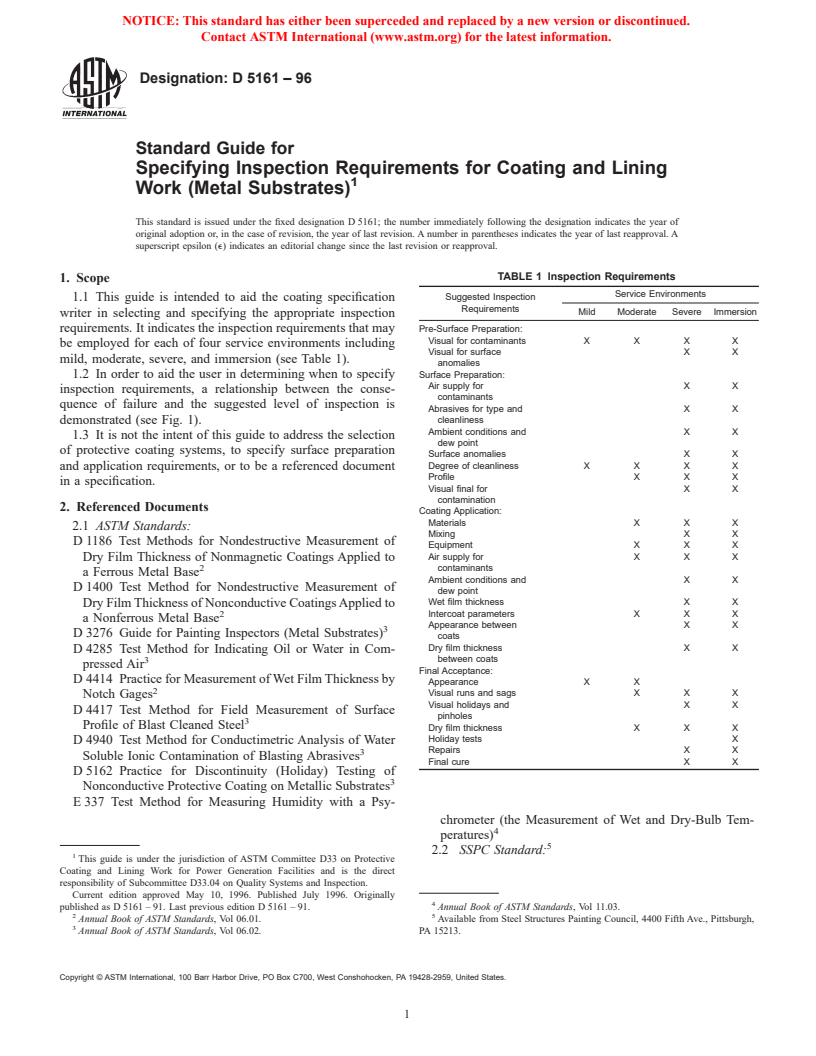
1.1 This guide is intended to aid the coating specification writer in selecting and specifying the appropriate inspection requirements. It indicates the inspection requirements that may be employed for each of four service environments including mild, moderate, severe, and immersion (see Table 1).
1.2 In order to aid the user in determining when to specify inspection requirements, a relationship between the consequence of failure and the suggested level of inspection is demonstrated (see Fig. 1).
1.3 It is not the intent of this guide to address the selection of protective coating systems, to specify surface preparation and application requirements, or to be a referenced document in a specification.
General Information
Relations
Standards Content (Sample)
NOTICE: This standard has either been superceded and replaced by a new version or discontinued.
Contact ASTM International (www.astm.org) for the latest information.
Designation: D 5161 – 96
Standard Guide for
Specifying Inspection Requirements for Coating and Lining
Work (Metal Substrates)
This standard is issued under the fixed designation D 5161; the number immediately following the designation indicates the year of
original adoption or, in the case of revision, the year of last revision. A number in parentheses indicates the year of last reapproval. A
superscript epsilon (e) indicates an editorial change since the last revision or reapproval.
TABLE 1 Inspection Requirements
1. Scope
Service Environments
Suggested Inspection
1.1 This guide is intended to aid the coating specification
Requirements
Mild Moderate Severe Immersion
writer in selecting and specifying the appropriate inspection
requirements. It indicates the inspection requirements that may
Pre-Surface Preparation:
Visual for contaminants X X X X
be employed for each of four service environments including
Visual for surface XX
mild, moderate, severe, and immersion (see Table 1).
anomalies
1.2 In order to aid the user in determining when to specify Surface Preparation:
Air supply for XX
inspection requirements, a relationship between the conse-
contaminants
quence of failure and the suggested level of inspection is
Abrasives for type and XX
demonstrated (see Fig. 1). cleanliness
Ambient conditions and XX
1.3 It is not the intent of this guide to address the selection
dew point
of protective coating systems, to specify surface preparation
Surface anomalies X X
Degree of cleanliness X X X X
and application requirements, or to be a referenced document
Profile X X X
in a specification.
Visual final for XX
contamination
2. Referenced Documents
Coating Application:
Materials X X X
2.1 ASTM Standards:
Mixing X X
D 1186 Test Methods for Nondestructive Measurement of
Equipment X X X
Air supply for XX X
Dry Film Thickness of Nonmagnetic Coatings Applied to
2 contaminants
a Ferrous Metal Base
Ambient conditions and XX
D 1400 Test Method for Nondestructive Measurement of
dew point
Dry Film Thickness of Nonconductive Coatings Applied to Wet film thickness X X
2 Intercoat parameters X X X
a Nonferrous Metal Base
Appearance between XX
D 3276 Guide for Painting Inspectors (Metal Substrates)
coats
Dry film thickness XX
D 4285 Test Method for Indicating Oil or Water in Com-
between coats
pressed Air
Final Acceptance:
D 4414 Practice for Measurement of Wet Film Thickness by
Appearance X X
Visual runs and sags X X X
Notch Gages
Visual holidays and XX
D 4417 Test Method for Field Measurement of Surface
pinholes
Profile of Blast Cleaned Steel
Dry film thickness X X X
Holiday tests X
D 4940 Test Method for Conductimetric Analysis of Water
Repairs X X
Soluble Ionic Contamination of Blasting Abrasives
Final cure X X
D 5162 Practice for Discontinuity (Holiday) Testing of
Nonconductive Protective Coating on Metallic Substrates
E 337 Test Method for Measuring Humidity with a Psy-
chrometer (the Measurement of Wet and Dry-Bulb Tem-
peratures)
2.2 SSPC Standard:
This guide is under the jurisdiction of ASTM Committee D33 on Protective
Coating and Lining Work for Power Generation Facilities and is the direct
responsibility of Subcommittee D33.04 on Quality Systems and Inspection.
Current edition approved May 10, 1996. Published July 1996. Originally
published as D 5161 – 91. Last previous edition D 5161 – 91. Annual Book of ASTM Standards, Vol 11.03.
2 5
Annual Book of ASTM Standards, Vol 06.01. Available from Steel Structures Painting Council, 4400 Fifth Ave., Pittsburgh,
Annual Book of ASTM Standards, Vol 06.02. PA 15213.
Copyright © ASTM International, 100 Barr Harbor Drive, PO Box C700, West Conshohocken, PA 19428-2959, United States.
NOTICE: This standard has either been superceded and replaced by a new version or discontinued.
Contact ASTM International (www.astm.org) for the latest information.
D 5161
5. Inspection Requirements
5.1 Pre-Surface Preparation:
5.1.1 Contaminants—Visually verify that oil and grease are
removed from the surface prior to surface preparation opera-
tions (see Guide D 3276).
5.1.2 Surface Anomalies—Visually verify that welds and
sharp or jagged edges have been suitably prepared for the
coating system being used (see Guide D 3276).
5.2 Surface Preparation:
5.2.1 Air Supply—Verify that air supply is clean and dry
(see Test Method D 4285).
5.2.2 Abrasives—Verify cleanliness and proper size and
type to achieve specified profile (see Test Method D 4940).
5.2.3 Ambient Conditions—Verify that air temperature, hu-
midity, surface temperature, and due point spread are appro-
priate (see Test Method E 337).
5.2.4 Surface Anomalies—Identify any burrs, slivers, scabs,
and weld spatter visible after blasting.
5.2.5 Surface Cleanliness—Verify degree of surface clean-
liness (see SSPC-Visl-89 or Visl-3).
5.2.6 Profile—Verify profile is within specified tolerance
using appropriate instruments (see Test Method D 4417).
NOTE 1—This figure is provided as a visual aid to represent graphically
5.2.7 Surface Contamination—Verify that all visible surface
the general relationship between the consequence of failure and the
suggested level of inspection. The slope and configuration of the curve
contaminants including oil, grease, dust, etc have been re-
wil
...


Questions, Comments and Discussion
Ask us and Technical Secretary will try to provide an answer. You can facilitate discussion about the standard in here.