ASTM F3270/F3270M-17
(Practice)Standard Practice for Compression versus Load Properties of Gasket Materials
Standard Practice for Compression versus Load Properties of Gasket Materials
SIGNIFICANCE AND USE
5.1 The load versus thickness properties of a gasket material are an important factor with regard to the selection of a given material for use in a particular sealing application. Additionally, compression/load behavior data are a common request from users. The test allows comparison of materials at room temperature or elevated temperatures or both. Additionally, properties can be evaluated while loading and unloading the material at room temperature or elevated temperatures or both. The significance of the test method is based, in part, on the assumption that, if a material exhibits too much compression at either room temperatures or elevated temperatures, it will no longer function as effectively as a seal. The results may be used in certain flange design methods to characterize properties for design such as finite element analysis (FEA). The results may be used to confirm adequate assembly loading based on measured gasket compression in the field. Two or more materials can be compared to determine differences in their compression properties. A sample of material can be compared to an established standard or previously determined characteristics on original lots of the same material for quality assurance purposes.
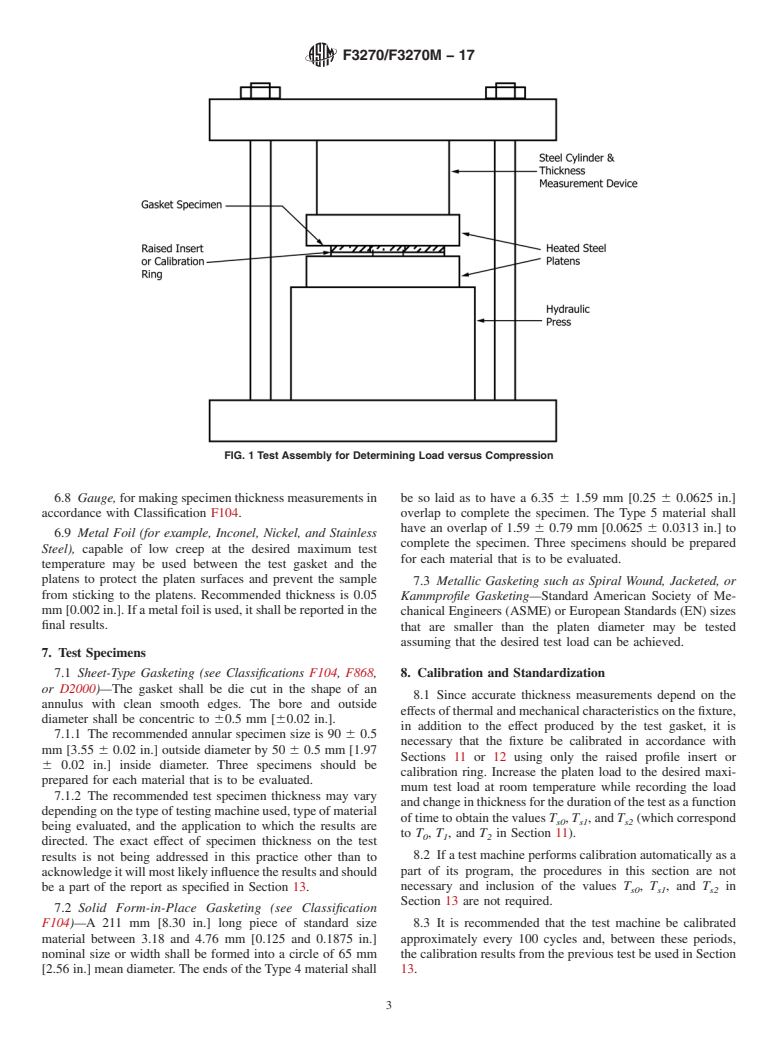
5.2 If desired, samples may be tested with a raised profile flange, insert, or calibration ring described in 6.3 and Fig. 1 so that the area (2042 mm2 [3.18 in.2]) remains constant during the test.
FIG. 1 Test Assembly for Determining Load versus Compression
SCOPE
1.1 This practice measures the compression properties of a gasket material by measuring gasket deflection while it is subjected to an increasing compressive load until a target load is reached. The load and change in thickness are recorded at a defined loading rate as a function of time for the duration of the test.
1.2 Suggested loading rates are 0.5 MPa/s [72.52 psi/s] for all types of gaskets except for expanded polytetrafluoroethylene (PTFE), elastomer, and cork/elastomer gaskets when 0.1 MPa/s [14.5 psi/s] is used.
1.3 The Part A test is performed that measures the compression properties of a gasket material by measuring gasket thickness while it is subjected to an increasing compressive load until a target load is reached. This test is performed at room temperature but may be performed at an elevated temperature if desired or when agreed upon by producer and user.
1.4 The Part B test may be performed that measures the compression properties of a gasket material by measuring gasket thickness while it is subjected to increasing compressive loads that includes a sequence or sequences in which the gasket is unloaded followed by a resumption of the compressive load until a target load is reached. The unloading rate is the same as the loading rate unless different loading and unloading rates are desired or when agreed upon by producer and user. This test is performed at room temperature but may be performed at an elevated temperature if desired or when agreed upon by producer and user.
1.5 The testing parameters for both Parts A and B including the gasket material type, gasket dimensions, platen type (RF or FF), target load, loading time, recording interval used during the test, loading and unloading rates, and temperature are to be reported with the results.
1.6 Units—The values stated in either SI units or inch-pound units are to be regarded separately as standard. The values stated in each system may not be exact equivalents; therefore, each system shall be used independently of the other. Combining values from the two systems may result in non-conformance with the standard.
1.7 This standard does not purport to address all of the safety concerns, if any, associated with its use. It is the responsibility of the user of this standard to establish appropriate safety, health, and environmental practices and determine the applicability of regulatory limitations prior to use.
1.8 This internation...
General Information
Relations
Standards Content (Sample)
This international standard was developed in accordance with internationally recognized principles on standardization established in the Decision on Principles for the
Development of International Standards, Guides and Recommendations issued by the World Trade Organization Technical Barriers to Trade (TBT) Committee.
Designation: F3270/F3270M − 17
Standard Practice for
1
Compression versus Load Properties of Gasket Materials
Thisstandard is issued under the fixed designation F3270/F3270M;the numberimmediatelyfollowingthedesignationindicatestheyear
of original adoption or, in the case of revision, the year of last revision. A number in parentheses indicates the year of last reapproval.
A superscript epsilon (´) indicates an editorial change since the last revision or reapproval.
1. Scope therefore, each system shall be used independently of the other.
Combining values from the two systems may result in non-
1.1 This practice measures the compression properties of a
conformance with the standard.
gasket material by measuring gasket deflection while it is
1.7 This standard does not purport to address all of the
subjected to an increasing compressive load until a target load
safety concerns, if any, associated with its use. It is the
is reached. The load and change in thickness are recorded at a
responsibility of the user of this standard to establish appro-
defined loading rate as a function of time for the duration of the
priate safety, health, and environmental practices and deter-
test.
mine the applicability of regulatory limitations prior to use.
1.2 Suggested loading rates are 0.5 MPa/s [72.52 psi/s] for
1.8 This international standard was developed in accor-
all types of gaskets except for expanded polytetrafluoroethyl-
dance with internationally recognized principles on standard-
ene (PTFE), elastomer, and cork/elastomer gaskets when 0.1
ization established in the Decision on Principles for the
MPa/s [14.5 psi/s] is used.
Development of International Standards, Guides and Recom-
1.3 The PartAtest is performed that measures the compres-
mendations issued by the World Trade Organization Technical
sion properties of a gasket material by measuring gasket
Barriers to Trade (TBT) Committee.
thickness while it is subjected to an increasing compressive
load until a target load is reached. This test is performed at
2. Referenced Documents
room temperature but may be performed at an elevated
2
2.1 ASTM Standards:
temperature if desired or when agreed upon by producer and
D2000 Classification System for Rubber Products in Auto-
user.
motive Applications
1.4 The Part B test may be performed that measures the
F104 Classification System for Nonmetallic Gasket Materi-
compression properties of a gasket material by measuring
als
gasketthicknesswhileitissubjectedtoincreasingcompressive
F868 Classification for Laminated Composite Gasket Mate-
loadsthatincludesasequenceorsequencesinwhichthegasket
rials
is unloaded followed by a resumption of the compressive load
until a target load is reached. The unloading rate is the same as
3. Terminology
theloadingrateunlessdifferentloadingandunloadingratesare
3.1 Definitions:
desired or when agreed upon by producer and user. This test is
3.1.1 final specimen thickness, T ,n—specimen thickness
2
performed at room temperature but may be performed at an
recorded at the target stress for the material type.
elevated temperature if desired or when agreed upon by
3.1.2 initial specimen thickness, T,n—initial specimen
1
producer and user.
thickness recorded on testing device.
1.5 The testing parameters for both PartsAand B including
3.1.3 original specimen thickness, T ,n—average of speci-
0
the gasket material type, gasket dimensions, platen type (RF or
men thickness measured in three places 120° apart before
FF), target load, loading time, recording interval used during
placing specimen on the testing device.
the test, loading and unloading rates, and temperature are to be
3.2 Symbols:
reported with the results.
3.2.1 T —original calibration ring thickness.
s0
1.6 Units—The values stated in either SI units or inch-
3.2.2 T —calibration ring thickness recorded on testing
pound units are to be regarded separately as standard. The s1
device after bringing platens together.
values stated in each system may not be exact equivalents;
1 2
This practice is under the jurisdiction ofASTM Committee F03 on Gaskets and For referenced ASTM standards, visit the ASTM website, www.astm.org, or
is the direct responsibility of Subcommittee F03.20 on Mechanical Test Methods. contact ASTM Customer Service at service@astm.org. For Annual Book of ASTM
Current edition approved Sept. 1, 2017. Published October 2017. DOI: 10.1520/ Standards volume information, refer to the standard’s Document Summary page on
F3270_F3270M-17. the ASTM website.
Copyright © ASTM International, 100 Barr Harbor Drive, PO Box C700, West Conshohocken, PA 19428-2959. United States
1
---------------------- Page: 1 ----------------------
F3270/
...


Questions, Comments and Discussion
Ask us and Technical Secretary will try to provide an answer. You can facilitate discussion about the standard in here.