ASTM E471-22
(Test Method)Standard Test Method for Obtaining Char Density Profile of Ablative Materials by Machining and Weighing
Standard Test Method for Obtaining Char Density Profile of Ablative Materials by Machining and Weighing
ABSTRACT
This test method covers the determination of the char density profile of a charred ablator. The total thickness of the char and degradation zone must be larger than the machining thicknesses required. Density variation throughout a charred ablator material is determined by successively measuring, machining, and weighing a sample of known size to obtain the density of the material removed by machining. The apparatus required for this method includes a laboratory balance capable of measuring to the nearest ten thousandth gram, and a machining technique capable of removing material in increments as small as a thousandth mm.
SCOPE
1.1 This test method covers the determination of the char density profile of a charred ablator that can be used with the following limitations:
1.1.1 The local surface imperfections must be removed, and the char must be able to be machined off in a plane parallel to the char-virgin material interface before the density profiles can be determined.
1.1.2 The char must be strong enough to withstand the machining and handling techniques employed.
1.1.3 The material should have orderly density variations. The total thickness of the char and degradation zone must be larger than the machining thicknesses required.
1.2 Units—The values stated in SI units are to be regarded as standard. No other units of measurement are included in this standard.
1.2.1 Exception—Certain inch-pound equivalent units are included in parentheses for information only.
1.3 This standard does not purport to address all of the safety concerns, if any, associated with its use. It is the responsibility of the user of this standard to establish appropriate safety, health, and environmental practices and determine the applicability of regulatory limitations prior to use.
1.4 This international standard was developed in accordance with internationally recognized principles on standardization established in the Decision on Principles for the Development of International Standards, Guides and Recommendations issued by the World Trade Organization Technical Barriers to Trade (TBT) Committee.
General Information
- Status
- Published
- Publication Date
- 31-Jul-2022
- Technical Committee
- E21 - Space Simulation and Applications of Space Technology
- Drafting Committee
- E21.08 - Thermal Protection
Overview
ASTM E471-22: Standard Test Method for Obtaining Char Density Profile of Ablative Materials by Machining and Weighing offers a detailed procedure for measuring the char density profile within charring ablator materials. Developed by ASTM Committee E21 on Space Simulation and Applications of Space Technology, this method supports the accurate assessment of density changes throughout the thickness of a charred ablator using precision machining and weighing techniques. The standard enables material engineers and researchers to evaluate the thermal performance and structural integrity of ablative materials, which are vital in applications exposed to extreme thermal environments.
Key Topics
- Char Density Profiling: The method systematically determines how density varies in an ablated (burnt or charred) material by successively removing thin layers via precise machining, measuring, and weighing.
- Sample Requirements: The ablator sample must have sufficient thickness, be free from significant surface imperfections, and possess sufficient structural integrity to withstand machining.
- Machining and Measurement: Specialized equipment is needed, such as:
- A laboratory balance capable of reading to 0.0001 grams
- Machining equipment capable of removing increments as small as 0.025 mm
- Environmental Controls: Accurate results depend on controlled humidity and temperature, as the char’s density can be affected by atmospheric moisture.
- Precision and Accuracy: The method offers high precision (errors generally less than 3%) when proper equipment and procedures are followed, with bias influenced by factors such as char friability, specimen size, and environmental conditions.
Applications
This standard test method is crucial for industries and research areas where ablation performance is of paramount importance. Typical applications include:
- Aerospace Engineering: Evaluation of thermal protection systems used on spacecraft, missiles, and reentry vehicles.
- Material Science Research: Characterization of newly developed heat shield materials or comparisons among commercial ablator products.
- Quality Assurance and Process Control: Verification of product consistency in manufacturing ablative components.
- Failure Analysis: Detailed investigation of ablator degradation following exposure to high-temperature or high-stress environments.
By enabling the measurement of density gradients from the charred exterior to the virgin interior of the ablator, stakeholders can better understand and optimize the ablation process for safer and more efficient material performance.
Related Standards
For those applying or referencing ASTM E471-22, the following standards may also be relevant:
- ASTM E285: Standard Test Method for Oxyacetylene Ablation Testing of Thermal Insulation Materials
- ASTM E162: Standard Test Method for Surface Flammability of Materials Using a Radiant Heat Energy Source
- ASTM D732: Standard Test Method for Shear Strength of Plastics by Punch Tool
- NASA Standards on Ablative Materials: Various procedures and reference documents for evaluating aerospace thermal protection materials.
These standards together form a robust foundation for the testing of charred ablator properties, fire resistance, and overall performance of materials destined for severe thermal environments.
Keywords: ASTM E471-22, char density profile, ablative materials, density measurement, thermal protection, aerospace materials testing, machining and weighing, material degradation, ablation testing.
Buy Documents
ASTM E471-22 - Standard Test Method for Obtaining Char Density Profile of Ablative Materials by Machining and Weighing
REDLINE ASTM E471-22 - Standard Test Method for Obtaining Char Density Profile of Ablative Materials by Machining and Weighing
Get Certified
Connect with accredited certification bodies for this standard

DEKRA North America
DEKRA certification services in North America.

Eagle Registrations Inc.
American certification body for aerospace and defense.

Element Materials Technology
Materials testing and product certification.
Sponsored listings
Frequently Asked Questions
ASTM E471-22 is a standard published by ASTM International. Its full title is "Standard Test Method for Obtaining Char Density Profile of Ablative Materials by Machining and Weighing". This standard covers: ABSTRACT This test method covers the determination of the char density profile of a charred ablator. The total thickness of the char and degradation zone must be larger than the machining thicknesses required. Density variation throughout a charred ablator material is determined by successively measuring, machining, and weighing a sample of known size to obtain the density of the material removed by machining. The apparatus required for this method includes a laboratory balance capable of measuring to the nearest ten thousandth gram, and a machining technique capable of removing material in increments as small as a thousandth mm. SCOPE 1.1 This test method covers the determination of the char density profile of a charred ablator that can be used with the following limitations: 1.1.1 The local surface imperfections must be removed, and the char must be able to be machined off in a plane parallel to the char-virgin material interface before the density profiles can be determined. 1.1.2 The char must be strong enough to withstand the machining and handling techniques employed. 1.1.3 The material should have orderly density variations. The total thickness of the char and degradation zone must be larger than the machining thicknesses required. 1.2 Units—The values stated in SI units are to be regarded as standard. No other units of measurement are included in this standard. 1.2.1 Exception—Certain inch-pound equivalent units are included in parentheses for information only. 1.3 This standard does not purport to address all of the safety concerns, if any, associated with its use. It is the responsibility of the user of this standard to establish appropriate safety, health, and environmental practices and determine the applicability of regulatory limitations prior to use. 1.4 This international standard was developed in accordance with internationally recognized principles on standardization established in the Decision on Principles for the Development of International Standards, Guides and Recommendations issued by the World Trade Organization Technical Barriers to Trade (TBT) Committee.
ABSTRACT This test method covers the determination of the char density profile of a charred ablator. The total thickness of the char and degradation zone must be larger than the machining thicknesses required. Density variation throughout a charred ablator material is determined by successively measuring, machining, and weighing a sample of known size to obtain the density of the material removed by machining. The apparatus required for this method includes a laboratory balance capable of measuring to the nearest ten thousandth gram, and a machining technique capable of removing material in increments as small as a thousandth mm. SCOPE 1.1 This test method covers the determination of the char density profile of a charred ablator that can be used with the following limitations: 1.1.1 The local surface imperfections must be removed, and the char must be able to be machined off in a plane parallel to the char-virgin material interface before the density profiles can be determined. 1.1.2 The char must be strong enough to withstand the machining and handling techniques employed. 1.1.3 The material should have orderly density variations. The total thickness of the char and degradation zone must be larger than the machining thicknesses required. 1.2 Units—The values stated in SI units are to be regarded as standard. No other units of measurement are included in this standard. 1.2.1 Exception—Certain inch-pound equivalent units are included in parentheses for information only. 1.3 This standard does not purport to address all of the safety concerns, if any, associated with its use. It is the responsibility of the user of this standard to establish appropriate safety, health, and environmental practices and determine the applicability of regulatory limitations prior to use. 1.4 This international standard was developed in accordance with internationally recognized principles on standardization established in the Decision on Principles for the Development of International Standards, Guides and Recommendations issued by the World Trade Organization Technical Barriers to Trade (TBT) Committee.
ASTM E471-22 is classified under the following ICS (International Classification for Standards) categories: 49.025.40 - Rubber and plastics. The ICS classification helps identify the subject area and facilitates finding related standards.
ASTM E471-22 is available in PDF format for immediate download after purchase. The document can be added to your cart and obtained through the secure checkout process. Digital delivery ensures instant access to the complete standard document.
Standards Content (Sample)
This international standard was developed in accordance with internationally recognized principles on standardization established in the Decision on Principles for the
Development of International Standards, Guides and Recommendations issued by the World Trade Organization Technical Barriers to Trade (TBT) Committee.
Designation:E471 −22
Standard Test Method for
Obtaining Char Density Profile of Ablative Materials by
Machining and Weighing
This standard is issued under the fixed designation E471; the number immediately following the designation indicates the year of
original adoption or, in the case of revision, the year of last revision. A number in parentheses indicates the year of last reapproval. A
superscript epsilon (´) indicates an editorial change since the last revision or reapproval.
INTRODUCTION
Theablationcharacteristicsofcharringmaterialsmustbewellknowninordertodesignthematerial
for a specific set of environmental conditions. The char density profile and the environmental
conditions under which it was formed can provide useful information about the ablation performance.
Amethod of obtaining the char density profile from a charred sample of material is described in the
following sections. Some chars are very friable and are easily broken before they can be measured.
Other chars are relatively strong and can be handled with ease. The type of char density profile
measurement described in this method is applicable if the char is strong enough to be machined
without breaking.
1. Scope ization established in the Decision on Principles for the
Development of International Standards, Guides and Recom-
1.1 This test method covers the determination of the char
mendations issued by the World Trade Organization Technical
density profile of a charred ablator that can be used with the
Barriers to Trade (TBT) Committee.
following limitations:
1.1.1 The local surface imperfections must be removed, and
2. Summary of Test Method
the char must be able to be machined off in a plane parallel to
the char-virgin material interface before the density profiles 2.1 Density variation throughout a charred ablator material
can be determined. is determined by successively measuring, machining, and
1.1.2 The char must be strong enough to withstand the weighing a sample of known size to obtain the density of the
machining and handling techniques employed. material removed by machining.
1.1.3 The material should have orderly density variations.
3. Apparatus
The total thickness of the char and degradation zone must be
larger than the machining thicknesses required.
3.1 The apparatus required for this method includes a
laboratory balance capable of measuring to the nearest 0.0001
1.2 Units—The values stated in SI units are to be regarded
as standard. No other units of measurement are included in this g, and a machining technique capable of removing material in
increments as small as 0.025 mm (0.001 in.). For example, flat
standard.
1.2.1 Exception—Certain inch-pound equivalent units are specimens can be machined with a surface grinder using a
medium fine grit ceramic grinding wheel of a soft grade
included in parentheses for information only.
dressed to the proper contour. Cylindrical specimens can be
1.3 This standard does not purport to address all of the
mounted in a lathe and the char can be removed with a sharp
safety concerns, if any, associated with its use. It is the
carbide or diamond tip tool.
responsibility of the user of this standard to establish appro-
priate safety, health, and environmental practices and deter-
4. Sampling
mine the applicability of regulatory limitations prior to use.
1.4 This international standard was developed in accor-
4.1 The charred sample selected for machining and weigh-
dance with internationally recognized principles on standard- ing should be taken from a representative section of the ablated
specimen where the environmental conditions are well known,
and where the surface is parallel to the char-virgin material
This test method is under the jurisdiction of ASTM Committee E21 on Space
Simulation andApplications of Space Technology and is the direct responsibility of
interface. Where large sections are available, this condition is
Subcommittee E21.08 on Thermal Protection.
usually met. For small samples which have been exposed to
Current edition approved Aug. 1, 2022. Published August 2022. Originally
varying environmental conditions along the length of the
approvedin1973.Lastpreviouseditionapprovedin2016asE471 – 96(2016).DOI:
10.1520/E0471-22. sample, the sample size will be smaller.
Copyright © ASTM International, 100 Barr Harbor Drive, PO Box C700, West Conshohocken, PA 19428-2959. United States
E471−22
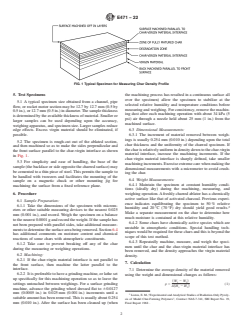
FIG. 1Typical Specimen for Measuring Char Density Profile
5. Test Specimens the machining process has resulted in a continuous surface all
over the specimen) allow the specimen to stabilize at the
5.1 A typical specimen size obtained from a channel, pipe
selected relative humidity and temperature conditions before
flow, or rocket motor section may be 12.7 by 12.7 mm (0.5 by
measuring and weighing. For consistency, remove the machin-
0.5 in.), or 12.7 mm (0.5 in.) in diameter.The sample thickness
ing dust after each machining operation with about 34 kPa (5
is determined by the available thickness of material. Smaller or
psi) air through a nozzle held about 25 mm (1 in.) from the
larger samples can be used depending upon the accuracy,
machined surface.
weighing apparatus, and specimen size. Larger samples reduce
edge effects. Excess virgin material should be eliminated, if 6.3 Dimensional Measurements:
possible. 6.3.1 The increment of material removed between weigh-
ings is usually 0.254 mm (0.010 in.) depending upon the total
5.2 The specimen is rough-cut out of the ablated section,
char thickness and the uniformity of the charred specimen. If
and then machined so as to make the sides perpendicular and
the char is relatively uniform in density down to the char-virgin
the front surface parallel to the char-virgin interface as shown
material interface, increase the machining increments. If the
in Fig. 1.
char-virgin material interface is sharply defined, take smaller
5.3 For simplicity and ease of handling, th
...
This document is not an ASTM standard and is intended only to provide the user of an ASTM standard an indication of what changes have been made to the previous version. Because
it may not be technically possible to adequately depict all changes accurately, ASTM recommends that users consult prior editions as appropriate. In all cases only the current version
of the standard as published by ASTM is to be considered the official document.
Designation: E471 − 96 (Reapproved 2016) E471 − 22
Standard Test Method for
Obtaining Char Density Profile of Ablative Materials by
Machining and Weighing
This standard is issued under the fixed designation E471; the number immediately following the designation indicates the year of
original adoption or, in the case of revision, the year of last revision. A number in parentheses indicates the year of last reapproval. A
superscript epsilon (´) indicates an editorial change since the last revision or reapproval.
INTRODUCTION
The ablation characteristics of charring materials must be well known in order to design the material
for a specific set of environmental conditions. The char density profile and the environmental
conditions under which it was formed can provide useful information about the ablation performance.
A method of obtaining the char density profile from a charred sample of material is described in the
following sections. Some chars are very friable and are easily broken before they can be measured.
Other chars are relatively strong and can be handled with ease. The type of char density profile
measurement described in this method is applicable if the char is strong enough to be machined
without breaking.
1. Scope
1.1 This test method covers the determination of the char density profile of a charred ablator that can be used with the following
limitations:
1.1.1 The local surface imperfections must be removed, and the char must be able to be machined off in a plane parallel to the
char-virgin material interface before the density profiles can be determined.
1.1.2 The char must be strong enough to withstand the machining and handling techniques employed.
1.1.3 The material should have orderly density variations. The total thickness of the char and degradation zone must be larger than
the machining thicknesses required.
1.2 Units—The values stated in SI units are to be regarded as standard. No other units of measurement are included in this
standard.
1.2.1 Exception—Certain inch-pound equivalent units are included in parentheses for information only.
1.3 This standard does not purport to address all of the safety concerns, if any, associated with its use. It is the responsibility
of the user of this standard to establish appropriate safety safety, health, and healthenvironmental practices and determine the
applicability of regulatory limitations prior to use.
1.4 This international standard was developed in accordance with internationally recognized principles on standardization
established in the Decision on Principles for the Development of International Standards, Guides and Recommendations issued
by the World Trade Organization Technical Barriers to Trade (TBT) Committee.
This test method is under the jurisdiction of ASTM Committee E21 on Space Simulation and Applications of Space Technology and is the direct responsibility of
Subcommittee E21.08 on Thermal Protection.
Current edition approved April 1, 2016Aug. 1, 2022. Published April 2016August 2022. Originally approved in 1973. Last previous edition approved in 20112016 as
E471 – 96 (2011).(2016). DOI: 10.1520/E0471-96R16.10.1520/E0471-22.
Copyright © ASTM International, 100 Barr Harbor Drive, PO Box C700, West Conshohocken, PA 19428-2959. United States
E471 − 22
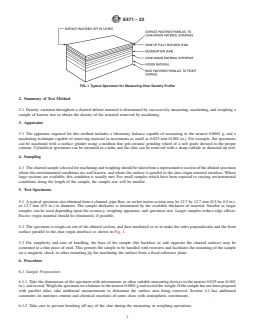
FIG. 1 Typical Specimen for Measuring Char Density Profile
2. Summary of Test Method
2.1 Density variation throughout a charred ablator material is determined by successively measuring, machining, and weighing a
sample of known size to obtain the density of the material removed by machining.
3. Apparatus
3.1 The apparatus required for this method includes a laboratory balance capable of measuring to the nearest 0.0001 g, and a
machining technique capable of removing material in increments as small as 0.025 mm (0.001 in.). For example, flat specimens
can be machined with a surface grinder using a medium fine grit ceramic grinding wheel of a soft grade dressed to the proper
contour. Cylindrical specimens can be mounted in a lathe and the char can be removed with a sharp carbide or diamond tip tool.
4. Sampling
4.1 The charred sample selected for machining and weighing should be taken from a representative section of the ablated specimen
where the environmental conditions are well known, and where the surface is parallel to the char-virgin material interface. Where
large sections are available, this condition is usually met. For small samples which have been exposed to varying environmental
conditions along the length of the sample, the sample size will be smaller.
5. Test Specimens
5.1 A typical specimen size obtained from a channel, pipe flow, or rocket motor section may be 12.7 by 12.7 mm (0.5 by 0.5 in.),
or 12.7 mm (0.5 in.) in diameter. The sample thickness is determined by the available thickness of material. Smaller or larger
samples can be used depending upon the accuracy, weighing apparatus, and specimen size. Larger samples reduce edge effects.
Excess virgin material should be eliminated, if possible.
5.2 The specimen is rough-cut out of the ablated section, and then machined so as to make the sides perpendicular and the front
surface parallel to the char-virgin interface as shown in Fig. 1.
5.3 For simplicity and ease of handling, the base of the sample (the backface or side opposite the charred surface) may be
cemented to a thin piece of steel. This permits the sample to be handled with tweezers and facilitates the mounting of the sample
on a magnetic chuck or other mounting jig for machining the surface from a fixed reference plane.
6. Procedure
6.1 Sample Preparation:
6.1.1 Take the dimensions of the specimen with micrometers or other suitable measuring devices to the nearest 0.025 mm (0.001
in.), and record. Weigh the specimen on a balance to the nearest 0.0001 g and record the weight. If the sample has not been prepared
with parallel sides, take additional measurements to determine the surface area being removed. Section 6.4 has additional
comments on moistur
...



Questions, Comments and Discussion
Ask us and Technical Secretary will try to provide an answer. You can facilitate discussion about the standard in here.
Loading comments...