ASTM B649-95
(Specification)Standard Specification for Ni-Fe-Cr-Mo-Cu Low-Carbon Alloy (UNS N08904), Ni-Fe-Cr-Mo-Cu-N Low-Carbon Alloys (UNS N08925, UNS N08031, and UNS N08926), and Cr-Ni-Fe-N Low-Carbon Alloy (UNS R20033) Bar and Wire
Standard Specification for Ni-Fe-Cr-Mo-Cu Low-Carbon Alloy (UNS N08904), Ni-Fe-Cr-Mo-Cu-N Low-Carbon Alloys (UNS N08925, UNS N08031, and UNS N08926), and Cr-Ni-Fe-N Low-Carbon Alloy (UNS R20033) Bar and Wire
SCOPE
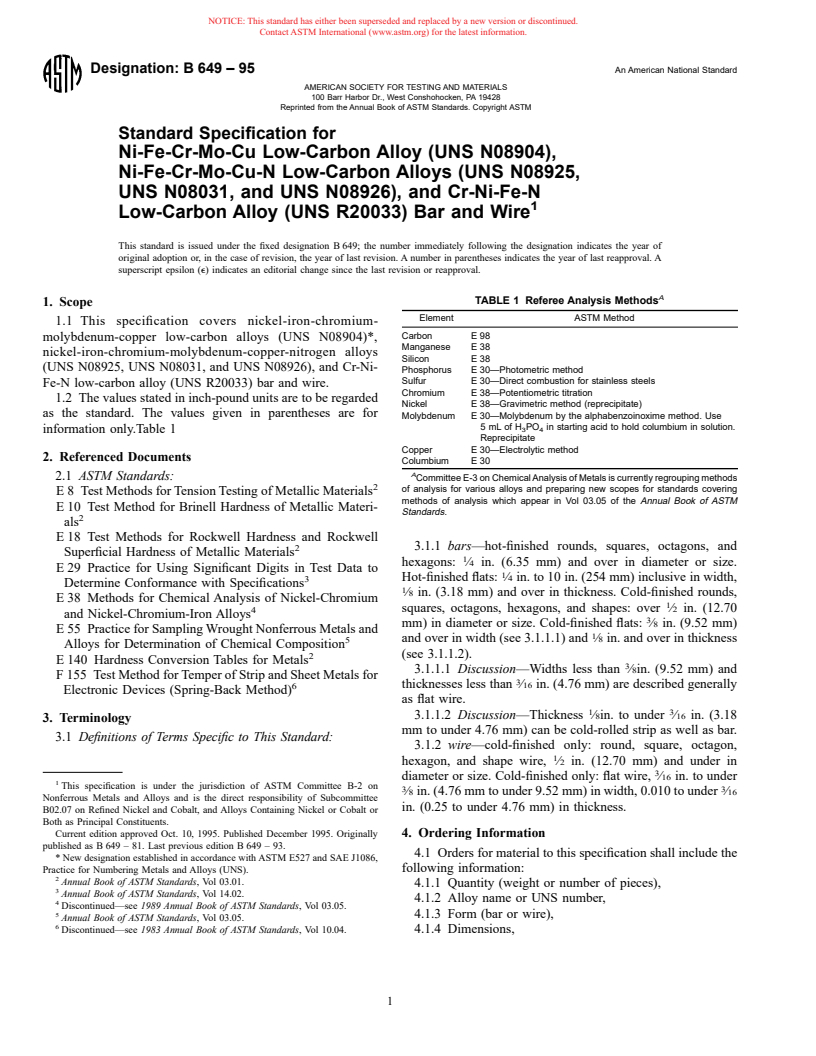
1.1 This specification covers nickel-iron-chromium-molybdenum-copper low-carbon alloys (UNS N08904)*, nickel-iron-chromium-molybdenum-copper-nitrogen alloys (UNS N08925, UNS N08031, and UNS N08926), and Cr-Ni-Fe-N low-carbon alloy (UNS R20033) bar and wire.
1.2 The values stated in inch-pound units are to be regarded as the standard. The values given in parentheses are for information only.
General Information
Relations
Buy Standard
Standards Content (Sample)
Designation: B 649 – 95 An American National Standard
AMERICAN SOCIETY FOR TESTING AND MATERIALS
100 Barr Harbor Dr., West Conshohocken, PA 19428
Reprinted from the Annual Book of ASTM Standards. Copyright ASTM
Standard Specification for
Ni-Fe-Cr-Mo-Cu Low-Carbon Alloy (UNS N08904),
Ni-Fe-Cr-Mo-Cu-N Low-Carbon Alloys (UNS N08925,
UNS N08031, and UNS N08926), and Cr-Ni-Fe-N
1
Low-Carbon Alloy (UNS R20033) Bar and Wire
This standard is issued under the fixed designation B 649; the number immediately following the designation indicates the year of
original adoption or, in the case of revision, the year of last revision. A number in parentheses indicates the year of last reapproval. A
superscript epsilon (e) indicates an editorial change since the last revision or reapproval.
A
TABLE 1 Referee Analysis Methods
1. Scope
Element ASTM Method
1.1 This specification covers nickel-iron-chromium-
Carbon E98
molybdenum-copper low-carbon alloys (UNS N08904)*,
Manganese E38
nickel-iron-chromium-molybdenum-copper-nitrogen alloys
Silicon E38
(UNS N08925, UNS N08031, and UNS N08926), and Cr-Ni-
Phosphorus E 30—Photometric method
Sulfur E 30—Direct combustion for stainless steels
Fe-N low-carbon alloy (UNS R20033) bar and wire.
Chromium E 38—Potentiometric titration
1.2 The values stated in inch-pound units are to be regarded
Nickel E 38—Gravimetric method (reprecipitate)
as the standard. The values given in parentheses are for
Molybdenum E 30—Molybdenum by the alphabenzoinoxime method. Use
5mLofH PO in starting acid to hold columbium in solution.
3 4
information only.Table 1
Reprecipitate
Copper E 30—Electrolytic method
2. Referenced Documents
Columbium E 30
A
2.1 ASTM Standards:
Committee E-3 on Chemical Analysis of Metals is currently regrouping methods
2
of analysis for various alloys and preparing new scopes for standards covering
E 8 Test Methods for Tension Testing of Metallic Materials
methods of analysis which appear in Vol 03.05 of the Annual Book of ASTM
E 10 Test Method for Brinell Hardness of Metallic Materi-
Standards.
2
als
E 18 Test Methods for Rockwell Hardness and Rockwell
3.1.1 bars—hot-finished rounds, squares, octagons, and
2
Superficial Hardness of Metallic Materials
1
hexagons: ⁄4 in. (6.35 mm) and over in diameter or size.
E 29 Practice for Using Significant Digits in Test Data to
1
Hot-finished flats: ⁄4 in. to 10 in. (254 mm) inclusive in width,
3
Determine Conformance with Specifications
1
⁄8 in. (3.18 mm) and over in thickness. Cold-finished rounds,
E 38 Methods for Chemical Analysis of Nickel-Chromium
1
squares, octagons, hexagons, and shapes: over ⁄2 in. (12.70
4
and Nickel-Chromium-Iron Alloys
3
mm) in diameter or size. Cold-finished flats: ⁄8 in. (9.52 mm)
E 55 Practice for Sampling Wrought Nonferrous Metals and
1
and over in width (see 3.1.1.1) and ⁄8 in. and over in thickness
5
Alloys for Determination of Chemical Composition
2 (see 3.1.1.2).
E 140 Hardness Conversion Tables for Metals
3
3.1.1.1 Discussion—Widths less than ⁄8in. (9.52 mm) and
F 155 Test Method for Temper of Strip and Sheet Metals for
3
6 thicknesses less than ⁄16 in. (4.76 mm) are described generally
Electronic Devices (Spring-Back Method)
as flat wire.
1 3
3.1.1.2 Discussion—Thickness ⁄8in. to under ⁄16 in. (3.18
3. Terminology
mm to under 4.76 mm) can be cold-rolled strip as well as bar.
3.1 Definitions of Terms Specific to This Standard:
3.1.2 wire—cold-finished only: round, square, octagon,
1
hexagon, and shape wire, ⁄2 in. (12.70 mm) and under in
3
diameter or size. Cold-finished only: flat wire, ⁄16 in. to under
1
This specification is under the jurisdiction of ASTM Committee B-2 on
3 3
⁄8 in. (4.76 mm to under 9.52 mm) in width, 0.010 to under ⁄16
Nonferrous Metals and Alloys and is the direct responsibility of Subcommittee
in. (0.25 to under 4.76 mm) in thickness.
B02.07 on Refined Nickel and Cobalt, and Alloys Containing Nickel or Cobalt or
Both as Principal Constituents.
Current edition approved Oct. 10, 1995. Published December 1995. Originally 4. Ordering Information
published as B 649 – 81. Last previous edition B 649 – 93.
4.1 Orders for material to this specification shall include the
* New designation established in accordance with ASTM E527 and SAE J1086,
following information:
Practice for Numbering Metals and Alloys (UNS).
2
Annual Book of ASTM Standards, Vol 03.01.
4.1.1 Quantity (weight or number of pieces),
3
Annual Book of ASTM Standards, Vol 14.02.
4.1.2 Alloy name or UNS number,
4
Discontinued—see 1989 Annual Book of ASTM Standards, Vol 03.05.
5
4.1.3 Form (bar or wire),
Annual Book of ASTM Standards, Vol 03.05.
6
Discontinued—see 1983 Annual Book of ASTM Standards, Vol 10.04. 4.1.4 Dimensions,
1
---------------------- Page: 1 ----------------------
B 649
TABLE 3 Product Analysis Tolerances
4.1.5 Finish (Section 9),
4.1.6 ASTM designation and year of issue, Tolerances Over the Max Limit or Under the Min Limit, %
4.1.7 Exceptions to the specification or special require- Element
UNS N08904
UNS N08031 UNS N08926 UNS R20
...


Questions, Comments and Discussion
Ask us and Technical Secretary will try to provide an answer. You can facilitate discussion about the standard in here.