ASTM D2979-01(2009)
(Test Method)Standard Test Method for Pressure-Sensitive Tack of Adhesives Using an Inverted Probe Machine
Standard Test Method for Pressure-Sensitive Tack of Adhesives Using an Inverted Probe Machine
SIGNIFICANCE AND USE
This test method provides a quantitative measure of the pressure-sensitive tack of the adhesive.
The method is designed for the adhesive mass itself and is suitable for measuring the tack of pressure-sensitive adhesives for use on both rigid and flexible backings.
This test method is suitable for quality control and research purposes.
SCOPE
1.1 This test method covers measurement of the pressure-sensitive tack of adhesives. This test method is applicable to those adhesives which form a bond of measurable strength rapidly upon contact with another surface and which can be removed from that surface cleanly, that is, without leaving a residue visible to the eye. For such adhesives, tack may be measured as the force required to separate an adhesive and the adherend at the interface shortly after they have been brought into contact under a defined load of known duration at a specified temperature.
1.2 The values stated in SI units are to be regarded as the standard. The values given in parentheses are for information only.
1.3 This standard does not purport to address all of the safety concerns, if any, associated with its use. It is the responsibility of the user of this standard to establish appropriate safety and health practices and determine the applicability of regulatory limitations prior to use.
General Information
Relations
Buy Standard
Standards Content (Sample)
NOTICE: This standard has either been superseded and replaced by a new version or withdrawn.
Contact ASTM International (www.astm.org) for the latest information
Designation: D2979 − 01(Reapproved 2009)
Standard Test Method for
Pressure-Sensitive Tack of Adhesives Using an Inverted
Probe Machine
This standard is issued under the fixed designation D2979; the number immediately following the designation indicates the year of
original adoption or, in the case of revision, the year of last revision.Anumber in parentheses indicates the year of last reapproval.A
superscript epsilon (´) indicates an editorial change since the last revision or reapproval.
1. Scope 4. Summary of Test Method
4.1 This test method involves bringing the tip of a cleaned
1.1 This test method covers measurement of the pressure-
probe of defined surface roughness into contact with the
sensitive tack of adhesives. This test method is applicable to
adhesiveatacontrolledrate,underafixedpressure,forashort
those adhesives which form a bond of measurable strength
time, at a given temperature; and subsequently breaking the
rapidly upon contact with another surface and which can be
bond formed between the probe and adhesive, also at a
removed from that surface cleanly, that is, without leaving a
controlled rate. Tack is measured as the maximum force
residue visible to the eye. For such adhesives, tack may be
required in breaking the adhesive bond.
measured as the force required to separate an adhesive and the
adherend at the interface shortly after they have been brought
5. Significance and Use
into contact under a defined load of known duration at a
specified temperature. 5.1 This test method provides a quantitative measure of the
pressure-sensitive tack of the adhesive.
1.2 The values stated in SI units are to be regarded as the
5.2 The method is designed for the adhesive mass itself and
standard. The values given in parentheses are for information
is suitable for measuring the tack of pressure-sensitive adhe-
only.
sives for use on both rigid and flexible backings.
1.3 This standard does not purport to address all of the
5.3 This test method is suitable for quality control and
safety concerns, if any, associated with its use. It is the
research purposes.
responsibility of the user of this standard to establish appro-
priate safety and health practices and determine the applica-
6. Apparatus
bility of regulatory limitations prior to use.
6.1 Probe—A Type 304 stainless steel rod, 5.0 mm (0.197
in.)indiameter,machinedatoneendof90°tothelongitudinal
2. Referenced Documents
axis.Thetipisfinishedtoasurfaceroughnessofnotmorethan
2.1 ASTM Standards:
500 or less than 250 nm (20 to 10 µin.) rms as measured by a
D907Terminology of Adhesives
surface-measuring device.
E4Practices for Force Verification of Testing Machines
NOTE 1—When the adhesive is supported on flexible backings, or is
E171Practice for Conditioning and Testing Flexible Barrier
greater than 0.25 mm (0.010 in.) thick, a probe with a spherical crown of
Packaging
0.05 mm (0.002 in.) high, and with a 62.5-mm (2.5-in.) radius may be
used.
3. Terminology
6.2 Pressure-Loading Weight—An annular ring whose in-
side diameter is slightly larger than the probe diameter. The
3.1 Definitions—Many terms in this test method are defined
ring weight is such that the pressure applied to the sample is
in Terminology D907.
9.79 6 0.10 kPa (1.42 psi).
NOTE 2—Contact pressures of 0.98, 1.96, or 4.90 kPa (0.14, 0.28 or
1 0.71 psi) may be obtained by employing annuli of different weight.These
This test method is under the jurisdiction of ASTM Committee D10 on
lower pressures as well as ones of 98 kPa (14.2 psi) or higher can be used
Packaging and is the direct responsibility of Subcommittee D10.14 on Tape and
to show the effect of pressure directly when tack is pressure-dependent.
Labels.
Current edition approved April 1, 2009. Published April 2009. Originally
6.3 Force Gage—A spring device with an indicator that
approved in 1971. Last previous edition approved in 2001 as D2979–01. DOI:
retains the maximum force reading until reset manually. The
10.1520/D2979-01R09.
For referenced ASTM standards, visit the ASTM website, www.astm.org, or
contact ASTM Customer Service at service@astm.org. For Annual Book of ASTM
Standards volume information, refer to the standard’s Document Summary page on An example of a suitable surface-measuring device is a Surfindicator manu-
the ASTM website. factured by Gould, Inc., Gage and Control Div., 4601 Arden Dr., El Monte, CA.
Copyright ©ASTM International, 100 Barr Harbor Drive, PO Box C700, West Conshohocken, PA19428-2959. United States
D2979 − 01 (2009)
spring characteristics is such that between 8.9 and 22.2 N (2 specimen large enough to cover the hole in the weight without
and5lb)arerequiredtoextenditthepermissible2.5mm(0.10 slippage during the test and small enough so that it does not
in.). Mount the probe directly on the force gage. adheretothecarriersupportingtheweight.Placetheweightin
the carrier.
NOTE 3—Other force-measuring devices such as strain gage load cells,
or devices with different force-deflection characteristics may be used in
NOTE 6—The proper relation of the supported adhesive on the ring
certain instances. Tack values obtained with these devices will differ in
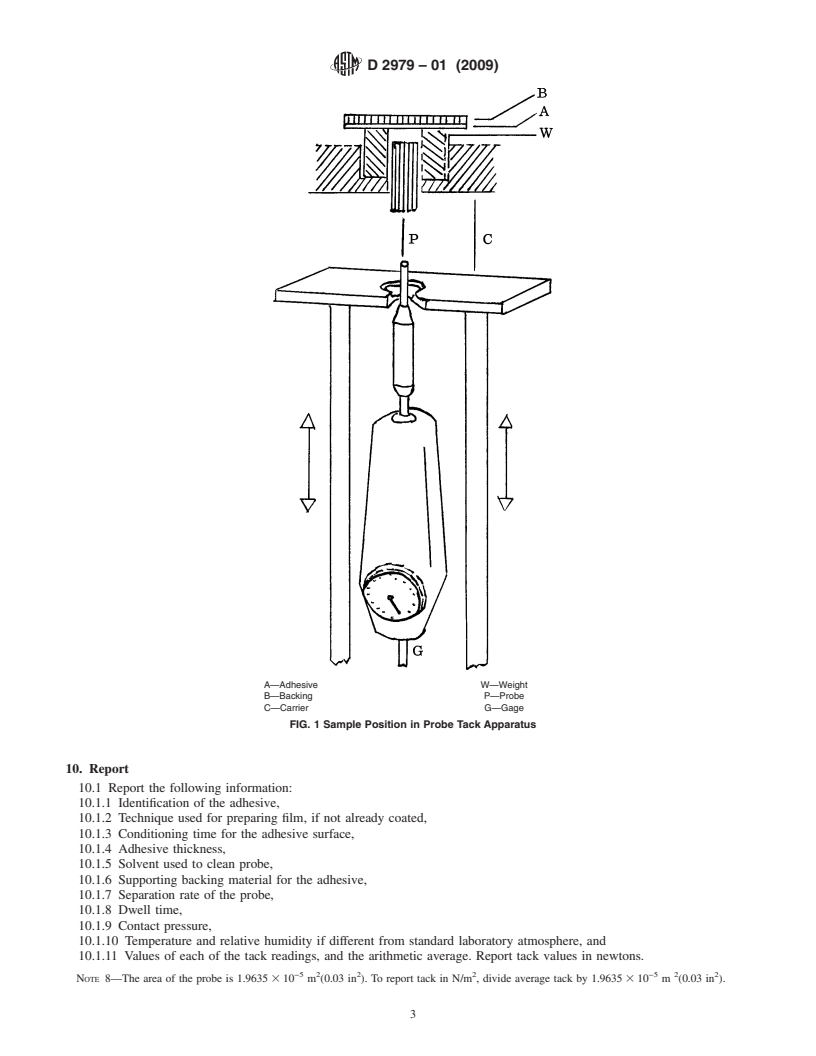
weighttotheprobeissketchedinFig.1.Onepossiblearrangementofthe
magnitude but will be related to standard values obtained with the
carrier and force gage is also illustrated.
specified gage.
9.3 At a speed of 10 6 0.1 mm/s, bring the probe into
6.4 Testing Machine —A mechanical system for bringing
contact with the adhesive. After a dwell time of 1.0 6 0.01 s
the adhesive into contact with the probe, automatically con-
separate the probe f
...
This document is not anASTM standard and is intended only to provide the user of anASTM standard an indication of what changes have been made to the previous version. Because
it may not be technically possible to adequately depict all changes accurately, ASTM recommends that users consult prior editions as appropriate. In all cases only the current version
of the standard as published by ASTM is to be considered the official document.
Designation:D2979–00 Designation: D 2979 – 01 (Reapproved 2009)
Standard Test Method for
Pressure-Sensitive Tack of Adhesives Using an Inverted
Probe Machine
This standard is issued under the fixed designation D2979; the number immediately following the designation indicates the year of
original adoption or, in the case of revision, the year of last revision.Anumber in parentheses indicates the year of last reapproval.A
superscript epsilon (´) indicates an editorial change since the last revision or reapproval.
1. Scope
1.1 This test method covers measurement of the pressure-sensitive tack of adhesives. This test method is applicable to those
adhesives which form a bond of measurable strength rapidly upon contact with another surface and which can be removed from
that surface cleanly, that is, without leaving a residue visible to the eye. For such adhesives, tack may be measured as the force
requiredtoseparateanadhesiveandtheadherendattheinterfaceshortlyaftertheyhavebeenbroughtintocontactunderadefined
load of known duration at a specified temperature.
1.2 The values stated in SI units are to be regarded as the standard. The values given in parentheses are for information only.
1.3 This standard does not purport to address all of the safety concerns, if any, associated with its use. It is the responsibility
of the user of this standard to establish appropriate safety and health practices and determine the applicability of regulatory
limitations prior to use.
2. Referenced Documents
2.1 ASTM Standards:
D907 Terminology of Adhesives Terminology of Adhesives
E4 Practices for Force Verification of Testing Machines
E171 Specification for Standard Atmospheres for Conditioning and Testing Flexible Barrier Materials
3. Terminology
3.1 Definitions—Many terms in this test method are defined in Terminology D907.
4. Summary of Test Method
4.1 This test method involves bringing the tip of a cleaned probe of defined surface roughness into contact with the adhesive
at a controlled rate, under a fixed pressure, for a short time, at a given temperature; and subsequently breaking the bond formed
betweentheprobeandadhesive,alsoatacontrolledrate.Tackismeasuredasthemaximumforcerequiredinbreakingtheadhesive
bond.
5. Significance and Use
5.1 This test method provides a quantitative measure of the pressure-sensitive tack of the adhesive.
5.2 The method is designed for the adhesive mass itself and is suitable for measuring the tack of pressure-sensitive adhesives
for use on both rigid and flexible backings.
5.3 This test method is suitable for quality control and research purposes.
6. Apparatus
6.1 Probe—AType 304 stainless steel rod, 5.0 mm (0.197 in.) in diameter, machined at one end of 90° to the longitudinal axis.
The tip is finished to a surface roughness of not more than 500 or less than 250 nm (20 to 10 µin.) rms as measured by a
surface-measuring device.
This test method is under the jurisdiction of ASTM Committee D14 on Adhesives and is the direct responsibility of Subcommittee D14.50 on Hot-Melt and
Pressure-Sensitive Adhesives.
Current edition approved Nov. 10, 2000. Published January 2001. Originally published as D2979–71. Last previous edition D2979–95.on Hot Melt Pressure Sensitive
Archive Adhesives.
Current edition approved April 1, 2009. Published April 2009. Originally approved in 1971. Last previous edition approved in 2001 as D2979–01.
ForreferencedASTMstandards,visittheASTMwebsite,www.astm.org,orcontactASTMCustomerServiceatservice@astm.org.For Annual Book of ASTM Standards
, Vol 15.06.volume information, refer to the standard’s Document Summary page on the ASTM website.
Annual Book of ASTM Standards, Vol 15.09.
An example of a suitable surface-measuring device is a Surfindicator manufactured by Gould, Inc., Gage and Control Div., 4601 Arden Dr., El Monte, CA.
Copyright ©ASTM International, 100 Barr Harbor Drive, PO Box C700, West Conshohocken, PA19428-2959, United States.
D 2979 – 01 (2009)
NOTE 1—When the adhesive is supported on flexible backings, or is greater than 0.25 mm (0.010 in.) thick, a probe with a spherical crown of 0.05
mm (0.002 in.) high, and with a 62.5-mm (2.5-in.) radius may be used.
6.2 Pressure-Loading Weight—Anannularringwhoseinsidediameterisslightlylargerthantheprobediameter.Theringweight
is such that the pressure applied to the sample is 9.79 6 0.10 kPa (1.42 psi).
NOTE 2—Contact pressures of 0.98, 1.96, or 4.90 kPa (0.14, 0.28 or 0.71 psi) may be obtained by employing annuli of different weight. These lower
pressures as well as ones of 98 kPa (14.2 psi) or higher can be used to show the effect of pressure directly when tack is pressure-dependent.
6.3 Force Gage—A spring device with an indicator that retains the maximum force reading until reset manually. The spring
characteristics is such that between 8.9 and 22.2 N (2 and 5 lb) are required to extend it the permissible 2.5 mm (0.10 in.). Mount
the probe directly on the force gage.
NOTE 3—Other force-measuring devices such as strain gage load cells, or devices with different force-deflection characteristics may be used in certain
instances. Tack values obtained with these devices will differ in magnitude but will be related to standard values obtained with the specified gage.
6.4 Testing Machine —Amechanicalsystemforbringingtheadhesiveintocontactwiththeprobe,automaticallycontrollingthe
dwell time during which the adhesive and probe are in contact under pressure, and subsequently pulling the adhesive away from
the probe. The machine is capable of maintaining a constant crosshead speed of 10 6 0.1 mm/s (24 6 0.24 in./min), sensing
cont
...


Questions, Comments and Discussion
Ask us and Technical Secretary will try to provide an answer. You can facilitate discussion about the standard in here.