ASTM B483/B483M-13e1
(Specification)Standard Specification for Aluminum and Aluminum-Alloy Drawn Tube and Drawn Pipe for General Purpose Applications
Standard Specification for Aluminum and Aluminum-Alloy Drawn Tube and Drawn Pipe for General Purpose Applications
SCOPE
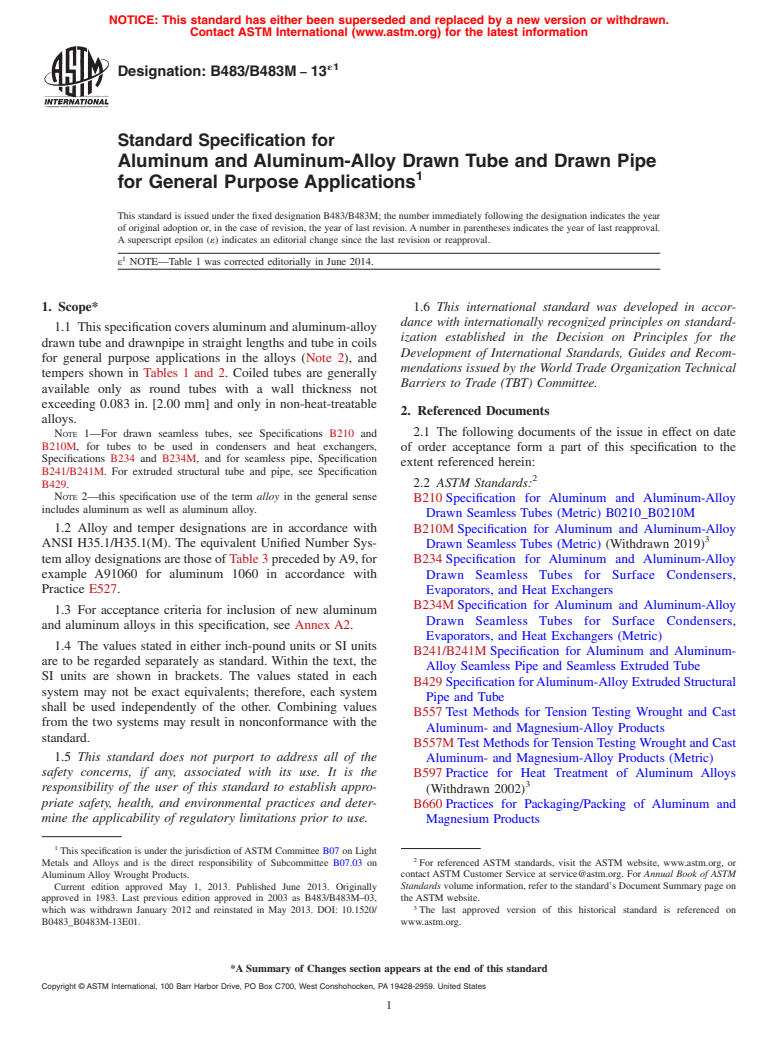
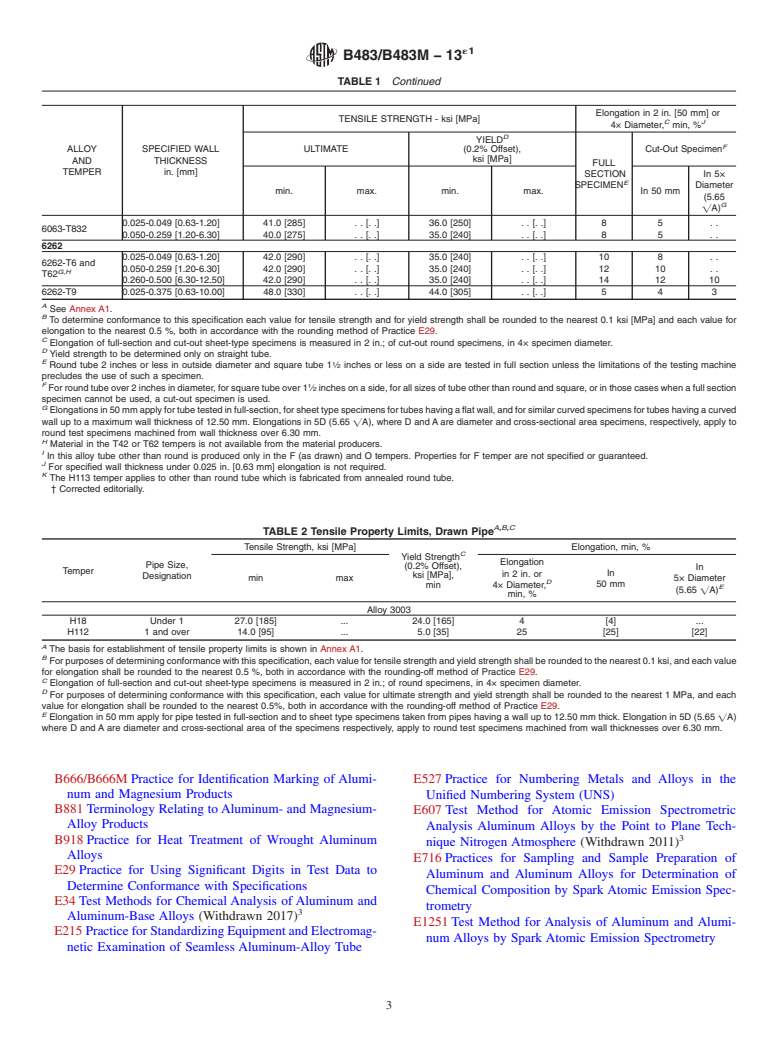
1.1 This specification covers aluminum and aluminum-alloy drawn tube and drawnpipe in straight lengths and tube in coils for general purpose applications in the alloys (Note 2), and tempers shown in Tables 1 and 2. Coiled tubes are generally available only as round tubes with a wall thickness not exceeding 0.083 in. [2.00 mm] and only in non-heat-treatable alloys.Note 1—For drawn seamless tubes, see Specifications B210 and B210M, for tubes to be used in condensers and heat exchangers, Specifications B234 and B234M, and for seamless pipe, Specification B241/B241M. For extruded structural tube and pipe, see Specification B429.Note 2—this specification use of the term alloy in the general sense includes aluminum as well as aluminum alloy.
1.2 Alloy and temper designations are in accordance with ANSI H35.1/H35.1(M). The equivalent Unified Number System alloy designations are those of Table 3 preceded by A9, for example A91060 for aluminum 1060 in accordance with Practice E527.
1.3 For acceptance criteria for inclusion of new aluminum and aluminum alloys in this specification, see Annex A2.
1.4 The values stated in either inch-pound units or SI units are to be regarded separately as standard. Within the text, the SI units are shown in brackets. The values stated in each system may not be exact equivalents; therefore, each system shall be used independently of the other. Combining values from the two systems may result in nonconformance with the standard.
1.5 This standard does not purport to address all of the safety concerns, if any, associated with its use. It is the responsibility of the user of this standard to establish appropriate safety and health practices and determine the applicability of regulatory limitations prior to use.
General Information
Relations
Buy Standard
Standards Content (Sample)
NOTICE: This standard has either been superseded and replaced by a new version or withdrawn.
Contact ASTM International (www.astm.org) for the latest information
´1
Designation: B483/B483M −13
Standard Specification for
Aluminum and Aluminum-Alloy Drawn Tube and Drawn Pipe
1
for General Purpose Applications
This standard is issued under the fixed designation B483/B483M; the number immediately following the designation indicates the year
of original adoption or, in the case of revision, the year of last revision.Anumber in parentheses indicates the year of last reapproval.
A superscript epsilon (´) indicates an editorial change since the last revision or reapproval.
1
ε NOTE—Table 1 was corrected editorially in June 2014.
1. Scope* 1.6 This international standard was developed in accor-
dance with internationally recognized principles on standard-
1.1 Thisspecificationcoversaluminumandaluminum-alloy
ization established in the Decision on Principles for the
drawn tube and drawnpipe in straight lengths and tube in coils
Development of International Standards, Guides and Recom-
for general purpose applications in the alloys (Note 2), and
mendations issued by the World Trade Organization Technical
tempers shown in Tables 1 and 2. Coiled tubes are generally
Barriers to Trade (TBT) Committee.
available only as round tubes with a wall thickness not
exceeding 0.083 in. [2.00 mm] and only in non-heat-treatable
2. Referenced Documents
alloys.
2.1 The following documents of the issue in effect on date
NOTE 1—For drawn seamless tubes, see Specifications B210 and
B210M, for tubes to be used in condensers and heat exchangers,
of order acceptance form a part of this specification to the
Specifications B234 and B234M, and for seamless pipe, Specification
extent referenced herein:
B241/B241M. For extruded structural tube and pipe, see Specification
2
2.2 ASTM Standards:
B429.
NOTE 2—this specification use of the term alloy in the general sense
B210Specification for Aluminum and Aluminum-Alloy
includes aluminum as well as aluminum alloy.
Drawn Seamless Tubes (Metric) B0210_B0210M
1.2 Alloy and temper designations are in accordance with
B210MSpecification for Aluminum and Aluminum-Alloy
3
ANSI H35.1/H35.1(M). The equivalent Unified Number Sys- Drawn Seamless Tubes (Metric) (Withdrawn 2019)
temalloydesignationsarethoseofTable3precededbyA9,for
B234Specification for Aluminum and Aluminum-Alloy
example A91060 for aluminum 1060 in accordance with Drawn Seamless Tubes for Surface Condensers,
Practice E527. Evaporators, and Heat Exchangers
B234MSpecification for Aluminum and Aluminum-Alloy
1.3 For acceptance criteria for inclusion of new aluminum
Drawn Seamless Tubes for Surface Condensers,
and aluminum alloys in this specification, see Annex A2.
Evaporators, and Heat Exchangers (Metric)
1.4 The values stated in either inch-pound units or SI units
B241/B241MSpecification for Aluminum and Aluminum-
are to be regarded separately as standard. Within the text, the
Alloy Seamless Pipe and Seamless Extruded Tube
SI units are shown in brackets. The values stated in each
B429SpecificationforAluminum-AlloyExtrudedStructural
system may not be exact equivalents; therefore, each system
Pipe and Tube
shall be used independently of the other. Combining values
B557Test Methods for Tension Testing Wrought and Cast
from the two systems may result in nonconformance with the
Aluminum- and Magnesium-Alloy Products
standard.
B557MTest Methods forTensionTestingWrought and Cast
1.5 This standard does not purport to address all of the
Aluminum- and Magnesium-Alloy Products (Metric)
safety concerns, if any, associated with its use. It is the
B597Practice for Heat Treatment of Aluminum Alloys
3
responsibility of the user of this standard to establish appro-
(Withdrawn 2002)
priate safety, health, and environmental practices and deter-
B660Practices for Packaging/Packing of Aluminum and
mine the applicability of regulatory limitations prior to use.
Magnesium Products
1
This specification is under the jurisdiction ofASTM Committee B07 on Light
2
Metals and Alloys and is the direct responsibility of Subcommittee B07.03 on For referenced ASTM standards, visit the ASTM website, www.astm.org, or
Aluminum Alloy Wrought Products. contact ASTM Customer Service at service@astm.org. For Annual Book of ASTM
Current edition approved May 1, 2013. Published June 2013. Originally Standards volume information, refer to the standard’s Document Summary page on
approved in 1983. Last previous edition approved in 2003 as B483/B483M–03, the ASTM website.
3
which was withdrawn January 2012 and reinstated in May 2013. DOI: 10.1520/ The last approved version of this historical standard is referenced on
B0483_B0483M-13E01. www.astm.org.
*A Summary of Changes section appears at the end of this standard
Copyright © ASTM International, 100 Barr Harbor Drive, PO Box C700, West Conshohocken, PA 19428-2959. United States
1
---------------------- Page: 1 ----------------------
´1
B483/B483M − 13
A,B
TABL
...
This document is not an ASTM standard and is intended only to provide the user of an ASTM standard an indication of what changes have been made to the previous version. Because
it may not be technically possible to adequately depict all changes accurately, ASTM recommends that users consult prior editions as appropriate. In all cases only the current version
of the standard as published by ASTM is to be considered the official document.
´1
Designation: B483/B483M − 13 B483/B483M − 13
Standard Specification for
Aluminum and Aluminum-Alloy Drawn Tube and Drawn Pipe
1
for General Purpose Applications
This standard is issued under the fixed designation B483/B483M; the number immediately following the designation indicates the year
of original adoption or, in the case of revision, the year of last revision. A number in parentheses indicates the year of last reapproval.
A superscript epsilon (´) indicates an editorial change since the last revision or reapproval.
1
ε NOTE—Table 1 was corrected editorially in June 2014.
1. Scope*
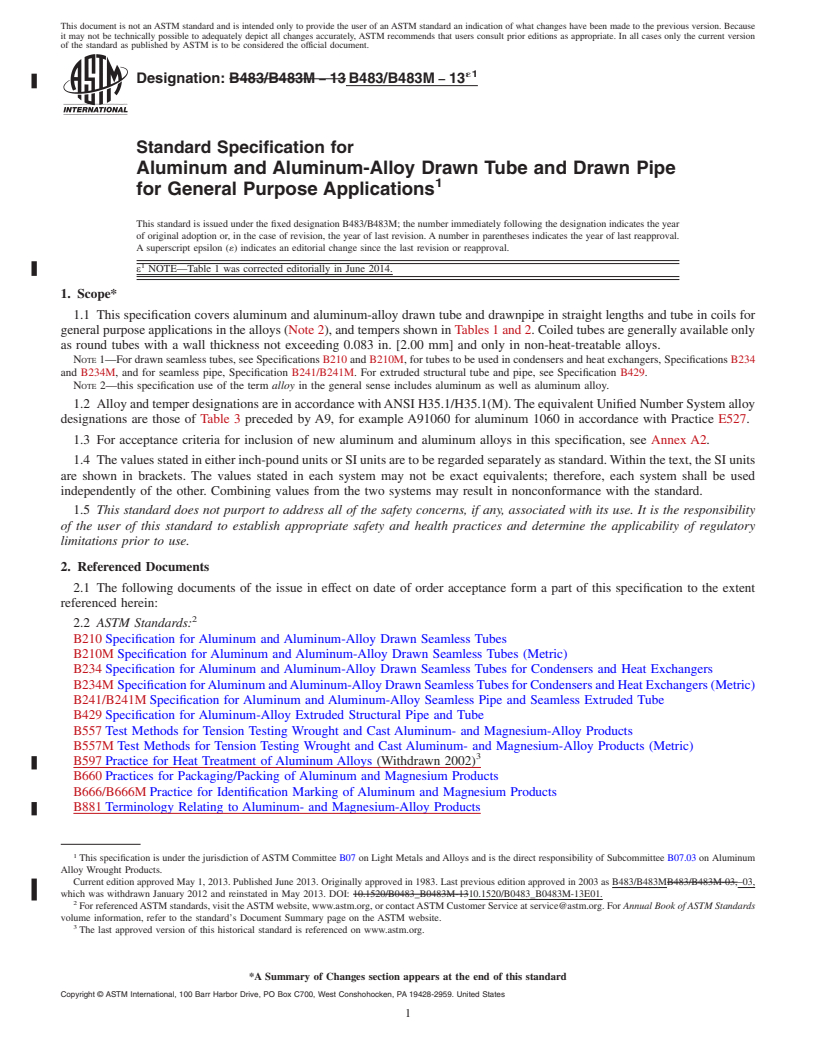
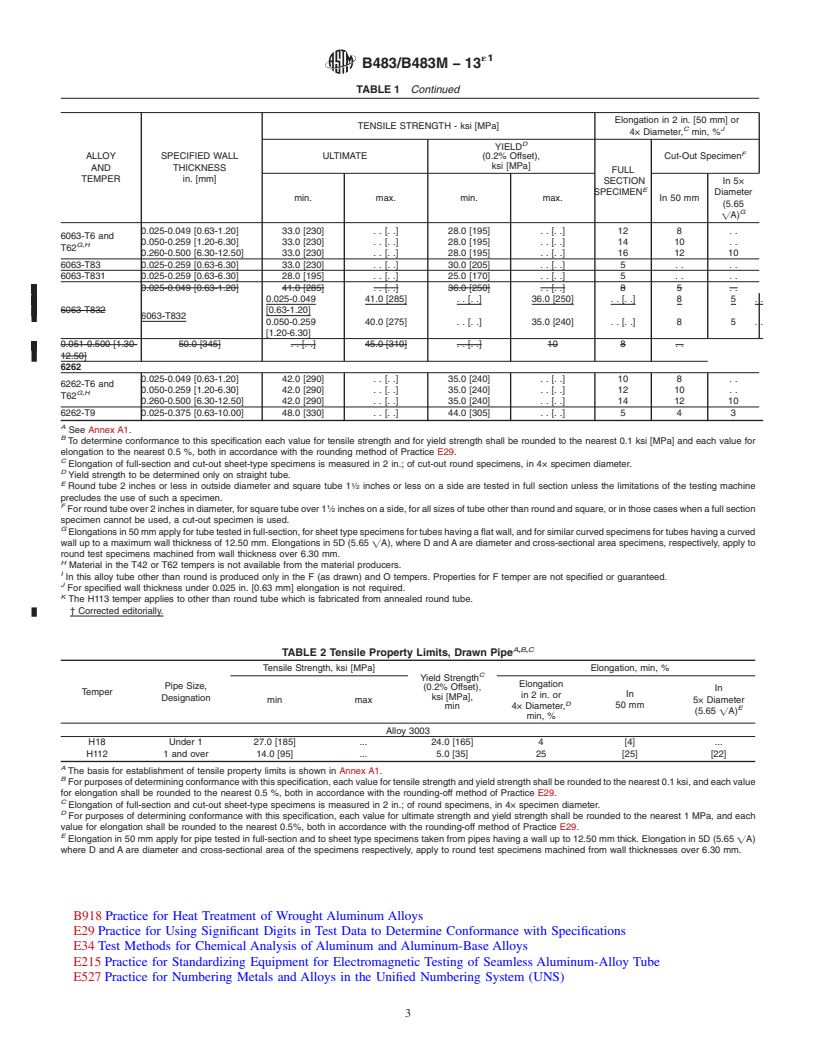
1.1 This specification covers aluminum and aluminum-alloy drawn tube and drawnpipe in straight lengths and tube in coils for
general purpose applications in the alloys (Note 2), and tempers shown in Tables 1 and 2. Coiled tubes are generally available only
as round tubes with a wall thickness not exceeding 0.083 in. [2.00 mm] and only in non-heat-treatable alloys.
NOTE 1—For drawn seamless tubes, see Specifications B210 and B210M, for tubes to be used in condensers and heat exchangers, Specifications B234
and B234M, and for seamless pipe, Specification B241/B241M. For extruded structural tube and pipe, see Specification B429.
NOTE 2—this specification use of the term alloy in the general sense includes aluminum as well as aluminum alloy.
1.2 Alloy and temper designations are in accordance with ANSI H35.1/H35.1(M). The equivalent Unified Number System alloy
designations are those of Table 3 preceded by A9, for example A91060 for aluminum 1060 in accordance with Practice E527.
1.3 For acceptance criteria for inclusion of new aluminum and aluminum alloys in this specification, see Annex A2.
1.4 The values stated in either inch-pound units or SI units are to be regarded separately as standard. Within the text, the SI units
are shown in brackets. The values stated in each system may not be exact equivalents; therefore, each system shall be used
independently of the other. Combining values from the two systems may result in nonconformance with the standard.
1.5 This standard does not purport to address all of the safety concerns, if any, associated with its use. It is the responsibility
of the user of this standard to establish appropriate safety and health practices and determine the applicability of regulatory
limitations prior to use.
2. Referenced Documents
2.1 The following documents of the issue in effect on date of order acceptance form a part of this specification to the extent
referenced herein:
2
2.2 ASTM Standards:
B210 Specification for Aluminum and Aluminum-Alloy Drawn Seamless Tubes
B210M Specification for Aluminum and Aluminum-Alloy Drawn Seamless Tubes (Metric)
B234 Specification for Aluminum and Aluminum-Alloy Drawn Seamless Tubes for Condensers and Heat Exchangers
B234M Specification for Aluminum and Aluminum-Alloy Drawn Seamless Tubes for Condensers and Heat Exchangers (Metric)
B241/B241M Specification for Aluminum and Aluminum-Alloy Seamless Pipe and Seamless Extruded Tube
B429 Specification for Aluminum-Alloy Extruded Structural Pipe and Tube
B557 Test Methods for Tension Testing Wrought and Cast Aluminum- and Magnesium-Alloy Products
B557M Test Methods for Tension Testing Wrought and Cast Aluminum- and Magnesium-Alloy Products (Metric)
3
B597 Practice for Heat Treatment of Aluminum Alloys (Withdrawn 2002)
B660 Practices for Packaging/Packing of Aluminum and Magnesium Products
B666/B666M Practice for Identification Marking of Aluminum and Magnesium Products
B881 Terminology Relating to Aluminum- and Magnesium-Alloy Products
1
This specification is under the jurisdiction of ASTM Committee B07 on Light Metals and Alloys and is the direct responsibility of Subcommittee B07.03 on Aluminum
Alloy Wrought Products.
Current edition approved May 1, 2013. Published June 2013. Originally approved in 1983. Last previous edition approved in 2003 as B483/B483MB483/B483M-03,–03,
which was withdrawn January 2012 and reinstated in May 2013. DOI: 10.1520/B0483_B0483M-1310.1520/B0483_B0483M-13E01.
2
For referenced ASTM standards, visit the ASTM website, www.astm.org, or contact ASTM Customer Service at service@astm.org. For Annual Book of ASTM Standards
volume information, refer to the standard’s Document Summary page on the ASTM website.
3
The last approved version of this historical standard is referenced on www.astm.org.
*A Summary of Changes section appears at the end of this standard
Copyright © ASTM International, 100 Barr Harbor Drive, PO Box C700, West Conshohocken, PA 19428-2959. United States
1
--
...


Questions, Comments and Discussion
Ask us and Technical Secretary will try to provide an answer. You can facilitate discussion about the standard in here.