ASTM A835-84(2000)
(Specification)Standard Specification for Sizes of Ferroalloys and Alloy Additives
Standard Specification for Sizes of Ferroalloys and Alloy Additives
SCOPE
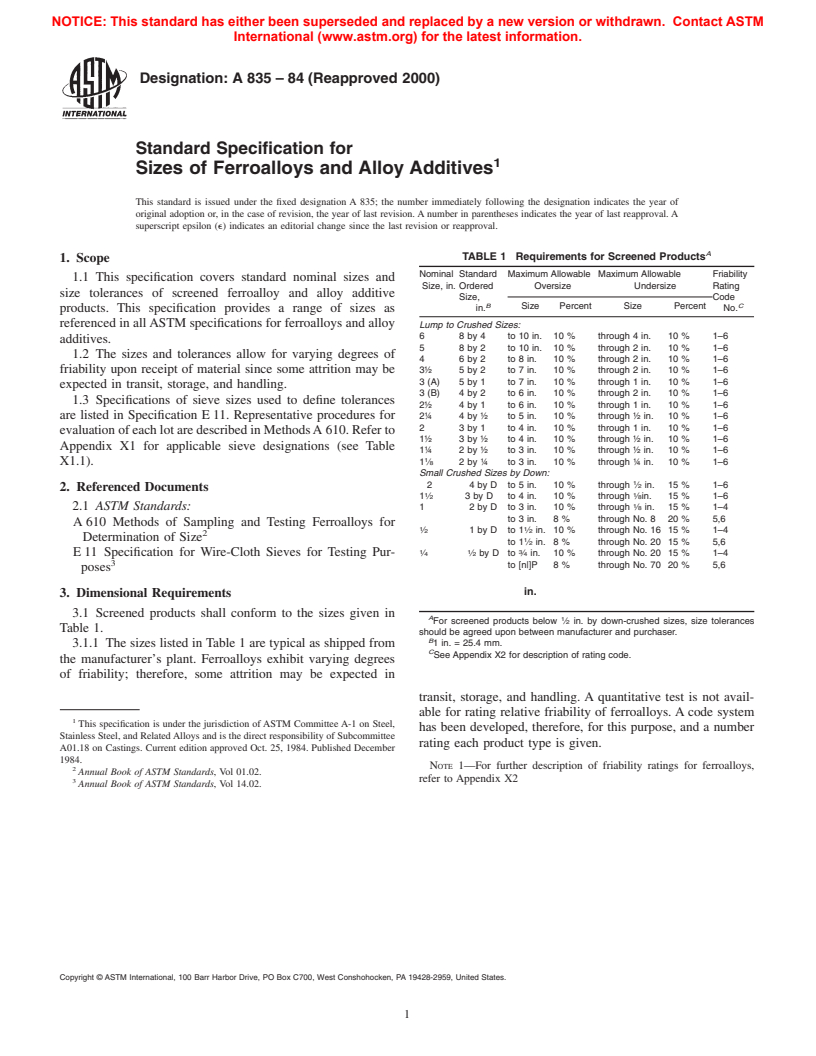
1.1 This specification covers standard nominal sizes and size tolerances of screened ferroalloy and alloy additive products. This specification provides a range of sizes as referenced in all ASTM specifications for ferroalloys and alloy additives.
1.2 The sizes and tolerances allow for varying degrees of friability upon receipt of material since some attrition may be expected in transit, storage, and handling.
1.3 Specifications of sieve sizes used to define tolerances are listed in Specification E11. Representative procedures for evaluation of each lot are described in Methods A610. Refer to Appendix X1 for applicable sieve designations.
General Information
Relations
Standards Content (Sample)
NOTICE: This standard has either been superseded and replaced by a new version or withdrawn. Contact ASTM
International (www.astm.org) for the latest information.
Designation: A 835 – 84 (Reapproved 2000)
Standard Specification for
Sizes of Ferroalloys and Alloy Additives
This standard is issued under the fixed designation A 835; the number immediately following the designation indicates the year of
original adoption or, in the case of revision, the year of last revision. A number in parentheses indicates the year of last reapproval. A
superscript epsilon (e) indicates an editorial change since the last revision or reapproval.
A
TABLE 1 Requirements for Screened Products
1. Scope
Nominal Standard Maximum Allowable Maximum Allowable Friability
1.1 This specification covers standard nominal sizes and
Size, in. Ordered Oversize Undersize Rating
size tolerances of screened ferroalloy and alloy additive
Size, Code
B C
Size Percent Size Percent
products. This specification provides a range of sizes as in. No.
referenced in allASTM specifications for ferroalloys and alloy Lump to Crushed Sizes:
6 8 by 4 to 10 in. 10 % through 4 in. 10 % 1–6
additives.
5 8 by 2 to 10 in. 10 % through 2 in. 10 % 1–6
1.2 The sizes and tolerances allow for varying degrees of
4 6 by 2 to 8 in. 10 % through 2 in. 10 % 1–6
friability upon receipt of material since some attrition may be
3½ 5 by 2 to 7 in. 10 % through 2 in. 10 % 1–6
3 (A) 5 by 1 to 7 in. 10 % through 1 in. 10 % 1–6
expected in transit, storage, and handling.
3 (B) 4 by 2 to 6 in. 10 % through 2 in. 10 % 1–6
1.3 Specifications of sieve sizes used to define tolerances
2½ 4 by 1 to 6 in. 10 % through 1 in. 10 % 1–6
are listed in Specification E 11. Representative procedures for 2¼ 4 by ½ to 5 in. 10 % through ½ in. 10 % 1–6
2 3 by 1 to 4 in. 10 % through 1 in. 10 % 1–6
evaluation of each lot are described in MethodsA 610. Refer to
1½ 3 by ½ to 4 in. 10 % through ½ in. 10 % 1–6
Appendix X1 for applicable sieve designations (see Table
1¼ 2 by ½ to 3 in. 10 % through ½ in. 10 % 1–6
X1.1). 1 ⁄8 2 by ¼ to 3 in. 10 % through ¼ in. 10 % 1–6
Small Crushed Sizes by Down:
2 4 by D to 5 in. 10 % through ⁄2 in. 15 % 1–6
2. Referenced Documents
1 1
1 ⁄2 3 by D to 4 in. 10 % through ⁄8in. 15 % 1–6
2.1 ASTM Standards: 1 2 by D to 3 in. 10 % through ⁄8 in. 15 % 1–4
to 3 in. 8 % through No. 8 20 % 5,6
A 610 Methods of Sampling and Testing Ferroalloys for
1 1
⁄2 1byD to 1 ⁄2 in. 10 % through No. 16 15 % 1–4
Determination of Size
to 1 ⁄2 in. 8 % through No. 20 15 % 5,6
1 1 3
E 11 Specification for Wire-Cloth Sieves for Testing Pur- ⁄4 ⁄2 by D to ⁄4 in. 10 % through No. 20 15 % 1–4
to [n|]P 8 % through No. 70 20 % 5,6
poses
in.
3. Dimensional Requirements
3.1 Screened products shall conform to the sizes given in
A
For screened products below ⁄2 in. by down-crushed sizes, size tolerances
Table 1.
should be agreed upon between manufacturer and purchaser.
B
1 in. = 25.4 mm.
3.1.1 The sizes listed in Table 1 are typical as shipped from
C
See Appendix X2 for description of rating code.
the manufacturer’s plant. Ferroalloys exhibit varying degrees
of friability; therefore, some attrition may be expected in
transit, storage, and handling. A quantitative test is not avail-
able for rating relative friability of ferroalloys. A code system
This specification is under the jurisdiction of ASTM Committee A-1 on Steel,
has been developed, therefore, for this purpose, and a number
Stainless Steel, and RelatedAlloys and is the dire
...


Questions, Comments and Discussion
Ask us and Technical Secretary will try to provide an answer. You can facilitate discussion about the standard in here.