ASTM D441-86(2002)
(Test Method)Standard Test Method of Tumbler Test for Coal
Standard Test Method of Tumbler Test for Coal
SCOPE
1.1 This test method covers the determination of the relative friability of a particular size of sized coal. It affords a means of measuring the liability of coal to break into smaller pieces when subjected to repeated handling at the mine or subsequently, by the distributor or by the consumer. This test method is serviceable for ascertaining the similarity of coals in respect to friability rather than for determining values within narrow limits to emphasize their dissimilarity. This test method also may serve to indicate the relative extent to which sized coals will suffer size degradation in certain mechanical feed devices. This test method may be used for differentiating between certain ranks and grades of coal, and therefore the test method is of service for coal classification purposes.
1.2 The values stated in inch-pound units shall be regarded as the standard. Mass may be expressed in metric values.
1.3 This standard does not purport to address all of the safety concerns, if any, associated with its use. It is the responsibility of the user of this standard to establish appropriate safety and health practices and determine the applicability of regulatory limitations prior to use.
General Information
Relations
Standards Content (Sample)
NOTICE: This standard has either been superseded and replaced by a new version or withdrawn.
Contact ASTM International (www.astm.org) for the latest information
Designation:D441–86(Reapproved 2002)
Standard Test Method of
Tumbler Test for Coal
This standard is issued under the fixed designation D441; the number immediately following the designation indicates the year of
original adoption or, in the case of revision, the year of last revision.Anumber in parentheses indicates the year of last reapproval.A
superscript epsilon (e) indicates an editorial change since the last revision or reapproval.
1. Scope and 7 ⁄4 in. in depth, inside measurements, such as is used for
pulverizing coal samples for analysis. The jar shall be fitted
1.1 Thistestmethodcoversthedeterminationoftherelative
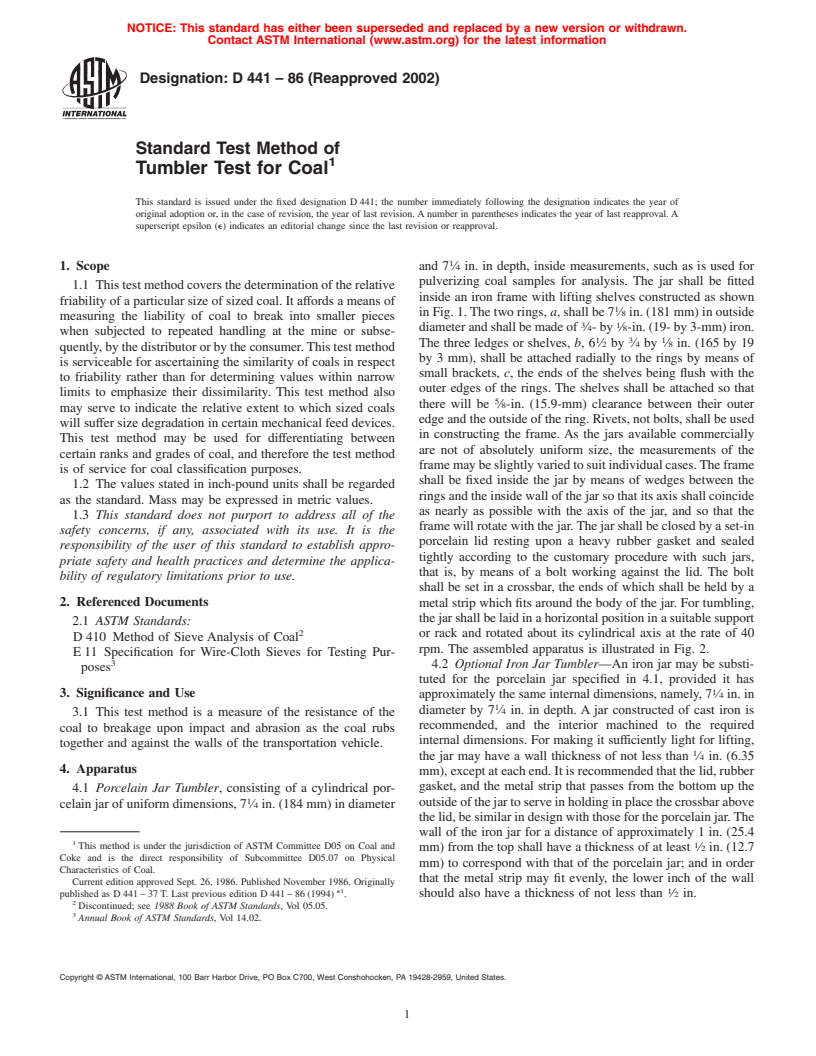
inside an iron frame with lifting shelves constructed as shown
friabilityofaparticularsizeofsizedcoal.Itaffordsameansof
inFig.1.Thetworings, a,shallbe7 ⁄8in.(181mm)inoutside
measuring the liability of coal to break into smaller pieces
3 1
diameterandshallbemadeof ⁄4-by ⁄8-in.(19-by3-mm)iron.
when subjected to repeated handling at the mine or subse-
1 3 1
The three ledges or shelves, b,6 ⁄2 by ⁄4 by ⁄8 in. (165 by 19
quently,bythedistributororbytheconsumer.Thistestmethod
by 3 mm), shall be attached radially to the rings by means of
is serviceable for ascertaining the similarity of coals in respect
small brackets, c, the ends of the shelves being flush with the
to friability rather than for determining values within narrow
outer edges of the rings. The shelves shall be attached so that
limits to emphasize their dissimilarity. This test method also
there will be ⁄8-in. (15.9-mm) clearance between their outer
may serve to indicate the relative extent to which sized coals
edgeandtheoutsideofthering.Rivets,notbolts,shallbeused
will suffer size degradation in certain mechanical feed devices.
in constructing the frame. As the jars available commercially
This test method may be used for differentiating between
are not of absolutely uniform size, the measurements of the
certain ranks and grades of coal, and therefore the test method
framemaybeslightlyvariedtosuitindividualcases.Theframe
is of service for coal classification purposes.
shall be fixed inside the jar by means of wedges between the
1.2 The values stated in inch-pound units shall be regarded
ringsandtheinsidewallofthejarsothatitsaxisshallcoincide
as the standard. Mass may be expressed in metric values.
as nearly as possible with the axis of the jar, and so that the
1.3 This standard does not purport to address all of the
framewillrotatewiththejar.Thejarshallbeclosedbyaset-in
safety concerns, if any, associated with its use. It is the
porcelain lid resting upon a heavy rubber gasket and sealed
responsibility of the user of this standard to establish appro-
tightly according to the customary procedure with such jars,
priate safety and health practices and determine the applica-
that is, by means of a bolt working against the lid. The bolt
bility of regulatory limitations prior to use.
shall be set in a crossbar, the ends of which shall be held by a
2. Referenced Documents metal strip which fits around the body of the jar. For tumbling,
thejarshallbelaidinahorizontalpositioninasuitablesupport
2.1 ASTM Standards:
or rack and rotated about its cylindrical axis at the rate of 40
D410 Method of Sieve Analysis of Coal
rpm. The assembled apparatus is illustrated in Fig. 2.
E11 Specification for Wire-Cloth Sieves for Testing Pur-
4.2 Optional Iron Jar Tumbler—An iron jar may be substi-
poses
tuted for the porcelain jar specified in 4.1, provided it has
3. Significance and Use
approximatelythesameinternaldimensions,namely,7 ⁄4in.in
diameter by 7 ⁄4 in. in depth. A jar constructed of cast iron is
3.1 This test method is a measure of the resistance of the
recommended, and the interior machined to the required
coal to breakage upon impact and abrasion as the coal rubs
internal dimensions. For making it sufficiently light for lifting,
together and against the walls of the transportation vehicle.
the jar may have a wall thickness of not less than ⁄4 in. (6.35
4. Apparatus
mm),exceptateachend.Itisrecommendedthatthelid,rubber
gasket, and the metal strip that passes from the bottom up the
4.1 Porcelain Jar Tumbler, consisting of a cylindrical por-
outsideofthejartoserveinholdinginplacethecrossbarabove
celainjarofuniformdimensions,7 ⁄4in.(184mm)indiameter
thelid,besimilarindesignwiththosefortheporcelainjar.The
wall of the iron jar for a distance of approximately 1 in. (25.4
This method is under the jurisdiction of ASTM Committee D05 on Coal and
mm) from the top shall have a thickness of at least ⁄2 in. (12.7
Coke and is the direct responsibility of Subcommittee D05.07 on Physical
mm) to correspond with that of the porcelain jar; and in order
Characteristics of Coal.
that the metal strip may fit evenly, the lower inch of the wall
Current edition approved Sept. 26, 1986. Published November 1986. Originally
e1
published as D441–37T. Last previous edition D441–86(1994) . should also have a thickness of not less than ⁄2 in.
Discontinued; see 1988 Book of ASTM Standards, Vol 05.05.
Annual Book of ASTM Standards, Vol 14.02.
Copyright © ASTM International, 100 Barr Harbor Drive, PO Box C700, West Conshohocken, PA 19428-2959, United States.
D441
4.4 Balance—The balance used for weighing the sample
shall be sensitive to 1 g.
5. Sampling
5.1 Collection of Gross Sample—Collect the gross sample
of coal in accordance with Section 5 of Method D410.
5.2 Preparation of Sample:
5.2.1 Make a preliminary sieving of a representative por-
tion, approximately 100 lbs (45 kg), of the gross sample, using
square-holesieveswith1.06-and1.50-in.(26.9-and38.1-mm)
openings.Ifthispreliminarysievingindicatesthatthepiecesof
coal are mostly smaller than 1.50 in., sieve successive repre-
sentative portions of the gross sample until at least 25 lbs (11
kg) of the 1.06- to 1.50-in. size are obtained. If most of the
pieces obtained by the preliminary sieving are larger than 1.50
in., conduct sieving of representative portions of the gross
sample until at least 50 lbs (23 kg) of the sieved material
remaining on the 1.06-in. sieve are available. Then break the
pieces so obtained that are larger than 1.50 in. with a hammer
until they pass the 1.50-in. sieve, avoiding as much as possible
Metric Equivalents
1 5 3 1 1
the production of pieces smaller than 1.06 in. Should the
in. ⁄8 ⁄8 ⁄4 6 ⁄2 7 ⁄8
(mm) (3.18) (15.9) (19.0) (165) (181)
combined weights of the 1.06- to 1.50-in. size, obtained by
sieving before and after hammer breakage of the larger pieces,
FIG. 1 Steel Frame Used in Jar Mill
belessthantherequired25lbs,augmenttheamountbyfurther
sieving and breakage of additional representative portions, or
the remainder of the gross sample, taking care to discard all
pieces in which noticeable cracks have developed by hammer
breakage. Take care also to provide pieces covering the whole
range of the 1.06- to 1.50-in. size in both the 25-lbs composite
sample, and in each 1000-g sample taken for test as in Section
5. This may be accomplished by the use of a 1.25-in.
(31.5-mm)sievetoseethatapproximatelyhalfoftheweightof
the pieces comprising thes
...


Questions, Comments and Discussion
Ask us and Technical Secretary will try to provide an answer. You can facilitate discussion about the standard in here.