ASTM C1525-18
(Test Method)Standard Test Method for Determination of Thermal Shock Resistance for Advanced Ceramics by Water Quenching
Standard Test Method for Determination of Thermal Shock Resistance for Advanced Ceramics by Water Quenching
SIGNIFICANCE AND USE
5.1 The high temperature capabilities of advanced ceramics are a key performance benefit for many demanding engineering applications. In many of those applications, advanced ceramics will have to perform across a broad temperature range with exposure to sudden changes in temperature and heat flux. Thermal shock resistance of the ceramic material is a critical factor in determining the durability of the component under transient thermal conditions.
5.2 This test method is useful for material development, quality assurance, characterization, and assessment of durability. It has limited value for design data generation, because of the limitations of the flexural test geometry in determining fundamental tensile properties.
5.3 Appendix X1 (following EN 820-3) provides an introduction to thermal stresses, thermal shock, and critical material/geometry factors. The appendix also contains a mathematical analysis of the stresses developed by thermal expansion under steady-state and transient conditions, as determined by mechanical properties, thermal characteristics, and heat transfer effects.
SCOPE
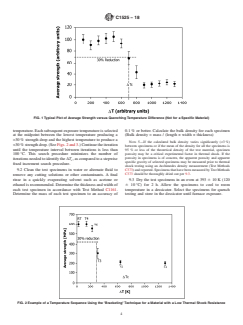
1.1 This test method describes the determination of the resistance of advanced ceramics to thermal shock by water quenching. The method builds on the experimental principle of rapid quenching of a test specimen at an elevated temperature in a water bath at room temperature. The effect of the thermal shock is assessed by measuring the reduction in flexural strength produced by rapid quenching of test specimens heated across a range of temperatures. For a quantitative measurement of thermal shock resistance, a critical temperature interval is determined by a reduction in the mean flexural strength of at least 30 %. The test method does not determine thermal stresses developed as a result of a steady-state temperature difference within a ceramic body or of thermal expansion mismatch between joined bodies. The test method is not intended to determine the resistance of a ceramic material to repeated shocks. Since the determination of the thermal shock resistance is performed by evaluating retained strength, the method is not suitable for ceramic components; however, test specimens cut from components may be used.
1.2 The test method is intended primarily for dense monolithic ceramics, but may also be applicable to certain composites such as whisker- or particulate-reinforced ceramic matrix composites that are macroscopically homogeneous.
1.3 Values expressed in this standard test method are in accordance with the International System of Units (SI) and IEEE/ASTM SI 10.
1.4 This standard does not purport to address all of the safety concerns, if any, associated with its use. It is the responsibility of the user of this standard to establish appropriate safety, health, and environmental practices and determine the applicability of regulatory limitations prior to use.
1.5 This international standard was developed in accordance with internationally recognized principles on standardization established in the Decision on Principles for the Development of International Standards, Guides and Recommendations issued by the World Trade Organization Technical Barriers to Trade (TBT) Committee.
General Information
- Status
- Published
- Publication Date
- 30-Jun-2018
- Technical Committee
- C28 - Advanced Ceramics
- Drafting Committee
- C28.01 - Mechanical Properties and Performance
Relations
- Effective Date
- 01-Jul-2018
- Effective Date
- 01-Jul-2019
- Effective Date
- 01-Jul-2019
- Effective Date
- 01-Jul-2018
- Effective Date
- 01-Sep-2017
- Effective Date
- 01-Aug-2016
- Effective Date
- 01-Aug-2016
- Effective Date
- 01-Jul-2015
- Effective Date
- 01-Dec-2014
- Effective Date
- 01-Jun-2014
- Effective Date
- 01-Mar-2014
- Effective Date
- 01-Aug-2013
- Effective Date
- 01-Aug-2013
- Effective Date
- 01-Feb-2013
- Effective Date
- 01-Feb-2013
Overview
ASTM C1525-18 is the Standard Test Method for Determination of Thermal Shock Resistance for Advanced Ceramics by Water Quenching, developed by ASTM International. This standard addresses how to evaluate the ability of advanced ceramics to withstand rapid temperature changes-a critical property for high-performance engineering materials subjected to severe thermal environments. The method involves rapidly quenching test specimens from elevated temperatures into a water bath and assessing retained flexural strength, providing a quantitative measure of a material’s thermal shock resistance.
Thermal shock resistance is a key indicator of ceramic durability under transient thermal conditions, making this standard highly relevant for industries utilizing ceramics in high-temperature, thermally-variable settings.
Key Topics
Thermal Shock Resistance Assessment
The method determines the resistance of advanced ceramics and certain composites to sudden temperature changes by water quenching, i.e., immersing a heated specimen in room-temperature water.Flexural Strength Measurement
The impact of thermal shock is quantified by the reduction in flexural strength of test specimens. A critical temperature difference (ΔT) is identified when mean flexural strength declines by at least 30%.Applicability
The test is primarily designed for dense monolithic ceramics but is also suitable for whisker- or particulate-reinforced ceramic matrix composites that are macroscopically homogeneous.Limitations
The method assesses single-shock resistance, not repeated shock or behavior due to steady-state temperature gradients or thermal expansion mismatches between assembled parts. It is not designed for generating design data and is best used with test specimens, not finished components.Standardized Reporting and Safety
Defined procedures for specimen preparation, equipment requirements, and safety considerations ensure repeatability and reliability. Users must establish appropriate safety and regulatory practices.
Applications
Material Development and Selection
The standard is valuable for the development and comparison of advanced ceramics in industries such as aerospace, automotive, energy, and electronics. It assists in selecting materials that can withstand abrupt thermal changes without catastrophic failure.Quality Assurance and Characterization
Manufacturers use this test for quality control, screening new materials, and assuring that ceramic batches meet durability specifications needed in high-performance applications.Durability Assessment
The standard aids in characterizing how ceramics maintain mechanical properties after exposure to thermal shock, supporting lifecycle analysis and reliability prediction for components such as heat exchangers, engine parts, and protective linings.Research and Benchmarking
Laboratories and research facilities use this method for comparative studies and benchmarking thermal shock resistance across different ceramic formulations and processing methods.
Related Standards
Professionals using ASTM C1525-18 may also refer to these related standards for comprehensive material assessment:
- ASTM C1161 - Test Method for Flexural Strength of Advanced Ceramics at Ambient Temperature
- ASTM C1239 - Practice for Reporting Uniaxial Strength Data and Estimating Weibull Distribution Parameters for Advanced Ceramics
- ASTM C1145 - Terminology of Advanced Ceramics
- ASTM C373 - Test Methods for Determination of Water Absorption and Associated Properties by Vacuum or Boil Method
- ASTM C1322 - Practice for Fractography and Characterization of Fracture Origins in Advanced Ceramics
- IEEE/ASTM SI 10 - Standard for Use of the International System of Units (SI)
- EN 820-3 - Determination of Resistance to Thermal Shock by Water Quenching (European equivalent)
Practical Value
ASTM C1525-18 standardizes the measurement of thermal shock resistance for advanced ceramic materials, supporting reliable material selection and quality control in sectors where ceramics face extreme temperature changes. Adherence to this method ensures consistent, comparable data that enable informed decisions on material performance and suitability under demanding service conditions.
Buy Documents
ASTM C1525-18 - Standard Test Method for Determination of Thermal Shock Resistance for Advanced Ceramics by Water Quenching
REDLINE ASTM C1525-18 - Standard Test Method for Determination of Thermal Shock Resistance for Advanced Ceramics by Water Quenching
Frequently Asked Questions
ASTM C1525-18 is a standard published by ASTM International. Its full title is "Standard Test Method for Determination of Thermal Shock Resistance for Advanced Ceramics by Water Quenching". This standard covers: SIGNIFICANCE AND USE 5.1 The high temperature capabilities of advanced ceramics are a key performance benefit for many demanding engineering applications. In many of those applications, advanced ceramics will have to perform across a broad temperature range with exposure to sudden changes in temperature and heat flux. Thermal shock resistance of the ceramic material is a critical factor in determining the durability of the component under transient thermal conditions. 5.2 This test method is useful for material development, quality assurance, characterization, and assessment of durability. It has limited value for design data generation, because of the limitations of the flexural test geometry in determining fundamental tensile properties. 5.3 Appendix X1 (following EN 820-3) provides an introduction to thermal stresses, thermal shock, and critical material/geometry factors. The appendix also contains a mathematical analysis of the stresses developed by thermal expansion under steady-state and transient conditions, as determined by mechanical properties, thermal characteristics, and heat transfer effects. SCOPE 1.1 This test method describes the determination of the resistance of advanced ceramics to thermal shock by water quenching. The method builds on the experimental principle of rapid quenching of a test specimen at an elevated temperature in a water bath at room temperature. The effect of the thermal shock is assessed by measuring the reduction in flexural strength produced by rapid quenching of test specimens heated across a range of temperatures. For a quantitative measurement of thermal shock resistance, a critical temperature interval is determined by a reduction in the mean flexural strength of at least 30 %. The test method does not determine thermal stresses developed as a result of a steady-state temperature difference within a ceramic body or of thermal expansion mismatch between joined bodies. The test method is not intended to determine the resistance of a ceramic material to repeated shocks. Since the determination of the thermal shock resistance is performed by evaluating retained strength, the method is not suitable for ceramic components; however, test specimens cut from components may be used. 1.2 The test method is intended primarily for dense monolithic ceramics, but may also be applicable to certain composites such as whisker- or particulate-reinforced ceramic matrix composites that are macroscopically homogeneous. 1.3 Values expressed in this standard test method are in accordance with the International System of Units (SI) and IEEE/ASTM SI 10. 1.4 This standard does not purport to address all of the safety concerns, if any, associated with its use. It is the responsibility of the user of this standard to establish appropriate safety, health, and environmental practices and determine the applicability of regulatory limitations prior to use. 1.5 This international standard was developed in accordance with internationally recognized principles on standardization established in the Decision on Principles for the Development of International Standards, Guides and Recommendations issued by the World Trade Organization Technical Barriers to Trade (TBT) Committee.
SIGNIFICANCE AND USE 5.1 The high temperature capabilities of advanced ceramics are a key performance benefit for many demanding engineering applications. In many of those applications, advanced ceramics will have to perform across a broad temperature range with exposure to sudden changes in temperature and heat flux. Thermal shock resistance of the ceramic material is a critical factor in determining the durability of the component under transient thermal conditions. 5.2 This test method is useful for material development, quality assurance, characterization, and assessment of durability. It has limited value for design data generation, because of the limitations of the flexural test geometry in determining fundamental tensile properties. 5.3 Appendix X1 (following EN 820-3) provides an introduction to thermal stresses, thermal shock, and critical material/geometry factors. The appendix also contains a mathematical analysis of the stresses developed by thermal expansion under steady-state and transient conditions, as determined by mechanical properties, thermal characteristics, and heat transfer effects. SCOPE 1.1 This test method describes the determination of the resistance of advanced ceramics to thermal shock by water quenching. The method builds on the experimental principle of rapid quenching of a test specimen at an elevated temperature in a water bath at room temperature. The effect of the thermal shock is assessed by measuring the reduction in flexural strength produced by rapid quenching of test specimens heated across a range of temperatures. For a quantitative measurement of thermal shock resistance, a critical temperature interval is determined by a reduction in the mean flexural strength of at least 30 %. The test method does not determine thermal stresses developed as a result of a steady-state temperature difference within a ceramic body or of thermal expansion mismatch between joined bodies. The test method is not intended to determine the resistance of a ceramic material to repeated shocks. Since the determination of the thermal shock resistance is performed by evaluating retained strength, the method is not suitable for ceramic components; however, test specimens cut from components may be used. 1.2 The test method is intended primarily for dense monolithic ceramics, but may also be applicable to certain composites such as whisker- or particulate-reinforced ceramic matrix composites that are macroscopically homogeneous. 1.3 Values expressed in this standard test method are in accordance with the International System of Units (SI) and IEEE/ASTM SI 10. 1.4 This standard does not purport to address all of the safety concerns, if any, associated with its use. It is the responsibility of the user of this standard to establish appropriate safety, health, and environmental practices and determine the applicability of regulatory limitations prior to use. 1.5 This international standard was developed in accordance with internationally recognized principles on standardization established in the Decision on Principles for the Development of International Standards, Guides and Recommendations issued by the World Trade Organization Technical Barriers to Trade (TBT) Committee.
ASTM C1525-18 is classified under the following ICS (International Classification for Standards) categories: 81.060.30 - Advanced ceramics. The ICS classification helps identify the subject area and facilitates finding related standards.
ASTM C1525-18 has the following relationships with other standards: It is inter standard links to ASTM C1525-04(2013), ASTM C1145-19, ASTM C1322-15(2019), ASTM C1239-13(2018), ASTM C373-17, ASTM C373-16, ASTM C373-16e1, ASTM C1322-15, ASTM C373-14a, ASTM E4-14, ASTM C373-14, ASTM C1161-13, ASTM C1239-13, ASTM C1145-06(2013)e1, ASTM C1145-06(2013). Understanding these relationships helps ensure you are using the most current and applicable version of the standard.
ASTM C1525-18 is available in PDF format for immediate download after purchase. The document can be added to your cart and obtained through the secure checkout process. Digital delivery ensures instant access to the complete standard document.
Standards Content (Sample)
This international standard was developed in accordance with internationally recognized principles on standardization established in the Decision on Principles for the
Development of International Standards, Guides and Recommendations issued by the World Trade Organization Technical Barriers to Trade (TBT) Committee.
Designation: C1525 − 18
Standard Test Method for
Determination of Thermal Shock Resistance for Advanced
Ceramics by Water Quenching
This standard is issued under the fixed designation C1525; the number immediately following the designation indicates the year of
original adoption or, in the case of revision, the year of last revision.Anumber in parentheses indicates the year of last reapproval.A
superscript epsilon (´) indicates an editorial change since the last revision or reapproval.
1. Scope Development of International Standards, Guides and Recom-
mendations issued by the World Trade Organization Technical
1.1 This test method describes the determination of the
Barriers to Trade (TBT) Committee.
resistance of advanced ceramics to thermal shock by water
quenching.Themethodbuildsontheexperimentalprincipleof
2. Referenced Documents
rapid quenching of a test specimen at an elevated temperature
in a water bath at room temperature. The effect of the thermal
2.1 ASTM Standards:
shock is assessed by measuring the reduction in flexural C373Test Methods for Determination of Water Absorption
strengthproducedbyrapidquenchingoftestspecimensheated
andAssociated Properties byVacuum Method for Pressed
acrossarangeoftemperatures.Foraquantitativemeasurement Ceramic Tiles and Glass Tiles and Boil Method for
of thermal shock resistance, a critical temperature interval is
Extruded Ceramic Tiles and Non-tile Fired Ceramic
determined by a reduction in the mean flexural strength of at Whiteware Products
least 30%. The test method does not determine thermal
C1145Terminology of Advanced Ceramics
stresses developed as a result of a steady-state temperature C1161Test Method for Flexural Strength of Advanced
difference within a ceramic body or of thermal expansion Ceramics at Ambient Temperature
mismatch between joined bodies. The test method is not C1239Practice for Reporting Uniaxial Strength Data and
intended to determine the resistance of a ceramic material to Estimating Weibull Distribution Parameters forAdvanced
repeated shocks. Since the determination of the thermal shock Ceramics
resistance is performed by evaluating retained strength, the C1322Practice for Fractography and Characterization of
method is not suitable for ceramic components; however, test Fracture Origins in Advanced Ceramics
specimens cut from components may be used. E4Practices for Force Verification of Testing Machines
E6Terminology Relating to Methods of MechanicalTesting
1.2 The test method is intended primarily for dense mono-
E616Terminology Relating to Fracture Testing (Discontin-
lithic ceramics, but may also be applicable to certain compos-
ued 1996) (Withdrawn 1996)
ites such as whisker- or particulate-reinforced ceramic matrix
IEEE/ASTM SI 10American National Standard for Metric
composites that are macroscopically homogeneous.
Practice
1.3 Values expressed in this standard test method are in
2.2 European Standard:
accordance with the International System of Units (SI) and
EN 820-3 Advanced Technical Ceramics—Monolithic
IEEE/ASTM SI 10.
Ceramics—Thermomechanical Properties—Part 3: Deter-
1.4 This standard does not purport to address all of the
mination of Resistance to Thermal Shock by Water
safety concerns, if any, associated with its use. It is the
Quenching
responsibility of the user of this standard to establish appro-
priate safety, health, and environmental practices and deter-
3. Terminology
mine the applicability of regulatory limitations prior to use.
3.1 Definitions:
1.5 This international standard was developed in accor-
dance with internationally recognized principles on standard-
ization established in the Decision on Principles for the
For referenced ASTM standards, visit the ASTM website, www.astm.org, or
contact ASTM Customer Service at service@astm.org. For Annual Book of ASTM
This test method is under the jurisdiction of ASTM Committee C28 on Standards volume information, refer to the standard’s Document Summary page on
Advanced Ceramics and is the direct responsibility of Subcommittee C28.01 on the ASTM website.
Mechanical Properties and Performance. The last approved version of this historical standard is referenced on
CurrenteditionapprovedJuly1,2018.PublishedJuly2018.Originallyapproved www.astm.org.
in 2002. Last previous edition approved in 2013 as C1525–04 (2013). DOI: Available from European Committee for Standardization (CEN), 36 rue de
10.1520/C1525-18. Stassart, B-1050, Brussels, Belgium, http://www.cenorm.be.
Copyright © ASTM International, 100 Barr Harbor Drive, PO Box C700, West Conshohocken, PA 19428-2959. United States
C1525 − 18
3.1.1 The terms described inTerminologies C1145, E6, and the limitations of the flexural test geometry in determining
E616areapplicabletothisstandardtestmethod.Specificterms fundamental tensile properties.
relevant to this test method are as follows:
5.3 Appendix X1 (following EN 820-3) provides an intro-
3.1.2 advanced ceramic, n—a highly engineered, high
duction to thermal stresses, thermal shock, and critical
performance, predominately non-metallic, inorganic, ceramic
material/geometry factors. The appendix also contains a math-
material having specific functional attributes. C1145
ematical analysis of the stresses developed by thermal expan-
3.1.3 critical temperature difference, ∆T,[θ],
sion under steady-state and transient conditions, as determined
c
n—temperaturedifferencebetweenthefurnaceandtheambient
by mechanical properties, thermal characteristics, and heat
temperature water bath that will cause a 30% drop in the
transfer effects.
average flexural strength.
–2
6. Interferences
3.1.4 flexural strength, σ, [FL ], n—a measure of the
f
ultimate strength of a specified beam specimen in bending,
6.1 Time-dependent phenomena such as stress corrosion or
determined at a given stress rate in a particular environment.
slow crack growth may influence the strength tests.This might
3.1.5 fracture toughness, n—a generic term for measures of especially be a problem if the test specimens are not properly
dried before strength testing.
resistance to extension of a crack. E616
3.1.6 slow crack growth (SCG), n—subcriticalcrackgrowth
6.2 Surface preparation of test specimens can introduce
(extension)whichmayresultfrom,butisnotrestrictedto,such
machining flaws, which may have a pronounced effect on the
mechanisms as environmentally assisted stress corrosion or
measured flexural strength. The surface preparation may also
diffusive crack growth. C1145
influence the cracking process due to the thermal shock
procedure. It is especially important to consider surface con-
3.1.7 thermal shock, n—a large and rapid temperature
ditions in comparing test specimens and components.
change, resulting in large temperature differences within or
across a body. C1145
6.3 The results are given in terms of a temperature differ-
ence between furnace and quenching bath (∆T). However, it is
3.1.8 thermal shock resistance, n—thecapabilityofmaterial
to retain its mechanical properties after exposure to one or important to notice that results may be different for the same
∆T but different absolute temperatures. It is therefore specified
more thermal shocks.
in this test method to quench to room temperature.
4. Summary of Test Method
6.4 Theformulaepresentedinthistestmethodapplystrictly
onlytomaterialsthatdonotexhibitR-curvebehavior,buthave
4.1 This test method indicates the ability of an advanced
ceramic product to withstand the stress generated by sudden a single-valued fracture toughness. If the test material exhibits
a strong R-curve behavior, that is, increase in fracture tough-
changes in temperature (thermal shock). The thermal shock
resistance is measured by determining the loss of strength (as ness with increasing crack length, caution must be taken in
interpreting the results.
comparedtoas-receivedspecimens)forceramictestspecimens
quicklycooledafterathermalexposure.Aseriesofrectangular
6.5 Test data for specimens of different geometries are not
or cylindrical test specimen sets is heated across a range of
directly comparable because of the effect of geometry on heat
different temperatures and then quenched rapidly in a water
transfer and stress gradients. Quantitative comparisons of
bath.After quenching, the test specimens are tested in flexure,
thermal shock resistance for different ceramic compositions
and the average retained flexural strength is determined for
should be done with equivalent test specimen geometries.
eachsetofspecimensquenchedfromagiventemperature.The
“critical temperature difference” for thermal shock is estab-
7. Apparatus
lished from the temperature difference (exposure temperature
7.1 Test Apparatus:
minus the water quench temperature) that produces a 30%
7.1.1 The test method requires a thermal exposure/
reduction in flexural strength compared to the average flexural
quenching system (consisting of a furnace, specimen handling
strength of the as-received test specimens.
equipment, and a quench bath) and a testing apparatus suitable
for measuring the flexural strength of the test specimens.
5. Significance and Use
7.1.2 The test method requires a furnace capable of heating
5.1 The high temperature capabilities of advanced ceramics
and maintaining a set of test specimens at the required
areakeyperformancebenefitformanydemandingengineering
temperature to 65K(65°C). The temperature shall be
applications.Inmanyofthoseapplications,advancedceramics
measured with suitable thermocouples located no more than
will have to perform across a broad temperature range with
2mm from the midpoint of the specimen(s) in the furnace.
exposure to sudden changes in temperature and heat flux.
Furnaces will usually have an open atmosphere, because air
Thermal shock resistance of the ceramic material is a critical
exposure is common during the transfer to the quench bath.
factor in determining the durability of the component under
transient thermal conditions. NOTE1—Ifairexposureisdetrimental,aspecialfurnace-quenchsystem
can be set up in which both the furnace and the quench unit are contained
5.2 This test method is useful for material development,
withinaninertatmospherecontainer.Acommondesignforsuchasystem
quality assurance, characterization, and assessment of durabil-
consists of a tube furnace positioned vertically above the quench tank, so
ity. It has limited value for design data generation, because of that the test specimen drops directly into the tank from the furnace.
C1525 − 18
specimen size and appropriate for larger test specimens (1, 2). Test
7.1.3 The method requires test specimen handling equip-
specimens of Type B may require greater quenching temperature differ-
mentdesignedsothatthetestspecimencanbetransferredfrom
ences in order to produce strength reduction. These test specimens may
the furnace to the quenching bath within 5 s.
not correctly rank the relative behavior of larger components. Only Type
7.1.4 Awater bath controlled to 293 6 2 K (20 6 2°C) is B coincides with Type B in Test Method C1161.
NOTE 3—Under some circumstances, the edges of prismatic test
required. The water bath must have sufficient volume to
specimens or the ends of cylindrical test specimens may be damaged by
prevent the temperature in the bath from rising more than 5 K
spallation during the quench test. These specimens should be discarded
(5°C) after test specimen quenching. It is recommended that
from the batch used for strength testing if the damage will interfere with
the bath be large enough for the test specimens to have cooled
the strength test. In any case, such spallation must be noted in the report.
sufficiently before reaching the bottom of the bath, or contain Spallation problems can be alleviated by chamfering sharp edges.
NOTE 4—The parallelism tolerances on the four longitudinal faces are
a screen near the bottom to prevent the test specimens from
0.015 mm for B and C and the cylindricity for A is 0.015 mm.
resting directly on the bottom of the bath.
8.2 Test Specimen Preparation—Dependingontheintended
7.1.5 The universal test machine used for strength testing in
application of the thermal shock data, one of the four test
this test method shall conform to the requirements of Practices
specimen preparation methods described in Test Method
E4. Specimens may be loaded in any suitable test machine,
C1161 may be used: as-fabricated, application-matched
provided that uniform test rates using either load-controlled or
machining, customary procedures, or standard procedures.
displacement-controlled mode can be maintained. The loads
usedindeterminingflexuralstrengthshallbeaccuratetowithin
8.3 Handling Precautions—Care shall be exercised in stor-
61.0%atanyloadwithintheselectedloadrateandloadrange
ing and handling of test specimens to avoid the introduction of
of the test machine as defined in Practices E4.
randomandsevereflaws,suchasmightoccuriftestspecimens
were allowed to impact or scratch each other.
7.1.6 The configuration and mechanical properties of the
testfixturesshallbeinaccordancewithTestMethodC1161for
8.4 Number of Test Specimens—A minimum of ten speci-
use with the standard four-point flexure specimens. If larger
mens shall be used to determine as-received strength at room
test pieces (size A or C below) are employed, the test fixture
temperature.Aminimum of 30 is required if estimates regard-
shall be scaled accordingly. There are currently no standard
ing the form of the strength distribution are to be determined
fixtures for testing cylindrical rods in flexure; however, the
(for example, a Weibull modulus). A minimum of five speci-
fixtures to be used shall have the appropriate articulation. Test
mens shall be used at each thermal shock temperature. It is
fixtureswithoutappropriatearticulationshallnotbepermitted;
recommended that as ∆T is established, an additional five
c
the articulation of the fixture shall meet the requirements
specimens be tested at this as well as the adjacent temperature
specified in Test Method C1161.
intervals. This will allow for determination of the mean and
7.1.7 The method requires a 393 K (120°C) drying oven to
standard deviation. If estimates regarding the form of the
remove moisture from test specimens before (if needed) and
strength distribution at the ∆T and adjoining temperature
c
after quench testing.
intervals are desired (for example,Weibull analysis) additional
7.1.8 A micrometer with a resolution of 0.002 mm (or
specimens must be tested at these temperature intervals. See
0.0001 in.) or smaller should be used to measure the test piece PracticeC1239forguidanceonestimatingWeibullparameters.
dimensions. The micrometer shall have flat anvil faces. The
9. Procedure
micrometer shall not have a ball tip or sharp tip, since these
might damage the test piece if the specimen dimensions are
9.1 Test Exposure Temperatures:
measured prior to fracture. Alternative dimension measuring 9.1.1 The maximum exposure target temperature of the
instruments may be used, provided that they have a resolution furnaceforthethermalshocktestofagivenadvancedceramic
of 0.002 mm (or 0.0001 in.) or finer and do no harm to the will be determined from the maximum performance tempera-
specimen. ture required for a specific application, specified in a compara-
tive thermal shock test, or cited in test literature.
9.1.2 The initial exposure temperature can be determined
8. Test Specimens
from literature values, prior test experience, or from a 50%
8.1 The ceramic test specimens shall be pieces specifically
value of the maximum exposure temperature. Follow-on
prepared for this purpose from bulk material or cut from
exposure/quench tests shall be performed such that the critical
components.
temperature difference is determined within a 50 K (50°C)
8.1.1 Specimen Size—Three specimen geometries are de-
interval.
fined for use in this test method:
9.1.3 Anefficient“bracketing”searchtechniquefor ∆T can
c
8.1.1.1 Type A—Rods 10 6 0.13 mm in diameter, 120 mm
be employed wherein the initial exposure temperature is
long.
chosen high enough that a definitive strength drop (>30% of
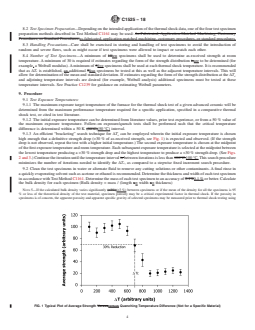
8.1.1.2 Type B—Bars3 60.13mm×4 60.13mmincross as-received strength, see Fig. 1) is expected and observed. (If
section, minimum 45 mm long with chamfered edges, in the strength drop is not observed, repeat the test with a higher
accordance with Type B in Test Method C1161. initial temperature.) The second exposure temperature is cho-
sen at the midpoint of the first exposure temperature and room
8.1.1.3 Type C—Bars 10 6 0.13 mm × 10 6 0.13 mm in
cross section, 120 mm long, with chamfered edges.
NOTE 2—The test specimens ofTypesAand C are intended to be large The boldface numbers in parentheses refer to a list of references at the end of
enough to produce a materials ranking that is basically independent of this standard.
C1525 − 18
FIG. 1 Typical Plot of Average Strength versus Quenching Temperature Difference (Not for a Specific Material)
temperature.Eachsubsequentexposuretemperatureisselected 0.1% or better. Calculate the bulk density for each specimen
at the midpoint betwee
...
This document is not an ASTM standard and is intended only to provide the user of an ASTM standard an indication of what changes have been made to the previous version. Because
it may not be technically possible to adequately depict all changes accurately, ASTM recommends that users consult prior editions as appropriate. In all cases only the current version
of the standard as published by ASTM is to be considered the official document.
Designation: C1525 − 04 (Reapproved 2013) C1525 − 18
Standard Test Method for
Determination of Thermal Shock Resistance for Advanced
Ceramics by Water Quenching
This standard is issued under the fixed designation C1525; the number immediately following the designation indicates the year of
original adoption or, in the case of revision, the year of last revision. A number in parentheses indicates the year of last reapproval. A
superscript epsilon (´) indicates an editorial change since the last revision or reapproval.
1. Scope
1.1 This test method describes the determination of the resistance of advanced ceramics to thermal shock by water quenching.
The method builds on the experimental principle of rapid quenching of a test specimen at an elevated temperature in a water bath
at room temperature. The effect of the thermal shock is assessed by measuring the reduction in flexural strength produced by rapid
quenching of test specimens heated across a range of temperatures. For a quantitative measurement of thermal shock resistance,
a critical temperature interval is determined by a reduction in the mean flexural strength of at least 30 %. The test method does
not determine thermal stresses developed as a result of a steady state steady-state temperature differencesdifference within a
ceramic body or of thermal expansion mismatch between joined bodies. The test method is not intended to determine the resistance
of a ceramic material to repeated shocks. Since the determination of the thermal shock resistance is performed by evaluating
retained strength, the method is not suitable for ceramic components; however, test specimens cut from components may be used.
1.2 The test method is intended primarily for dense monolithic ceramics, but may also be applicable to certain composites such
as whisker- or particulate-reinforced ceramic matrix composites that are macroscopically homogeneous.
1.3 Values expressed in this standard test method are in accordance with the International System of Units (SI) and Standard
IEEE/ASTM SI 10.
1.4 This standard does not purport to address all of the safety concerns, if any, associated with its use. It is the responsibility
of the user of this standard to establish appropriate safety safety, health, and healthenvironmental practices and determine the
applicability of regulatory limitations prior to use.
1.5 This international standard was developed in accordance with internationally recognized principles on standardization
established in the Decision on Principles for the Development of International Standards, Guides and Recommendations issued
by the World Trade Organization Technical Barriers to Trade (TBT) Committee.
2. Referenced Documents
2.1 ASTM Standards:
C373 Test Methods for Determination of Water Absorption and Associated Properties by Vacuum Method for Pressed Ceramic
Tiles and Glass Tiles and Boil Method for Extruded Ceramic Tiles and Non-tile Fired Ceramic Whiteware Products
C1145 Terminology of Advanced Ceramics
C1161 Test Method for Flexural Strength of Advanced Ceramics at Ambient Temperature
C1239 Practice for Reporting Uniaxial Strength Data and Estimating Weibull Distribution Parameters for Advanced Ceramics
C1322 Practice for Fractography and Characterization of Fracture Origins in Advanced Ceramics
E4 Practices for Force Verification of Testing Machines
E6 Terminology Relating to Methods of Mechanical Testing
E616 Terminology Relating to Fracture Testing (Discontinued 1996) (Withdrawn 1996)
IEEE/ASTM SI 10 Standard for Use of the International System of Units (SI): The Modern Metric SystemAmerican National
Standard for Metric Practice
This test method is under the jurisdiction of ASTM Committee C28 on Advanced Ceramics and is the direct responsibility of Subcommittee C28.01 on Mechanical
Properties and Performance.
Current edition approved Aug. 1, 2013July 1, 2018. Published September 2013July 2018. Originally approved in 2002. Last previous edition approved in 20092013 as
C1525 – 04 (2009).(2013). DOI: 10.1520/C1525-04R13.10.1520/C1525-18.
For referenced ASTM standards, visit the ASTM website, www.astm.org, or contact ASTM Customer Service at service@astm.org. For Annual Book of ASTM Standards
volume information, refer to the standard’s Document Summary page on the ASTM website.
The last approved version of this historical standard is referenced on www.astm.org.
Copyright © ASTM International, 100 Barr Harbor Drive, PO Box C700, West Conshohocken, PA 19428-2959. United States
C1525 − 18
2.2 European Standard:
EN 820-3 Advanced Technical Ceramics—Monolithic Ceramics—Thermomechanical Properties—Part 3: Determination of
Resistance to Thermal Shock by Water Quenching
3. Terminology
3.1 Definitions:
3.1.1 The terms described in Terminologies C1145, E6, and E616 are applicable to this standard test method. Specific terms
relevant to this test method are as follows:
3.1.2 advanced ceramic, n—a highly engineered, high performance, predominately non-metallic, inorganic, ceramic material
having specific functional attributes. C1145
3.1.3 critical temperature difference, ΔT , [θ], n—temperature difference between the furnace and the ambient temperature
c
water bath that will cause a 30 % drop in the average flexural strength.
–2
3.1.4 flexural strength, σ , [FL ], n—a measure of the ultimate strength of a specified beam specimen in bending, determined
f
at a given stress rate in a particular environment.
3.1.5 fracture toughness, n—a generic term for measures of resistance to extension of a crack. E616
3.1.6 slow crack growth (SCG), n—subcritical crack growth (extension) which may result from, but is not restricted to, such
mechanisms as environmentally-assisted environmentally assisted stress corrosion or diffusive crack growth. C1145
3.1.7 thermal shock, n—a large and rapid temperature change, resulting in large temperature differences within or across a body.
C1145
3.1.8 thermal shock resistance, n—the capability of material to retain its mechanical properties after exposure to one or more
thermal shocks.
4. Summary of Test Method
4.1 This test method indicates the ability of an advanced ceramic product to withstand the stress generated by sudden changes
in temperature (thermal shock). The thermal shock resistance is measured by determining the loss of strength (as compared to
as-received specimens) for ceramic test specimens quickly cooled after a thermal exposure. A series of rectangular or cylindrical
test specimen sets areis heated across a range of different temperatures and then quenched rapidly in a water bath. After quenching,
the test specimens are tested in flexure, and the average retained flexural strength is determined for each set of specimens quenched
from a given temperature. The “critical temperature difference” for thermal shock is established from the temperature difference
(exposure temperature minus the water quench temperature) that produces a 30 % reduction in flexural strength compared to the
average flexural strength of the as-received test specimens.
5. Significance and Use
5.1 The high temperature capabilities of advanced ceramics are a key performance benefit for many demanding engineering
applications. In many of those applications, advanced ceramics will have to perform across a broad temperature range with
exposure to sudden changes in temperature and heat flux. Thermal shock resistance of the ceramic material is a critical factor in
determining the durability of the component under transient thermal conditions.
5.2 This test method is useful for material development, quality assurance, characterization, and assessment of durability. It has
limited value for design data generation, because of the limitations of the flexural test geometry in determining fundamental tensile
properties.
5.3 Appendix X1 (following EN 820-3) provides an introduction to thermal stresses, thermal shock, and critical material/
geometry factors. The appendix also contains a mathematical analysis of the stresses developed by thermal expansion under steady
state steady-state and transient conditions, as determined by mechanical properties, thermal characteristics, and heat transfer
effects.
6. Interferences
6.1 Time-dependent phenomena such as stress corrosion or slow crack growth may influence the strength tests. This might
especially be a problem if the test specimens are not properly dried before strength testing.
6.2 Surface preparation of test specimens can introduce machining flaws, which may have a pronounced effect on the measured
flexural strength. The surface preparation may also influence the cracking process due to the thermal shock procedure. It is
especially important to consider surface conditions in comparing test specimens and components.
6.3 The results are given in terms of a temperature difference between furnace and quenching bath (ΔT). However, it is
important to notice that results may be different for the same ΔT but different absolute temperatures. It is therefore specified in this
test method to quench to room temperature.
Available from European Committee for Standardization (CEN), 36 rue de Stassart, B-1050, Brussels, Belgium, http://www.cenorm.be.
C1525 − 18
6.4 The formulae presented in this test method apply strictly only to materials that do not exhibit RR-curve-curve behavior, but
have a single-valued fracture toughness. If the test material exhibits a strong R-curve behavior, that is, increase in fracture
toughness with increasing crack length, caution must be taken in interpreting the results.
6.5 Test data for specimens of different geometries are not directly comparable because of the effect of geometry on heat transfer
and stress gradients. Quantitative comparisons of thermal shock resistance for different ceramic compositions should be done with
equivalent test specimen geometries.
7. Apparatus
7.1 Test Apparatus:
7.1.1 The test method requires a thermal exposure/quenching system (consisting of a furnace, specimen handling equipment,
and a quench bath) and a testing apparatus suitable for measuring the flexural strength of the test specimens.
7.1.2 The test method requires a furnace capable of heating and maintaining a set of test specimens at the required temperature
to 6 5 K (6 5°C). 65 K (65 °C). The temperature shall be measured with suitable thermocouples located no more than 2 mm
2 mm from the midpoint of the specimen(s) in the furnace. Furnaces will usually have an open atmosphere, because air exposure
is common during the transfer to the quench bath.
NOTE 1—If air exposure is detrimental, a special furnace-quench system can be set up in which both the furnace and the quench unit are contained
within an inert atmosphere container. A common design for such a system consists of a tube furnace positioned vertically above the quench tank, so that
the test specimen drops directly into the tank from the furnace.
7.1.3 The method requires a test specimen handling equipment designed so that the test specimen can be transferred from the
furnace to the quenching bath within 5 s.
7.1.4 A water bath controlled to 293 6 2 K (20°C(20 6 2°C)2 °C) is required. The water bath must have sufficient volume to
prevent the temperature in the bath from rising more than 5 K (5°C)(5 °C) after test specimen quenching. It is recommended that
the bath be large enough for the test specimens to have cooled sufficiently before reaching the bottom of the bath, or contain a
screen near the bottom to prevent the test specimens from resting directly on the bottom of the bath.
7.1.5 The universal test machine used for strength testing in this test method shall conform to the requirements of
PracticePractices E4. Specimens may be loaded in any suitable test machine, provided that uniform test rates, either rates using
either load-controlled or displacement-controlled mode,mode can be maintained. The loads used in determining flexural strength
shall be accurate to within 61.0 % at any load within the selected load rate and load range of the test machine as defined in
PracticePractices E4.
7.1.6 The configuration and mechanical properties of the test fixtures shall be in accordance with Test Method C1161 for use
with the standard four-point flexure specimens. If larger test pieces (sizes(size A or C below) are employed, the test fixture shall
be scaled accordingly. There are currently no standard fixtures for testing cylindrical rods in flexure; however, the fixtures to be
used shall have the appropriate articulation. Test fixtures without appropriate articulation shall not be permitted; the articulation
of the fixture shall meet the requirements specified in Test Method C1161.
7.1.7 The method requires a 393 K (120°C)(120 °C) drying oven to remove moisture from test specimens before (if needed)
and after quench testing.
7.1.8 A micrometer with a resolution of 0.002 mm (or 0.0001 in.) or smaller should be used to measure the test piece
dimensions. The micrometer shall have flat anvil faces. The micrometer shall not have a ball tip or sharp tip, since these might
damage the test piece if the specimen dimensions are measured prior to fracture. Alternative dimension measuring instruments may
be used, provided that they have a resolution of 0.002 mm (or 0.0001 in.) or finer and do no harm to the specimen.
8. Test Specimens
8.1 The ceramic test specimens shall be pieces specifically prepared for this purpose from bulk material or cut from components.
8.1.1 Specimen Size—Three specimen geometries are defined for use in this test method:
8.1.1.1 Type A—Rods 10 6 0.13 mm in diameter, 120 mm long.
8.1.1.2 Type B—Bars 3 6 0.13 mm × 4 6 0.13 mm in cross section, minimum 45 mm long with chamfered edges, in accordance
with typeType B in Test Method C1161.
8.1.1.3 Type C—Bars 10 6 0.13 mm × 10 6 0.13 mm in cross section, 120 mm long, with chamfered edges.
NOTE 2—The test specimens of Types A and C type are intended to be large enough to produce a materials ranking that is basically independent of
specimen size and appropriate for larger test specimens (1, 2)). . Test specimens of Type B type may require greater quenching temperature differences
in order to produce strength reduction. These test specimens may not correctly rank the relative behavior of larger components. Only Type B coincides
with Type B in Test Method C1161.
NOTE 3—Under some circumstances, the edges of prismatic test specimens or the ends of cylindrical test specimens may be damaged by spallation
during the quench test. These specimens should be discarded from the batch used for strength testing if the damage will interfere with the strength test.
In any case, such spallation must be noted in the report. Spallation problems can be alleviated by chamfering sharp edges.
NOTE 4—The parallelism tolerances on the four longitudinal faces are 0.015 mm for B and C and the cylindricity for A is 0.015 mm.
The boldface numbers in parentheses refer to a list of references at the end of this standard.
C1525 − 18
8.2 Test Specimen Preparation—Depending on the intended application of the thermal shock data, one of the four test specimen
preparation methods described in Test Method C1161 may be used: As-Fabricated, Application-Matched Machining, Customary
Procedures, or Standard Procedures.as-fabricated, application-matched machining, customary procedures, or standard procedures.
8.3 Handling Precautions—Care shall be exercised in storing and handling of test specimens to avoid the introduction of
random and severe flaws, such as might occur if test specimens were allowed to impact or scratch each other.
8.4 Number of Test Specimens—A minimum of 10ten specimens shall be used to determine as-received strength at room
temperature. A minimum of 30 is required if estimates regarding the form of the strength distribution isare to be determined (for
example, a Weibull modulus). A minimum of 5five specimens shall be used at each thermal shock temperature. It is recommended
that as ΔT is established, an additional 5five specimens be tested at this as well as the adjacent temperature intervals. This will
c
allow for determination of the mean and standard deviation. If estimates regarding the form of the strength distribution at the ΔT
c
and adjoining temperature intervals are desired (for example, Weibull analysis) additional specimens must be tested at these
temperature intervals. See Practice C1239 for guidance on estimating Weibull parameters.
9. Procedure
9.1 Test Exposure Temperatures:
9.1.1 The maximum exposure target temperature of the furnace for the thermal shock test of a given advanced ceramic will be
determined from the maximum performance temperature required for a specific application, specified in a comparative thermal
shock test, or cited in test literature.
9.1.2 The initial exposure temperature can be determined from literature values, prior test experience, or from a 50 % value of
the maximum exposure temperature. Follow-on exposure/quench tests shall be performed such that the critical temperature
difference is determined within a 50 K (50°C)(50 °C) interval.
9.1.3 An efficient “bracketing” search technique for ΔT can be employed wherein the initial exposure temperature is chosen
c
high enough that a definitive strength drop (>30 % of as-received strength, see Fig. 1) is expected and observed. (If the strength
drop is not observed, repeat the test with a higher initial temperature.) The second exposure temperature is chosen at the midpoint
of the first exposure temperature and room temperature. Each subsequent exposure temperature is selected at the midpoint between
the lowest temperature producing a >30 % strength drop and the highest temperature to produce a <30 % strength drop. (See Figs.
2 and 3.) Continue the iteration until the temperature interval is between iterations is les
...
Questions, Comments and Discussion
Ask us and Technical Secretary will try to provide an answer. You can facilitate discussion about the standard in here.
Loading comments...