ASTM B691-18(2024)
(Specification)Standard Specification for Iron-Nickel-Chromium-Molybdenum Alloy (UNS N08367) Rod, Bar, and Wire
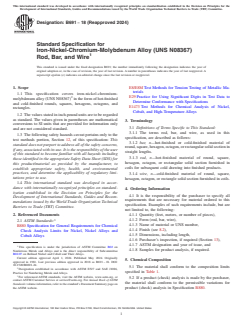
Standard Specification for Iron-Nickel-Chromium-Molybdenum Alloy (UNS N08367) Rod, Bar, and Wire
ABSTRACT
This specification covers the standard for hot-finished and cold-finished rounds, squares, hexagons, octagons, and rectangles made from iron-nickel-chromium-molybdenum alloys (UNS N08366 and UNS N08367). Mechanical properties such as tensile strength, yield strength, and elongation shall be tested accordingly. Each specimen shall be subjected to chemical analysis and tension test.
SCOPE
1.1 This specification covers iron-nickel-chromium-molybdenum alloy (UNS N08367)2 in the form of hot-finished and cold-finished rounds, squares, hexagons, octagons, and rectangles.
1.2 The values stated in inch-pound units are to be regarded as standard. The values given in parentheses are mathematical conversions to SI units that are provided for information only and are not considered standard.
1.3 The following safety hazards caveat pertains only to the test methods portion, Section 12, of this specification: This standard does not purport to address all of the safety concerns, if any, associated with its use. It is the responsibility of the user of this standard to become familiar with all hazards including those identified in the appropriate Safety Data Sheet (SDS) for this product/material as provided by the manufacturer, to establish appropriate safety, health, and environmental practices, and determine the applicability of regulatory limitations prior to use.
1.4 This international standard was developed in accordance with internationally recognized principles on standardization established in the Decision on Principles for the Development of International Standards, Guides and Recommendations issued by the World Trade Organization Technical Barriers to Trade (TBT) Committee.
General Information
- Status
- Published
- Publication Date
- 31-Mar-2024
- Technical Committee
- B02 - Nonferrous Metals and Alloys
- Drafting Committee
- B02.07 - Refined Nickel and Cobalt and Their Alloys
Overview
ASTM B691-18(2024): Standard Specification for Iron-Nickel-Chromium-Molybdenum Alloy (UNS N08367) Rod, Bar, and Wire is an internationally recognized standard developed by ASTM International. It outlines requirements for the manufacture, chemical composition, mechanical testing, and tolerances of hot-finished and cold-finished rounds, squares, hexagons, octagons, and rectangles produced from the iron-nickel-chromium-molybdenum alloy designated as UNS N08367. The specification ensures consistency and quality in the manufacturing and supply of these high-performance alloys, supporting global trade and reliable material selection.
Key Topics
- Product Forms: Covers rod, bar, and wire in rounds, squares, hexagons, octagons, and rectangular cross-sections, provided in both hot-finished and cold-finished conditions.
- Material Composition: Specifies strict chemical composition limits for elements such as chromium, nickel, molybdenum, carbon, manganese, silicon, phosphorus, sulfur, nitrogen, copper, and iron.
- Mechanical Properties: Requires testing for tensile strength, yield strength, and elongation to confirm material performance.
- Dimensional Tolerances: Details allowable variances for diameter, width, thickness, and straightness for each product form.
- Safety Considerations: Reminds users to follow appropriate safety, health, and environmental practices and consult Safety Data Sheets (SDS) supplied by manufacturers.
- Marking and Certification: Outlines requirements for product marking and supplier certification, ensuring traceability and conformance to the standard.
- Testing Methods: Referenced ASTM methods for chemical analysis and tension testing, as well as sampling and retesting procedures.
Applications
Iron-Nickel-Chromium-Molybdenum Alloy (UNS N08367) Rod, Bar, and Wire produced under ASTM B691-18(2024) are widely used in demanding environments requiring excellent corrosion resistance and mechanical strength. Typical sectors and uses include:
- Chemical Processing: Equipment and components exposed to aggressive chemicals and extreme temperatures, such as piping, vessels, and heat exchangers.
- Oil and Gas: Structural and tubing applications where exposure to chloride-rich and acidic environments is common.
- Marine Engineering: Offshore and coastal fabrications requiring resistance to saltwater corrosion.
- Aerospace and Power Generation: Parts where both mechanical reliability and high-performance corrosion resistance are critical.
- General Industrial Applications: Any setting where the specified alloy’s performance advantages are required for rods, bars, or wires in various finished forms.
Related Standards
For comprehensive implementation and material selection, ASTM B691-18(2024) references and aligns with several related ASTM standards:
- ASTM B880 - General Requirements for Chemical Check Analysis Limits for Nickel, Nickel Alloys, and Cobalt Alloys.
- ASTM E8/E8M - Test Methods for Tension Testing of Metallic Materials.
- ASTM E29 - Practice for Using Significant Digits in Test Data to Determine Conformance with Specifications.
- ASTM E1473 - Test Methods for Chemical Analysis of Nickel, Cobalt, and High-Temperature Alloys.
- UNS N08367 - Unified Numbering System designation for the specified alloy.
Practical Value
Adherence to ASTM B691-18(2024) guarantees that rod, bar, and wire products made from UNS N08367 alloys meet rigorous standards for quality, reliability, and international compatibility. This standard enhances material traceability, ensures consistent performance, and facilitates cross-border trade, making it a crucial reference for manufacturers, engineers, and quality assurance professionals in industries relying on advanced corrosion-resistant and high-strength alloy materials.
Buy Documents
ASTM B691-18(2024) - Standard Specification for Iron-Nickel-Chromium-Molybdenum Alloy (UNS N08367) Rod, Bar, and Wire
Get Certified
Connect with accredited certification bodies for this standard

Element Materials Technology
Materials testing and product certification.

Inštitut za kovinske materiale in tehnologije
Institute of Metals and Technology. Materials testing, metallurgical analysis, NDT.
Sponsored listings
Frequently Asked Questions
ASTM B691-18(2024) is a technical specification published by ASTM International. Its full title is "Standard Specification for Iron-Nickel-Chromium-Molybdenum Alloy (UNS N08367) Rod, Bar, and Wire". This standard covers: ABSTRACT This specification covers the standard for hot-finished and cold-finished rounds, squares, hexagons, octagons, and rectangles made from iron-nickel-chromium-molybdenum alloys (UNS N08366 and UNS N08367). Mechanical properties such as tensile strength, yield strength, and elongation shall be tested accordingly. Each specimen shall be subjected to chemical analysis and tension test. SCOPE 1.1 This specification covers iron-nickel-chromium-molybdenum alloy (UNS N08367)2 in the form of hot-finished and cold-finished rounds, squares, hexagons, octagons, and rectangles. 1.2 The values stated in inch-pound units are to be regarded as standard. The values given in parentheses are mathematical conversions to SI units that are provided for information only and are not considered standard. 1.3 The following safety hazards caveat pertains only to the test methods portion, Section 12, of this specification: This standard does not purport to address all of the safety concerns, if any, associated with its use. It is the responsibility of the user of this standard to become familiar with all hazards including those identified in the appropriate Safety Data Sheet (SDS) for this product/material as provided by the manufacturer, to establish appropriate safety, health, and environmental practices, and determine the applicability of regulatory limitations prior to use. 1.4 This international standard was developed in accordance with internationally recognized principles on standardization established in the Decision on Principles for the Development of International Standards, Guides and Recommendations issued by the World Trade Organization Technical Barriers to Trade (TBT) Committee.
ABSTRACT This specification covers the standard for hot-finished and cold-finished rounds, squares, hexagons, octagons, and rectangles made from iron-nickel-chromium-molybdenum alloys (UNS N08366 and UNS N08367). Mechanical properties such as tensile strength, yield strength, and elongation shall be tested accordingly. Each specimen shall be subjected to chemical analysis and tension test. SCOPE 1.1 This specification covers iron-nickel-chromium-molybdenum alloy (UNS N08367)2 in the form of hot-finished and cold-finished rounds, squares, hexagons, octagons, and rectangles. 1.2 The values stated in inch-pound units are to be regarded as standard. The values given in parentheses are mathematical conversions to SI units that are provided for information only and are not considered standard. 1.3 The following safety hazards caveat pertains only to the test methods portion, Section 12, of this specification: This standard does not purport to address all of the safety concerns, if any, associated with its use. It is the responsibility of the user of this standard to become familiar with all hazards including those identified in the appropriate Safety Data Sheet (SDS) for this product/material as provided by the manufacturer, to establish appropriate safety, health, and environmental practices, and determine the applicability of regulatory limitations prior to use. 1.4 This international standard was developed in accordance with internationally recognized principles on standardization established in the Decision on Principles for the Development of International Standards, Guides and Recommendations issued by the World Trade Organization Technical Barriers to Trade (TBT) Committee.
ASTM B691-18(2024) is classified under the following ICS (International Classification for Standards) categories: 77.140.60 - Steel bars and rods. The ICS classification helps identify the subject area and facilitates finding related standards.
ASTM B691-18(2024) is available in PDF format for immediate download after purchase. The document can be added to your cart and obtained through the secure checkout process. Digital delivery ensures instant access to the complete standard document.
Standards Content (Sample)
This international standard was developed in accordance with internationally recognized principles on standardization established in the Decision on Principles for the
Development of International Standards, Guides and Recommendations issued by the World Trade Organization Technical Barriers to Trade (TBT) Committee.
Designation: B691 − 18 (Reapproved 2024)
Standard Specification for
Iron-Nickel-Chromium-Molybdenum Alloy (UNS N08367)
Rod, Bar, and Wire
This standard is issued under the fixed designation B691; the number immediately following the designation indicates the year of
original adoption or, in the case of revision, the year of last revision. A number in parentheses indicates the year of last reapproval. A
superscript epsilon (´) indicates an editorial change since the last revision or reapproval.
1. Scope E8/E8M Test Methods for Tension Testing of Metallic Ma-
terials
1.1 This specification covers iron-nickel-chromium-
2 E29 Practice for Using Significant Digits in Test Data to
molybdenum alloy (UNS N08367) in the form of hot-finished
Determine Conformance with Specifications
and cold-finished rounds, squares, hexagons, octagons, and
E1473 Test Methods for Chemical Analysis of Nickel,
rectangles.
Cobalt, and High-Temperature Alloys
1.2 The values stated in inch-pound units are to be regarded
as standard. The values given in parentheses are mathematical
3. Terminology
conversions to SI units that are provided for information only
3.1 Definitions of Terms Specific to This Standard:
and are not considered standard.
3.1.1 The terms rod, bar, and wire, as used in this
1.3 The following safety hazards caveat pertains only to the
specification, are described as follows:
test methods portion, Section 12, of this specification: This
3.1.2 bar, n—hot-finished or cold-finished material of
standard does not purport to address all of the safety concerns,
round, square, hexagon, octagon, or rectangular solid section in
if any, associated with its use. It is the responsibility of the user
straight lengths.
of this standard to become familiar with all hazards including
3.1.3 rod, n—hot-finished material of round, square,
those identified in the appropriate Safety Data Sheet (SDS) for
hexagon, octagon, or rectangular solid section furnished in
this product/material as provided by the manufacturer, to
coils for subsequent cold drawing into finished products.
establish appropriate safety, health, and environmental
practices, and determine the applicability of regulatory limi-
3.1.4 wire, n—cold-finished material of round, square,
tations prior to use.
hexagon, octagon, or rectangle solid section furnished in coils.
1.4 This international standard was developed in accor-
dance with internationally recognized principles on standard-
4. Ordering Information
ization established in the Decision on Principles for the
4.1 It is the responsibility of the purchaser to specify all
Development of International Standards, Guides and Recom-
requirements that are necessary for material ordered to this
mendations issued by the World Trade Organization Technical
specification. Examples of such requirements include, but are
Barriers to Trade (TBT) Committee.
not limited to, the following:
2. Referenced Documents 4.1.1 Quantity (feet, meters, or number of pieces),
4.1.2 Form (rod, bar, wire),
2.1 ASTM Standards:
4.1.3 Name of material or UNS number,
B880 Specification for General Requirements for Chemical
4.1.4 Finish (see 8.2),
Check Analysis Limits for Nickel, Nickel Alloys and
4.1.5 Dimensions, including length,
Cobalt Alloys
4.1.6 Purchaser’s inspection, if required (Section 13),
4.1.7 ASTM designation and year of issue, and
This specification is under the jurisdiction of ASTM Committee B02 on
Nonferrous Metals and Alloys and is the direct responsibility of Subcommittee 4.1.8 Samples for product analysis, if required.
B02.07 on Refined Nickel and Cobalt and Their Alloys.
Current edition approved April 1, 2024. Published May 2024. Originally
5. Chemical Composition
approved in 1981. Last previous edition approved in 2018 as B691 – 18. DOI:
10.1520/B0691-24.
5.1 The material shall conform to the composition limits
Designation established in accordance with ASTM E527 and SAE J1086,
specified in Table 1.
Practice for Numbering Metals and Alloys.
For referenced ASTM standards, visit the ASTM website, www.astm.org, or
5.2 If a product (check) analysis is made by the purchaser,
contact ASTM Customer Service at service@astm.org. For Annual Book of ASTM
the material shall conform to the permissible variations for
Standards volume information, refer to the standard’s Document Summary page on
the ASTM website. product (check) analysis in Specification B880.
Copyright © ASTM International, 100 Barr Harbor Drive, PO Box C700, West Conshohocken, PA 19428-2959. United States
B691 − 18 (2024)
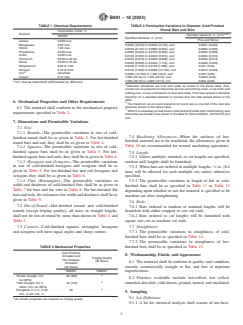
TABLE 1 Chemical Requirements TABLE 3 Permissible Variations in Diameter Cold-Finished
Round Bars and Wire
Composition Limits, %
Element
A,B,C
Diameter tolerance, in. (mm)
N08367
Specified Diameter, in. (mm)
Plus and Minus
Carbon 0.030 max
Manganese 2.00 max
0.0030 (0.076) to 0.0048 (0.122), excl 0.0001 (0.003)
Silicon 1.00 max
0.0048 (0.122) to 0.0080 (0.203), excl 0.0002 (0.005)
Phosphorus 0.040 max
0.0080 (0.203) to 0.0120 (0.305), excl 0.0003 (0.008)
Sulfur 0.030 max
0.0120 (0.305) to 0.0240 (0.610), excl 0.0004 (0.010)
Chromium 20.00 to 22.00
0.0240 (0.610) to 0.0330 (0.838), excl 0.0005 (0.013)
Nickel 23.50 to 25.50
0.0330 (0.838) to 0.0440 (1.118), excl 0.0008 (0.020)
Molybdenum 6.00 to 7.00
0.0440 (1.118) to 0.3125 (7.938), excl 0.001 (0.03)
Nitrogen 0.18 to 0.25
0.3125 (7.938) to 0.5000 (12.700), excl 0.0015 (0.038)
A
Iron remainder
0.5000 (12.700) to 1.000 (25.4), excl 0.002 (0.05)
Copper 0.75 max 1.000 (25.40) to 1.500 (38.10), excl 0.0025 (0.06)
1.500 (38.10) to 4.000 (101.6), incl 0.003 (0.08)
A
Iron shall be determined arithmetically by difference.
A
Diameter tolerances are over and under as shown in the above table. Also,
rounds can be produced to tolerances all over and nothing under, or all under and
nothing over, or any combination of over and under, if the total spread in diameter
tolerance for a specified diameter is not less than the total spread shown in the
table.
6. Mechanical Properties and Other Requirements
B
The maximum out-of-round tolerance for round wire is one-half of the total size
tolerance shown in the above table.
6.1 The material shall conform to the mechanical property
C
When it is necessary to heat treat or heat treat and pickle after cold finishing, size
requirements specified in Table 2.
tolerances are double those shown in the table for sizes 0.0240 in. (0.610 mm) and
over.
7. Dimensions and Permissible Variations
7.1 Size:
7.1.1 Rounds—The permissible variations in size of cold-
7.4 Machining Allowances—When the surfaces of hot-
finished round shall be as given in Table 3. For hot-finished
finished material are to be machined, the allowances given in
round bars and rod, they shall be as given in Table 4.
Table 10 are recommended for normal machining operations.
7.1.2 Squares—The permissible variations in size of cold-
finished square bars shall be as given in Table 5. For hot-
7.5 Length:
finished square bars and rods, they shall be as given in Table 4.
7.5.1 Unless multiple, nominal, or cut lengths are specified,
7.1.3 Hexagons and Octagons—The permissible variations
random mill lengths shall be furnished.
in size of cold-finished hexagons and octagons shall be as
7.5.2 When bars are ordered in multiple lengths, ⁄4 in. (6.4
given in Table 5. For hot-finished bar and rod hexagons and
mm) will be allowed for each multiple cut, unless otherwise
octagons they shall be as given in Table 6.
specified.
7.1.4 Flats (Rectangles)—The permissible variations in
7.5.3 The permissible variations in length of hot or cold-
width and thickness of cold-finished flats shall be as given in
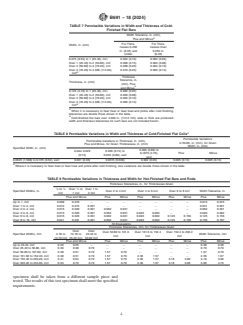
finished bars shall be as specified in Table 11 or Table 12
Table 7 for bars and for wire in Table 8. For hot-finished flat
depending upon whether or not the material is specified to be
bars and rods, the tolerances for width and thickness shall be as
machine-cut after straightening.
given in Table 9.
7.6 Ends:
7.2 Out-of-Round—Hot-finished rounds and cold-finished
7.6.1 Bars ordered to random or nominal lengths will be
rounds (except forging quality), all sizes, in straight lengths,
furnished with either cropped or saw-cut ends.
shall not be out-of-round by more than shown in Table 4 and
7.6.2 Bars ordered to cut lengths will be furnished with
Table 3.
square saw-cut or machine cut ends.
7.3 Corners—Cold-finished squares, rectangles, hexagons
7.7 Straightness:
and octagons will have equal angles and sharp corners.
7.7.1 The permissible variations in straightness of cold-
finished bars shall be as specified in Table 13.
7.7.2 The permissible variations in straightness of hot-
finished bars shall be as specified in Table 13.
TABLE 2 Mechanical Properties
Cold-Finished-
8. Workmanship, Finish, and Appearance
Annealed and
Forging Quality
Hot-Finished-
(All Sizes)
8.1 The material shall be uniform in quality and condition,
Annealed
(All Sizes) smooth, commercially straight or flat, and free of injurious
N08367 N08367 imperfections.
A
Tensile strength, min, 95 (655)
8.2 Finishes available include hot-rolled, hot rolled-
ksi (MPa)
A
annealed-descaled, cold-drawn, ground, turned, and machined.
Yield strength, 0.2 % 45 (310)
offset, min, ksi (MPa)
A
Elongation in 2 in. or 50 30
9. Sampling
mm, or 4D, min, %
A 9.1 Lot Definition:
No tensile properties are required on forging quality.
9.1.1 A lot for chemical analysis shall consist of one heat.
B691 − 18 (2024)
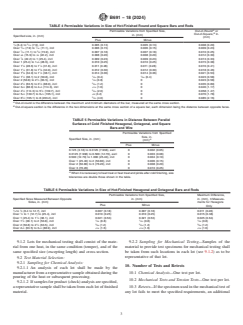
TABLE 4 Permissible Variations in Size of Hot-Finished Round and Square Bars and Rods
A
Permissible Variations from Specified Size, Out-of-Round or
B
Out-of-Square, in.
in. (mm)
Specified size, in. (mm)
(mm)
Plus Minus
1 5
⁄4 (6.4) to ⁄16 (7.9), incl 0.005 (0.13) 0.005 (0.13) 0.008 (0.20)
5 7
Over ⁄16 (7.9) to ⁄16 (11.1), incl 0.006 (0.15) 0.006 (0.15) 0.009 (0.23)
7 5
Over ⁄16 (11.1) to ⁄8 (15.9), incl 0.007 (0.18) 0.007 (0.18) 0.010 (0.25)
5 7
Over ⁄8 (15.9) to ⁄8 (22.2), incl 0.008 (0.20) 0.008 (0.20) 0.012 (0.30)
Over ⁄8 (22.2) to 1 (25.4), incl 0.009 (0.23) 0.009 (0.23) 0.013 (0.33)
Over 1 (25.4) to 1 ⁄8 (28.6), incl 0.010 (0.25) 0.010 (0.25) 0.015 (0.38)
1 1
Over 1 ⁄8 (28.6) to 1 ⁄4 (31.8), incl 0.011 (0.28) 0.011 (0.28) 0.016 (0.41)
1 3
Over 1 ⁄4 (31.8) to 1 ⁄8 (34.9), incl 0.012 (0.30) 0.012 (0.30) 0.018 (0.46)
3 1
Over 1 ⁄8 (34.9) to 1 ⁄2 (38.1), incl 0.014 (0.36) 0.014 (0.36) 0.021 (0.53)
1 1 1
Over 1 ⁄2 (38.1) to 2 (50.8), incl ⁄64 (0.4) ⁄64 (0.4) 0.023 (0.58)
1 1
Over 2 (50.8) to 2 ⁄2 (63.5), incl ⁄32 (0.8) 0 0.023 (0.58)
1 1 3
Over 2 ⁄2 (63.5) to 3 ⁄2 (88.9), incl ⁄64 (1.2) 0 0.035 (0.89)
1 1 1
Over 3 ⁄2 (88.9) to 4 ⁄2 (114.3), incl ⁄16 (1.6) 0 0.046 (1.17)
1 1 5
Over 4 ⁄2 (114.3) to 5 ⁄2 (139.7), incl ⁄64 (2.0) 0 0.058 (1.47)
1 1 1
Over 5 ⁄2 (139.7) to 6 ⁄2 (165.1), incl ⁄8 (3.2) 0 0.070 (1.78)
1 5
Over 6 ⁄2 (165.1) to 8 (203.2), incl ⁄32 (4.0) 0 0.085 (2.16)
A
Out-of-round is the difference between the maximum and minimum diameters of the bar, measured at the same cross section.
B
Out-of-square section is the difference in the two dimensions at the same cross section of a square bar, each dimension being the distance between opposite faces.
TABLE 5 Permissible Variations in Distance Between Parallel
Surfaces of Cold Finished Hexagonal, Octagonal, and Square
Bars and Wire
Permissible Variations from Specified
Size, in.
Specified Size, in. (mm) A
(mm)
Plus Minus
0.125 (3.18) to 0.3125 (7.938), excl 0 0.002 (0.05)
0.3125 (7.938) to 0.500 (12.70), excl 0 0.003 (0.08)
0.500 (12.70) to 1.000 (25.40), incl 0 0.004 (0.10)
Over 1 (25.40) to 2 (50.80), incl 0 0.006 (0.15)
Over 2 (50.80) to 3 (76.20), incl 0 0.008 (0.20)
Over 3 (76.20) 0 0.010 (0.25)
A
When it is necessary to heat treat or heat treat and pickle after cold finishing, size
tolerances are double those shown in the table.
TABLE 6 Permissible Variations in Size of Hot-Finished Hexagonal and Octagonal Bars and Rods
Permissible Variations from Specified Size, Maximum Difference,
Specified Sizes Measured Between Opposite in. (mm) in. (mm), 3 Measure-
Sides, in. (mm) ments for Hexagons
Plus Minus
Only
1 1
⁄4 to ⁄2 (6.4 to 12.7), incl 0.007 (0.18) 0.007 (0.18) 0.011 (0.28)
Over ⁄2 to 1 (12.7) to (25.4), incl 0.010 (0.25) 0.010 (0.25) 0.015 (0.38)
Over 1 (25.4) to 1 ⁄2 (38.1), incl 0.021 (0.53) 0.021 (0.53) 0.025 (0.64)
1 1 1 1
Over 1 ⁄2 (38.1) to 2 (50.8), incl ⁄32 (0.8) ⁄32 (0.8) ⁄32 (0.8)
1 3 3 3
Over 2 (50.8) to 2 ⁄2 (63.5), incl ⁄64 (1.2) ⁄64 (1.2) ⁄64 (1.2)
1 1 1 1 1
Over 2 ⁄2 (63.5) to 3 ⁄2 (88.9), incl ⁄16 (1.6) ⁄16 (1.6) ⁄16 (1.6)
9.1.2 Lots for mechanical testing shall consist of the mate- 9.2.2 Sampling for Mechanical Testing—Samples of the
rial from one heat, in the same condition (temper), and of the material to provide test specimens for mechanical testing shall
same specified size (
...


Questions, Comments and Discussion
Ask us and Technical Secretary will try to provide an answer. You can facilitate discussion about the standard in here.
Loading comments...