ASTM F2633-19
(Specification)Standard Specification for Wrought Seamless Nickel-Titanium Shape Memory Alloy Tube for Medical Devices and Surgical Implants
Standard Specification for Wrought Seamless Nickel-Titanium Shape Memory Alloy Tube for Medical Devices and Surgical Implants
ABSTRACT
This specification covers the chemical, mechanical, and dimensional requirements for wrought seamless nickel-titanium shape memory alloy tubes used for the manufacture of medical devices and surgical implants. Tubes shall be furnished in the superelastic condition, and the outer surface shall have a pickled, ground, or mechanically polished finish, or as agreed upon between purchaser and supplier. This specification addresses those product variables that differentiate drawn medical grade tube from the raw material and mill product forms. This specification applies precisely to tube with 10 mm (0.4 in.) and smaller nominal outside diameter and 2 mm (0.08 in.) and thinner nominal wall thickness. The mechanical properties to which the tubes shall conform are ultimate tensile strength (UTS), uniform elongation, upper plateau strength, lower plateau strength, and residual elongation.
SCOPE
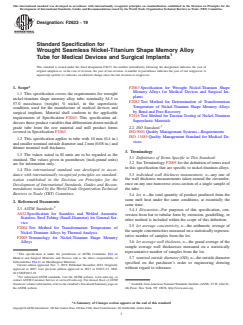
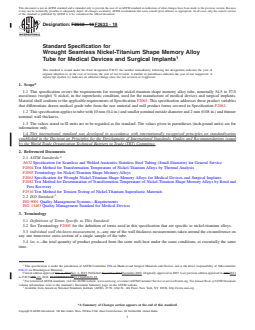
1.1 This specification covers the requirements for wrought nickel-titanium shape memory alloy tube, nominally 54.5 to 57.0 mass/mass (weight) % nickel, in the superelastic condition, used for the manufacture of medical devices and surgical implants. Material shall conform to the applicable requirements of Specification F2063. This specification addresses those product variables that differentiate drawn medical grade tube from the raw material and mill product forms covered in Specification F2063.
1.2 This specification applies to tube with 10 mm (0.4 in.) and smaller nominal outside diameter and 2 mm (0.08 in.) and thinner nominal wall thickness.
1.3 The values stated in SI units are to be regarded as the standard. The values given in parentheses (inch-pound units) are for information only.
1.4 This international standard was developed in accordance with internationally recognized principles on standardization established in the Decision on Principles for the Development of International Standards, Guides and Recommendations issued by the World Trade Organization Technical Barriers to Trade (TBT) Committee.
General Information
- Status
- Published
- Publication Date
- 31-Oct-2019
- Technical Committee
- F04 - Medical and Surgical Materials and Devices
- Drafting Committee
- F04.12 - Metallurgical Materials
Relations
- Effective Date
- 01-Nov-2019
- Effective Date
- 01-Sep-2019
- Effective Date
- 01-Aug-2018
- Effective Date
- 01-Oct-2017
- Effective Date
- 01-Dec-2016
- Effective Date
- 01-May-2015
- Refers
ASTM F2516-14 - Standard Test Method for Tension Testing of Nickel-Titanium Superelastic Materials - Effective Date
- 01-Oct-2014
- Effective Date
- 01-Oct-2014
- Effective Date
- 01-Dec-2012
- Effective Date
- 01-Dec-2010
- Effective Date
- 01-Jun-2010
- Refers
ASTM F2516-07e2 - Standard Test Method for Tension Testing of Nickel-Titanium Superelastic Materials - Effective Date
- 01-Dec-2007
- Refers
ASTM F2516-07e1 - Standard Test Method for Tension Testing of Nickel-Titanium Superelastic Materials - Effective Date
- 01-Dec-2007
- Refers
ASTM F2516-07 - Standard Test Method for Tension Testing of Nickel-Titanium Superelastic Materials - Effective Date
- 01-Dec-2007
- Effective Date
- 15-Aug-2006
Overview
ASTM F2633-19 is the standard specification for wrought seamless nickel-titanium shape memory alloy tubes intended for medical devices and surgical implants. Developed by ASTM International, this standard outlines the chemical, mechanical, and dimensional requirements for nickel-titanium (Nitinol) tubes, which exhibit unique superelastic and shape memory properties. The document ensures that medical-grade tubes meet strict performance and safety criteria, promoting consistency and reliability in products critical to patient care.
This specification applies specifically to seamless tubes with a nominal outside diameter of 10 mm (0.4 in.) or smaller and nominal wall thicknesses of 2 mm (0.08 in.) or thinner. Tubes are delivered in the superelastic condition unless otherwise agreed upon by the supplier and purchaser.
Key Topics
- Material Composition: Specifies nickel content between 54.5% and 57.0% by weight, conforming to ASTM F2063 raw material requirements.
- Product Forms: Covers tubes produced through wrought processes, including drawing and extrusion methods.
- Mechanical Properties: Requires compliance with performance standards for ultimate tensile strength, uniform elongation, upper and lower plateau strengths, and residual elongation.
- Dimensional Tolerances: Defines permissible variations in outside diameter, wall thickness, straightness, and concentricity, improving the consistency of medical device manufacturing.
- Surface Finish: Outlines options for the tube’s outer and inner surface finishes, such as pickled, ground, or mechanically polished, to meet specific device manufacturing needs.
- Quality Management: Mandates adherence to quality management systems like ISO 9001 or ISO 13485 for traceable and controlled manufacturing processes.
- Certification and Reporting: Requires suppliers to certify compliance and provide detailed test results, ensuring traceability and transparency.
Applications
Nickel-titanium shape memory alloy tubes manufactured under ASTM F2633-19 are widely used in the medical industry due to their superelasticity, biocompatibility, and resistance to deformation. Key applications include:
- Stents: Both vascular and non-vascular stents benefit from the tube’s flexibility and ability to return to preset shapes.
- Catheters and Guidewires: The robust yet flexible properties of Nitinol tubes make them ideal for navigating the vascular system.
- Orthopedic Implants: Used for bone anchors, staples, and pins, where shape memory assists in minimally invasive procedures.
- Dental and Endoscopic Devices: Utilized for their corrosion resistance and mechanical reliability during repeated use.
The standard supports device manufacturers in producing consistent, high-quality components that comply with international regulations and maintain patient safety.
Related Standards
Medical device manufacturers and suppliers should be aware of several related standards for seamless nickel-titanium tube production and characterization:
- ASTM F2063: Specification for wrought nickel-titanium shape memory alloys for medical devices and implants (covers raw material forms).
- ASTM F2004: Test method for transformation temperature of nickel-titanium alloys by thermal analysis.
- ASTM F2082: Test method for determining the transformation temperature by bend and free recovery.
- ASTM F2516: Test method for tension testing of nickel-titanium superelastic materials.
- ISO 9001: Quality management systems requirements.
- ISO 13485: Quality management systems for medical devices.
Adhering to ASTM F2633-19 and these related standards facilitates regulatory compliance, improves product consistency, and enhances trust in the safety and effectiveness of critical medical devices and surgical implants.
Keywords: ASTM F2633-19, nickel-titanium tube, Nitinol, shape memory alloy, superelastic alloys, medical devices, surgical implants, stents, seamless tube, ISO 13485.
Buy Documents
ASTM F2633-19 - Standard Specification for Wrought Seamless Nickel-Titanium Shape Memory Alloy Tube for Medical Devices and Surgical Implants
REDLINE ASTM F2633-19 - Standard Specification for Wrought Seamless Nickel-Titanium Shape Memory Alloy Tube for Medical Devices and Surgical Implants
Get Certified
Connect with accredited certification bodies for this standard

Element Materials Technology
Materials testing and product certification.

Inštitut za kovinske materiale in tehnologije
Institute of Metals and Technology. Materials testing, metallurgical analysis, NDT.
Sponsored listings
Frequently Asked Questions
ASTM F2633-19 is a technical specification published by ASTM International. Its full title is "Standard Specification for Wrought Seamless Nickel-Titanium Shape Memory Alloy Tube for Medical Devices and Surgical Implants". This standard covers: ABSTRACT This specification covers the chemical, mechanical, and dimensional requirements for wrought seamless nickel-titanium shape memory alloy tubes used for the manufacture of medical devices and surgical implants. Tubes shall be furnished in the superelastic condition, and the outer surface shall have a pickled, ground, or mechanically polished finish, or as agreed upon between purchaser and supplier. This specification addresses those product variables that differentiate drawn medical grade tube from the raw material and mill product forms. This specification applies precisely to tube with 10 mm (0.4 in.) and smaller nominal outside diameter and 2 mm (0.08 in.) and thinner nominal wall thickness. The mechanical properties to which the tubes shall conform are ultimate tensile strength (UTS), uniform elongation, upper plateau strength, lower plateau strength, and residual elongation. SCOPE 1.1 This specification covers the requirements for wrought nickel-titanium shape memory alloy tube, nominally 54.5 to 57.0 mass/mass (weight) % nickel, in the superelastic condition, used for the manufacture of medical devices and surgical implants. Material shall conform to the applicable requirements of Specification F2063. This specification addresses those product variables that differentiate drawn medical grade tube from the raw material and mill product forms covered in Specification F2063. 1.2 This specification applies to tube with 10 mm (0.4 in.) and smaller nominal outside diameter and 2 mm (0.08 in.) and thinner nominal wall thickness. 1.3 The values stated in SI units are to be regarded as the standard. The values given in parentheses (inch-pound units) are for information only. 1.4 This international standard was developed in accordance with internationally recognized principles on standardization established in the Decision on Principles for the Development of International Standards, Guides and Recommendations issued by the World Trade Organization Technical Barriers to Trade (TBT) Committee.
ABSTRACT This specification covers the chemical, mechanical, and dimensional requirements for wrought seamless nickel-titanium shape memory alloy tubes used for the manufacture of medical devices and surgical implants. Tubes shall be furnished in the superelastic condition, and the outer surface shall have a pickled, ground, or mechanically polished finish, or as agreed upon between purchaser and supplier. This specification addresses those product variables that differentiate drawn medical grade tube from the raw material and mill product forms. This specification applies precisely to tube with 10 mm (0.4 in.) and smaller nominal outside diameter and 2 mm (0.08 in.) and thinner nominal wall thickness. The mechanical properties to which the tubes shall conform are ultimate tensile strength (UTS), uniform elongation, upper plateau strength, lower plateau strength, and residual elongation. SCOPE 1.1 This specification covers the requirements for wrought nickel-titanium shape memory alloy tube, nominally 54.5 to 57.0 mass/mass (weight) % nickel, in the superelastic condition, used for the manufacture of medical devices and surgical implants. Material shall conform to the applicable requirements of Specification F2063. This specification addresses those product variables that differentiate drawn medical grade tube from the raw material and mill product forms covered in Specification F2063. 1.2 This specification applies to tube with 10 mm (0.4 in.) and smaller nominal outside diameter and 2 mm (0.08 in.) and thinner nominal wall thickness. 1.3 The values stated in SI units are to be regarded as the standard. The values given in parentheses (inch-pound units) are for information only. 1.4 This international standard was developed in accordance with internationally recognized principles on standardization established in the Decision on Principles for the Development of International Standards, Guides and Recommendations issued by the World Trade Organization Technical Barriers to Trade (TBT) Committee.
ASTM F2633-19 is classified under the following ICS (International Classification for Standards) categories: 77.150.40 - Nickel and chromium products. The ICS classification helps identify the subject area and facilitates finding related standards.
ASTM F2633-19 has the following relationships with other standards: It is inter standard links to ASTM F2633-13, ASTM A632-19, ASTM F2063-18, ASTM F2004-17, ASTM F2004-16, ASTM F2082-15, ASTM F2516-14, ASTM A632-04(2014), ASTM F2063-12, ASTM F2005-05(2010), ASTM F2004-05(2010), ASTM F2516-07e2, ASTM F2516-07e1, ASTM F2516-07, ASTM F2082-06. Understanding these relationships helps ensure you are using the most current and applicable version of the standard.
ASTM F2633-19 is available in PDF format for immediate download after purchase. The document can be added to your cart and obtained through the secure checkout process. Digital delivery ensures instant access to the complete standard document.
Standards Content (Sample)
This international standard was developed in accordance with internationally recognized principles on standardization established in the Decision on Principles for the
Development of International Standards, Guides and Recommendations issued by the World Trade Organization Technical Barriers to Trade (TBT) Committee.
Designation:F2633 −19
Standard Specification for
Wrought Seamless Nickel-Titanium Shape Memory Alloy
Tube for Medical Devices and Surgical Implants
This standard is issued under the fixed designation F2633; the number immediately following the designation indicates the year of
original adoption or, in the case of revision, the year of last revision. A number in parentheses indicates the year of last reapproval. A
superscript epsilon (´) indicates an editorial change since the last revision or reapproval.
1. Scope* F2063 Specification for Wrought Nickel-Titanium Shape
Memory Alloys for Medical Devices and Surgical Im-
1.1 This specification covers the requirements for wrought
plants
nickel-titanium shape memory alloy tube, nominally 54.5 to
F2082 Test Method for Determination of Transformation
57.0 mass/mass (weight) % nickel, in the superelastic
Temperature of Nickel-Titanium Shape Memory Alloys
condition, used for the manufacture of medical devices and
by Bend and Free Recovery
surgical implants. Material shall conform to the applicable
F2516 Test Method for Tension Testing of Nickel-Titanium
requirements of Specification F2063. This specification ad-
Superelastic Materials
dressesthoseproductvariablesthatdifferentiatedrawnmedical
grade tube from the raw material and mill product forms 2.2 ISO Standard:
covered in Specification F2063. ISO 9001 Quality Management Systems—Requirements
ISO 13485 Quality Management Standard for Medical De-
1.2 This specification applies to tube with 10 mm (0.4 in.)
vices
and smaller nominal outside diameter and 2 mm (0.08 in.) and
thinner nominal wall thickness.
3. Terminology
1.3 The values stated in SI units are to be regarded as the
3.1 Definitions of Terms Specific to This Standard:
standard. The values given in parentheses (inch-pound units)
3.2 See Terminology F2005 for the definition of terms used
are for information only.
in this specification that are specific to nickel-titanium alloys.
1.4 This international standard was developed in accor-
3.3 individual wall thickness measurement, n—any one of
dance with internationally recognized principles on standard-
the wall thickness measurements taken around the circumfer-
ization established in the Decision on Principles for the
ence on any one transverse cross-section of a single sample of
Development of International Standards, Guides and Recom-
the tube.
mendations issued by the World Trade Organization Technical
Barriers to Trade (TBT) Committee.
3.4 lot, n—the total quantity of product produced from the
same melt heat under the same conditions, at essentially the
2. Referenced Documents
same time.
2.1 ASTM Standards:
3.4.1 Discussion—For purposes of this specification, con-
A632 Specification for Seamless and Welded Austenitic
version from bar to tubular form by extrusion, gundrilling, or
Stainless Steel Tubing (Small-Diameter) for General Ser-
other method is included within the scope of this definition.
vice
3.5 lot average concentricity, n—the arithmetic average of
F2004 Test Method for Transformation Temperature of
the sample concentricities measured on a statistically represen-
Nickel-Titanium Alloys by Thermal Analysis
tative number of samples from the lot.
F2005 Terminology for Nickel-Titanium Shape Memory
Alloys 3.6 lot average wall thickness, n—the grand average of the
sample average wall thicknesses measured on a statistically
representative number of samples from the lot.
This specification is under the jurisdiction of ASTM Committee F04 on
Medical and Surgical Materials and Devices and is the direct responsibility of
3.7 nominal outside diameter (OD), n—theoutsidediameter
Subcommittee F04.12 on Metallurgical Materials.
specified on the purchaser’s order or engineering drawing
Current edition approved Nov. 1, 2019. Published December 2019. Originally
without regard to tolerance.
approved in 2007. Last previous edition approved in 2013 as F2633–13. DOI:
10.1520/F2633-19.
For referenced ASTM standards, visit the ASTM website, www.astm.org, or
contact ASTM Customer Service at service@astm.org. For Annual Book of ASTM
Standards volume information, refer to the standard’s Document Summary page on Available fromAmerican National Standards Institute (ANSI), 25 W. 43rd St.,
the ASTM website. 4th Floor, New York, NY 10036, http://www.ansi.org.
*A Summary of Changes section appears at the end of this standard
Copyright © ASTM International, 100 Barr Harbor Drive, PO Box C700, West Conshohocken, PA 19428-2959. United States
F2633−19
3.8 nominal wall thickness, n—the wall thickness specified 4.1.8 Length (exact or random, see 9.4),
bythepurchaser’sorderorengineeringdrawingwithoutregard 4.1.9 Dimensional Tolerances (see Table 2 and Table 3),
to tolerance. 4.1.10 Certification requirements (see Section 11), and
4.1.11 Specialrequirementsorsupplementaryrequirements,
3.9 sample average wall thickness, n—the arithmetic aver-
if any.
age of all individual wall thickness measurements measured on
a single sample.
5. Materials and Manufacture
3.10 sample concentricity, n—two times the offset between
5.1 Method of Manufacture:
the centers of the two circles representing the outside diameter
5.1.1 Seamless tube shall be made from bar, hollow bar, or
(OD) and the inside diameter (ID) of the tube.
tube raw material forms that meet the requirements of Speci-
3.10.1 Discussion—For purposes of this specification, the
fication F2063.
sample minimum wall and the sample maximum wall mea-
5.1.2 Seamless tube shall be made by a process in which the
sured on any one transverse cross section of a single sample
tube periphery is continuous at all stages of the process.
shall be used to calculate concentricity. Also, for purposes of
5.2 Condition—Tube shall be furnished in the superelastic
this specification, sample concentricity shall be expressed as a
condition or as agreed upon between purchaser and supplier.
percent and shall be calculated using the following equation:
5.3 Surface Finish:
A 2 B
Sample concentricity percent 5 2 3 3100
F G
5.3.1 The tube outer surface shall be furnished, as specified
A1B
by the purchaser, with a uniform, adherent oxide of any color,
where:
chemically etched, ground, or mechanically polished finish.
A = sample maximum wall, and
Other finishes may be agreed upon between purchaser and
B = sample minimum wall.
supplier.
5.3.2 The tube inner surface shall be furnished, as specified
3.11 sample maximum wall thickness, n—the largest indi-
by the purchaser, with a uniform, adherent oxide of any color,
vidual wall thickness measurement taken around the circum-
chemically etched, or mechanically conditioned finish.
ference on any one transverse cross section of a single sample
5.3.3 Inner and outer surface roughness and the method of
of tube.
measurement shall be as agreed upon between the purchaser
3.11.1 Discussion—In practice, the sample maximum wall
and supplier.
thicknessmaybethelargestofnolessthanfourindividualwall
thickness measurements taken at uniformly spaced locations
6. Chemical Composition
around the circumference of a single sample of the tube.
6.1 Seamless tube shall be made from bar, hollow bar, or
3.12 sample minimum wall thickness, n—the smallest indi-
tube raw material forms that meet the chemical composition
vidual wall thickness measurement taken around the circum-
requirements of Specification F2063.
ference on any one transverse cross section of a single sample
6.2 Hydrogen content shall be analyzed and reported when
of tube.
required by the purchaser. The analysis shall be made on the
3.12.1 Discussion—In practice, the sample minimum wall
finished tube.
thickness may be the smallest of no less than four individual
wall thickness measurements taken at uniformly spaced loca-
7. Transformation Temperature
tions around the circumference of a single sample of the tube.
7.1 The raw material manufacturer shall measure the ingot
4. Ordering Information transformation temperature of the raw material on fully an-
nealed samples per Test Method F2004 as required in Speci-
4.1 Inquiries and orders for material under this specification
fication F2063.The raw material supplier shall report the ingot
may include the following information:
austenite finish (ingot A ) transformation temperature as well
f
4.1.1 Quantity (total length or number of pieces),
as any of ingot Martensite finish (M ), Martensite peak (M ),
f p
4.1.2 This ASTM specification and date of issue,
Martensitestart(M ),Austenitestart(A ),orAustenitepeakA
s s p
4.1.3 Condition (see 5.2),
transformation temperatures as required by the raw material
4.1.4 Active Austenite Finish Temperature (see 7.3),
purchaser. Each ingot transformation temperature reported will
4.1.5 Mechanical Properties (see Table 1),
be clearly labeled by transformation type.
4.1.6 Surface Finish (see 5.3),
4.1.7 Nominal Dimensions including either OD and ID, OD 7.2 The ingot A and any other appropriate ingot transfor-
f
and wall, or ID and wall, or engineering drawing number, mation temperature reported by the raw material supplier may
TABLE 1 Mechanical Properties
UTS Uniform Elongation Upper Plateau Strength Lower Plateau Strength Residual Elongation
Condition Min MPa (ksi) Min % in 50 mm (2 in.) or Min MPa (ksi) at 3 % Min MPa (ksi) at 2.5 % Max % after 6 % strain
4D strain strain
A B
Superelastic 1000 (145) 10 380 (55) 0.3 %
A
Superelastic properties are measured per Test Method F2516 at room temperature.
B
Lower plateau strength value may be measured and reported for information only.
F2633−19
TABLE 2 Permissible Variation in OD or ID Dimensions
transverse metallographic cross section, or by some other
Nominal OD or ID in mm (in.) Permissible Variation appropriate method. The method of wall thickness measure-
from Nominal in mm (in.)
ment shall be agreed upon between purchaser and supplier.
Less than or equal to 1.5 (0.059) ±0.025 (0.001)
1.5 to 6.5 (0.059 to 0.256) incl ±0.050 (0.002)
9.3 Concentricity:
6.5 to 10 (0.256 to 1.2) incl ±0.075 (0.003)
9.3.1 Concentricity shall be measured and reported when
specified by the purchaser.
9.3.1.1 For wall thickness of 0.2 mm (0.008 in.) or greater
TABLE 3 Permissible Variation in Wall Thickness Dimensions
and OD/W ratio of 15 or less, all sample concentricities shall
Nominal Wall Thickness Permissible Wall
be less than or equal to 10 %. For tube with nominal wall
Thickness Variation
Less than 0.2 mm (0.008 in.) ±0.025 mm (0.001 in.) thickness less than 0.2 mm (0.008 in.) or OD/W ratio greater
from nominal wall thickness
than 15, concentricity shall be agreed upon between purchaser
Greater than or equal to 0.2 mm ±12 % of
A and supplier.
(0.008 in.) nominal wall thickness
9.3.2 This concentricity requirement does not apply to tube
A
The ±12 % tolerance for a particular nominal wall thickness may be converted to
specified as OD and ID unless agreed upon between purchaser
a decimal by multiplying 0.12 times the nominal wall thickness and rounding to the
appropriate decimal place.
and supplier.
9.3.3 Alternate means of calculating and reporting concen-
tricity may be agreed upon between purchaser and supplier.
be reported on the finished tube certification as the ingot
9.4 Length:
transformation temperature when required by the finish tube
9.4.1 For exact length orders, nominal length and length
purchaser. Each ingot transformation temperature reported will
variation shall be agreed upon between purchaser and supplier.
be clearly labeled by the transformation ty
...
This document is not an ASTM standard and is intended only to provide the user of an ASTM standard an indication of what changes have been made to the previous version. Because
it may not be technically possible to adequately depict all changes accurately, ASTM recommends that users consult prior editions as appropriate. In all cases only the current version
of the standard as published by ASTM is to be considered the official document.
Designation: F2633 − 13 F2633 − 19
Standard Specification for
Wrought Seamless Nickel-Titanium Shape Memory Alloy
Tube for Medical Devices and Surgical Implants
This standard is issued under the fixed designation F2633; the number immediately following the designation indicates the year of
original adoption or, in the case of revision, the year of last revision. A number in parentheses indicates the year of last reapproval. A
superscript epsilon (´) indicates an editorial change since the last revision or reapproval.
1. Scope*
1.1 This specification covers the requirements for wrought nickel-titanium shape memory alloy tube, nominally 54.5 to 57.0
mass/mass (weight) % nickel, in the superelastic condition, used for the manufacture of medical devices and surgical implants.
Material shall conform to the applicable requirements of Specification F2063. This specification addresses those product variables
that differentiate drawn medical grade tube from the raw material and mill product forms covered in Specification F2063.
1.2 This specification applies to tube with 10 mm (0.4 in.) and smaller nominal outside diameter and 2 mm (0.08 in.) and thinner
nominal wall thickness.
1.3 The values stated in SI units are to be regarded as the standard. The values given in parentheses (inch-pound units) are for
information only.
1.4 This international standard was developed in accordance with internationally recognized principles on standardization
established in the Decision on Principles for the Development of International Standards, Guides and Recommendations issued
by the World Trade Organization Technical Barriers to Trade (TBT) Committee.
2. Referenced Documents
2.1 ASTM Standards:
A632 Specification for Seamless and Welded Austenitic Stainless Steel Tubing (Small-Diameter) for General Service
F2004 Test Method for Transformation Temperature of Nickel-Titanium Alloys by Thermal Analysis
F2005 Terminology for Nickel-Titanium Shape Memory Alloys
F2063 Specification for Wrought Nickel-Titanium Shape Memory Alloys for Medical Devices and Surgical Implants
F2082 Test Method for Determination of Transformation Temperature of Nickel-Titanium Shape Memory Alloys by Bend and
Free Recovery
F2516 Test Method for Tension Testing of Nickel-Titanium Superelastic Materials
2.2 ISO Standard:
ISO 9001 Quality Management Systems—Requirements
ISO 13485 Quality Management Standard for Medical Devices
3. Terminology
3.1 Definitions of Terms Specific to This Standard:
3.2 See Terminology F2005 for the definition of terms used in this specification that are specific to nickel-titanium alloys.
3.3 individual wall thickness measurement, n—any one of the wall thickness measurements taken around the circumference on
any one transverse cross-section of a single sample of the tube.
3.4 lot, n—the total quantity of product produced from the same melt heat under the same conditions, at essentially the same
time.
This specification is under the jurisdiction of ASTM Committee F04 on Medical and Surgical Materials and Devices and is the direct responsibility of Subcommittee
F04.12 on Metallurgical Materials.
Current edition approved Oct. 1, 2013Nov. 1, 2019. Published November 2013December 2019. Originally approved in 2007. Last previous edition approved in 20072013
as F2633–07.–13. DOI: 10.1520/F2633-13.10.1520/F2633-19.
For referenced ASTM standards, visit the ASTM website, www.astm.org, or contact ASTM Customer Service at service@astm.org. For Annual Book of ASTM Standards
volume information, refer to the standard’s Document Summary page on the ASTM website.
Available from American National Standards Institute (ANSI), 25 W. 43rd St., 4th Floor, New York, NY 10036, http://www.ansi.org.
*A Summary of Changes section appears at the end of this standard
Copyright © ASTM International, 100 Barr Harbor Drive, PO Box C700, West Conshohocken, PA 19428-2959. United States
F2633 − 19
3.4.1 Discussion—
For purposes of this specification, conversion from bar to tubular form by extrusion, gundrilling, or other method is included within
the scope of this definition.
3.5 lot average concentricity, n—the arithmetic average of the sample concentricities measured on a statistically representative
number of samples from the lot.
3.6 lot average wall thickness, n—the grand average of the sample average wall thicknesses measured on a statistically
representative number of samples from the lot.
3.7 nominal outside diameter (OD), n—the outside diameter specified on the purchaser’s order or engineering drawing without
regard to tolerance.
3.8 nominal wall thickness, n—the wall thickness specified by the purchaser’s order or engineering drawing without regard to
tolerance.
3.9 sample average wall thickness, n—the arithmetic average of all individual wall thickness measurements measured on a
single sample.
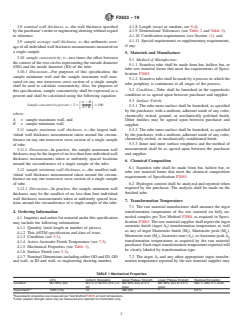
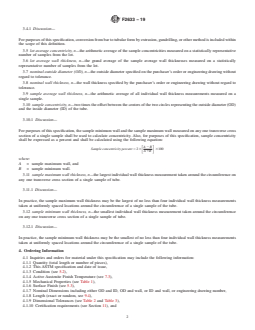
3.10 sample concentricity, n—two times the offset between the centers of the two circles representing the outside diameter (OD)
and the inside diameter (ID) of the tube.
3.10.1 Discussion—
For purposes of this specification, the sample minimum wall and the sample maximum wall measured on any one transverse cross
section of a single sample shall be used to calculate concentricity. Also, for purposes of this specification, sample concentricity
shall be expressed as a percent and shall be calculated using the following equation:
A 2 B
Sample concentricity percent 5 23 3100
F G
A1B
where:
A = sample maximum wall, and
B = sample minimum wall.
3.11 sample maximum wall thickness, n—the largest individual wall thickness measurement taken around the circumference on
any one transverse cross section of a single sample of tube.
3.11.1 Discussion—
In practice, the sample maximum wall thickness may be the largest of no less than four individual wall thickness measurements
taken at uniformly spaced locations around the circumference of a single sample of the tube.
3.12 sample minimum wall thickness, n—the smallest individual wall thickness measurement taken around the circumference
on any one transverse cross section of a single sample of tube.
3.12.1 Discussion—
In practice, the sample minimum wall thickness may be the smallest of no less than four individual wall thickness measurements
taken at uniformly spaced locations around the circumference of a single sample of the tube.
4. Ordering Information
4.1 Inquiries and orders for material under this specification may include the following information:
4.1.1 Quantity (total length or number of pieces),
4.1.2 This ASTM specification and date of issue,
4.1.3 Condition (see 5.2),
4.1.4 Active Austenite Finish Temperature (see 7.3),
4.1.5 Mechanical Properties (see Table 1),
4.1.6 Surface Finish (see 5.3),
4.1.7 Nominal Dimensions including either OD and ID, OD and wall, or ID and wall, or engineering drawing number,
4.1.8 Length (exact or random, see 9.4),
4.1.9 Dimensional Tolerances (see Table 2 and Table 3),
4.1.10 Certification requirements (see Section 11), and
F2633 − 19
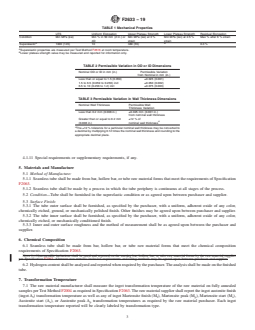
TABLE 1 Mechanical Properties
UTS Uniform Elongation Upper Plateau Strength Lower Plateau Strength Residual Elongation
Condition Min MPa (ksi) Min % in 50 mm (2 in.) or Min MPa (ksi) at 3 % Min MPa (ksi) at 2.5 % Max % after 6 % strain
4D strain strain
A B
Superelastic 1000 (145) 10 380 (55) 0.3 %
A
Superelastic properties are measured per Test Method F2516 at room temperature.
B
Lower plateau strength value may be measured and reported for information only.
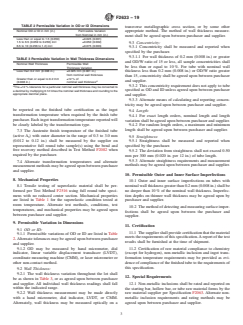
TABLE 2 Permissible Variation in OD or ID Dimensions
Nominal OD or ID in mm (in.) Permissible Variation
from Nominal in mm (in.)
Less than or equal to 1.5 (0.059) ±0.025 (0.001)
1.5 to 6.5 (0.059 to 0.256) incl ±0.050 (0.002)
6.5 to 10 (0.256 to 1.2) incl ±0.075 (0.003)
TABLE 3 Permissible Variation in Wall Thickness Dimensions
Nominal Wall Thickness Permissible Wall
Thickness Variation
Less than 0.2 mm (0.008 in.) ±0.025 mm (0.001 in.)
from nominal wall thickness
Greater than or equal to 0.2 mm ±12 % of
A
(0.008 in.) nominal wall thickness
A
The ±12 % tolerance for a particular nominal wall thickness may be converted to
a decimal by multiplying 0.12 times the nominal wall thickness and rounding to the
appropriate decimal place.
4.1.11 Special requirements or supplementary requirements, if any.
5. Materials and Manufacture
5.1 Method of Manufacture:
5.1.1 Seamless tube shall be made from bar, hollow bar, or tube raw material forms that meet the requirements of Specification
F2063.
5.1.2 Seamless tube shall be made by a process in which the tube periphery is continuous at all stages of the process.
5.2 Condition—Tube shall be furnished in the superelastic condition or as agreed upon between purchaser and supplier.
5.3 Surface Finish:
5.3.1 The tube outer surface shall be furnished, as specified by the purchaser, with a uniform, adherent oxide of any color,
chemically etched, ground, or mechanically polished finish. Other finishes may be agreed upon between purchaser and supplier.
5.3.2 The tube inner surface shall be furnished, as specified by the purchaser, with a uniform, adherent oxide of any color,
chemically etched, or mechanically conditioned finish.
5.3.3 Inner and outer surface roughness and the method of measurement shall be as agreed upon between the purchaser and
supplier.
6. Chemical Composition
6.1 Seamless tube shall be made from bar, hollow bar, or tube raw material forms that meet the chemical composition
requirements of Specification F2063.
NOTE 1—Non-metallic inclusions shall be rated and reported on the starting bar, hollow bar, or tube raw material forms by the raw material supplier
per Specification F2063. Alternate non-metallic inclusion requirements and rating methods may be agreed upon between purchaser and supplier.
6.2 Hydrogen content shall be analyzed and reported when required by the purchaser. The analysis shall be made on the finished
tube.
7. Transformation Temperature
7.1 The raw material manufacturer shall measure the ingot transformation temperature of the raw material on fully annealed
samples per Test Method F2004 as required in Specification F2063. The raw material supplier shall report the ingot austenite finish
(ingot A ) transformation temperature as well as any of ingot Martensite finish (M ), Martensite peak (M ), Martensite start (M ),
f f p s
Austenite start (A ), or Austenite peak A transformation temperatures as required by the raw material purchaser. Each ingot
s p
transformation temperature reported will be clearly labeled by transformation type.
F2633 − 19
7.2 The ingot A and any other appropriate ingot transformation temperature reported by the raw material supplier may be
f
reported on the finished tube certification as the ingot transformation temperature when required by the finish tube purchaser. Each
ingot transformation temperature reported will be clearly labeled by the transformation type.
7.3 The Austenite finish temperature of the finished tube (active A ) with outer diameter in the range of 0.3 to 3.0 mm (0.012
f
to 0.12 in.) shall be measured by the supplier on representative full round tube sample(s) using the bend and free recovery method
described in Test Method F2082 when required by the purchaser.
7.4 Alternate transformation temperatures and alternate measurement methods may be agreed upon between purchaser and
supplier.
8. Mechanical Properties
8.1 Tensile testing of superelastic material shall be performed per Test Method F2516 using full round tube specimens with no
reduced center section. Mechanical properties are listed in Table 1 for the superelastic condition tested at room temperature.
Alternate test methods, conditions, test temperatures, and mechanical properties may be agreed upon between purchaser and
supplier.
9. Permissible Variation in Di
...
Questions, Comments and Discussion
Ask us and Technical Secretary will try to provide an answer. You can facilitate discussion about the standard in here.
Loading comments...