ASTM F812-12
(Specification)Standard Specification for Surface Discontinuities of Nuts, Inch and Metric Series
Standard Specification for Surface Discontinuities of Nuts, Inch and Metric Series
ABSTRACT
This specification establishes allowable limits for the various types of surface discontinuities such as cracks that may occur during the manufacture and processing of metric-series nuts and inch-series nuts. The different types of surface discontinuities and allowable limits are presented in details. The nuts shall be inspected for surface discontinuities to meet the requirements prescribed. Cone proof load test shall be performed to meet the requirements prescribed.
SCOPE
1.1 This specification establishes allowable limits for the various types of surface discontinuities that may occur during the manufacture and processing of metric-series nuts with nominal diameters 5 mm and larger and inch-series nuts with nominal diameters 1/4 in. and larger.
1.2 The values stated in either SI (metric) or inch-pound units are to be regarded separately as standard. The values stated in each system are not exact equivalents; therefore, each system must be used independently of the other. Combining values from the two systems may result in nonconformance with the specification.
1.3 When the engineering requirements of the application necessitate control of surface discontinuities on nuts, the purchaser shall specify conformance to this ASTM specification in the original inquiry and purchase order.
1.3.1 When the engineering requirements of the application necessitate that surface discontinuities on nuts be controlled within limits closer than those specified in this specification, the purchaser shall specify the applicable limits in the original inquiry and purchase order.
1.4 The allowable limits established in this specification for metric nuts, with nominal diameters 5 to 24 mm inclusive, are essentially identical with requirements given in ISO/DIS 6157/II. There are no ISO standards for surface discontinuities on metric-series nuts with nominal diameters larger than 24 mm or on any inch-series nuts.
1.5 The following precautionary caveat pertains only to the test method portion, Section 7, of this specification: This standard does not purport to address all of the safety concerns, if any, associated with its use. It is the responsibility of the user of this standard to establish appropriate safety and health practices and determine the applicability of regulatory limitations prior to use.
General Information
Relations
Buy Standard
Standards Content (Sample)
NOTICE: This standard has either been superseded and replaced by a new version or withdrawn.
Contact ASTM International (www.astm.org) for the latest information
Designation:F812 −12
Standard Specification for
1
Surface Discontinuities of Nuts, Inch and Metric Series
ThisstandardisissuedunderthefixeddesignationF812;thenumberimmediatelyfollowingthedesignationindicatestheyearoforiginal
adoption or, in the case of revision, the year of last revision.Anumber in parentheses indicates the year of last reapproval.Asuperscript
epsilon (´) indicates an editorial change since the last revision or reapproval.
This standard has been approved for use by agencies of the U.S. Department of Defense.
1. Scope* 2. Referenced Documents
2
2.1 ASTM Standards:
1.1 This specification establishes allowable limits for the
various types of surface discontinuities that may occur during F606 Test Methods for Determining the Mechanical Proper-
ties of Externally and Internally Threaded Fasteners,
the manufacture and processing of metric-series nuts with
nominal diameters 5 mm and larger and inch-series nuts with Washers, Direct Tension Indicators, and Rivets
1
nominal diameters ⁄4 in. and larger. F606M Test Methods for Determining the Mechanical Prop-
erties of Externally and Internally Threaded Fasteners,
1.2 The values stated in either SI (metric) or inch-pound
Washers, and Rivets (Metric)
units are to be regarded separately as standard. The values
F1470 Practice for Fastener Sampling for Specified Me-
stated in each system are not exact equivalents; therefore, each
chanical Properties and Performance Inspection
system must be used independently of the other. Combining
F1789 Terminology for F16 Mechanical Fasteners
values from the two systems may result in nonconformance
2.2 ISO Standard:
with the specification.
ISO/DIS 6157/II Fasteners, Surface Discontinuities on
1.3 When the engineering requirements of the application 3
Nuts
necessitate control of surface discontinuities on nuts, the
purchaser shall specify conformance to this ASTM specifica-
3. Ordering Information
tion in the original inquiry and purchase order.
3.1 Orders for nuts requiring surface discontinuity control
1.3.1 When the engineering requirements of the application
shall include:
necessitate that surface discontinuities on nuts be controlled
3.1.1 ASTM designation and date of issue of this specifica-
within limits closer than those specified in this specification,
tion.
the purchaser shall specify the applicable limits in the original
3.1.2 Special requirements, for example, closer discontinu-
inquiry and purchase order.
ity limits (1.3.1) and inspection sampling plan (6.2).
1.4 The allowable limits established in this specification for
4. Types of Surface Discontinuities (See Standard F1789
metric nuts, with nominal diameters 5 to 24 mm inclusive, are
for definitions not provided)
essentially identical with requirements given in ISO/DIS 6157/
II. There are no ISO standards for surface discontinuities on
4.1 Crack:
metric-seriesnutswithnominaldiameterslargerthan24mmor
4.1.1 Quench Cracks—Typical quench cracks are shown in
on any inch-series nuts.
Fig. 1; limits are specified in 5.2.
4.1.2 Forging Cracks—Typical forging cracks are shown in
1.5 The following precautionary caveat pertains only to the
Fig. 2; limits are specified in 5.3.
test method portion, Section 7, of this specification:This
4.1.3 Inclusion Cracks—Normally caused by nonmetallic
standard does not purport to address all of the safety concerns,
inclusions or stringers inherent in the raw material. Typical
if any, associated with its use. It is the responsibility of the user
inclusion cracks are shown in Fig. 2; limits are specified in 5.3.
of this standard to establish appropriate safety and health
4.1.4 Locking-Element Cracks—Occur due to application of
practices and determine the applicability of regulatory limita-
pressure when forming the locking element of prevailing
tions prior to use.
torque-typenuts.Suchcracksareusuallylocatedinthevicinity
1 2
This specification is under the jurisdiction of ASTM Committee F16 on For referenced ASTM standards, visit the ASTM website, www.astm.org, or
Fasteners and is the direct responsibility of Subcommittee F16.93 on Quality contact ASTM Customer Service at service@astm.org. For Annual Book of ASTM
Assurance Provisions for Fasteners. Standards volume information, refer to the standard’s Document Summary page on
Current edition approved Oct. 1, 2012. Published November 2012. Originally the ASTM website.
3
approved in 1983. Last previous edition approved in 2007 as F812/F812M – 07. Available from American National Standards Institute (ANSI), 25 W. 43rd St.,
DOI: 10.1520/F0812-12. 4th Floor, New York, NY 10036, http://www.ansi.org.
*A Summary of Changes section appears at the end of this standard
Copyright © ASTM International, 100 Barr Harbor Drive, PO Box C700, West Conshohocken, PA 19428-2959. United States
1
---------------------- Page: 1 ----------------------
F812−12
...
Designation: F812/F812M − 07 F812 − 12
Standard Specification for
1
Surface Discontinuities of Nuts, Inch and Metric Series
This standard is issued under the fixed designation F812/F812M;F812; the number immediately following the designation indicates the
year of original adoption or, in the case of revision, the year of last revision. A number in parentheses indicates the year of last
reapproval. A superscript epsilon (´) indicates an editorial change since the last revision or reapproval.
This standard has been approved for use by agencies of the Department of Defense.
1. Scope*
1.1 This specification establishes allowable limits for the various types of surface discontinuities that may occur during the
manufacture and processing of metric-series nuts with nominal diameters 5 mm and larger and inch-series nuts with nominal
1
diameters ⁄4 in. and larger.
1.2 The values stated in either SI (metric) or inch-pound units are to be regarded separately as standard. The values stated in
each system are not exact equivalents; therefore, each system must be used independently of the other. Combining values from
the two systems may result in nonconformance with the specification.
1.3 When the engineering requirements of the application necessitate control of surface discontinuities on nuts, the purchaser
shall specify conformance to this ASTM specification in the original inquiry and purchase order.
1.3.1 When the engineering requirements of the application necessitate that surface discontinuities on nuts be controlled within
limits closer than those specified in this specification, the purchaser shall specify the applicable limits in the original inquiry and
purchase order.
1.4 The allowable limits established in this specification for metric nuts, with nominal diameters 5 to 24 mm inclusive, are
essentially identical with requirements given in ISO/DIS 6157/II. There are no ISO standards for surface discontinuities on
metric-series nuts with nominal diameters larger than 24 mm or on any inch-series nuts.
1.5 The following precautionary caveat pertains only to the test method portion, Section 7, of this specification:This standard
does not purport to address all of the safety concerns, if any, associated with its use. It is the responsibility of the user of this
standard to establish appropriate safety and health practices and determine the applicability of regulatory limitations prior to use.
2. Referenced Documents
2
2.1 ASTM Standards:
F606 Test Methods for Determining the Mechanical Properties of Externally and Internally Threaded Fasteners, Washers, Direct
Tension Indicators, and Rivets
F606M Test Methods for Determining the Mechanical Properties of Externally and Internally Threaded Fasteners, Washers, and
Rivets (Metric)
F1470 Practice for Fastener Sampling for Specified Mechanical Properties and Performance Inspection
F1789 Terminology for F16 Mechanical Fasteners
2.2 ISO Standard:
3
ISO/DIS 6157/II Fasteners, Surface Discontinuities on Nuts
3. Ordering Information
3.1 Orders for nuts requiring surface discontinuity control shall include:
3.1.1 ASTM designation and date of issue of this specification.
3.1.2 Special requirements, for example, closer discontinuity limits (1.3.1) and inspection sampling plan (6.2).
4. Types of Surface Discontinuities (See Standard F1789 for definitions not provided)
4.1 Crack:
4.1.1 Quench Cracks—Typical quench cracks are shown in Fig. 1; limits are specified in 5.2.
4.1.2 Forging Cracks—Typical forging cracks are shown in Fig. 2; limits are specified in 5.3.
4.1.3 Inclusion Cracks—Normally caused by nonmetallic inclusions or stringers inherent in the raw material. Typical inclusion
cracks are shown in Fig. 2; limits are specified in 5.3.
*A Summary of Changes section appears at the end of this standard
Copyright © ASTM International, 100 Barr Harbor Drive, PO Box C700, West Conshohocken, PA 19428-2959. United States
1
---------------------- Page: 1 ----------------------
F812 − 12
FIG. 1 Typical Quench Cracks in Nuts
FIG. 2 Typical Forging and Inclusion Cracks in Nuts
4.1.4 Locking-Element Cracks—Occur due to application of pressure when forming the locking element of prevailing
torque-type nuts. Such cracks are usually located in the vicinity of the locking element and may be either on the internal or external
surface. Typical locking element cracks are shown in Fig. 3; limits are specified in 5.4.
4.1.5 Washer-Retainer Cracks—Openings in the lip or hub of metal used to retain a washer on a nut. Washer-retainer cracks may
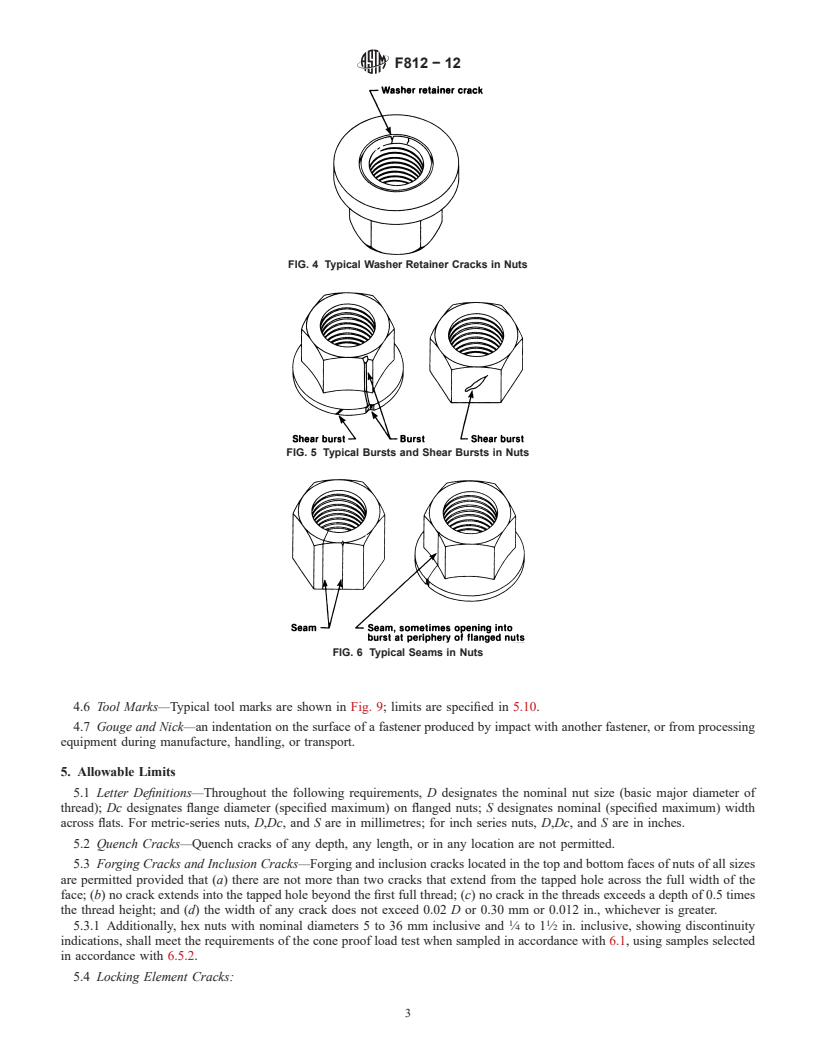
occur when pressure is applied to the lip or hub during assembly of the washer. Typical washer-retainer cracks are shown in Fig.
4; limits are specified in 5.5.
4.2 Burst—A typical burst is shown in Fig. 5; limits are specified in 5.6.
4.2.1 Shear Burst—A typical shear burst is shown in Fig. 5; limits are specified in 5.6.
4.3 Seam—Typical seams are shown in Fig. 6; limits are specified in 5.7.
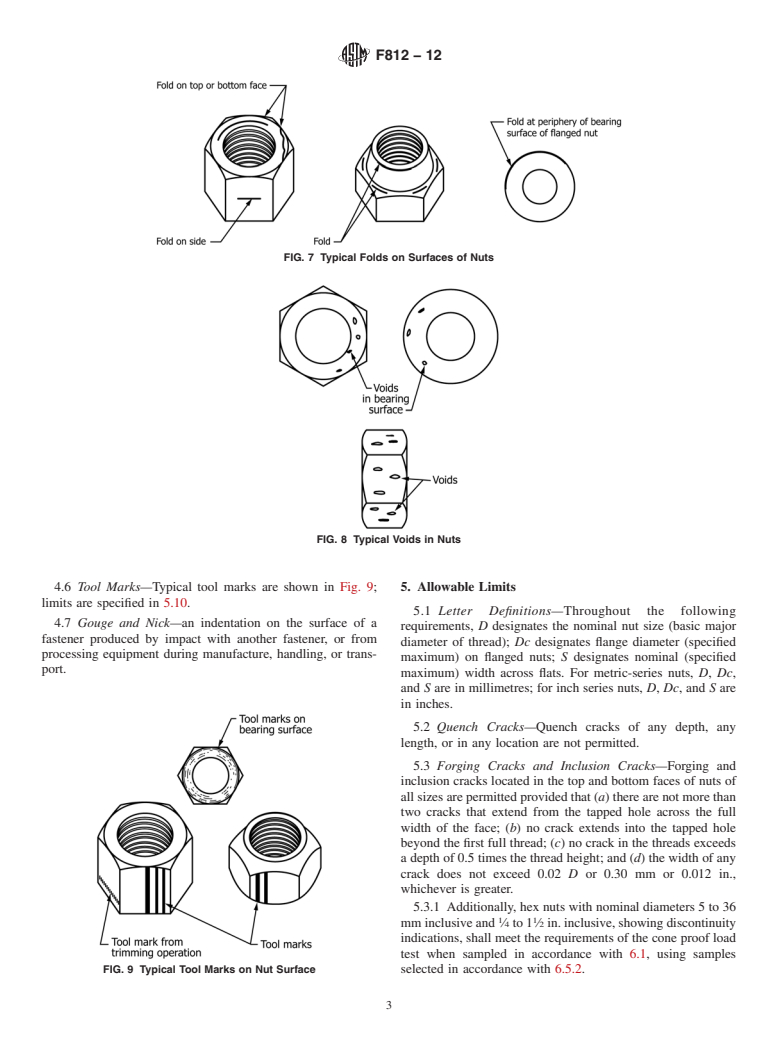
4.4 Fold—Typical folds are shown in Fig. 7; limits are specified in 5.8.
4.5 Voi
...


Questions, Comments and Discussion
Ask us and Technical Secretary will try to provide an answer. You can facilitate discussion about the standard in here.