ASTM C1326-13
(Test Method)Standard Test Method for Knoop Indentation Hardness of Advanced Ceramics
Standard Test Method for Knoop Indentation Hardness of Advanced Ceramics
SIGNIFICANCE AND USE
5.1 For advanced ceramics, Knoop indenters are used to create indentations. The surface projection of the long diagonal is measured with optical microscopes.
5.2 The Knoop indentation hardness is one of many properties that is used to characterize advanced ceramics. Attempts have been made to relate Knoop indentation hardness to other hardness scales, but no generally accepted methods are available. Such conversions are limited in scope and should be used with caution, except for special cases where a reliable basis for the conversion has been obtained by comparison tests.
5.3 For advanced ceramics, the Knoop indentation is often preferred to the Vickers indentation since the Knoop long diagonal length is 2.8 times longer than the Vickers diagonal for the same force, and cracking is much less of a problem (1).5 On the other hand, the long slender tip of the Knoop indentation is more difficult to precisely discern, especially in materials with low contrast. The indentation forces chosen in this test method are designed to produce indentations as large as may be possible with conventional microhardness equipment, yet not so large as to cause cracking.
5.4 The Knoop indentation is shallower than Vickers indentations made at the same force. Knoop indents may be useful in evaluating coating hardnesses.
5.5 Knoop hardness is calculated from the ratio of the applied force divided by the projected indentation area on the specimen surface. It is assumed that the elastic springback of the narrow diagonal is negligible. (Vickers indenters are also used to measure hardness, but Vickers hardness is calculated from the ratio of applied force to the area of contact of the four faces of the undeformed indenter.)
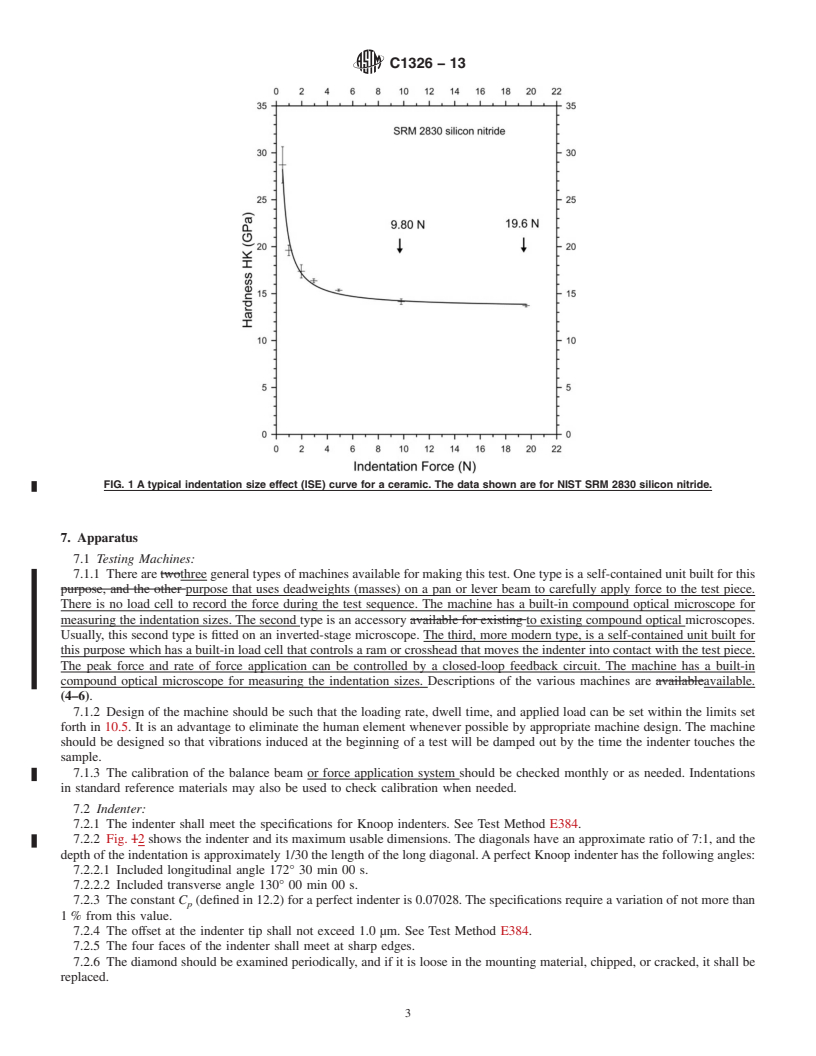
5.6 A full hardness characterization includes measurements over a broad range of indentation forces. Knoop hardness of ceramics usually decreases with increasing indentation size or indentation force such as that shown in Fig. 1.
SCOPE
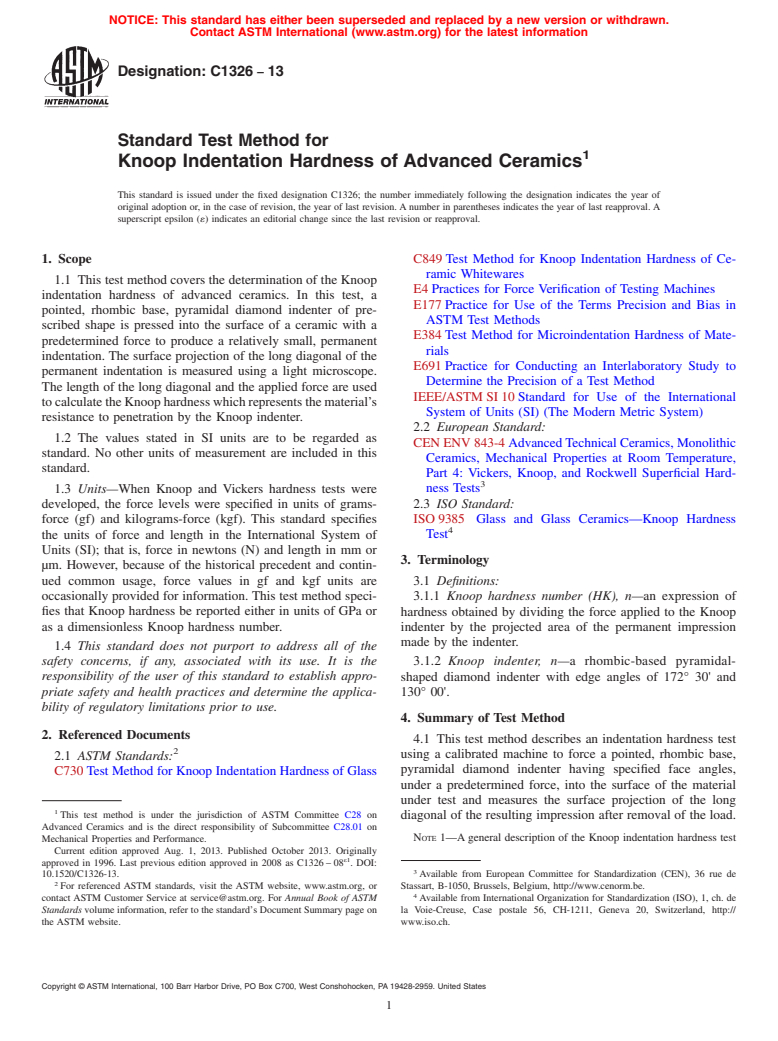
1.1 This test method covers the determination of the Knoop indentation hardness of advanced ceramics. In this test, a pointed, rhombic base, pyramidal diamond indenter of prescribed shape is pressed into the surface of a ceramic with a predetermined force to produce a relatively small, permanent indentation. The surface projection of the long diagonal of the permanent indentation is measured using a light microscope. The length of the long diagonal and the applied force are used to calculate the Knoop hardness which represents the material’s resistance to penetration by the Knoop indenter.
1.2 The values stated in SI units are to be regarded as standard. No other units of measurement are included in this standard.
1.3 Units—When Knoop and Vickers hardness tests were developed, the force levels were specified in units of grams-force (gf) and kilograms-force (kgf). This standard specifies the units of force and length in the International System of Units (SI); that is, force in newtons (N) and length in mm or μm. However, because of the historical precedent and continued common usage, force values in gf and kgf units are occasionally provided for information. This test method specifies that Knoop hardness be reported either in units of GPa or as a dimensionless Knoop hardness number.
1.4 This standard does not purport to address all of the safety concerns, if any, associated with its use. It is the responsibility of the user of this standard to establish appropriate safety and health practices and determine the applicability of regulatory limitations prior to use.
General Information
Relations
Buy Standard
Standards Content (Sample)
NOTICE: This standard has either been superseded and replaced by a new version or withdrawn.
Contact ASTM International (www.astm.org) for the latest information
Designation: C1326 − 13
Standard Test Method for
1
Knoop Indentation Hardness of Advanced Ceramics
This standard is issued under the fixed designation C1326; the number immediately following the designation indicates the year of
original adoption or, in the case of revision, the year of last revision.Anumber in parentheses indicates the year of last reapproval.A
superscript epsilon (´) indicates an editorial change since the last revision or reapproval.
1. Scope C849Test Method for Knoop Indentation Hardness of Ce-
ramic Whitewares
1.1 This test method covers the determination of the Knoop
E4Practices for Force Verification of Testing Machines
indentation hardness of advanced ceramics. In this test, a
E177Practice for Use of the Terms Precision and Bias in
pointed, rhombic base, pyramidal diamond indenter of pre-
ASTM Test Methods
scribed shape is pressed into the surface of a ceramic with a
E384Test Method for Microindentation Hardness of Mate-
predetermined force to produce a relatively small, permanent
rials
indentation. The surface projection of the long diagonal of the
E691Practice for Conducting an Interlaboratory Study to
permanent indentation is measured using a light microscope.
Determine the Precision of a Test Method
The length of the long diagonal and the applied force are used
IEEE/ASTMSI10Standard for Use of the International
tocalculatetheKnoophardnesswhichrepresentsthematerial’s
System of Units (SI) (The Modern Metric System)
resistance to penetration by the Knoop indenter.
2.2 European Standard:
1.2 The values stated in SI units are to be regarded as
CENENV843-4AdvancedTechnicalCeramics,Monolithic
standard. No other units of measurement are included in this
Ceramics, Mechanical Properties at Room Temperature,
standard.
Part 4: Vickers, Knoop, and Rockwell Superficial Hard-
3
ness Tests
1.3 Units—When Knoop and Vickers hardness tests were
developed, the force levels were specified in units of grams- 2.3 ISO Standard:
ISO9385 Glass and Glass Ceramics—Knoop Hardness
force (gf) and kilograms-force (kgf). This standard specifies
4
the units of force and length in the International System of Test
Units (SI); that is, force in newtons (N) and length in mm or
3. Terminology
µm. However, because of the historical precedent and contin-
ued common usage, force values in gf and kgf units are 3.1 Definitions:
occasionally provided for information. This test method speci- 3.1.1 Knoop hardness number (HK), n—an expression of
fies that Knoop hardness be reported either in units of GPa or
hardness obtained by dividing the force applied to the Knoop
as a dimensionless Knoop hardness number. indenter by the projected area of the permanent impression
made by the indenter.
1.4 This standard does not purport to address all of the
safety concerns, if any, associated with its use. It is the 3.1.2 Knoop indenter, n—a rhombic-based pyramidal-
responsibility of the user of this standard to establish appro-
shaped diamond indenter with edge angles of 172° 30' and
priate safety and health practices and determine the applica- 130° 00'.
bility of regulatory limitations prior to use.
4. Summary of Test Method
2. Referenced Documents
4.1 This test method describes an indentation hardness test
2
using a calibrated machine to force a pointed, rhombic base,
2.1 ASTM Standards:
pyramidal diamond indenter having specified face angles,
C730Test Method for Knoop Indentation Hardness of Glass
under a predetermined force, into the surface of the material
under test and measures the surface projection of the long
1
This test method is under the jurisdiction of ASTM Committee C28 on
diagonal of the resulting impression after removal of the load.
Advanced Ceramics and is the direct responsibility of Subcommittee C28.01 on
Mechanical Properties and Performance. NOTE 1—Ageneral description of the Knoop indentation hardness test
Current edition approved Aug. 1, 2013. Published October 2013. Originally
ε1
approved in 1996. Last previous edition approved in 2008 as C1326–08 . DOI:
3
10.1520/C1326-13. Available from European Committee for Standardization (CEN), 36 rue de
2
For referenced ASTM standards, visit the ASTM website, www.astm.org, or Stassart, B-1050, Brussels, Belgium, http://www.cenorm.be.
4
contact ASTM Customer Service at service@astm.org. For Annual Book of ASTM Available from International Organization for Standardization (ISO), 1, ch. de
Standards volume information, refer to the standard’s Document Summary page on la Voie-Creuse, Case postale 56, CH-1211, Geneva 20, Switzerland, http://
the ASTM website. www.iso.ch.
Copyright © ASTM International, 100 Barr Harbor Drive, PO Box C700, West Conshohocken, PA 19428-2959. United States
1
---------------------- Page: 1 ----------------------
C1326 − 13
is given in Test Method E384. The present test method differs from this
...
This document is not an ASTM standard and is intended only to provide the user of an ASTM standard an indication of what changes have been made to the previous version. Because
it may not be technically possible to adequately depict all changes accurately, ASTM recommends that users consult prior editions as appropriate. In all cases only the current version
of the standard as published by ASTM is to be considered the official document.
´1
Designation: C1326 − 08 C1326 − 13
Standard Test Method for
1
Knoop Indentation Hardness of Advanced Ceramics
This standard is issued under the fixed designation C1326; the number immediately following the designation indicates the year of
original adoption or, in the case of revision, the year of last revision. A number in parentheses indicates the year of last reapproval. A
superscript epsilon (´) indicates an editorial change since the last revision or reapproval.
1
ε NOTE—Added research report footnote to Section 14.6.1 editorially in September 2008.
1. Scope
1.1 This test method covers the determination of the Knoop indentation hardness of advanced ceramics. In this test, a pointed,
rhombic base, pyramidal diamond indenter of prescribed shape is pressed into the surface of a ceramic with a predetermined force
to produce a relatively small, permanent indentation. The surface projection of the long diagonal of the permanent indentation is
measured using a light microscope. The length of the long diagonal and the applied force are used to calculate the Knoop hardness
which represents the material’s resistance to penetration by the Knoop indenter.
1.2 The values stated in SI units are to be regarded as standard. No other units of measurement are included in this standard.
1.3 Units—When Knoop and Vickers hardness tests were developed, the force levels were specified in units of grams-force (gf)
and kilograms-force (kgf). This standard specifies the units of force and length in the International System of Units (SI); that is,
force in newtons (N) and length in mm or μm. However, because of the historical precedent and continued common usage, force
values in gf and kgf units are occasionally provided for information. This test method specifies that Knoop hardness be reported
either in units of GPa or as a dimensionless Knoop hardness number.
1.4 This standard does not purport to address all of the safety concerns, if any, associated with its use. It is the responsibility
of the user of this standard to establish appropriate safety and health practices and determine the applicability of regulatory
limitations prior to use.
2. Referenced Documents
2
2.1 ASTM Standards:
C730 Test Method for Knoop Indentation Hardness of Glass
C849 Test Method for Knoop Indentation Hardness of Ceramic Whitewares
E4 Practices for Force Verification of Testing Machines
E177 Practice for Use of the Terms Precision and Bias in ASTM Test Methods
E384 Test Method for Knoop and Vickers Hardness of Materials
E691 Practice for Conducting an Interlaboratory Study to Determine the Precision of a Test Method
IEEE/ASTM SI 10 Standard for Use of the International System of Units (SI) (The Modern Metric System)
2.2 European Standard:
CEN ENV 843-4 Advanced Technical Ceramics, Monolithic Ceramics, Mechanical Properties at Room Temperature, Part 4:
3
Vickers, Knoop, and Rockwell Superficial Hardness Tests
2.3 ISO Standard:
4
ISO 9385 Glass and Glass Ceramics—Knoop Hardness Test
3. Terminology
3.1 Definitions:
1
This test method is under the jurisdiction of ASTM Committee C28 on Advanced Ceramics and is the direct responsibility of Subcommittee C28.01 on Mechanical
Properties and Performance.
Current edition approved Aug. 1, 2008Aug. 1, 2013. Published September 2008October 2013. Originally approved in 1996. Last previous edition approved in 20032008
ε1
as C1326 – 03.C1326 – 08 . DOI: 10.1520/C1326-08E01.10.1520/C1326-13.
2
For referenced ASTM standards, visit the ASTM website, www.astm.org, or contact ASTM Customer Service at service@astm.org. For Annual Book of ASTM Standards
volume information, refer to the standard’s Document Summary page on the ASTM website.
3
Available from European Committee for Standardization (CEN), 36 rue de Stassart, B-1050, Brussels, Belgium, http://www.cenorm.be.
4
Available from International Organization for Standardization (ISO), 1, ch. de la Voie-Creuse, Case postale 56, CH-1211, Geneva 20, Switzerland, http://www.iso.ch.
Copyright © ASTM International, 100 Barr Harbor Drive, PO Box C700, West Conshohocken, PA 19428-2959. United States
1
---------------------- Page: 1 ----------------------
C1326 − 13
3.1.1 Knoop hardness number (HK), n—an expression of hardness obtained by dividing the force applied to the Knoop indenter
by the projected area of the permanent impression made by the indenter.
3.1.2 Knoop indenter, n—a rhombic-based pyramidal-shaped diamond indenter with edge angles of 172° 30' and 130° 00'.
4. Summary of Test Method
4.1 This test method describes an indentation h
...


Questions, Comments and Discussion
Ask us and Technical Secretary will try to provide an answer. You can facilitate discussion about the standard in here.