ASTM B9-90(2012)
(Specification)Standard Specification for Bronze Trolley Wire
Standard Specification for Bronze Trolley Wire
ABSTRACT
This specification covers round, grooved, and figure-9 deep-section grooved bronze trolley wire. The bronze trolley wire shall be made in any of the three distinct alloys indicated in accordance with their increasing conductivities: Alloy 40, Alloy 55 and Alloy 80. Tensile tests and tension tests shall be performed wherein the wires shall conform to the required values of tensile strength and elongation. Twist tests shall be performed wherein round wires shall conform to the required number of twists. The specimens shall also connform to the required values of electrical resistivity.
SCOPE
1.1 This specification covers round, grooved, and figure-9 deep-section grooved bronze trolley wire.
1.2 The bronze trolley wire may be made in any of the three distinct alloys indicated in accordance with their increasing conductivities: Alloy 40, Alloy 55, Alloy 80.
1.3 The values stated in inch-pound units are to be regarded as the standard. The metric equivalents of inch-pound units given in this standard may be approximate.
General Information
Relations
Standards Content (Sample)
NOTICE: This standard has either been superseded and replaced by a new version or withdrawn.
Contact ASTM International (www.astm.org) for the latest information
Designation:B9 −90 (Reapproved 2012)
Standard Specification for
Bronze Trolley Wire
This standard is issued under the fixed designation B9; the number immediately following the designation indicates the year of original
adoption or, in the case of revision, the year of last revision.Anumber in parentheses indicates the year of last reapproval.Asuperscript
epsilon (´) indicates an editorial change since the last revision or reapproval.
1. Scope 4.2 Tests on a specimen of round wire containing a joint
shall show at least 95 % of the tensile strength specified in
1.1 This specification covers round, grooved, and figure-9
Table 1. Elongation tests shall not be made on specimens
deep-section grooved bronze trolley wire.
containing joints.
1.2 The bronze trolley wire may be made in any of the three
4.3 Tension tests shall be made on representative samples.
distinct alloys indicated in accordance with their increasing
The elongation shall be determined as the permanent increase
conductivities: Alloy 40, Alloy 55, Alloy 80.
in length, due to the breaking of the wire in tension, measured
1.3 The values stated in inch-pound units are to be regarded
between gage marks placed originally 10 in. (254 mm) apart
as the standard. The metric equivalents of inch-pound units
uponthetestspecimen(ExplanatoryNote2).Thefractureshall
given in this standard may be approximate.
be between the gage marks and not closer than 1 in. (25.4 mm)
to either gage mark.
2. Ordering Information
5. Dimensions and Permissible Variations
2.1 Orders for material under this specification shall include
the following information:
5.1 The size of round trolley wire shall be expressed as the
2.1.1 Quantity of each size, section, and class,
diameter of the wire in decimal fractions of an inch to the
2.1.2 Wire size: diameter in in. (see 5.1 and Table 1) or area
nearest 0.1 mil (0.0001 in.) (0.0025 mm).
in circular mils (see 8.1 and Fig. 1 and Fig. 2),
5.2 Wire shall be truly cylindrical in form. The diameter
2.1.3 Shape of section (see 1.1),
shall not vary more than 61 % from that specified.
2.1.4 Alloy (see 1.2),
2.1.5 Package size (see 17.3),
6. Twist Test
2.1.6 Lagging, if required (see 17.1),
6.1 For the purpose of determining and developing defects
2.1.7 Relation between vertical axis of grooved wire and
which may be prejudicial to the life of trolley wire, owing to its
axis of reel (see 17.1),
peculiar service as compared to that of wire for other purposes,
2.1.8 Size of arbor hole if other than 4-in. (102 mm) square
round wire shall be subjected to the twist test described in 6.2.
(see 17.2),
Round wire shall not be considered satisfactory if it does not
2.1.9 Special package marking, if required (see 17.4), and
withstand, without breaking, at least the number of twists
2.1.10 Place of inspection (Section 15).
prescribed in Table 2.
3. Material
6.2 Three twist tests shall be made on specimens 10 in. (254
mm) in length between the holders of the testing machine. The
3.1 The material shall be bronze of such nature and com-
position (Explanatory Note 1) as to secure, by proper twisting machine shall be so constructed that there is a linear
motion of the tail stock with respect to the head.The twist shall
treatment, the qualities prescribed in this specification for the
finished wire. be applied not faster than 10 turns/min. All three specimens
shall be twisted to destruction and shall not reveal under test
ROUND WIRE
any seams, pits, slivers, or surface imperfections of sufficient
magnitude to indicate inherent defects or imperfections in the
4. Tensile Properties
wire. At the time of fracture the wire shall twist with reason-
4.1 Round wire shall conform to the requirements as to
able uniformity.
tensile properties prescribed in Table 1.
GROOVED AND FIGURE-9 WIRE
This specification is under the jurisdiction of ASTM Committee B01 on
7. Tensile Properties
Electrical Conductors and is the direct responsibility of Subcommittee B01.04 on
Conductors of Copper and Copper Alloys.
7.1 Grooved and figure-9 wire shall conform to the appli-
Current edition approved Oct. 15, 2012. Published November 2012. Originally
cable requirements as to tensile properties prescribed in Table
approved in 1915. Last previous edition approved in 2008 as B9 – 90 (2008). DOI:
10.1520/B0009-90R12. 3.
Copyright © ASTM International, 100 Barr Harbor Drive, PO Box C700, West Conshohocken, PA 19428-2959. United States
B9−90 (2012)
TABLE 1 Tensile Requirements for Round Trolley Wire
Diameter Area Tensile Strength, min Elongation
in 10 in.
Alloys 40 and 55 Alloy 80
(254 mm),
in. mm cmil mm
psi MPa psi MPa min, %
0.5477 13.911 300 000 152.0 64 800 447 61 500 424 4.50
0.4600 11.648 211 600 107.0 69 000 476 65 000 448 3.75
0.4096 10.404 167 800 85.0 71 000 490 67 000 462 3.25
0.3648 9.266 133 100 67.4 73 000 503 69 000 476 2.75
0.3249 8.252 105 600 53.5 76 000 524 72 000 496 2.40
7.2 Tests on a specimen of grooved or figure-9 wire con- without breaking shall not be considered satisfactory.The twist
taining a joint shall show at least 95 % of the tensile strength test shall be omitted for figure-9 wire.
specified in Table 3. Elongation tests shall not be made on
ROUND, GROOVED, AND FIGURE-9 WIRE
specimens containing joints.
7.3 The tension and elongation tests for grooved or figure-9
11. Resistivity
wire shall be made in the same manner as those on round wire
11.1 Electrical resistivity shall be determined on represen-
as described in 4.3.
tative samples by resistance measurements (Explanatory Note
8. Dimensions and Permissible Variations 3).At a temperature of 20°C the resistivity shall not exceed the
values prescribed in Table 4.
8.1 The size of the trolley wire shall be expressed as the
nominal area of cross section in circular mils. 11.2 Lower resistivities in wires conforming to the physical
qualifications may be obtained by the use of special alloys.
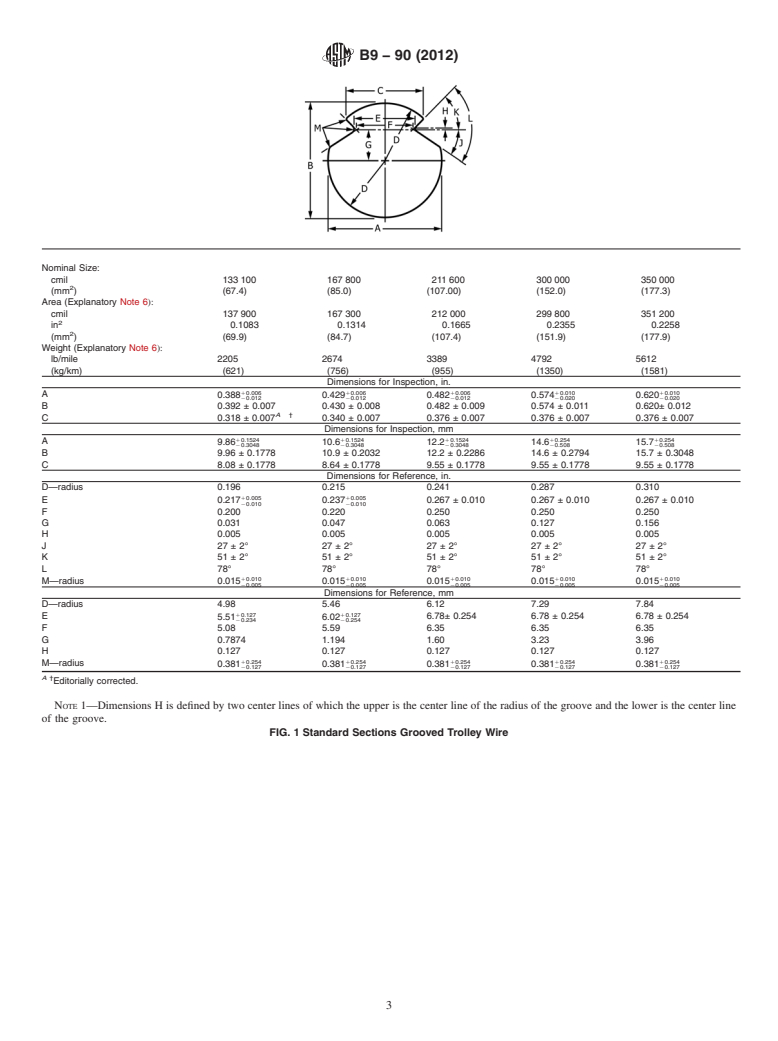
8.2 The standard sizes of grooved trolley wire shall be as
specified in Fig. 1.
12. Density
8.3 Thestandardsizeoffigure-9wireshallbeasspecifiedin
12.1 For the purpose of calculating mass, cross-sections,
Fig. 2.
and so forth, the density of the bronze (Explanatory Note 4)
3 3
8.4 The weight in pounds per mile of grooved and figure-9
shall be taken as 8.89 g/cm (0.32117 lb/in. ) at 20°C (Ex-
trolley wire calculated from the weight of a specimen not less
planatory Note 5).
than 18 in. (460 mm) in length shall not vary more than 64%
from that specified in Fig. 1 for grooved wire, and Fig. 2 for
13. Joints
figure-9 wire.
13.1 Nojointsshallbemadeinthecompletedwire.Jointsin
8.5 Conformance of the trolley wire to the specified dimen-
the wire and rods made prior to final drawings shall be in
sionsshallbedeterminedbytakingthemeasurementsshownin
accordance with the best commercial practice, and shall be
Fig. 1 and Fig. 2 under the heading, “Dimensions for
capable of meeting the tensile strength requirements in 4.2 or
Inspection, in.” The shape of the groove shall be checked with
7.2.
the appropriate “go” and “no-go” slip gages described in Fig.
3. The gages shall be applied to the ends of the samples taken
14. Workmanship, Finish, and Appearance
from each reel. Samples shall be clean and the ends free from
14.1 The wire shall be of uniform size, shape, and quality
burrs. The groove shall be considered as conforming to this
throughout, and shall be free from all scale, flaws, splits, and
specificationifthe“go”gagecanbepushedonthestraightened
scratches not consistent with the best commercial practice.
wire by hand and the “no-go” gage cannot be pushed on the
wire.
15. Inspection
9. Sections
15.1 All tests governing the acceptance or rejection of the
9.1 Standard sections of grooved trolley wire shall be
wire, unless otherwise specified, shall be made at the place of
known as the “American Standard Grooved Trolley Wire manufacture with apparatus furnished by the manufacturer and
Sections” (the Standard Design of the American Transit Engi-
inthepresenceofthepurchaserorhisrepresentative,whoshall
neering Association) shown in Fig. 1. be furnished a copy of the tests. The manufacturer shall afford
theinspectorrepresentingthepurchaserallreasonablefacilities
9.2 The standard section of figure-9 wire shall be as shown
to satisfy him as to the reliability of the results before the wire
in Fig. 2.
is delivered. If the purchaser waives inspection, and if he so
elects at that time, he shall be furnished with a certified copy of
10. Twist Test
tests made by the manufacturer.
10.1 For the purpose of determining and developing defects
that may be prejudicial to the life of trolley wire, owing to its
16. Rejection
peculiar service as compared to that of wire for other purposes,
grooved wire shall be subjected to the twist test described in 16.1 Any reel of wire that fails to conform to the require-
6.2. Grooved wire that does not withstand at least three twists ments prescribed in this specification may be rejected. Failure
B9−90 (2012)
Nominal Size:
cmil 133 100 167 800 211 600 300 000 350 000
(mm ) (67.4) (85.0) (107.00) (152.0) (177.3)
Area (Explanatory Note 6):
cmil 137 900 167 300 212 000 299 800 351 200
in 0.1083 0.1314 0.1665 0.2355 0.2258
(mm ) (69.9) (84.7) (107.4) (151.9) (177.9)
Weight (Explanatory Note 6):
lb/mile 2205 2674 3389 4792 5612
(kg/km) (621) (756) (955) (1350) (1581)
Dimensions for Inspection, in.
10.006 10.006 10.006 10.010 10.010
A 0.388 0.429 0.482 0.574 0.620
20.012 20.012 20.012 20.020 20.020
B 0.392 ± 0.007 0.430 ± 0.008 0.482 ± 0.009 0.574 ± 0.011 0.620± 0.012
A †
C 0.318 ± 0.007 0.340 ± 0.007 0.376 ± 0.007 0.376 ± 0.007 0.376 ± 0.007
Dimensions for Inspection, mm
10.1524 10.1524 10.1524 10.254 10.254
A
9.86 10.6 12.2 14.6 15.7
20.3048 20.3048 20.3048 20.508 20.508
B 9.96 ± 0.1778 10.9 ± 0.2032 12.2 ± 0.2286 14.6 ± 0.2794 15.7 ± 0.3048
C 8.08 ± 0.1778 8.64 ± 0.1778 9.55 ± 0.1778 9.55 ± 0.1778 9.55 ± 0.1778
Dimensions for Reference, in.
D—radius 0.196 0.215 0.241 0.287 0.310
10.005 10.005
E 0.217 0.237 0.267 ± 0.010 0.267 ± 0.010 0.267 ± 0.010
20.010 20.010
F 0.200 0.220 0.250 0.250 0.250
G 0.031 0.047 0.063 0.127 0.
...


Questions, Comments and Discussion
Ask us and Technical Secretary will try to provide an answer. You can facilitate discussion about the standard in here.