Standard Specification for Reactive and Refractory Metal Clad Plate

ABSTRACT
This specification covers plate consisting of a base metal to which is bonded, integrally and continuously, on one or both sides a layer of one of the following: titanium, zirconium, tantalum, niobium, and their alloys. The material generally is intended for pressure vessel use. The cladding metal shall be bonded to the base metal by any cladding operation that will produce a clad product which will conform to the requirements of this specification. When the cladding operation does not affect the chemical composition of the cladding or base metal, or both, the chemical analysis, in accordance with cladding, or base metal specifications or both, may be performed prior to the cladding operation. All heat treatments shall be performed as needed in the cladding operation unless otherwise specified or agreed between the purchaser and the manufacturer. Mechanical testing of the base metal, in accordance with the base metal specification, may be performed prior to the cladding operation. The tensile properties shall be determined by a tension test on the base metal only in accordance with the testing requirements of the base metal specification. The specimen orientation, location with respect to thickness, and number of tests and retests shall be in accordance with the requirements of the base metal specification when tension, bend, and impact tests shall be performed. The product surfaces shall be free of excess imperfections and extraneous materials as determined by visual examination.
SCOPE
1.1 This specification covers plate consisting of a base metal to which is bonded, integrally and continuously, on one or both sides a layer of one of the following: titanium, zirconium, tantalum, niobium, and their alloys. The material generally is intended for pressure vessel use.  
1.2 The values stated in inch-pound units are to be regarded as standard. The values given in parentheses are mathematical conversions to SI units that are provided for information only and are not considered standard. The values in parentheses and in metric tables are provided for information only.

General Information

Status
Historical
Publication Date
30-Apr-2016
Current Stage
Ref Project

Relations

Buy Standard

Technical specification
ASTM B898-11(2016) - Standard Specification for Reactive and Refractory Metal Clad Plate
English language
7 pages
sale 15% off
Preview
sale 15% off
Preview
Technical specification
REDLINE ASTM B898-11(2016) - Standard Specification for Reactive and Refractory Metal Clad Plate
English language
7 pages
sale 15% off
Preview
sale 15% off
Preview

Standards Content (Sample)


NOTICE: This standard has either been superseded and replaced by a new version or withdrawn.
Contact ASTM International (www.astm.org) for the latest information
Designation:B898 −11 (Reapproved 2016)
Standard Specification for
Reactive and Refractory Metal Clad Plate
This standard is issued under the fixed designation B898; the number immediately following the designation indicates the year of
original adoption or, in the case of revision, the year of last revision.Anumber in parentheses indicates the year of last reapproval.A
superscript epsilon (´) indicates an editorial change since the last revision or reapproval.
1. Scope 2.3 Military Standard:
MIL-J-24445A Joint, Bimetallic Bonded, Aluminum to
1.1 Thisspecificationcoversplateconsistingofabasemetal
Steel
towhichisbonded,integrallyandcontinuously,ononeorboth
sides a layer of one of the following: titanium, zirconium,
3. Terminology
tantalum, niobium, and their alloys. The material generally is
3.1 Definitions of Terms Specific to This Standard:
intended for pressure vessel use.
3.1.1 This material is considered as single-clad or double-
1.2 The values stated in inch-pound units are to be regarded
clad dependent upon whether one or both sides of the base
as standard. The values given in parentheses are mathematical
metal are covered by a cladding metal.
conversions to SI units that are provided for information only
3.1.2 base metal, n—the component that comprises the
andarenotconsideredstandard.Thevaluesinparenthesesand
greatest percentage of total thickness.
in metric tables are provided for information only.
3.1.3 cladding metal, or cladding metals, n—the
2. Referenced Documents
component, or components, which individually comprise less
than the greatest percentage of total thickness.
2.1 ASTM Standards:
A265Specification for Nickel and Nickel-Base Alloy-Clad 3.1.4 cladding operation, n—the production event, which
Steel Plate results in the formation of the bond between the cladding and
A578/A578MSpecification for Straight-Beam Ultrasonic base metal components, plus all related prebonding and post
Examination of Rolled Steel Plates for Special Applica- bonding operations, prior to supply to the purchaser.
tions
3.1.5 interface, n—of the clad product, is that region of
B265Specification for Titanium and Titanium Alloy Strip,
thickness in which the product transitions from essentially
Sheet, and Plate
100% base metal to 100% cladding metal. Also known as
B393Specification for Niobium and Niobium Alloy Strip,
bond or bond zone.
Sheet, and Plate
3.1.6 interlayer, n—ametallayerofatypeorgradedifferent
B551/B551MSpecification for Zirconium and Zirconium
from the cladding metal and base metal, which is applied
Alloy Strip, Sheet, and Plate
between the cladding and base metal.
B708Specification for Tantalum and Tantalum Alloy Plate,
3.1.7 integrally and continuously bonded, adv—a condition
Sheet, and Strip
in which the cladding metal and base metal are brought
2.2 ASME Code:
together to form a metallurgical bond at essentially the entire
BoilerandPressureVesselCode,SectionIXWeldingQuali-
interfaceofthetwometalsbymeansotherthanthoseprocesses
fications
that do not produce a homogeneous composite plate.
Boiler and Pressure Vessel Code, Section VIIIDivisions 1,
2, 3
4. Ordering Information
1 4.1 Ordersformaterialunderthisspecificationshallinclude
This specification is under the jurisdiction of ASTM Committee B10 on
Reactive and Refractory Metals and Alloys and is the direct responsibility of the following information:
Subcommittee B10.01 on Titanium.
4.1.1 Quantity.
Current edition approved May 1, 2016. Published May 2016. Originally
4.1.2 Product dimensions, including thickness of both clad-
approved in 1999. Last previous edition approved in 2011 as B898–11. DOI:
ding metal and base metal. It should state whether each
10.1520/B0898-11R16.
For referenced ASTM standards, visit the ASTM website, www.astm.org, or
thicknessvalueisminimumornominal.Ifnotstated,thickness
contact ASTM Customer Service at service@astm.org. For Annual Book of ASTM
values shall be nominal.
Standards volume information, refer to the standard’s Document Summary page on
the ASTM website.
Available from American Society of Mechanical Engineers (ASME), ASME
International Headquarters, Three Park Ave., New York, NY 10016-5990, http:// Available from DLA Document Services, Building 4/D, 700 Robbins Ave.,
www.asme.org. Philadelphia, PA 19111-5094, http://quicksearch.dla.mil.
Copyright © ASTM International, 100 Barr Harbor Drive, PO Box C700, West Conshohocken, PA 19428-2959. United States
B898−11 (2016)
4.1.3 Cladding metal type and specification (the cladding 7. Mechanical Properties
metal specification) (see Section 6).
7.1 The base metal shall conform to the mechanical prop-
4.1.4 Base metal type and specification (the base metal
erty requirements prescribed in the base metal specification.
specification) (see Section 6).
7.2 The mechanical properties of the cladding metal may
4.1.5 Flatness requirements (see 10.3).
not conform necessarily to the mechanical property require-
4.1.6 Ultrasonic inspection level (see Section 11).
ments prescribed in the cladding metal specification unless
4.1.7 Heat treatment requirements, if any.
otherwise agreed upon between manufacturer and purchaser.
4.1.8 Restrictions limiting or disallowing welding, or weld
repair, or both, if any (see Section 12).
7.3 Mechanicaltestingofthebasemetal,inaccordancewith
4.1.9 Any additional codes and standards specified by the
the base metal specification, may be performed prior to the
purchaser or manufacturer.
cladding operation if the cladding operation does not affect the
4.1.10 Supplementary Requirements, if any.
applicable mechanical properties of the base metal.
4.1.11 Additional requirements, if any.
7.4 Unless simulated post cladding heat treatments are
specifiedbythepurchaser,SupplementaryRequirementS5,the
5. Materials and Manufacture
mechanical test specimens shall be representative of the
5.1 Process:
material in the heat treatment condition of product being
shipped from the clad manufacturer.
5.1.1 The base metal shall be manufactured in accordance
withallapplicablerequirementsofthebasemetalspecification
7.5 Tensile Strength Requirements—The tensile properties
(see 4.1.4).
shall be determined by a tension test on the base metal only in
5.1.2 The cladding metal shall be manufactured in accor-
accordance with the testing requirements of the base metal
dance with all applicable requirements of the cladding metal
specification. When tension test specimen are taken from the
specification (see 4.1.3).
clad plate, the cladding shall be removed before tension tests
5.1.3 The cladding metal shall be bonded to the base metal
are made.
by any cladding operation that will produce a clad product
7.6 Bond Shear Strength—Whenbondshearstrengthtesting
which will conform to the requirements of this specification.
is specified, Supplementary Requirement S1, the bond shear
Cladding methods may be, but are not limited to, explosion
strength of the clad product shall be 20000 psi (137.9 MPa)
bonding, roll bonding, and weld overlay.
minimum when tested in accordance with Fig. 1.
5.1.4 The cladding metal may be fabricated from multiple
sheets or plates by edge butt welding prior to the cladding
8. Chemical Analysis
operation.
5.1.5 The cladding thickness may consist of multiple layers
8.1 When the cladding operation does not affect the chemi-
of the cladding metal.
cal composition of the cladding or base metal, or both, the
chemical analysis, in accordance with cladding, or base metal
5.2 Heat Treatment—Unless otherwise specified or agreed
specifications, or both, may be performed prior to the cladding
between the purchaser and the manufacturer, all heat treat-
operation. Otherwise, chemical analysis of the applicable
ments shall be performed as needed in the cladding operation
component or components shall be performed after the clad-
to assure the following:
ding operation in accordance with the cladding metal or base
5.2.1 The cladding metal conforms to the applicable re-
metal specifications, or both.
quirements of the cladding metal specification,
5.2.2 The base metal conforms to the applicable require-
8.2 When chemical analysis of the finished product is
ments of the base metal specification, and
invoked, Supplementary Requirement S4, the frequency of
5.2.3 The clad bond exhibits optimum resistance to dis- testing,specimenlocation,andtestingmethodsshallbeagreed
bonding during common fabrication processes.
upon between manufacturer and purchaser.
6. Chemical Composition 9. Location and Number of Tests and Retests
6.1 The composite plate may conform to any desired com-
9.1 Tension, Bend, and Impact Tests (When Required)—The
bination of cladding metal and base metal as described in 6.2
specimen orientation, location with respect to thickness, and
and 6.3 and as agreed upon between the purchaser and the
number of tests and retests shall be in accordance with the
manufacturer.
requirementsofthebasemetalspecification.Thetestspecimen
location within the plate shall be at the manufacturer’s option.
6.2 Cladding Metal—The cladding metal shall conform to
the requirements as to chemical composition prescribed in the
10. Dimensions and Flatness, Permissible Variations
applicable cladding metal specification: B265, B393, B551/
B551M,or B708.
10.1 Thickness:
10.1.1 Cladding metal thickness tolerances shall be in
6.3 Base Metal—The base metal shall be steel or any other
accordance with Table 1.
product conforming to specifications for metal plate. The base
metal shall conform to the requirements as to chemical 10.1.2 Base metal thickness tolerances shall be in accor-
composition prescribed in the base metal specification. dance with Table 2.
B898−11 (2016)
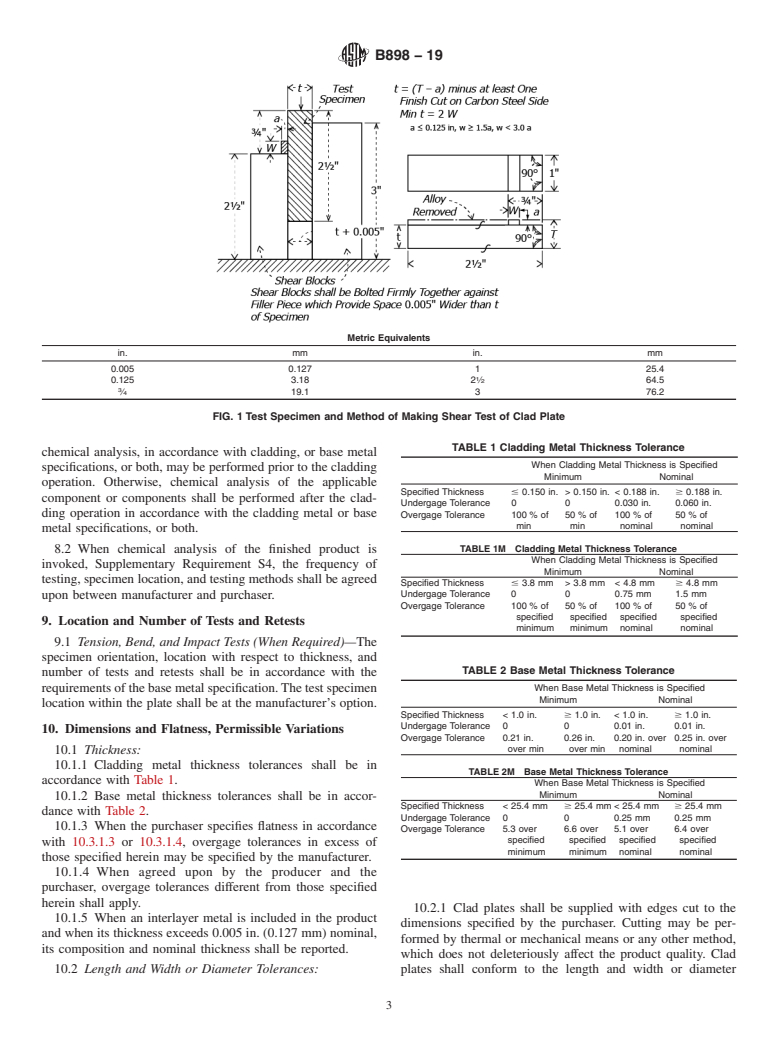
t = Cladding Metal Thickness—If > 0.125 in. (3.2 mm), machine to 0.125 in. (3.2 mm) max
T = Base Metal Thickness—If base metal thickness >1.0 in. (25.4 mm), it may be machined to 1.0 in. (25.4 mm) nominal.
Remove all cladding from base metal, except for area shown.
All corners are 90°.
FIG. 1Shear Test Specimen
TABLE 1 Cladding Metal Thickness Tolerance
10.1.4 When agreed upon by the producer and the
When Cladding Metal Thickness is Specified purchaser, overgage tolerances different from those specified
Minimum Nominal
herein shall apply.
Specified Thickness # 0.150 in. > 0.150 in. < 0.188 in. $ 0.188 in.
10.1.5 When an interlayer metal is included in the product
Undergage Tolerance 0 0 0.030 in. 0.060 in.
and when its thickness exceeds 0.005 in. (0.127 mm) nominal,
Overgage Tolerance 100 % of 50 % of 100 % of 50 % of
min min nominal nominal its composition and nominal thickness shall be reported.
10.2 Length and Width or Diameter Tolerances:
TABLE1M Cladding Metal Thickness Tolerance
When Cladding Metal Thickness is Specified
10.2.1 Clad plates shall be supplied with edges cut to the
Minimum Nominal
dimensions specified by the purchaser. Cutting may be per-
Specified Thickness # 3.8 mm > 3.8 mm < 4.8 mm $ 4.8 mm
formed by thermal or mechanical means or any other method,
Undergage Tolerance 0 0 0.75 mm 1.5 mm
Overgage Tolerance 100 % of 50 % of 100 % of 50 % of
which does not deleteriously affect the product quality. Clad
specified specified specified specified
plates shall conform to the length and width or diameter
minimum minimum nominal nominal
tolerancesofTable3unlessotherwiseagreeduponbetweenthe
manufacturer and purchaser.
10.2.2 When specified by the purchaser, clad plate shall be
TABLE 2 Base Metal Thickness Tolerance
suppliedintheas-cladormilledge,condition.Minimumsound
When Base Metal Thickness is Specified
Minimum Nominal bondsizeshallbespecified,andlengthandwidthtolerancesof
Specified Thickness < 1.0 in. $ 1.0 in. < 1.0 in. $ 1.0 in. the as-supplied product shall be as agreed upon between
Undergage Tolerance 0 0 0.01 in. 0.01 in.
Overgage Tolerance 0.21 in. 0.26 in. 0.20 in. over 0.25 in. over
over min over min nominal nominal
TABLE 3 Length and Width, or Diameter, Tolerance
TABLE2M Base Metal Thickness Tolerance
Permissible Variation from Specified Length and
When Base Metal Thickness is Specified Total Thickness
Widths or Diameter
Minimum Nominal
<2.0 in. –0, +0.8 in.
Specified Thickness < 25.4 mm $ 25.4 mm < 25.4 mm $ 25.4 mm
$ 2.0 in., < 4.0 in. –0, +1.0 in.
Undergage Tolerance 0 0 0.25 mm 0.25 mm
$ 4.0 in., <8.0 in. –0, +1.5 in.
Overgage Tolerance 5.3 over 6.6 over 5.1 over 6.4 over
$ 8.0 in. per agreement
specified specified specified specified
minimum minimum nominal nominal
TABLE3M Length and Width, or Diameter, Tolerance
Permissible Variation from Specified Length and
Total Thickness
Widths or Diameter
<50 mm –0, +20 mm
$ 50, <100 –0, +25 mm
10.1.3 When the purchaser specifies flatness in accordance
$ 100, <200 –0, +38 mm
with 10.3.1.3 or 10.3.1.4, overgage tolerances in excess of
$ 200 mm per agreement
those specified herein may be specified by the manufacturer.
B898−11 (2016)
purchaserandmanufacturer.Alledgenonbondareasoutsideof metal, or the base metal, or both, as specified by the purchaser,
the specified minimum sound bond area shall be marked to be machined to the requirements of 10.3.1.3 without
clearly on the surface, or the boundary of the required sound reducing thickness below the minimum specified, upon appli-
bondareashallbemarkedclearlyonthesoundbondportionof cation of proper set-up and machining practice.
the surface, or both. 10.3.1.5 Other Flatness—Other flatness requirements may
be agreed upon mutually between the manufacturer and the
10.3 Flatness:
purchaser.
10.3.1 Flatness of the clad plate shall be in accordance with
one of the following flatness tolerance requirements. When
11. Nondestructive Testing
flatness requirements are not specified by the purchaser,
flatness tolerances of 10.3.1.1 shall apply. 11.1 After the completion of all mechanical and thermal
10.3.1.1 Standard Plate Flatness—Out-of-flatness of the
processing components of the cladding operation, clad plates
cladding face shall not exceed the requirements of Table 4. shall be inspected for bond integrity in accordance with the
This flatness criteria typically is applicable for clad plates
procedures and methods of Specification A578/A578M. Scan-
intended for subsequent forming, or fabrication, or both. ning shall be performed with a 1 in. (25 mm) or 1 ⁄8 in. (30
10.3.1.2 Special Flatness—Out-of-flatness of the cladding mm) diameter or 1 in. (25 mm) square transducer. Any
face shall not exceed 0.100 in. (2.5 mm) over any 36-in.
indication which causes 100% loss of back reflection accom-
(915-mm)span.Thisflatnesscriteriatypicallyisapplicablefor panied by a reflection from the clad interface shall be record-
plates used in the flat condition.
able. Three Quality Levels shall apply. If the ultrasonic
10.3.1.3 Machined Flatness—Out-of-flatness of one or both inspection class is not spe
...


This document is not an ASTM standard and is intended only to provide the user of an ASTM standard an indication of what changes have been made to the previous version. Because
it may not be technically possible to adequately depict all changes accurately, ASTM recommends that users consult prior editions as appropriate. In all cases only the current version
of the standard as published by ASTM is to be considered the official document.
Designation: B898 − 11 B898 − 11 (Reapproved 2016)
Standard Specification for
Reactive and Refractory Metal Clad Plate
This standard is issued under the fixed designation B898; the number immediately following the designation indicates the year of
original adoption or, in the case of revision, the year of last revision. A number in parentheses indicates the year of last reapproval. A
superscript epsilon (´) indicates an editorial change since the last revision or reapproval.
1. Scope
1.1 This specification covers plate consisting of a base metal to which is bonded, integrally and continuously, on one or both
sides a layer of one of the following: titanium, zirconium, tantalum, niobium, and their alloys. The material generally is intended
for pressure vessel use.
1.2 The values stated in inch-pound units are to be regarded as standard. The values given in parentheses are mathematical
conversions to SI units that are provided for information only and are not considered standard. The values in parentheses and in
metric tables are provided for information only.
2. Referenced Documents
2.1 ASTM Standards:
A265 Specification for Nickel and Nickel-Base Alloy-Clad Steel Plate
A578/A578M Specification for Straight-Beam Ultrasonic Examination of Rolled Steel Plates for Special Applications
B265 Specification for Titanium and Titanium Alloy Strip, Sheet, and Plate
B393 Specification for Niobium and Niobium Alloy Strip, Sheet, and Plate
B551/B551M Specification for Zirconium and Zirconium Alloy Strip, Sheet, and Plate
B708 Specification for Tantalum and Tantalum Alloy Plate, Sheet, and Strip
2.2 ASME Code:
Boiler and Pressure Vessel Code, Section IX Welding Qualifications
Boiler and Pressure Vessel Code, Section VIII Divisions 1, 2, 3
2.3 Military Standard:
MIL-J-24445A Joint, Bimetallic Bonded, Aluminum to Steel
3. Terminology
3.1 Definitions of Terms Specific to This Standard:
3.1.1 This material is considered as single-clad or double-clad dependent upon whether one or both sides of the base metal are
covered by a cladding metal.
3.1.2 base metal, n—the component that comprises the greatest percentage of total thickness.
3.1.3 cladding metal, or cladding metals, n—the component, or components, which individually comprise less than the greatest
percentage of total thickness.
3.1.4 cladding operation, n—the production event, which results in the formation of the bond between the cladding and base
metal components, plus all related prebonding and post bonding operations, prior to supply to the purchaser.
3.1.5 interface, n—of the clad product, is that region of thickness in which the product transitions from essentially 100 % base
metal to 100 % cladding metal. Also known as bond or bond zone.
This specification is under the jurisdiction of ASTM Committee B10 on Reactive and Refractory Metals and Alloys and is the direct responsibility of Subcommittee
B10.01 on Titanium.
Current edition approved Sept. 1, 2011May 1, 2016. Published September 2011May 2016. Originally approved in 1999. Last previous edition approved in 20052011 as
ε1
B898 – 05B898 – 11. . DOI: 10.1520/B0898-11.10.1520/B0898-11R16.
For referenced ASTM standards, visit the ASTM website, www.astm.org, or contact ASTM Customer Service at service@astm.org. For Annual Book of ASTM Standards
volume information, refer to the standard’s Document Summary page on the ASTM website.
Available from American Society of Mechanical Engineers (ASME), ASME International Headquarters, Three Park Ave., New York, NY 10016-5990, http://
www.asme.org.
Available from Standardization Documents Order Desk, DODSSP, Bldg. 4, Section D, DLA Document Services, Building 4/D, 700 Robbins Ave., Philadelphia, PA
19111-5098, http://dodssp.daps.dla.mil.19111-5094, http://quicksearch.dla.mil.
Copyright © ASTM International, 100 Barr Harbor Drive, PO Box C700, West Conshohocken, PA 19428-2959. United States
B898 − 11 (2016)
3.1.6 interlayer, n—a metal layer of a type or grade different from the cladding metal and base metal, which is applied between
the cladding and base metal.
3.1.7 integrally and continuously bonded, adv—a condition in which the cladding metal and base metal are brought together to
form a metallurgical bond at essentially the entire interface of the two metals by means other than those processes that do not
produce a homogeneous composite plate.
4. Ordering Information
4.1 Orders for material under this specification shall include the following information:
4.1.1 Quantity.
4.1.2 Product dimensions, including thickness of both cladding metal and base metal. It should state whether each thickness
value is minimum or nominal. If not stated, thickness values shall be nominal.
4.1.3 Cladding metal type and specification (the cladding metal specification) (see Section 6).
4.1.4 Base metal type and specification (the base metal specification) (see Section 6).
4.1.5 Flatness requirements (see 10.3).
4.1.6 Ultrasonic inspection level (see Section 11).
4.1.7 Heat treatment requirements, if any.
4.1.8 Restrictions limiting or disallowing welding, or weld repair, or both, if any (see Section 12).
4.1.9 Any additional codes and standards specified by the purchaser or manufacturer.
4.1.10 Supplementary Requirements, if any.
4.1.11 Additional requirements, if any.
5. Materials and Manufacture
5.1 Process:
5.1.1 The base metal shall be manufactured in accordance with all applicable requirements of the base metal specification (see
4.1.4).
5.1.2 The cladding metal shall be manufactured in accordance with all applicable requirements of the cladding metal
specification (see 4.1.3).
5.1.3 The cladding metal shall be bonded to the base metal by any cladding operation that will produce a clad product which
will conform to the requirements of this specification. Cladding methods may be, but are not limited to, explosion bonding, roll
bonding, and weld overlay.
5.1.4 The cladding metal may be fabricated from multiple sheets or plates by edge butt welding prior to the cladding operation.
5.1.5 The cladding thickness may consist of multiple layers of the cladding metal.
5.2 Heat Treatment—Unless otherwise specified or agreed between the purchaser and the manufacturer, all heat treatments shall
be performed as needed in the cladding operation to assure the following:
5.2.1 The cladding metal conforms to the applicable requirements of the cladding metal specification,
5.2.2 The base metal conforms to the applicable requirements of the base metal specification, and
5.2.3 The clad bond exhibits optimum resistance to disbonding during common fabrication processes.
6. Chemical Composition
6.1 The composite plate may conform to any desired combination of cladding metal and base metal as described in 6.2 and 6.3
and as agreed upon between the purchaser and the manufacturer.
6.2 Cladding Metal—The cladding metal shall conform to the requirements as to chemical composition prescribed in the
applicable cladding metal specification: B265, B393, B551/B551M, or B708.
6.3 Base Metal—The base metal shall be steel or any other product conforming to specifications for metal plate. The base metal
shall conform to the requirements as to chemical composition prescribed in the base metal specification.
7. Mechanical Properties
7.1 The base metal shall conform to the mechanical property requirements prescribed in the base metal specification.
7.2 The mechanical properties of the cladding metal may not conform necessarily to the mechanical property requirements
prescribed in the cladding metal specification unless otherwise agreed upon between manufacturer and purchaser.
7.3 Mechanical testing of the base metal, in accordance with the base metal specification, may be performed prior to the
cladding operation if the cladding operation does not affect the applicable mechanical properties of the base metal.
7.4 Unless simulated post cladding heat treatments are specified by the purchaser, Supplementary Requirement S5, the
mechanical test specimens shall be representative of the material in the heat treatment condition of product being shipped from
the clad manufacturer.
B898 − 11 (2016)
7.5 Tensile Strength Requirements—The tensile properties shall be determined by a tension test on the base metal only in
accordance with the testing requirements of the base metal specification. When tension test specimen are taken from the clad plate,
the cladding shall be removed before tension tests are made.
7.6 Bond Shear Strength—When bond shear strength testing is specified, Supplementary Requirement S1, the bond shear
strength of the clad product shall be 20 000 psi (137.9 MPa) minimum when tested in accordance with Fig. 1.
8. Chemical Analysis
8.1 When the cladding operation does not affect the chemical composition of the cladding or base metal, or both, the chemical
analysis, in accordance with cladding, or base metal specifications, or both, may be performed prior to the cladding operation.
Otherwise, chemical analysis of the applicable component or components shall be performed after the cladding operation in
accordance with the cladding metal or base metal specifications, or both.
8.2 When chemical analysis of the finished product is invoked, Supplementary Requirement S4, the frequency of testing,
specimen location, and testing methods shall be agreed upon between manufacturer and purchaser.
9. Location and Number of Tests and Retests
9.1 Tension, Bend, and Impact Tests (When Required)—The specimen orientation, location with respect to thickness, and
number of tests and retests shall be in accordance with the requirements of the base metal specification. The test specimen location
within the plate shall be at the manufacturer’smanufacturer’s option.
10. Dimensions and Flatness, Permissible Variations
10.1 Thickness:
10.1.1 Cladding metal thickness tolerances shall be in accordance with Table 1.
10.1.2 Base metal thickness tolerances shall be in accordance with Table 2.
10.1.3 When the purchaser specifies flatness in accordance with 10.3.1.3 or 10.3.1.4, overgage tolerances in excess of those
specified herein may be specified by the manufacturer.
10.1.4 When agreed upon by the producer and the purchaser, overgage tolerances different from those specified herein shall
apply.
10.1.5 When an interlayer metal is included in the product and when its thickness exceeds 0.005 in. (0.127 mm) nominal, its
composition and nominal thickness shall be reported.
10.2 Length and Width or Diameter Tolerances:
10.2.1 Clad plates shall be supplied with edges cut to the dimensions specified by the purchaser. Cutting may be performed by
thermal or mechanical means or any other method, which does not deleteriously affect the product quality. Clad plates shall
conform to the length and width or diameter tolerances of Table 3 unless otherwise agreed upon between the manufacturer and
purchaser.
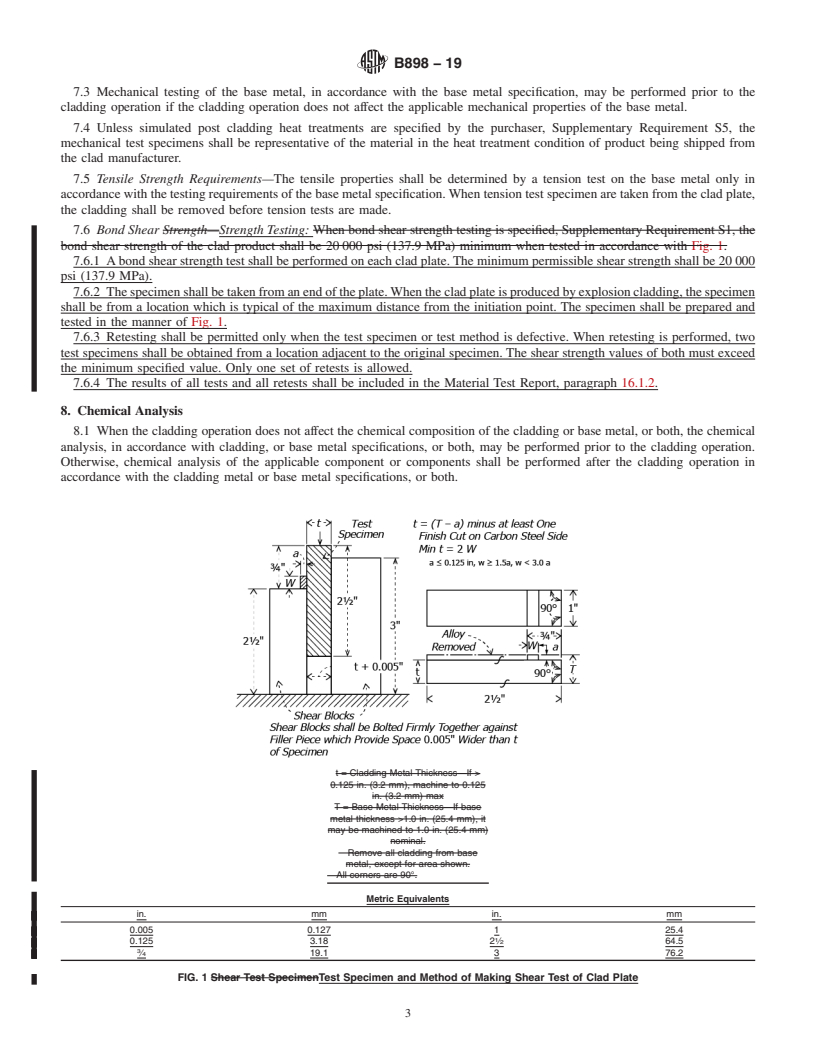
t = Cladding Metal Thickness—If > 0.125 in. (3.2 mm), machine to 0.125 in. (3.2 mm) max
T = Base Metal Thickness—If base metal thickness >1.0 in. (25.4 mm), it may be machined to 1.0 in. (25.4 mm) nominal.
Remove all cladding from base metal, except for area shown.
All corners are 90°.
FIG. 1 Shear Test Specimen
B898 − 11 (2016)
TABLE 1 Cladding Metal Thickness Tolerance
When Cladding Metal Thickness is Specified
Minimum Nominal
When Cladding Metal Thickness is Specified
Minimum Nominal
Specified Thickness # 0.150 in. > 0.150 in. < 0.188 in. $ 0.188 in.
Undergage Tolerance 0 0 0.030 in. 0.060 in.
Overgage Tolerance 100 % of 50 % of 100 % of 50 % of
min min nominal nominal
TABLE 1M Cladding Metal Thickness Tolerance
When Cladding Metal Thickness is Specified
Minimum Nominal
Specified Thickness # 3.8 mm > 3.8 mm < 4.8 mm $ 4.8 mm
Undergage Tolerance 0 0 0.75 mm 1.5 mm
Overgage Tolerance 100 % of 50 % of 100 % of 50 % of
specified specified specified specified
minimum minimum nominal nominal
TABLE 2 Base Metal Thickness Tolerance
When Base Metal Thickness is Specified
Minimum Nominal
When Base Metal Thickness is Specified
Minimum Nominal
Specified Thickness < 1.0 in. $ 1.0 in. < 1.0 in. $ 1.0 in.
Undergage Tolerance 0 0 0.01 in. 0.01 in.
Overgage Tolerance 0.21 in. 0.26 in. 0.20 in. over 0.25 in. over
over min over min nominal nominal
TABLE 2M Base Metal Thickness Tolerance
When Base Metal Thickness is Specified
Minimum Nominal
Specified Thickness < 25.4 mm $ 25.4 mm < 25.4 mm $ 25.4 mm
Undergage Tolerance 0 0 0.25 mm 0.25 mm
Overgage Tolerance 5.3 over 6.6 over 5.1 over 6.4 over
specified specified specified specified
minimum minimum nominal nominal
TABLE 3 Length and Width, or Diameter, Tolerance
Permissible Variation from Specified Length and
Total Thickness
Widths or Diameter
Permissible Variation from Specified Length and
Total Thickness
Widths or Diameter
<2.0 in. –0, +0.8 in.
$ 2.0 in., < 4.0 in. –0, +1.0 in.
$ 4.0 in., <8.0 in. –0, +1.5 in.
$ 8.0 in. per agreement
TABLE 3M Length and Width, or Diameter, Tolerance
Permissible Variation from Specified Length and
Total Thickness
Widths or Diameter
<50 mm –0, +20 mm
$ 50, <100 –0, +25 mm
$ 100, <200 –0, +38 mm
$ 200mm per agreement
$ 200 mm per agreement
10.2.2 When specified by the purchaser, clad plate shall be supplied in the as-clad or mill edge, condition. Minimum sound bond
size shall be specified, and length and width tolerances of the as-supplied product shall be as agreed upon between purchaser and
manufacturer. All edge nonbond areas outside of the specified minimum sound bond area shall be marked clearly on the surface,
or the boundary of the required sound bond area shall be marked clearly on the sound bond portion of the surface, or both.
10.3 Flatness:
10.3.1 Flatness of the clad plate shall be in accordance with one of the following flatness tolerance requirements. When flatness
requirements are not specified by the purchaser, flatness tolerances of 10.3.1.1 shall apply.
10.3.1.1 Standard Plate Flatness—Out-of-flatness of the cladding face shall not exceed the requirements of Table 4. This
flatness criteria typically is applicable for clad plates intended for subsequent forming, or fabrication, or both.
B898 − 11 (2016)
TABLE 4 Permissible Variations in Flatness of Cladding Metal
Surface
Total Thickness Maximum Out-of-Flatness Maximum Out-of-Flatness Over
A,B,C,D E,A,D
(in.) Over any 36 in. any 72 in.
Total Thickness Maximum Out-of-Flatness Maximum Out-of-Flatness Over
A,B,C,D E,A,D
(in.) Over
...

Questions, Comments and Discussion

Ask us and Technical Secretary will try to provide an answer. You can facilitate discussion about the standard in here.