ASTM D3115-95(2009)
(Test Method)Standard Test Method for Explosive Reactivity of Lubricants with Aerospace Alloys Under High Shear
Standard Test Method for Explosive Reactivity of Lubricants with Aerospace Alloys Under High Shear
SIGNIFICANCE AND USE
Explosive reactivity has resulted when parts made from some light alloys, typically high in aluminum and magnesium, are loaded under shear conditions while in contact with certain lubricants. A typical example is a threaded part, lubricated with a chlorofluorocarbon grease, pulled up normally tight.
SCOPE
1.1 This test method is used to evaluate for explosive reactivity of various lubricants in the presence of aerospace alloys under high shear conditions.
1.2 The values stated in SI units are to be regarded as the standard. In cases where materials, products, or equipment are available in inch-pound units only, SI units are omitted.
1.3 This standard is used to measure and describe the response of materials, products, or assemblies to heat and flame under controlled conditions, but does not by itself incorporate all factors required for fire hazard or fire risk assessment of the materials, products, or assemblies under actual fire conditions.
1.4 This standard does not purport to address all of the safety concerns, if any, associated with its use. It is the responsibility of the user of this standard to establish appropriate safety and health practices and determine the applicability of regulatory limitations prior to use.
General Information
Relations
Standards Content (Sample)
NOTICE: This standard has either been superseded and replaced by a new version or withdrawn.
Contact ASTM International (www.astm.org) for the latest information
Designation: D3115 − 95(Reapproved 2009)
Standard Test Method for
Explosive Reactivity of Lubricants with Aerospace Alloys
Under High Shear
This standard is issued under the fixed designation D3115; the number immediately following the designation indicates the year of
original adoption or, in the case of revision, the year of last revision. A number in parentheses indicates the year of last reapproval. A
superscript epsilon (´) indicates an editorial change since the last revision or reapproval.
1. Scope 3. Terminology
3.1 Definitions of Terms Specific to This Standard:
1.1 This test method is used to evaluate for explosive
3.1.1 explosive reactivity, n—occurrence of sparks, smoke,
reactivity of various lubricants in the presence of aerospace
or explosive (audible) sounds during this test.
alloys under high shear conditions.
3.1.2 lubricants, n—liquid materials used as lubricants or
1.2 The values stated in SI units are to be regarded as the
cutting fluids in the presence of aerospace alloys.
standard. In cases where materials, products, or equipment are
available in inch-pound units only, SI units are omitted.
4. Summary of Test Method
1.3 This standard is used to measure and describe the
4.1 A shaped dowel pin made of the test material is rotated
response of materials, products, or assemblies to heat and
at 1760 rpm under a pressure of 689 MPa (1000 psi) for 1 min
flame under controlled conditions, but does not by itself
in a shaped hole (drilled into a block of the test material)
incorporate all factors required for fire hazard or fire risk
containing the test lubricant. Observation for indications of
assessment of the materials, products, or assemblies under
reaction is made.
actual fire conditions.
1.4 This standard does not purport to address all of the
5. Significance and Use
safety concerns, if any, associated with its use. It is the
5.1 Explosive reactivity has resulted when parts made from
responsibility of the user of this standard to establish appro-
some light alloys, typically high in aluminum and magnesium,
priate safety and health practices and determine the applica-
are loaded under shear conditions while in contact with certain
bility of regulatory limitations prior to use.
lubricants.Atypicalexampleisathreadedpart,lubricatedwith
a chlorofluorocarbon grease, pulled up normally tight.
2. Referenced Documents
2.1 ASTM Standards:
6. Apparatus
B209 Specification for Aluminum and Aluminum-Alloy
6.1 Fluted Ball-End End Mills, two, 12.7 6 0.025 mm
Sheet and Plate
(0.500 6 0.001 in.) in diameter with a 6.35 6 0.025-mm
B221 Specification forAluminum andAluminum-Alloy Ex-
(0.2506 0.001-in.) radius tip, finished to 0.203 to 0.406 µm (8
truded Bars, Rods, Wire, Profiles, and Tubes
to 16 µin.) rms.
2.2 ANSI Standard:
3 6.2 Drill Press, capable of rotating at 1760 rpm under a
B46.1 Surface Texture
6.89-MPa (1000-psi) load.
6.3 Drill Chuck, capacity 12.7-mm ( ⁄2-in.) end mill.
6.4 Loading Device, capable of putting a pressure of 6.89
This test method is under the jurisdiction of ASTM Committee D02 on
Petroleum Products and Lubricants and is the direct responsibility of Subcommittee
MPa (1000 psi) on the dowel test pin.
D02.L0.07 on Engineering Sciences of High Performance Fluids and Solids.ASTM
6.5 Force Gauge, 1112 N (250-lbf) force.
Committee F07 onAerospace andAircraft maintains a continued interest in this test
method and will make use of it in the future.
Current edition approved Oct. 1, 2009. Published November 2009. Originally
approvedin1972.Lastpreviouseditionapprovedin2005asD3115–95(2005).DOI:
10.1520/D3115-95R09. Carbide tipped ball-end end mills are available and may be used when working
For referenced ASTM standards, visit the ASTM website, www.astm.org, or with metals harder than aluminum.
contact ASTM Customer Service at service@astm.org. For Annual Book of ASTM The sole source of supply of the gauge known to the committee at this time is
Standards volume information, refer to the standard’s Document Summary page on AMETEK, Inc., Testing Equipment Div., Box 288, Lansdale, PA 19446. If you are
the ASTM website. aware of alternative suppliers, please provide this information to ASTM Interna-
Available fromAmerican National Standards Institute (ANSI), 25 W. 43rd St., tional Headquarters.Your comments will receive careful consideration at a meeting
4th Floor, New York, NY 10036, http://www.ansi.org. of the responsible technical committee, which you may attend.
Copyright © ASTM International, 100 Barr Harbor Drive, PO Box C700, West Conshohocken, PA 19428-2959. United States
D3115 − 95 (2009)
mm in.
0.254 0.010
6.35 0.250
12.7 0.500
FIG. 1 Block, Drilled for Tests
NOTE 1—Both ends of each dowel pin may be so prepared and each
6.6 Drill Press Vise, capable of holding the test block in
considered a new test pin under 9.8 provided that the dimensions are
position.
maintained as required.
6.7 Surface Texture Standards, conforming to American
7.3 Acetone, reagent grade.
National Standard for Surface Texture (ANSI B46.1).
7.4 Test Lubricant, sufficient for at least one test series (that
6.8 Transparent Safety Shield.
is, 6 mL).
6.9 Thermocouple and Potentiometer ,optional,formeasur-
8. Test Specimen
ing hole-bottom temperature.
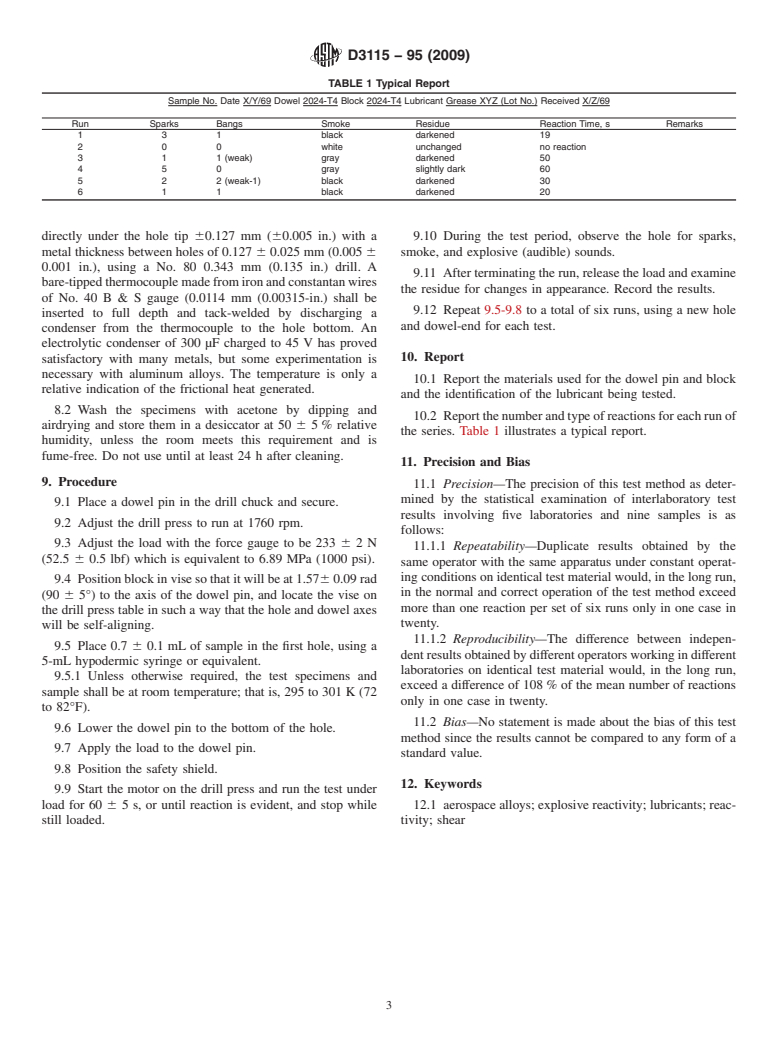
8.1 Prepare the block, as shown in Fig. 1, by drilling six
6.10 Desiccator, maintained at 50 6 5 % relative humidity.
holes with the 12.7 mm (0.500-in.) ball-end end mill to a depth
Water saturated with Ca(NO ) ·4H O at 294 K (70°F) is
3 2 2
of 12.7 mm 6 0.254 mm (0.500 6 0.100 in.) measured to the
satisfactory.
tip of the hole. The hole centers shall not be less than 12.7 mm
7. Materials
(0.500 in.) from the edge of the block or another hole. The ball
end mill will create the correct surface finish in the hole when
7.1 Blocks,oftheappropriatealloy,25.4mm(1in.)thickby
driven at 500 to 600 rpm with no lubricant.
38 mm (1.5 in.) wide by 165 mm (6.5 in.) long. Unless
8.1.1 If it is desired to determine the temperat
...


Questions, Comments and Discussion
Ask us and Technical Secretary will try to provide an answer. You can facilitate discussion about the standard in here.