ISO 7884-2:1987
(Main)Glass — Viscosity and viscometric fixed points — Part 2: Determination of viscosity by rotation viscometers
Glass — Viscosity and viscometric fixed points — Part 2: Determination of viscosity by rotation viscometers
This method allows continuous measurements viscosity and measurements under various shearing stresses. The viscosity is determined by the flow field coefficient, the torque and the rotational frequency. Two types of rotation viscometers are described: viscometer of the Couette type with adjustable revolving crucible and viscometer of Searle type with the crucibel at rest and the plunger revolving. The procedure is specified and typical examples of flow field with formules for calculating (annex A) and a typical rotation viscometer (annex B) are described.
Verre — Viscosité et points viscosimétriques fixes — Partie 2: Détermination de la viscosité à l'aide de viscosimètres à rotation
General Information
- Status
- Published
- Publication Date
- 25-Nov-1987
- Technical Committee
- ISO/TC 48 - Laboratory equipment
- Drafting Committee
- ISO/TC 48 - Laboratory equipment
- Current Stage
- 9060 - Close of review
- Completion Date
- 04-Jun-2031
Overview
ISO 7884-2:1987 defines a laboratory method for determining the dynamic viscosity of glass using rotation viscometers. It is Part 2 of the ISO 7884 series on glass viscosity and viscometric fixed points and covers continuous viscosity measurements and flow-curve (shear-rate) tests. Viscosity is obtained from the measured torque and rotational frequency together with a calculated or calibrated flow field coefficient and an instrument constant. The standard describes two rotation viscometer geometries (Couette and Searle) and includes practical annexes with flow-field formulae (Annex A) and an example viscometer (Annex B).
Key topics and technical requirements
- Measurement principle: Viscosity determined from torque, rotational frequency and the flow-field coefficient or instrument constant; supports measurements at varying shear stresses to produce flow curves.
- Viscometer types:
- Couette type - revolving crucible, stationary plunger.
- Searle type - crucible at rest, revolving plunger.
- Calibration: Instruments must be calibrated with viscometric standard liquids or certified reference glasses (see ISO 7884-1) to determine instrument constant and correct for mechanical losses (friction, bearings, air drag).
- Apparatus requirements:
- Electrically heated tube furnace (normally up to 1 400 °C; special cases up to 1 600 °C).
- Thermocouples (type S or B), calibrated and low thermal inertia.
- Crucibles (ceramic or noble metal) with sample volumes typically 20–250 cm3.
- Noble-metal plungers (platinum/rhodium alloys), shaft and torque-measuring device (torsion wire/spring/balance).
- Devices for centring, concentricity checks (≤1/100 plunger diameter), and thermal stability.
- Measurement control: Temperature stability to ±2 °C and gradient ≤1 °C/cm; rotational frequency typically ≤8 s−1 (inertia effects considered above 1 s−1); torque and frequency ranges chosen to give reliable instrument response.
- Sample handling: Melted glass free of bubbles; careful loading and immersion to avoid contamination or foam; crucible protection recommended for fragile ceramics.
Applications and who uses it
- Quality control and process laboratories in the glass industry (melting, refining, forming).
- Research laboratories studying viscosity–temperature relationships and non‑Newtonian behavior of glass melts.
- Instrument manufacturers and calibration labs for rotation viscometers.
- Standardization bodies and testing services validating viscometric fixed points and certified reference glasses.
ISO 7884-2 is essential when accurate, reproducible rotational-viscometer measurements are required to characterize glass melt viscosity for production control, process modelling and material development.
Related standards
- ISO 7884-1:1987 - reference glasses and calibration examples for viscometry.
- Other parts of ISO 7884 series (fibre elongation viscometers, beam bending, sinking bar, softening/annealing points, dilatometric transformation temperatures).
Frequently Asked Questions
ISO 7884-2:1987 is a standard published by the International Organization for Standardization (ISO). Its full title is "Glass — Viscosity and viscometric fixed points — Part 2: Determination of viscosity by rotation viscometers". This standard covers: This method allows continuous measurements viscosity and measurements under various shearing stresses. The viscosity is determined by the flow field coefficient, the torque and the rotational frequency. Two types of rotation viscometers are described: viscometer of the Couette type with adjustable revolving crucible and viscometer of Searle type with the crucibel at rest and the plunger revolving. The procedure is specified and typical examples of flow field with formules for calculating (annex A) and a typical rotation viscometer (annex B) are described.
This method allows continuous measurements viscosity and measurements under various shearing stresses. The viscosity is determined by the flow field coefficient, the torque and the rotational frequency. Two types of rotation viscometers are described: viscometer of the Couette type with adjustable revolving crucible and viscometer of Searle type with the crucibel at rest and the plunger revolving. The procedure is specified and typical examples of flow field with formules for calculating (annex A) and a typical rotation viscometer (annex B) are described.
ISO 7884-2:1987 is classified under the following ICS (International Classification for Standards) categories: 81.040.01 - Glass in general. The ICS classification helps identify the subject area and facilitates finding related standards.
ISO 7884-2:1987 is available in PDF format for immediate download after purchase. The document can be added to your cart and obtained through the secure checkout process. Digital delivery ensures instant access to the complete standard document.
Standards Content (Sample)
ISO
INTERNATIONAL STANDARD
7884-2
First edition
1987-12-15
INTERNATIONAL ORGANIZATION FOR STANDARDIZATION
ORGANISATION INTERNATIONALE DE NORMALISATION
MEXAyHAPOAHAR OPTAHM3A~Wl fl0 CTAH,QAPTM3A~MM
Glass - Vkcosity and viscometric fixed Points -
Part 2 :
Determination of viscosity by rotation viscometers
Reference number
ISO 7884-2 : 1987 (E)
Foreword
ISO (the International Organization for Standardization) is a worldwide federation of
national Standards bodies (ISO member bodies). The work of preparing International
Standards is normally carried out through ISO technical committees. Esch member
body interested in a subject for which a technical committee has been established has
the right to be represented on that committee. International organizations, govern-
mental and non-governmental, in liaison with ISO, also take part in the work.
Draft International Standards adopted by the technical committees are circulated to
the member bodies for approval before their acceptance as International Standards by
the ISO Council. They are approved in accordance with ISO procedures requiring at
least 75 % approval by the member bodies voting.
International Standard ISO 7884-2 was prepared by Technical Committee ISO/TC 48,
Laborstory glassware and related apparatus.
Users should note that all International Standards undergo revision from time to time
and that any reference made herein to any other International Standard implies its
latest edition, unless otherwise stated.
0 International Organkation for Standardkation, 1987
Printed in Switzerland
INTERNATIONAL STANDARD ISO 7884-2 : 1987 (E)
Glass - Viscosity and viscometric fixed Points -
Part 2 :
Determination of viscosity by rotation viscometers
ture range from about 1 600 to 600 OC, the torque necessary
0 Introduction
ranging from 0,l to 20 Nmmm according to the construction of
International Standard ISO 7884, Glass - Viscosity and the apparatus. The method is applicable if the rotational fre-
viscometric fixed Points, consists of the following separate quency does not exceed 8 s - 1; however, at rotational frequen-
Parts : cies above 1 s-1 it should be ascertained that inertia forces are
.
negligible.
Part 7 : Principles for determining viscosity and viscometric
fixed poin ts.
2 Reference
Part 2 : Determination of viscosity b y ro ta tion viscometers.
IEC Publication W-1, Thermocouples - Part 7: Reference
tables.
Part 3: Determination of viscosity b y fibre elonga tion
viscome ter.
3 Definitions
Part 4: Determination of viscosity by beam bending.
For the purposes of this part of ISO 7884, the following defini-
Part 5: Determination of working poin t b y sinking bar
tions apply.
viscome ter.
3.1 Field of flow, crucible and plunger
Part 6: Determination o f so ftening poin t.
Part 7: Determination of annealing Point and strain Point by 3.1.1 field of flow: The whole gap filled by the molten glass
Sample and the spatial distribution of the flow velocities within
beam bending.
it, including its boundaries.
transforma tion
Part 8: Determination o f (dila tometricj
tempera ture. 3.1.2 crucible : The outer boundary of the molten glass sam-
ple corresponding to the inner sur-face of the crucible up to the
level of the melt.
1 Scope and field of application
3.1.3 plunger : The inner boundary of the molten glass sam-
This part of ISO 7884 specifies a method of determining, by
ple corresponding to the outer surface of the plunger up to the
means of rotation viscometers, the dynamic viscosity of glass
level of the melt.
and, in particular, the viscosity-temperature relationship at any
temperature or viscosity within the range of measurement. This
3.2 Flow field coefficient and instrument constant
covers the ranges of viscosity for melting, refining and working
of glass.
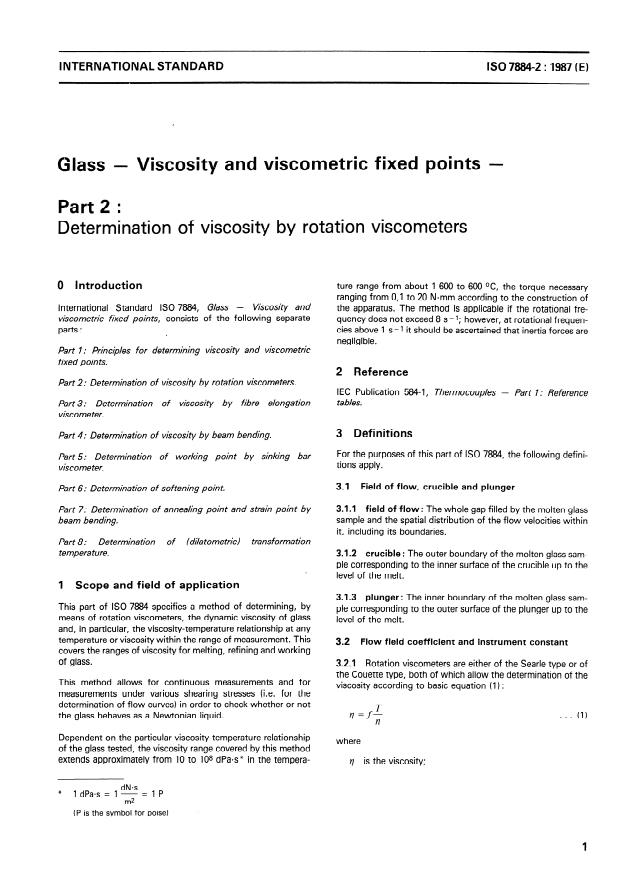
3.2.1 Rotation viscometers are either of the Searle type or of
the Couette type, both of which allow the determination of the
This method allows for continuous measurements and for
viscosity according to basic equation (1) :
measurements under various shearing Stresses (i.e. for the
determination of flow curves) in Order to check whether or not
T
. . .
the glass behaves as a Newtonian liquid. fl =f- (1)
r-2
Dependent on the particular viscosity-temperature relationship
where
of the glass tested, the viscosity range covered by this method
extends approximately from 10 to 108 dPas* in the tempera-
151 is the viscosity;
dN.s
*
1 dPas = 1 z = 1 P
(P is the Symbol for Poise)
ISO 7884-2 : 1987 (E)
f is the flow field coefficient; 3.2.3 In many cases the rotational frequency y1 and the torque
Tare not read or recorded directly. For the sake of convenience
T is the torque applied to the plunger; all the factors needed for their calculation and the flow field
coefficient tan be combined into a special instrument cons-
is uency either of the plunger (Searle
n the rotational freq tant k*. This constant shall be determined by calibration using
or of the crucible (Couette type). viscometric Standard liquids with Newtonian behaviour. 1)
tYPeI
The flow field coefficient f is a function only of the
3.2.4 The flow field coefficientfand the instrument constants
geometrical shape of the field of flow and has the dimension of
k and k* are, for Newtonian liquids, independent of the rota-
reciprocal cu hic length.
tional frequency, of the torque and of the viscosity. They are
slightly dependent on temperature because of the thermal ex-
The analytical calculation of the flow field coefficient is possible
pansion of the glass melt, of the crucible and of the plunger
in a restricted number of geometries, e.g. in the following cases
(see 7.3).
(sec also annex A).
3.3 Torques
a) Crucible and plunger are shaped like infinite concentric
cylinders; methods of eliminating experimentally the effect
3.3.1 driving torque: The torque applied by the drive to the
of the plane end surfaces are known from literature, but
boundary surface rotating with the rotational frequency n.
they are difficult to apply in the case of glass melts.
b) Crucible and plunger form two confocal rotation sur-
3.3.2 frictional torque: Torque of the opposite sign to the
faces of the second Order, e.g. two half-ellipsoids, tut
driving torque, arising from the viscous flow between the two
perpendicularly to the axis of rotation.
boundaries, the one rotating and the other being at rest.
If the shapes of the crucible and of the plunger are made up by
of mechanical losses : The frictional
3.3.3 torque
several rotational surfaces, the boundaries of the perpendicular
resistance caused by influences other than the glass melt (e.g.
median cuts being irregular curves (e.g. cylinders with plane or
friction in bearings, air friction; in the case of rotational vibra-
cone-shaped or hemi-spherical ends), the flow field coefficient
tions, also the self-damping of the torsion spring).
tan be determined only by means of viscometric Standard
liquids with Newtonian behaviour. 1)
3.3.4 In the case of stationary rotation, which is essential for
obtaining correct results, these three torques add up to zero
(action = reaction). Torques of mechanical losses, caused by
3.2.2 If, for the torque, the length and/or the rotational fre-
the particular construction of the instrument, shall be
quency, units are used which do not correspond to the unit for
eliminated through a correction.
the viscosity, and if the resulting factor is combined with the
flow field coefficient, a new constant, the instrument con-
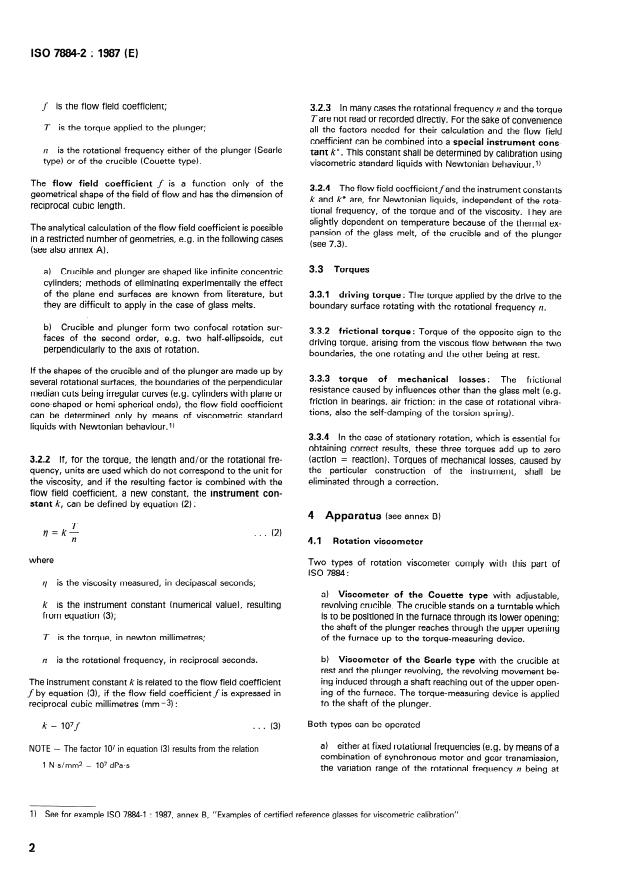
stant k, tan be defined by equation (2) :
4 Apparatus (sec annex BI
T
=
. . . (2)
v k-
n 4.1 Rotation viscometer
where Two types of rotation viscometer comply with this part of
ISO 7884:
is the viscosity measured, in decipascal seconds;
a) Viscometer of the Couette type with adjustable,
resulting revolving crucible. The crucible Stands on a turntable which
k is the instrument constant numerical value),
is to be positioned in the furnace through its lower opening;
from equation (3);
the shaft of the plunger reaches through the upper opening
of the furnace up to the torque-measuring device.
T is the torque, in newton millimetres;
b) Viscometer of the Searle type with the crucible at
n is the rotational frequency, in reciprocal seconds.
rest and the plunger revolving, the revolving movement be-
ing induced through a shaft reaching out of the upper open-
The instrument constant k is related to the flow field coefficient
ing of the furnace. The torque-measuring device is applied
f by equation (31, if the flow field coefficient f is expressed in
to the shaft of the plunger.
reciprocal cubic millimetres (mm -3) :
Both types tan be operated
. . .
k = NVf (3)
a) either at fixed rotational frequencies (e.g. by means of a
NOTE - The factor 107 in equation (3) results from the relation
combination of synchronous motor and gear transmission,
1 N.s/mmz = 107 dpa-s
the Variation range of the rotational frequency IZ being at
See for example ISO 7884-1 : 1987, annex B, “Examples of certified reference glasses for viscometric calibration”.
1)
ISO 7884-2 : 1987 (El
4.4 Crucible and plunger
least 1 :lOO) with a torque-measuring device (torsion wires,
torsion spring or torsion balance) whose possible inaccur-
acy shall not exceed 2 % at a torque of about 5 Ngmm;
4.4.1 Crucibles
b) or at fixed torques (e.g. by means of a weight and
According to their Chemical resistance to the glass melt under
pulley System or by means of an electric motor-) with a
test, the crucibles shall be made sf ceramic material (e.g.
measuring device for the rotational frequency (frequency
alumina) or noble metal. If ceramic crucibles are used (normally
meter, electronie speedmeter with Optical or inductive sen-
they tan be used only once), it is recommended that such a
sor, microscope for very low rates).
crucible be placed in a larger crucible made of thin noble sheet-
metal, in Order to protect the furnace in case the ceramic cru-
special screening
To protect these Parts of the apparatus,
cible breaks. Noble metal crucibles (preferably platinum or
necessary water-cooling is recommended.
against heat or, if I
platinum-rhodium alloys) require cleaning, e.g. in a hydro-
fluoric acid bath. The volume of the crucibles (Sample volume)
shall normally be between 20 and 250 cm?
4.2 Furnace
Electrically heated tube-shaped furnace, designed for a
4.4.2 Plungers
vertical working Position, for temperatures up to 1 400 OC (in
special cases up to 1 600 OC), with covers for the upper and the
The plungers shall be made of noble metal, preferably of
lower ends of the tube which shall be made of heat-resistant
platinum-rhodium alloys. They shall be welded to a long thin
ceramic material, The temperature in the flow field area or in
shaft, reaching out of the furnace to the torque-measuring in-
the adjacent space in the furnace shall be constant to & 2 OC
strument. The shaft may be made entirely of noble metal, or
with respect to time, and the temperature gradient shall not ex-
alternatively only that part of it which plunges into the melt may
ceed 1 OC/cm.
be of noble metal, the part above the melt being made of
ceramic material.
NOTE - This requirement is achieved by one or more of the following
devices: extra heaters at the two ends of the ceramic tube; baffles
The lower end of a cylindrical plunger shall be cone-shaped,
made from noble metals (e.g. platinum); a suitable cover on the cru-
not plane, in Order to avoid bubbles adhering to it; this would
cible; a thick-walled crucible made of noble metal. Good thermal insu-
produce scatter in the results. Moreover, the plunger shall have
lation of the furnace is required in any case.
no sharp edges, as sharp edges would be more easily attacked
by the melt. Therefore, the plungers should be spheres,
cylinders with hemi-spherical ends, or ellipsoids.
4.3 Temperature measuring and indicating instruments
NOTE - The contribution to the torque sf flow arising from the shaft
4.3.1 The alumina-insulated platinum-10 % rhodium/platinum
tan be restricted to less than 15 %.
(type S according to IEC 5841), or (for extensive use above
1 200 OC) platinum-30% rhodium/platinum-6% rhodium (type B
If the flow field coefficient is to be determined by calcu lation,
according to IEC 584-1) thermocouples shall exhibit low
the shape of the plunger shal I be Chosen accordingly.
thermal inertia (the diameter of the wires should not be greater
than 0,5 mm). The wires shall have a sufficient length within
By means of a set of plungers of different sizes, the ratio of the
the furnace (with respect to heat conduction along the wires).
sizes being for example 1:2, the possible range of measurement
tan be extended by about one Order of magnitude.
4.3.2 Control thermocouples should be located as near as
possible to the furnace winding for fast response. The hot junc-
4.5 Apparatus for quantifying the test Sample
tion of the measurement thermocouple, however, shall be
placed in the immediate vicinity of the flow field (the crucible).
One of the following methods shall be used:
In accordance with ISO 78841, the measurement thermo-
couple shall be calibrated and the calibration checked regularly.
a) a balance and device for determining the density of the
glass at room temperature (between 18 and 28 OC); or
NOTE - Further improvement in the accuracy of the temperature
determination is achieved by dipping the (electrically isolated)
b) a device for determining the distance between the sur-
measurement thermocouple into the melt and/or by Observation of the
temperature distribution by means of two further thermocouples
face of the melt and the upper edge of the crucible at a
placed above and below the crucible. If the construction of the viscom-
temperature above the melting range sf the Sample, e.g. at
eter permits the positioning of the measurement thermocouple at the
1 000 OC; or
centre of the plunger, the best assignment of temperature to the shear
area, which is mainly responsible for the measured viscosity, is achiev-
c) a device for the visual determination of the Ievel of the
ed; in that case other special devices (see note to 4.2) may be omitted.
melt in the crucible.
4.3.3 The electrical output of the thermocouples shall be
4.6 Devices for the adjustment of the flow fielet
determined at zero current by means of potentiometers or high-
resistance electronie amplifiers having a sensitivity of 1 pV.
Precautions shall be taken that the ice-bath for the cold junc- 4.6.1 Device for the adjustment of the Position of the furnace
tion is maintained at 0 OC throughout the test. If the and/or of the torque-meter, if necessary with a facility for
temperature measuring equipment is fitted with automatic cold swinging the furnace or the viscometer aside and precisely back
junction compensation, the ice-bath tan be omitted. in the same plane again.
ISO 7884-2 : 1987 (E)
Glasses with an unusually high tendency to foam, evaporate or
4.6.2 Device for centring crucible and plunger.
attack chemically the crucible and plunger materials give rise to
special requirements for the preparation of the Sample and for
4.6.3 Device for checking the concentric running of the
the materials which come into contact with the melt.
plunger or of the crucible; deviations shall not exceed l/lOO of
the plunger diameter; such faults normally originate from bends
in the plunger shaft.
6 Procedure
lt is recommended to use a self-centring Suspension device,
a universal joint; i ts effectiveness shall be checked.
e.g.
6.1 Calibration
When the Position of the appara
...


Questions, Comments and Discussion
Ask us and Technical Secretary will try to provide an answer. You can facilitate discussion about the standard in here.
Loading comments...