ASTM C598-93(2019)
(Test Method)Standard Test Method for Annealing Point and Strain Point of Glass by Beam Bending
Standard Test Method for Annealing Point and Strain Point of Glass by Beam Bending
SIGNIFICANCE AND USE
4.1 This test method offers an alternate procedure to Test Method C336 for determining the annealing and strain points of glass. It is particularly recommended for glasses not adaptable to flame working. Also fewer corrections are necessary in data reduction.
SCOPE
1.1 This test method covers the determination of the annealing point and the strain point of a glass by measuring the rate of midpoint viscous bending of a simply loaded glass beam.2 However, at temperatures corresponding to the annealing and strain points, the viscosity of glass is highly time-dependent. Hence, any viscosities that might be derived or inferred from measurements by this procedure cannot be assumed to represent equilibrium structural conditions.
1.2 The annealing and strain points shall be obtained following a specified procedure after direct calibration of the apparatus using beams of standard glasses having known annealing and strain points such as those supplied and certified by the National Institute of Standards and Technology.3
1.3 This test method, as an alternative to Test Method C336 is particularly well suited for glasses that for one reason or another are not adaptable for flame working. It also has the advantages that thermal expansion and effective length corrections, common to the fiber elongation method, are eliminated.
1.4 The values stated in metric units are to be regarded as the standard. The values given in parentheses are for information only.
1.5 This standard does not purport to address all of the safety concerns, if any, associated with its use. It is the responsibility of the user of this standard to establish appropriate safety, health, and environmental practices and determine the applicability of regulatory limitations prior to use.
1.6 This international standard was developed in accordance with internationally recognized principles on standardization established in the Decision on Principles for the Development of International Standards, Guides and Recommendations issued by the World Trade Organization Technical Barriers to Trade (TBT) Committee.
General Information
- Status
- Published
- Publication Date
- 31-Jul-2019
- Technical Committee
- C14 - Glass and Glass Products
- Drafting Committee
- C14.04 - Physical and Mechanical Properties
Relations
- Effective Date
- 01-Aug-2019
- Effective Date
- 01-May-2015
- Effective Date
- 01-Apr-2010
- Effective Date
- 01-Sep-2005
- Effective Date
- 01-Jan-2000
- Effective Date
- 01-Jan-2000
- Effective Date
- 01-Aug-2019
- Effective Date
- 01-Aug-2019
- Effective Date
- 01-Aug-2019
- Effective Date
- 01-Aug-2019
- Effective Date
- 01-Aug-2019
- Effective Date
- 01-Aug-2019
- Referred By
ASTM C770-16(2020) - Standard Test Method for Measurement of Glass Stress—Optical Coefficient - Effective Date
- 01-Aug-2019
Overview
ASTM C598-93(2019) - Standard Test Method for Annealing Point and Strain Point of Glass by Beam Bending outlines a procedure for determining the annealing and strain points of glass using the beam bending method. This standard provides an alternative to the fiber elongation method (ASTM C336), offering advantages particularly for glasses not suited to flame-working and reducing the need for various measurement corrections. By following a specified calibration and measurement process, this test yields reliable results for evaluating internal stress relief temperatures essential to glass manufacturing, processing, and quality control.
Key Topics
- Beam Bending Technique: Focuses on assessing glass viscosity and stress relief by measuring the viscous deflection rate of a simply loaded glass beam.
- Annealing Point: The temperature at which internal stresses in glass are substantially relieved within minutes, determined by the rate of midway deflection in the test beam.
- Strain Point: The lower temperature point at which internal stresses are relieved over hours, established by extrapolation from the annealing point data.
- Calibration with Standards: Calibration of apparatus is performed using beams from standard glasses, such as those certified by the National Institute of Standards and Technology (NIST).
- Reduced Corrections: Eliminates thermal expansion and effective length corrections that are necessary in some other test methods, increasing procedural efficiency.
Applications
The ASTM C598-93(2019) test method is particularly valuable in several practical applications:
- Glass Manufacturing: Determining precise annealing and strain points helps control the cooling processes, ensuring structural integrity and minimizing defect risks.
- Quality Assurance: Reliable identification of glass stress relief temperatures is critical for predicting long-term durability and performance in various products.
- Research & Development: Provides researchers with a standardized way to compare properties of different glass compositions.
- Non-Flame Workable Glasses: Especially suited for analyzing glasses that cannot be safely or effectively flame-worked, broadening the scope of materials tested.
- Standardization: Supports compliance with international practices and trade regulations by adhering to principles from the World Trade Organization’s TBT Committee.
Related Standards
When working with glass annealing point and strain point determination, the following related standards are also important:
- ASTM C336: Standard Test Method for Annealing Point and Strain Point of Glass by Fiber Elongation - An alternative method for glasses adaptable to flame working.
- NIST Special Publication 260: Provides certified reference materials for calibration.
- General Glass Standards: Many other ASTM standards address glass properties, thermal performance, and manufacturing methods.
Practical Value
Implementing ASTM C598-93(2019) enables glass producers and laboratories to:
- Use a robust, reproducible method compatible with a variety of glass types.
- Minimize error and uncertainty by leveraging certified reference materials for calibration.
- Meet industry and regulatory requirements for glass quality and performance.
- Facilitate international trade and technical cooperation by adopting harmonized testing standards.
Through its precise procedures and adaptation to non-flame-workable glasses, ASTM C598-93(2019) is an essential resource for anyone involved in the glass industry seeking to ensure product safety, reliability, and regulatory compliance.
Buy Documents
ASTM C598-93(2019) - Standard Test Method for Annealing Point and Strain Point of Glass by Beam Bending
Frequently Asked Questions
ASTM C598-93(2019) is a standard published by ASTM International. Its full title is "Standard Test Method for Annealing Point and Strain Point of Glass by Beam Bending". This standard covers: SIGNIFICANCE AND USE 4.1 This test method offers an alternate procedure to Test Method C336 for determining the annealing and strain points of glass. It is particularly recommended for glasses not adaptable to flame working. Also fewer corrections are necessary in data reduction. SCOPE 1.1 This test method covers the determination of the annealing point and the strain point of a glass by measuring the rate of midpoint viscous bending of a simply loaded glass beam.2 However, at temperatures corresponding to the annealing and strain points, the viscosity of glass is highly time-dependent. Hence, any viscosities that might be derived or inferred from measurements by this procedure cannot be assumed to represent equilibrium structural conditions. 1.2 The annealing and strain points shall be obtained following a specified procedure after direct calibration of the apparatus using beams of standard glasses having known annealing and strain points such as those supplied and certified by the National Institute of Standards and Technology.3 1.3 This test method, as an alternative to Test Method C336 is particularly well suited for glasses that for one reason or another are not adaptable for flame working. It also has the advantages that thermal expansion and effective length corrections, common to the fiber elongation method, are eliminated. 1.4 The values stated in metric units are to be regarded as the standard. The values given in parentheses are for information only. 1.5 This standard does not purport to address all of the safety concerns, if any, associated with its use. It is the responsibility of the user of this standard to establish appropriate safety, health, and environmental practices and determine the applicability of regulatory limitations prior to use. 1.6 This international standard was developed in accordance with internationally recognized principles on standardization established in the Decision on Principles for the Development of International Standards, Guides and Recommendations issued by the World Trade Organization Technical Barriers to Trade (TBT) Committee.
SIGNIFICANCE AND USE 4.1 This test method offers an alternate procedure to Test Method C336 for determining the annealing and strain points of glass. It is particularly recommended for glasses not adaptable to flame working. Also fewer corrections are necessary in data reduction. SCOPE 1.1 This test method covers the determination of the annealing point and the strain point of a glass by measuring the rate of midpoint viscous bending of a simply loaded glass beam.2 However, at temperatures corresponding to the annealing and strain points, the viscosity of glass is highly time-dependent. Hence, any viscosities that might be derived or inferred from measurements by this procedure cannot be assumed to represent equilibrium structural conditions. 1.2 The annealing and strain points shall be obtained following a specified procedure after direct calibration of the apparatus using beams of standard glasses having known annealing and strain points such as those supplied and certified by the National Institute of Standards and Technology.3 1.3 This test method, as an alternative to Test Method C336 is particularly well suited for glasses that for one reason or another are not adaptable for flame working. It also has the advantages that thermal expansion and effective length corrections, common to the fiber elongation method, are eliminated. 1.4 The values stated in metric units are to be regarded as the standard. The values given in parentheses are for information only. 1.5 This standard does not purport to address all of the safety concerns, if any, associated with its use. It is the responsibility of the user of this standard to establish appropriate safety, health, and environmental practices and determine the applicability of regulatory limitations prior to use. 1.6 This international standard was developed in accordance with internationally recognized principles on standardization established in the Decision on Principles for the Development of International Standards, Guides and Recommendations issued by the World Trade Organization Technical Barriers to Trade (TBT) Committee.
ASTM C598-93(2019) is classified under the following ICS (International Classification for Standards) categories: 81.040.10 - Raw materials and raw glass. The ICS classification helps identify the subject area and facilitates finding related standards.
ASTM C598-93(2019) has the following relationships with other standards: It is inter standard links to ASTM C598-93(2013), ASTM C336-71(2015), ASTM C336-71(2010), ASTM C336-71(2005), ASTM C336-71(1995)e1, ASTM C336-71(2000), ASTM F105-72(2019), ASTM C1350M-96(2019), ASTM E438-92(2018), ASTM C162-05(2015), ASTM C336-71(2020), ASTM F79-69(2019), ASTM C770-16(2020). Understanding these relationships helps ensure you are using the most current and applicable version of the standard.
ASTM C598-93(2019) is available in PDF format for immediate download after purchase. The document can be added to your cart and obtained through the secure checkout process. Digital delivery ensures instant access to the complete standard document.
Standards Content (Sample)
This international standard was developed in accordance with internationally recognized principles on standardization established in the Decision on Principles for the
Development of International Standards, Guides and Recommendations issued by the World Trade Organization Technical Barriers to Trade (TBT) Committee.
Designation: C598 − 93 (Reapproved 2019)
Standard Test Method for
Annealing Point and Strain Point of Glass by Beam
Bending
This standard is issued under the fixed designation C598; the number immediately following the designation indicates the year of
original adoption or, in the case of revision, the year of last revision.Anumber in parentheses indicates the year of last reapproval.A
superscript epsilon (´) indicates an editorial change since the last revision or reapproval.
1. Scope Development of International Standards, Guides and Recom-
mendations issued by the World Trade Organization Technical
1.1 Thistestmethodcoversthedeterminationoftheanneal-
Barriers to Trade (TBT) Committee.
ing point and the strain point of a glass by measuring the rate
of midpoint viscous bending of a simply loaded glass beam.
2. Referenced Documents
However, at temperatures corresponding to the annealing and
2.1 ASTM Standards:
strain points, the viscosity of glass is highly time-dependent.
C336Test Method for Annealing Point and Strain Point of
Hence, any viscosities that might be derived or inferred from
Glass by Fiber Elongation
measurements by this procedure cannot be assumed to repre-
sent equilibrium structural conditions.
3. Terminology
1.2 The annealing and strain points shall be obtained fol-
3.1 Definitions:
lowing a specified procedure after direct calibration of the
3.1.1 annealing range—the range of glass temperature in
apparatus using beams of standard glasses having known
which stresses in glass articles can be relieved at a commer-
annealingandstrainpointssuchasthosesuppliedandcertified
cially desirable rate. For purposes of comparing glasses, the
by the National Institute of Standards and Technology.
annealing range is assumed to correspond with the tempera-
tures between the annealing point (A. P.) and the strain point
1.3 This test method, as an alternative toTest Method C336
(St. P.).
is particularly well suited for glasses that for one reason or
another are not adaptable for flame working. It also has the
3.1.2 annealing point—that temperature at which internal
advantages that thermal expansion and effective length
stresses in a glass are substantially relieved in a matter of
corrections, common to the fiber elongation method, are
minutes. During a test in accordance with the requirements of
eliminated.
this test method, the midpoint rate of viscous deflection of the
test beam is measured by an extensometer with suitable
1.4 The values stated in metric units are to be regarded as
magnification during cooling at a rate of 4 6 1°C⁄min. The
the standard. The values given in parentheses are for informa-
nominal deflection rate at the annealing point ideally is as
tion only.
follows:
1.5 This standard does not purport to address all of the
211 3
Deflectionrate, cm/min 5 2.67 310 L M /I (1)
safety concerns, if any, associated with its use. It is the ~ !
c
responsibility of the user of this standard to establish appro-
where:
priate safety, health, and environmental practices and deter-
L = support span, cm;
mine the applicability of regulatory limitations prior to use.
M = centrally applied load, g; and
1.6 This international standard was developed in accor-
I = cross-section moment of inertia of test beam, cm (see
c
dance with internationally recognized principles on standard-
Appendix X1).
ization established in the Decision on Principles for the
3.1.3 strain point—that temperature at which internal
stresses in a glass are substantially relieved in a matter of
hours. The strain point is determined by extrapolation of the
This test method is under the jurisdiction of ASTM Committee C14 on Glass
annealing point data and is the temperature at which the
and Glass Products and is the direct responsibility of Subcommittee C14.04 on
viscous deflection rate is 0.0316 times that observed at the
Physical and Mechanical Properties.
Current edition approved Aug. 1, 2019. Published August 2019. Originally
annealing point.
approved in 1967. Last previous edition approved in 2013 as C598–93(2013).
DOI: 10.1520/C0598-93R19.
2 4
Hagy, H. E., “Experimental Evaluation of Beam Bending Method of Deter- For referenced ASTM standards, visit the ASTM website, www.astm.org, or
8 15
mining GlassViscosities in the Range 10 to 10 Poises,” Journal of the American contact ASTM Customer Service at service@astm.org. For Annual Book of ASTM
Ceramic Society, Vol 46, No. 2, 1963, pp. 95–97. Standards volume information, refer to the standard’s Document Summary page on
NIST Special Publication 260. the ASTM website.
Copyright © ASTM International, 100 Barr Harbor Drive, PO Box C700, West Conshohocken, PA 19428-2959. United States
C598 − 93 (2019)
4. Significance and Use over the length of the specimen beam and along the axis of the
furnace from the undeflected beam plane to a point 13 mm
4.1 This test method offers an alternate procedure to Test
( ⁄2in.) below.
Method C336 for determining the annealing and strain points
5.1.2 Temperature Measuring and Indicating Instruments—
of glass. It is particularly recommended for glasses not
For the measurement of temperature, there shall be provided a
adaptable to flame working.Also fewer corrections are neces-
calibrated Type R or S thermocouple. The thermocouple shall
sary in data reduction.
be housed in a double-bore alumina tube with its junction
5. Apparatus
placed within 5 mm of the specimen near the axis of the
furnace. It is recommended that the thermocouple be refer-
5.1 The apparatus shall consist of a furnace, a means of
enced to 0°C by means of an ice bath and its emf measured
controlling its temperature and cooling rate, a specimen holder
with a calibrated potentiometer having a sensitivity of 61µV
andloadingrod,andameansofobservingtherateofmidpoint
andanaccuracyof 65µV.Precautionsshallbetakentoensure
viscous deflection of the glass beam.
that the ice bath is maintained at 0°C throughout the test.
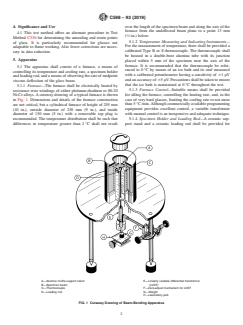
5.1.1 Furnace—The furnace shall be electrically heated by
5.1.3 Furnace Control—Suitable means shall be provided
resistance-wire windings of either platinum-rhodium or 80-20
for idling the furnace, controlling the heating rate, and, in the
Ni-Cr alloys.Acutaway drawing of a typical furnace is shown
case of very hard glasses, limiting the cooling rate to not more
in Fig. 1. Dimensions and details of the furnace construction
than5°C⁄min.Althoughcommerciallyavailableprogramming
are not critical, but a cylindrical furnace of height of 255 mm
equipment provides excellent control, a variable transformer
(10 in.), outside diameter of 230 mm (9 in.), and inside
with manual control is an inexpensive and adequate technique.
diameter of 130 mm (5 in.) with a removable top plug is
recommended. The temperature distribution shall be such that 5.1.4 Specimen Holder and Loading Rod—A ceramic sup-
differences in temperature greater than 2°C shall not result port stand and a ceramic loading rod shall be provided for
A—Alumina muffle support stand E—Linearly variable differential transformer
B—Specimen beam (LVDT)
C—Thermocouple F—Zero-adjust mechanism for LVDT
D—Loading rod G—Weight
H—Laboratory jack
FIG. 1 Cutaway Drawing of Beam-Bending Apparatus
C598 − 93 (2019)
supportingthespecimenandapplyingtheloadtothespecimen, moments of inertia shall bracket the expected operating range
respectively. The thermal expansion characteristics of both but be limited to the maximum permissible variation as
stand and rod materials must be very similar so as to minimize specified in Section 6. Carry out tests keeping load, span, and
motion of the loading rod on cooling as a result of expansion cooling rate constant. Make a linear calibration plot as shown
differences (see Appendix X2). A rectangular alumina muffle in Fig. 2. Then use this calibration plot to determine the
makes a suitable support stand (Note 1). The side walls of this deflection rates at the annealing points of unknown glasses
muffle can be notched to define specimen position. The having similar annealing points. It is recommended that the
supporting surfaces of these notches shall be flat and lie in a apparatus be recalibrated periodically depending upon inci-
planeperpendiculartotheaxisofthefurnace.Theinsideedges dence of usage.
of these supporting surfaces define the support span once the
7.2 Annealing Point Measurement—Measure the deflection
specimen beam starts to deflect. A support span of about
rate of the glass under test in accordance with the standard
50mm is recommended. A suitable loading rod can be pro-
procedure as described in Section 8. Obtain a plot as in Fig. 3
vided by a single-crystal sapphire rod flame bent at one end in
by following the procedure described in 9.1. Select from the
the form of a shepherds’ crook. The arrangement is shown in
calibrationplotin7.1thedeflectionrateofthecalibratingglass
Fig. 1.
having the same cross-section moment of inertia as the test
glass. Using the deflection rate thus obtained, determine the
NOTE1—Vitreoussilicaisasuitablematerialforbothsupportstandand
loading rod. It is not recommended for temperatures above 900°C.
corresponding temperatu
...


Questions, Comments and Discussion
Ask us and Technical Secretary will try to provide an answer. You can facilitate discussion about the standard in here.
Loading comments...