ASTM A1012-02(2007)
(Specification)Standard Specification for Seamless and Welded Ferritic, Austenitic and Duplex Alloy Steel Condenser and Heat Exchanger Tubes With Integral Fins
Standard Specification for Seamless and Welded Ferritic, Austenitic and Duplex Alloy Steel Condenser and Heat Exchanger Tubes With Integral Fins
ABSTRACT
This specification describes seamless and welded ferritic, austenitic and duplex alloy steel tubing on which the external or internal surface, or both, has been modified by a cold forming process to produce and integral enhanced surface for improved heat transfer. The integrally enhanced (finned) tubes shall be manufactured from seamless, welded, or welded/cold worked plain tubes that conform to the specified requirements. The tube shall conform to the requirements for tensile properties prescribed in the governing plain tube specification. Pneumatic tests, eddy-current tests, air underwater pressure tests, pressure differential tests, and hydrostatic tests shall be made in accordance with the requirements specified.
SCOPE
1.1 This specification describes seamless and welded ferritic, austenitic and duplex alloy steel tubing on which the external or internal surface, or both, has been modified by a cold forming process to produce an integral enhanced surface for improved heat transfer. The tubes are used in surface condensers, evaporators, heat exchangers and similar heat transfer apparatus in unfinned end diameters up to and including 1 in. (25.4 mm). Boiler tubes are excluded.
1.2 The values stated in inch-pound units are to be regarded as the standard. The values given in parentheses are for information only.
1.3 The following precautionary statement pertains to the test method portion only, Section 12, of this specification: This standard does not purport to address all of the safety concerns, if any, associated with its use. It is the responsibility of the user of this standard to establish appropriate safety and health practices and determine the applicability of regulatory limitations prior to use.
General Information
Relations
Standards Content (Sample)
NOTICE: This standard has either been superseded and replaced by a new version or
discontinued. Contact ASTM International (www.astm.org) for the latest information.
Designation: A1012 – 02 (Reapproved 2007)
Standard Specification for
Seamless and Welded Ferritic, Austenitic and Duplex Alloy
Steel Condenser and Heat Exchanger Tubes With Integral
Fins
This standard is issued under the fixed designation A1012; the number immediately following the designation indicates the year of
original adoption or, in the case of revision, the year of last revision. A number in parentheses indicates the year of last reapproval. A
superscript epsilon (´) indicates an editorial change since the last revision or reapproval.
1. Scope A269 Specification for Seamless and Welded Austenitic
Stainless Steel Tubing for General Service
1.1 This specification describes seamless and welded fer-
A688/A688M Specification for WeldedAustenitic Stainless
ritic, austenitic and duplex alloy steel tubing on which the
Steel Feedwater Heater Tubes
external or internal surface, or both, has been modified by a
A789/A789M Specification for Seamless and Welded
cold forming process to produce an integral enhanced surface
Ferritic/Austenitic Stainless Steel Tubing for General Ser-
for improved heat transfer. The tubes are used in surface
vice
condensers, evaporators, heat exchangers and similar heat
A803/A803M Specification for Welded Ferritic Stainless
transfer apparatus in unfinned end diameters up to and includ-
Steel Feedwater Heater Tubes
ing 1 in. (25.4 mm). Boiler tubes are excluded.
A941 Terminology Relating to Steel, Stainless Steel, Re-
1.2 The values stated in inch-pound units are to be regarded
lated Alloys, and Ferroalloys
as the standard. The values given in parentheses are for
A1016/A1016M Specification for General Requirements
information only.
for Ferritic Alloy Steel, Austenitic Alloy Steel, and Stain-
1.3 The following precautionary statement pertains to the
less Steel Tubes
test method portion only, Section 12, of this specification: This
standard does not purport to address all of the safety concerns,
3. Terminology
if any, associated with its use. It is the responsibility of the user
3.1 Definitions—For definition of general terms used in this
of this standard to establish appropriate safety and health
specification, refer to Specification A941.
practices and determine the applicability of regulatory limita-
3.2 Symbols (Integral Fin Tube Nomenclature):
tions prior to use.
2. Referenced Documents
D = outside diameter of unenhanced section
2.1 ASTM Standards:
D = inside diameter of unenhanced section
i
A213/A213M Specification for Seamless Ferritic and Aus-
d = root diameter of enhanced section outside of tube
r
tenitic Alloy-Steel Boiler, Superheater, and Heat-
d = outside diameter of enhanced section
o
Exchanger Tubes
d = inside diameter of enhanced section
i
A249/A249M Specification for Welded Austenitic Steel
W = wall thickness of unenhanced section
Boiler, Superheater, Heat-Exchanger, and Condenser W = wall thickness of enhanced section
f
F = height of fin—enhanced section outside of tube
Tubes
h
F = mean fin thickness—enhanced section outside of tube
A268/A268M Specification for Seamless and Welded Fer- m
P = mean rib pitch—enhanced section inside of tube
ritic and Martensitic Stainless Steel Tubing for General
R = height of rib—enhanced section inside of tube
h
Service
H = rib helix angle—enhanced section inside of tube
a
T = transition taper
t
This specification is under the jurisdiction of ASTM Committee A01 on Steel,
Stainless Steel and Related Alloys and is the direct responsibility of Subcommittee 4. Ordering Information
A01.10 on Stainless and Alloy Steel Tubular Products.
4.1 It is the responsibility of the purchaser to specify all
Current edition approved March 1, 2007. Published April 2007. Originally
requirements that are necessary for material ordered under this
approved in 2000. Last previous edition approved in 2002 as A1012-02. DOI:
10.1520/A1012-02R07.
specification. Such requirements may include, but are not
For referenced ASTM standards, visit the ASTM website, www.astm.org, or
limited to, the following:
contact ASTM Customer Service at service@astm.org. For Annual Book of ASTM
4.1.1 ASTM designation and year of issue (this specifica-
Standards volume information, refer to the standard’s Document Summary page on
the ASTM website. tion);
Copyright © ASTM International, 100 Barr Harbor Drive, PO Box C700, West Conshohocken, PA 19428-2959, United States.
A1012 – 02 (2007)
6. Materials and Manufacture
6.1 The integrally enhanced (finned) tubes shall be manu-
factured from seamless, welded, or welded/cold worked plain
tubes that conform to one of the following ASTM specifica-
tions: A213/A213M, A249/A249M, A268/A268M, A269,
A688/A688M, A789/A789M, A803/A803M.
7. Temper
FIG. 1 Outside Enhancement Only
7.1 The tube after enhancing shall normally be supplied in
the as-finned temper. When specified by the purchaser, for
bending, coiling or other fabricating operations, enhanced
portions of the tube may be stress relief annealed or solution
annealed.
7.2 Heat treatment of enhanced sections, or bend areas, or
both, shall be in accordance with the governing plain tube
specification.
8. Chemical Composition
8.1 The tubing specified shall conform to the chemical
requirements prescribed in the governing plain tube specifica-
FIG. 2 Outside and Inside Enhancement
tion.
9. Tensile Requirements
4.1.2 ASTM designation and year of issue (plain tube
9.1 The tube prior to the finning operation, or unenhanced
specification);
portions of the finned tube, shall conform to the requirements
4.1.3 Welded or seamless;
for tensile properties prescribed in the governing plain tube
4.1.4 Alloy grade and UNS designation;
specification.
4.1.5 Dimensions; plain tube outside diameter, plain tube
10. Permissible Variations in Dimensions
wall thickness (average or minimum specified), length and
location of unenhanced surfaces and the total tube length.
10.1 Diameter—The outside diameter of the unenhanced
Configuration of enhanced surfaces (fins per unit length, fin
sections shall not exceed the diameter tolerances shown in the
height, wall thickness under fin, rib pitch, rib height, etc.) shall
governing plain tube specification as measured by micrometers
be as agreed upon between the manufacturer and purchaser
andverifiedby“go”and“nogo”ringgages.Thediameterover
(see Figs. 1 and 2).
theenhancedsectionsshallnotexceedthediameteroftheplain
4.1.6 Temper (as-finned or stress relief annealed);
sections involved, as determined by a “go” ring gage unless
4.1.7 Quantity;
otherwise specified. The dimensions of the ring gages shall be
4.1.8 Packaging; as described in 10.1.1 and 10.1.2.
10.1.1 The inside diameter dimension of the “go” ring gage
4.1.9 Nondestructive tests;
shall be equal to the nominal tube diameter, plus the maximum
4.1.10 Customer inspection;
tolerance, plus .002 in. The length of the “go” ring gage shall
4.1.11 Mill test report;
be 1 in. (25.4 mm) minimum.
4.1.12 Certification.
10.1.2 The inside diameter dimension of the “no go” ring
gage shall be equal to the nominal tube diameter minus the
5. General Requirements
maximum tolerance. The length of the “no go” ring gage shall
5.1 Material furnished under this specification shall con-
be 1 in. (25.4 mm) minimum.
form to the applicable requirements of Specification A1016/
10.2 Wall Thickness—The wall thickness of enhanced and
A1016M unless otherwise provided herein.
unenhanced sections shall not exceed the thickness tolerances
5.2 Enhanced (integrally finned) sections of the tube shall
shown in the governing plain tube specification unless other-
be produced by cold forming the tubing in such a manner that
wise agreed to between the manufacture and purchaser. No
exterior fins, wall under the fin and inside ribs (when specified)
tube at any point shall be less than the minimum thickness
are homogeneous.
specified in the plain sections or in the enhanced sections.
5.3 Tubes described by this specification shall be furnished
10.3 Length—The length of the tubes shall not be less than
with unenhanced (plain) ends.
that specified, but may exceed the specified value by the
5.4 Enhanced sections of the tube are normally supplied in amounts given in Table 1.
the “as finned” temper (cold worked condition produced by the 10.3.1 The length of plain ends, as measured from the tube
enhancing operation). The unenhanced sections of the tube end to the first tool impression, shall not be less than that
shall be in the annealed condition and shall be suitable for specified, but may exceed the specified value by ⁄2 in. (12.7
rolling-in operations. mm).
A1012 – 02 (2007)
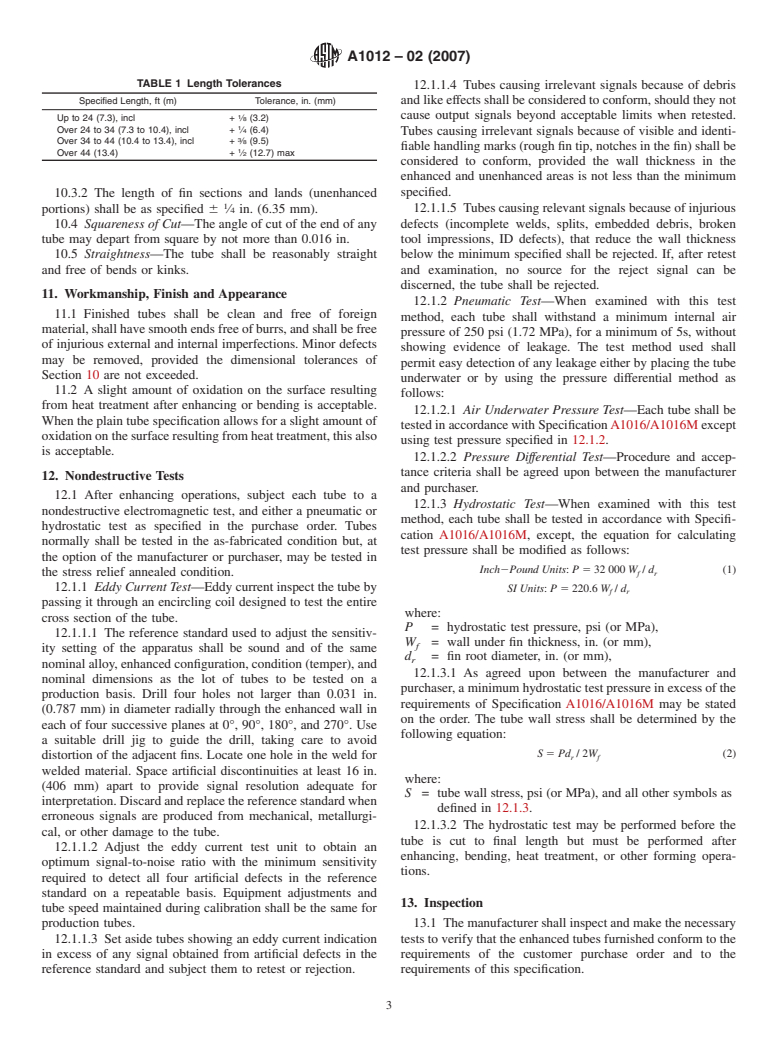
TABLE 1 Length Tolerances
12.1.1.4 Tubes causing irrelevant signals because of debris
Specified Length, ft (m) Tolerance, in. (mm) and like effects shall be considered to conform, should they not
1 cause output signals beyond acceptable limits when retested.
Up to 24 (7.3), incl + ⁄8 (3.2)
Over 24 to 34 (7.3 to 10.4), incl + ⁄4 (6.4)
Tubes causing irrelevant signals because of visible and identi-
Over 34 to 44 (10.4 to 13.4), incl + ⁄8 (9.5)
fiable handling marks (rough fin tip, notches in the fin) shall be
Over 44 (13.4) + ⁄2 (12.7) max
considered to conform, provided the wall thickness in the
enhanced and
...


Questions, Comments and Discussion
Ask us and Technical Secretary will try to provide an answer. You can facilitate discussion about the standard in here.