ASTM A270-98ae03
(Specification)Standard Specification for Seamless and Welded Austenitic Stainless Steel Sanitary Tubing
Standard Specification for Seamless and Welded Austenitic Stainless Steel Sanitary Tubing
SCOPE
1.1 This specification covers grades of seamless and welded austenitic stainless steel sanitary tubing intended for use in the dairy and food industry and having special surface finishes. Pharmaceutical quality may be requested, as a supplementary requirement.
1.2 This specification covers tubes in sizes up to and including 12 in. (304.8 mm) in outside diameter.
1.3 The values stated in inch-pound units are to be regarded as the standard.
1.4 Optional supplementary requirements are provided, and when one or more of these are desired, each shall be so stated in the order.
General Information
Relations
Standards Content (Sample)
An American National Standard
e3
Designation: A 270 – 98a
Standard Specification for
Seamless and Welded Austenitic Stainless Steel Sanitary
Tubing
This standard is issued under the fixed designation A 270; the number immediately following the designation indicates the year of
original adoption or, in the case of revision, the year of last revision. A number in parentheses indicates the year of last reapproval. A
superscript epsilon (e) indicates an editorial change since the last revision or reapproval.
This standard has been approved for use by agencies of the Department of Defense.
e NOTE—Values for Silicon in TP 316 and TP 316L in Table 1 were editorially corrected in June 1999.
e NOTE—Paragraph 1.2 was editorially updated August 2000.
e NOTE—Paragraph 1.2 was editorially updated October 2000.
1. Scope measurement of surface roughness usually performed by mov-
ing a stylus in a straight line along the surface, although other
1.1 This specification covers grades of seamless and welded
methods may be used.
austenitic stainless steel sanitary tubing intended for use in the
dairy and food industry and having special surface finishes.
4. Ordering Information
Pharmaceutical quality may be requested, as a supplementary
4.1 Orders for material under this specification should
requirement.
include the following, as required, to describe the desired
1.2 This specification covers tubes in sizes up to and
material adequately:
including 9 in. (203.2 mm) in outside diameter.
4.1.1 Quantity (feet, metres, or number of lengths),
1.3 The values stated in inch-pound units are to be regarded
4.1.2 Name of material (seamless or welded tubes),
as the standard.
4.1.3 Size (outside diameter and average wall thickness),
1.4 Optional supplementary requirements are provided, and
4.1.4 Length (specific or random),
when one or more of these are desired, each shall be so stated
4.1.5 Surface finish (Section 14),
in the order.
4.1.6 Optional requirements (product analysis, see Section
2. Referenced Documents 9; hydrostatic or nondestructive electric test, see Section11).
4.1.7 Test report required (Certification Section of Specifi-
2.1 ASTM Standards:
cation A 450/A 450M),
A 262 Practices for Detecting Susceptibility to Intergranu-
4.1.8 Specification designation,
lar Attack in Austenitic Stainless Steels
4.1.9 Special requirements, and
A 450/A 450M Specification for General Requirements for
4.2 Any supplementary requirements.
Carbon, Ferritic Alloy, and Austenitic Alloy Steel Tubes
A 967 Specification for Chemical Passivation Treatments
5. General Requirements
for Stainless Steel Parts
5.1 Material furnished under this specification shall con-
2.2 ANSI/ASME Standard:
form to the applicable requirements of the current edition
B46.1 Surface Texture (Surface Roughness, Waviness, and
4 of Specification A 450/A 450M, unless otherwise provided
Lay
herein.
3. Terminology
6. Manufacture
3.1 Definition:
6.1 The tubes shall be made by the seamless or welded
3.1.1 roughness average, Ra, n—arithmetic average surface
process.
roughness normally reported in microinches or microns; a
6.2 At the manufacturer’s option, tubing may be furnished
either hot finished or cold finished.
This specification is under the jurisdiction of ASTM Committee A01 on Steel,
Stainless Steel, and RelatedAlloys, and is the direct responsibility of Subcommittee
7. Heat Treatment
A01.10 on Steel Tubing.
7.1 All material shall be furnished in the heat-treated
Current edition approved Dec. 10, 1998. Published April 1999. Originally
e2
published as A 270 – 44 T. Last previous edition A 270 – 95a .
condition. The heat treatment procedure, except for N08926
Annual Book of ASTM Standards, Vol 01.03.
andN08367,shallconsistofheatingthematerialtoaminimum
Annual Book of ASTM Standards, Vol 01.01.
4 temperature of 1900°F (1040°C) and quenching in water or
Available from American National Standards Institute, 11 West 42nd Street,
rapid cooling by other means.
13th Floor, New York, NY 10036.
Copyright © ASTM International, 100 Barr Harbor Drive, PO Box C700, West Conshohocken, PA 19428-2959, United States.
e3
A 270 – 98a
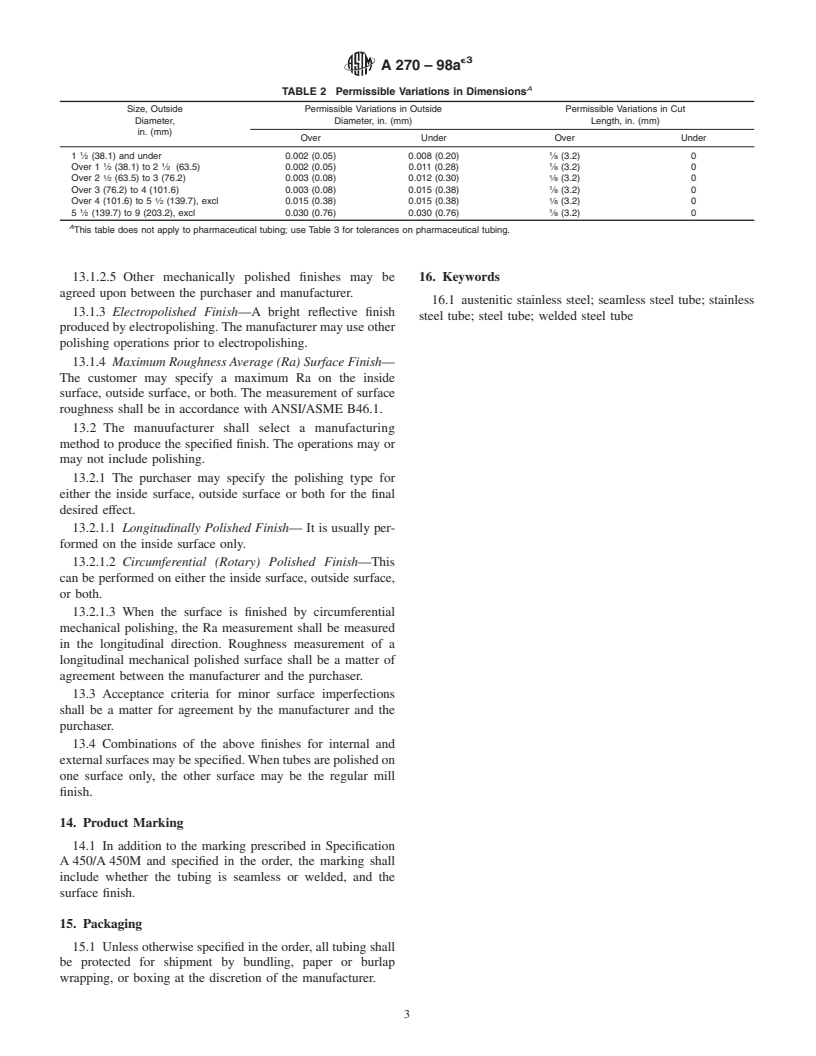
7.2 N08926 shall be heat-treated to a minimum temperature 12.1.1 Variations in outside diameter and length from those
of 2010°F [1100°C] followed by quenching in water or rapidly specified shall not exceed the amount prescribed in Table 2 for
cooling by other means. UNS N08367 should be solution tubes with specified wall thicknesses of 0.049 in. (1.24 mm)
annealed from 2025°F (1107°C) minimum followed by rapid and over. For tubes specified with wall thicknesses under 0.049
quenching. in. (1.24 mm), the diameter tolerances shall be a matter for
agreement by the manufacturer and the purchaser.
8. Chemical Composition
12.1.2 When tubing >4 in. (101.6 mm) diameter is ordered,
additional ovality may be required for thin wall tubing. Thin
8.1 The steel shall conform to the requirements as to
wall tubing applies when the specified wall is less than 0.150
chemical composition as prescribed in Table 1.
in. (3.81 mm).When thin wall tubing is ordered, the maximum
9. ProductAnalysis
and minimum diameter at any cross section shall deviate from
the specified diameter by no more than twice the permissible
9.1 When requested by the purchaser, analyses of one billet
variation in outside diameter given in Table 2; however, the
perheatortwolengthsofflat-rolledstockperheatortwotubes
mean diameter at that cross section must still be within the
from each heat or from each lot of 250 tubes or fraction thereof
given permissible variation.
shallbemade.Thechemicalcompositionthusdeterminedshall
12.1.3 The wall thickness at any point shall not vary more
conform to the requirements specified.
than 12 ⁄2 %, over and under, from the average wall thickness
9.2 If the analysis of one of these test specimens does not
specified.
conform to the requirements specified, an analysis of two
billets or two lengths of flat-rolled stock from the same heat or
13. Surface Finishes
an analysis of two tubes from the same lot may be made, each
of which shall conform to the requirements specified.
13.1 The following surface finishes may be specified:
13.1.1 Mill Finish—Afinishwithoutadditionalpolishingor
10. Mechanical Tests Required
operations intended to smooth the surface.
10.1 Reverse Flattening Test—For welded tubes, one re-
13.1.2 Mechanically Polished Surface Finish—The pur-
verse flattening test shall be made on a specimen from each
chaser may specify one of the following finish numbers for a
1500 ft (457 m) of finished tubing.
mechanically polished surface:
13.1.2.1 Finish No. 80—A ground finish produced by pol-
11. Hydrostatic or Nondestructive Electric Test
ishing a tube with an abrasive media impregnated with No. 80
11.1 Each tube shall be subjected to the nondestructive grit.
electric test or the hydrostatic test. The type of test to be used 13.1.2.2 Finish No. 120—A ground finish produced by
shall be at the option of the manufacturer, unless otherwise
polishing a tube with an abrasive media impregnated with No.
specified in the purchase order.
120 grit.
13.1.2.3 Finish No. 180—A ground finish produced by
12. Permissible Variations in Dimensions
polishing a tube with an abrasive media impregnated with No.
180 grit.
12.1 The following variations in dimensions shall apply,
unless pharmaceutical tubing (Supplementary Requirement 13.1.2.4 Finish No. 240—A ground finish produced by
S2) is specified. When S2 is specified, the dimensions of Table polishing a tube with an abrasive media impregnated with No.
S2.3 shall apply. 240 grit.
TABLE 1 Chemical Requirements
Element Grade TP 304 TP 304L . . . TP 316 TP 316L . . . . . .
UNS S30400 S30403 S31254 S31600 S31603 N08926 N08367
A
Designation
Composition, %
B B
Carbon, max 0.08 0.035 0.020 0.08 0.035 0.020 0.030
Manganese, 2.00 2.00 1.00 2.00 2.00 2.00 2.00
max
Phosphorus, 0.040 0.040 0.030 0.040 0.040 0.03 0.040
max
Sulfur, max 0.030 0.030 0.010 0.030 0.030 0.01 0.030
Silicon, max 0.75 0.75 1.00 0.75 0.75 0.5 1.00
Nickel 8.00–11.0 8.00–13.00 17.5–18.5 10.00–14.00 10.00–15.00 24.00–26.00 23.50–25.50
Chromium 18.00–20.00 18.00–20.00 19.5–20.5 16.00–18.00 16.00–18.00 19.00–21.00 20.00–22.00
Molybdenum . . . . . . 6.0–6.5 2.00–3.00 2.00–3.00 6.0–7.0 6.00–7.00
C
Nitrogen . . . . . . 0.18–0.22 . . . . . . 0.15–0.25 0.18–0.25
Copper . . . . . . 0.50–1.00 . . . . . . 0.5–1.5 0.75 max
A
New designation established in accordance with ASTM E 527 and SAE J 1086, Practice for Numbering Metals and Alloys (UNS).
B
For small diameter or thin walls or both, where many drawing passes are required, a carbon maximum of 0.040 % is necessary in grades TP304L and TP316L. Small
outside diameter tubes are defined as those less than 0.500 in. (12.7 mm) in outside diameter and light wall tubes as those less than 0.049 in. (1.24 mm) in average wall
thickness (0.044 in. (1.12 mm) in minimum wall thickness).
C
The method of analysis for nitrogen shall be a matter of agreement between the purchas
...


Questions, Comments and Discussion
Ask us and Technical Secretary will try to provide an answer. You can facilitate discussion about the standard in here.