ASTM E345-93(2002)
(Test Method)Standard Test Methods of Tension Testing of Metallic Foil
Standard Test Methods of Tension Testing of Metallic Foil
SIGNIFICANCE AND USE
Tension tests provide information on the strength and ductility of materials under uniaxial tensile stresses. This information may be useful in comparisons of materials, alloy development, quality control, and design.
The results of tension tests from selected portions of a part or material may not totally represent the strength and ductility of the entire end product of its in-service behavior in different environments.
These test methods are considered satisfactory for acceptance testing of commercial shipments since the methods have been used extensively for these purposes.
Tension tests provide a means to determine the ductility of materials through the measurement either of elongation or reduction of area. However, as specimen thickness is reduced, tension tests may become less useful for the determination of ductility. For these purposes Test Method E 796 presents an alternative procedure for measuring ductility.
SCOPE
1.1 These test methods cover the tension testing of metallic foil at room temperature in thicknesses less than 0.006 in. (0.150 mm).
Note 1—Exception to these methods may be necessary in individual specifications or test methods for a particular material.
1.2 The values stated in inch-pound units are to be regarded as the standard. The SI values in parentheses are for information only.
1.3 This standard does not purport to address all of the safety concerns, if any, associated with its use. It is the responsibility of the user of this standard to establish appropriate safety and health practices and determine the applicability of regulatory limitations prior to use.
General Information
Relations
Standards Content (Sample)
NOTICE: This standard has either been superseded and replaced by a new version or withdrawn.
Contact ASTM International (www.astm.org) for the latest information
Designation:E345–93(Reapproved 2002)
Standard Test Methods of
Tension Testing of Metallic Foil
This standard is issued under the fixed designation E 345; the number immediately following the designation indicates the year of
original adoption or, in the case of revision, the year of last revision. A number in parentheses indicates the year of last reapproval. A
superscript epsilon (e) indicates an editorial change since the last revision or reapproval.
This standard has been approved for use by agencies of the Department of Defense.
1. Scope 3. Terminology
1.1 These test methods cover the tension testing of metallic 3.1 The definitions of terms relating to tension testing
foil at room temperature in thicknesses less than 0.006 in. appearing in TerminologyE6 apply to the terms used in these
(0.150 mm). methods of tension testing.
NOTE 1—Exception to these methods may be necessary in individual
4. Significance and Use
specifications or test methods for a particular material.
4.1 Tension tests provide information on the strength and
1.2 The values stated in inch-pound units are to be regarded
ductility of materials under uniaxial tensile stresses. This
as the standard. The SI values in parentheses are for informa-
information may be useful in comparisons of materials, alloy
tion only.
development, quality control, and design.
1.3 This standard does not purport to address all of the
4.2 The results of tension tests from selected portions of a
safety concerns, if any, associated with its use. It is the
part or material may not totally represent the strength and
responsibility of the user of this standard to establish appro-
ductility of the entire end product of its in-service behavior in
priate safety and health practices and determine the applica-
different environments.
bility of regulatory limitations prior to use.
4.3 These test methods are considered satisfactory for ac-
ceptance testing of commercial shipments since the methods
2. Referenced Documents
have been used extensively for these purposes.
2.1 ASTM Standards:
4.4 Tension tests provide a means to determine the ductility
B 193 Test Method for Resistivity of Electrical Conductor
of materials through the measurement either of elongation or
Materials
reduction of area. However, as specimen thickness is reduced,
E4 Practices for Force Verification of Testing Machines
tension tests may become less useful for the determination of
E6 Terminology Relating to Methods of Mechanical Test-
ductility. For these purposes Test Method E 796 presents an
ing
alternative procedure for measuring ductility.
E8 Test Methods forTensionTesting of Metallic Materials
E8M Test Methods for Tension Testing of Metallic Mate-
5. Apparatus
rials (Metric)
5.1 Testing Machines—Machines used for tension testing
E29 Practice for Using Significant Digits in Test Data to
shall conform to the requirements of PracticesE4. The loads
Determine Conformance with Specifications
used in determining tensile strength, yield strength, and yield
E 252 Test Method for Thickness of Thin Foil and Film by
point shall be within the verified loading range of the testing
Weighing
machine as defined in PracticesE4.
E 796 Test Method for Ductility Testing of Metallic Foil
5.2 Gripping Devices:
5.2.1 General—Various types of gripping devices may be
used to transmit the measured load applied by the testing
These test methods are under the jurisdiction of ASTM Committee E28 on
Mechanical Testing and are the direct responsibility of Subcommittee E28.04 on
machine to the test specimen. To ensure axial tensile stress
Uniaxial Testing.
within the gage length, the axis of the test specimen must
Current edition approved Aug. 15, 1993. Published October 1993. Originally
e1 coincide with the center line of the heads of the testing
published as E 345 – 68 T. Last previous edition E 345 – 87 (1992) .
machine. Any departure from this center line may introduce
Annual Book of ASTM Standards, Vol 02.03.
Annual Book of ASTM Standards, Vol 03.01.
bending stresses that are not included in the usual stress
Annual Book of ASTM Standards, Vol 14.02.
computation (load divided by cross-sectional area).
Annual Book of ASTM Standards, Vol 02.02.
Copyright © ASTM International, 100 Barr Harbor Drive, PO Box C700, West Conshohocken, PA 19428-2959, United States.
E345–93 (2002)
Dimensions
Specimen
Type A Type B
in. mm in. mm
G—Gage length 2.000 6 0.005 50.0 6 0.1 5 125
W—Width 0.500 6 0.010 12.50 6 0.25 0.500 12.5
T—Thickness thickness of foil thickness of foil
R—Radius of fillet, min ⁄4 19 . .
L—Overall Length, min 8 200 9 230
A—Length of reduced section, min 2 ⁄4 60 . .
B—Length of grip section, min 2 50 . .
C—Width of grip section, approx. ⁄4 20 0.500 12.5
NOTE 1—ForTypeAspecimens,theendsofthereducedsectionshallnotdifferinwidthbymorethan0.002in.(0.05mm).Also,theremaybeagradual
decrease in width from the ends to the center, but the width at either end shall not be more than 0.005 in. (0.10 mm) larger than the width at the center.
NOTE 2—The dimension T is the thickness of the test specimen as provided for in the applicable material specifications.
FIG. 1 Foil Tension Test Specimen
5.2.2 Wedge Grips—Testing machines usually are equipped 7. Procedures
with wedge grips. These wedge grips generally furnish a
7.1 Type A Specimen Preparation—The specimens can be
satisfactory means of gripping long specimens of ductile
machined in packs by use of a milling-type cutter. The
materials in the thicker foil gages. If, for any reason, one grip
machined specimens shall be examined under about 203
of a pair advances farther than the other as the grips tighten, an
magnification to determine that the edges are smooth and that
undesirable bending stress may be introduced. When liners are
there are no surface scratches or creases. Specimens showing
used behind the wedges, they must be of the same thickness
discernible scratches, creases, or edge discontinuities shall be
and their faces must be flat and parallel. For proper gripping, it
rejected. The milling cutter shall be sharpened or renewed
is desirable that the entire length of the serrated face of each
when necessary. When machining some thicknesses and tem-
wedge be in contact with the specimen.Abuffer material such
pers of material it may be necessary to interleave the samples
as 320-grit silicon carbide paper may be inserted between the
with hard aluminum sheet, a plastic, or other suitable material.
specimen and serrated faces to minimize tearing of specimens.
For some materials it may be desirable to polish the edges of
5.2.3 Smooth Face Grips—For foils less than 0.003 in.
the specimens, either mechanically or by electropolishing.
(0.076 mm) thickness, it may be desirable that the grips have
7.2 TypeBSpecimenPreparation—The specimens, particu-
smooth faces and that the gripping pressure be about 100 psi
larly of soft and of thin hard metals, may be prepared by
(0.7 MPa) for each 0.001 in. (0.025 mm) of specimen thick-
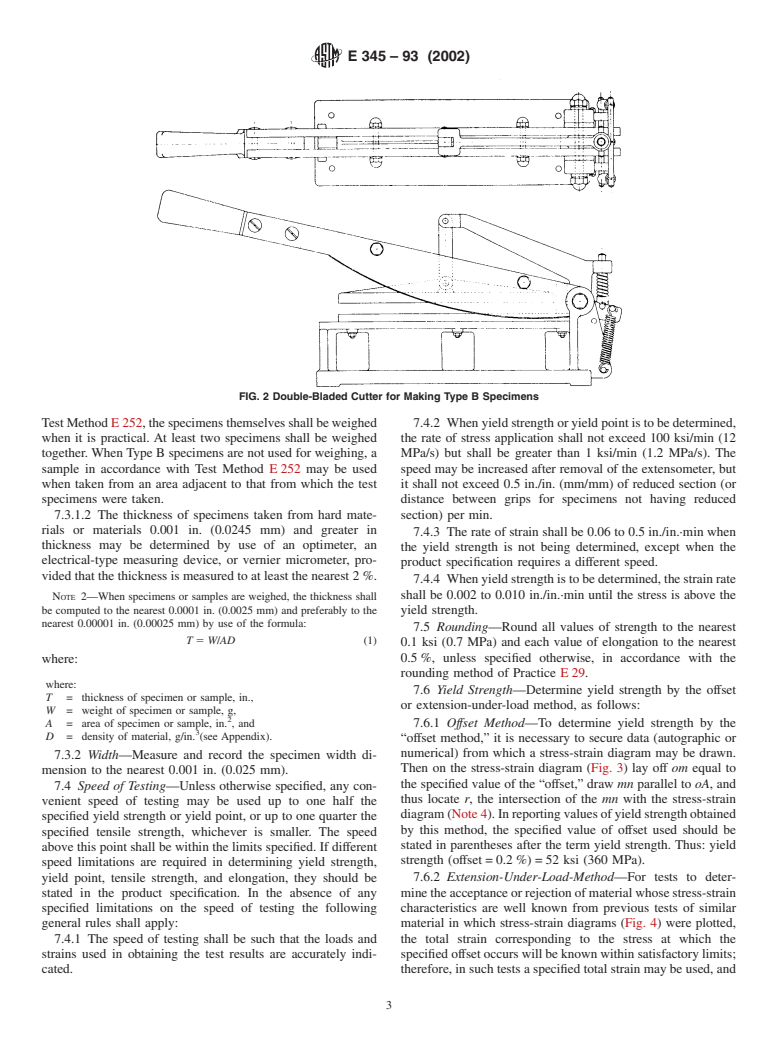
shearing, for example, by use of a double-bladed cutter (Fig. 2)
ness. 6
or by slitting. The cutting edges should be lubricated, if
necessary with a material such as stearic acid in alcohol or
6. Test Specimen
another suitable material. The finished specimens shall be
6.1 General—Test specimens shall be prescribed in the
examined under about 203 magnification to determine that the
product specification for the material being tested. If a Type A
edges are smooth and there are no surface scratches or creases.
specimen is used, all specimen dimensions, test procedures,
Specimens showing discernible surface scratches, creases, or
and calculations shall be in compliance with those shown in
edge discontinuities shall be rejected.
Test MethodsE8orE8M.
7.3 Specimen Measurement:
6.2 Type A Specimen—Type A specimens shall be in accor-
7.3.1 Thickness:
dance with the ⁄2-in. (12.5-mm) sheet-type specimen shown in
7.3.1.1 Thicknessofspecimenstakenfromsoftfoilsorfrom
Fig. 1. To avoid lateral buckling in tests of some materials, the
foils 0.002 in. (0.05 mm) and thinner shall be determined to an
minimum radius of the fillet should be ⁄4 in. (19 mm), or the
accuracy of 2 % of the thickness by weighing in accordance
width of the grip ends should be only slightly larger than the
with Test Method E 252 or by measuring devices. When using
width of the reduced section, or both; and the reduced section
should be at least 20 % longer than the gage length.
6.3 Type B Specimens—Type B specimens shall be in
The Thwing-Albert JDC-50 precision cutter available from Thwing-Albert
accordance with the ⁄2-in. (12.5-mm) wide parallel sided
Instrument Co., 10960 Dutton Rd., Philadelphia, PA 19154, has been found to be
specimen shown in Fig. 1. acceptable.
E345–93 (2002)
FIG. 2 Double-Bladed Cutter for Making Type B Specimens
TestMethodE 252,thespecimensthemselvesshallbeweighed 7.4.2 When yield strength or yield point is to be determined,
when it is practical. At least two specimens shall be weighed the rate of stress application shall not exceed 100 ks
...


Questions, Comments and Discussion
Ask us and Technical Secretary will try to provide an answer. You can facilitate discussion about the standard in here.