ASTM A835/A835M-10(2015)
(Specification)Standard Specification for Sizes of Ferroalloys and Alloy Additives
Standard Specification for Sizes of Ferroalloys and Alloy Additives
ABSTRACT
This specification covers standards for sizes of screened ferroalloys and alloy additives. Products shall conform to specified nominal size, standard ordered size, maximum allowable oversize, maximum allowable undersize, and friability rating. Description of the friability ratings of the ferroalloys is also provided.
SCOPE
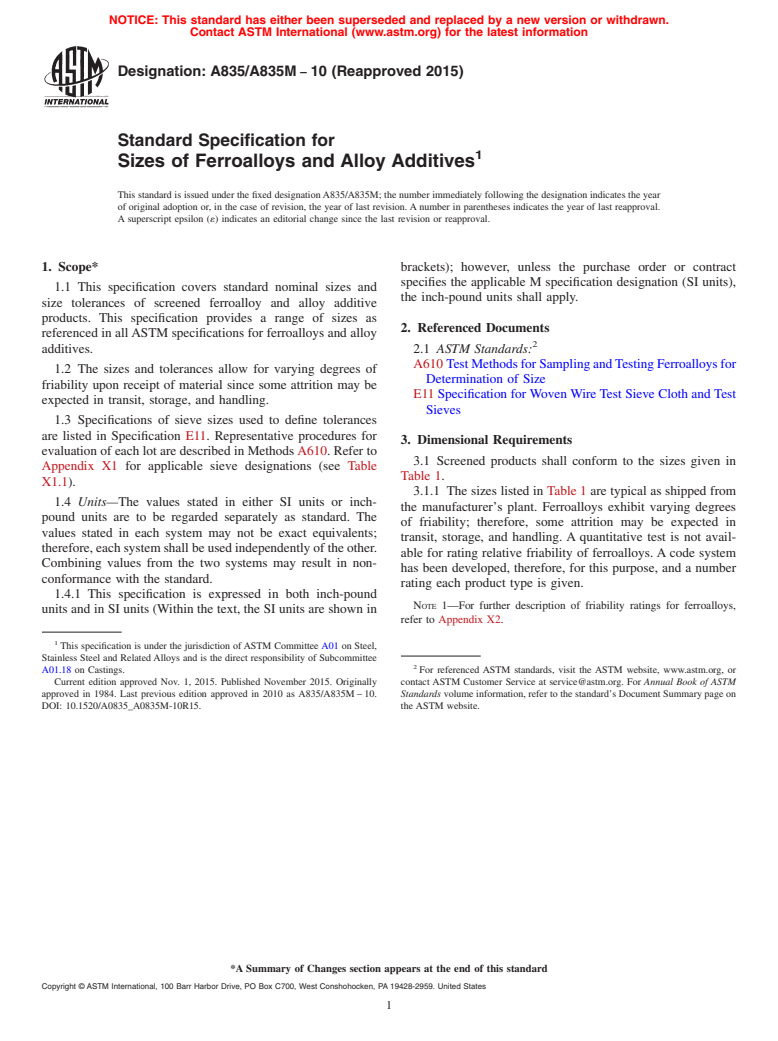
1.1 This specification covers standard nominal sizes and size tolerances of screened ferroalloy and alloy additive products. This specification provides a range of sizes as referenced in all ASTM specifications for ferroalloys and alloy additives.
1.2 The sizes and tolerances allow for varying degrees of friability upon receipt of material since some attrition may be expected in transit, storage, and handling.
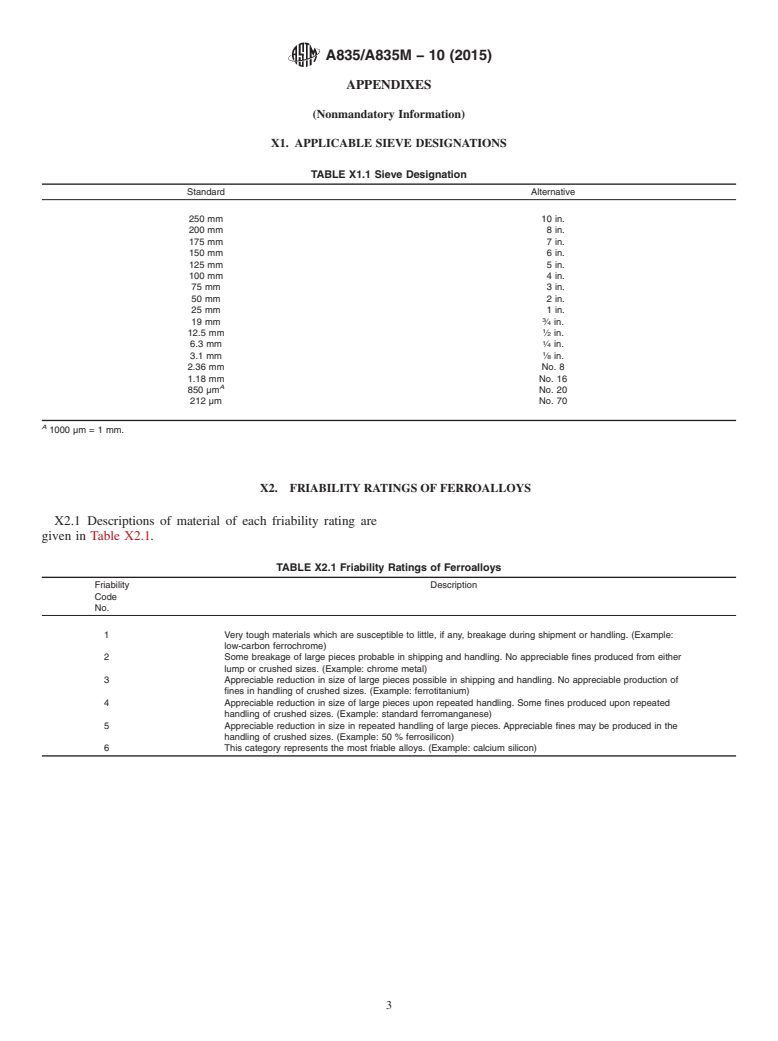
1.3 Specifications of sieve sizes used to define tolerances are listed in Specification E11. Representative procedures for evaluation of each lot are described in Methods A610. Refer to Appendix X1 for applicable sieve designations (see Table X1.1).
1.4 Units—The values stated in either SI units or inch-pound units are to be regarded separately as standard. The values stated in each system may not be exact equivalents; therefore, each system shall be used independently of the other. Combining values from the two systems may result in non-conformance with the standard.
1.4.1 This specification is expressed in both inch-pound units and in SI units (Within the text, the SI units are shown in brackets); however, unless the purchase order or contract specifies the applicable M specification designation (SI units), the inch-pound units shall apply.
General Information
Relations
Buy Standard
Standards Content (Sample)
NOTICE: This standard has either been superseded and replaced by a new version or withdrawn.
Contact ASTM International (www.astm.org) for the latest information
Designation:A835/A835M −10 (Reapproved 2015)
Standard Specification for
1
Sizes of Ferroalloys and Alloy Additives
This standard is issued under the fixed designationA835/A835M; the number immediately following the designation indicates the year
of original adoption or, in the case of revision, the year of last revision. A number in parentheses indicates the year of last reapproval.
A superscript epsilon (´) indicates an editorial change since the last revision or reapproval.
1. Scope* brackets); however, unless the purchase order or contract
specifies the applicable M specification designation (SI units),
1.1 This specification covers standard nominal sizes and
the inch-pound units shall apply.
size tolerances of screened ferroalloy and alloy additive
products. This specification provides a range of sizes as
2. Referenced Documents
referenced in allASTM specifications for ferroalloys and alloy
2
additives. 2.1 ASTM Standards:
A610 TestMethodsforSamplingandTestingFerroalloysfor
1.2 The sizes and tolerances allow for varying degrees of
Determination of Size
friability upon receipt of material since some attrition may be
E11 Specification for Woven Wire Test Sieve Cloth and Test
expected in transit, storage, and handling.
Sieves
1.3 Specifications of sieve sizes used to define tolerances
are listed in Specification E11. Representative procedures for
3. Dimensional Requirements
evaluation of each lot are described in Methods A610. Refer to
3.1 Screened products shall conform to the sizes given in
Appendix X1 for applicable sieve designations (see Table
Table 1.
X1.1).
3.1.1 The sizes listed in Table 1 are typical as shipped from
1.4 Units—The values stated in either SI units or inch-
the manufacturer’s plant. Ferroalloys exhibit varying degrees
pound units are to be regarded separately as standard. The
of friability; therefore, some attrition may be expected in
values stated in each system may not be exact equivalents;
transit, storage, and handling. A quantitative test is not avail-
therefore, each system shall be used independently of the other.
able for rating relative friability of ferroalloys. A code system
Combining values from the two systems may result in non-
has been developed, therefore, for this purpose, and a number
conformance with the standard.
rating each product type is given.
1.4.1 This specification is expressed in both inch-pound
NOTE 1—For further description of friability ratings for ferroalloys,
units and in SI units (Within the text, the SI units are shown in
refer to Appendix X2.
1
This specification is under the jurisdiction of ASTM Committee A01 on Steel,
Stainless Steel and Related Alloys and is the direct responsibility of Subcommittee
2
A01.18 on Castings. For referenced ASTM standards, visit the ASTM website, www.astm.org, or
Current edition approved Nov. 1, 2015. Published November 2015. Originally contact ASTM Customer Service at service@astm.org. For Annual Book of ASTM
approved in 1984. Last previous edition approved in 2010 as A835/A835M – 10. Standards volume information, refer to the standard’s Document Summary page on
DOI: 10.1520/A0835_A0835M-10R15. the ASTM website.
*A Summary of Changes section appears at the end of this standard
Copyright © ASTM International, 100 Barr Harbor Drive, PO Box C700, West Conshohocken, PA 19428-2959. United States
1
---------------------- Page: 1 ----------------------
A835/A835M−10 (2015)
A
TABLE 1 Requirements for Screened Products
Nominal Standard Maximum Maximum Friability
Size, Ordered Allowable Allowable Rating
in. Size, Oversize Undersize Code
B
[mm] in. No.
Size in. Percent Size in. Percent
[mm]
[mm] [mm]
Lump to Crushed Sizes:
6 [150] 8 [200] to 10 10 % through 10 % 1–6
by 4 [250] 4 [100]
[100]
5 [125] 8 [200] to 10 10 % through 10 % 1–6
by 2 [250] 2 [50]
[50]
4 [100] 6 [150] to 8 10 % through 10 % 1–6
by 2 [200] 2 [50]
[50]
1
3 ⁄2 [90] 5 [125] to 7 10 % through 10 % 1–6
by 2 [175] 2 [50]
[50]
3 [75] 5 [125] to 7 10 % through 10 % 1–6
(A) by 1 [175] 1 [25]
[25]
3 [75] 4 [100] to 6 10 % through 10 % 1–6
(B) by 2 [150] 2 [50]
[50]
1
2 ⁄2 [65] 4 [100] to 6 10 % through 10 % 1–6
by 1 [150] 1 [25]
[25]
1
2 ⁄4 [60] 4 [100] to 5 10 % through 10 % 1–6
1 1
by ⁄2 [125] ⁄2 [15]
[15]
2 [50] 3 [75] to 4 10 % through 10 % 1–6
by 1 [100] 1 [25]
[25]
1
1 ⁄2 [40] 3 [75] to 4 10 % through 10 % 1–6
1 1
by ⁄2 [100] ⁄2 [15]
[15]
1
1 ⁄4 [30] 2 [50] to 3 10 % through 10 % 1–6
1 1
by ⁄2 [75] ⁄2 [15]
[15]
1
1 ⁄8 [30] 2 [50] to 3 10 % through 10 % 1–6
1 1
by ⁄4 [75] ⁄4 [5]
[5]
Small Crushed Sizes by Down:
2 [50] 4 [100] to 10 % through 15 % 1–6
1
by D 5[125] ⁄2 [15]
1
1 ⁄2 [40] 3 [75] to 4 10 % through 15 % 1–6
1
by D [100] ⁄8 [3]
1 [25] 2 [50] to 3[75] 10 % through 15 % 1–4
1
by D ⁄8 [3]
to 3 8 % through 20 % 5,6
[75] No. 8
1 1
⁄2 [15] 1 [25] to 1 ⁄2 10 % through 15 % 1–4
by D [40] No. 16
1
to 1 ⁄2 8 % t
...
This document is not an ASTM standard and is intended only to provide the user of an ASTM standard an indication of what changes have been made to the previous version. Because
it may not be technically possible to adequately depict all changes accurately, ASTM recommends that users consult prior editions as appropriate. In all cases only the current version
of the standard as published by ASTM is to be considered the official document.
Designation: A835/A835M − 10 A835/A835M − 10 (Reapproved 2015)
Standard Specification for
1
Sizes of Ferroalloys and Alloy Additives
This standard is issued under the fixed designation A835/A835M; the number immediately following the designation indicates the year
of original adoption or, in the case of revision, the year of last revision. A number in parentheses indicates the year of last reapproval.
A superscript epsilon (´) indicates an editorial change since the last revision or reapproval.
1. Scope*
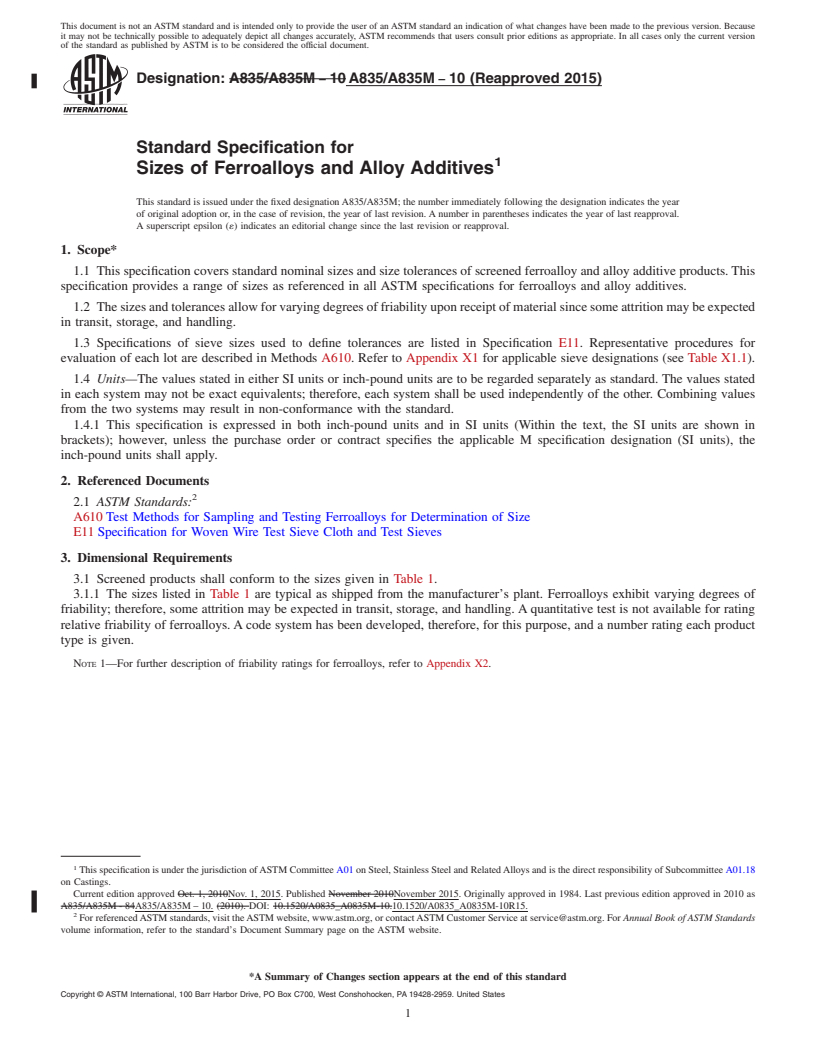
1.1 This specification covers standard nominal sizes and size tolerances of screened ferroalloy and alloy additive products. This
specification provides a range of sizes as referenced in all ASTM specifications for ferroalloys and alloy additives.
1.2 The sizes and tolerances allow for varying degrees of friability upon receipt of material since some attrition may be expected
in transit, storage, and handling.
1.3 Specifications of sieve sizes used to define tolerances are listed in Specification E11. Representative procedures for
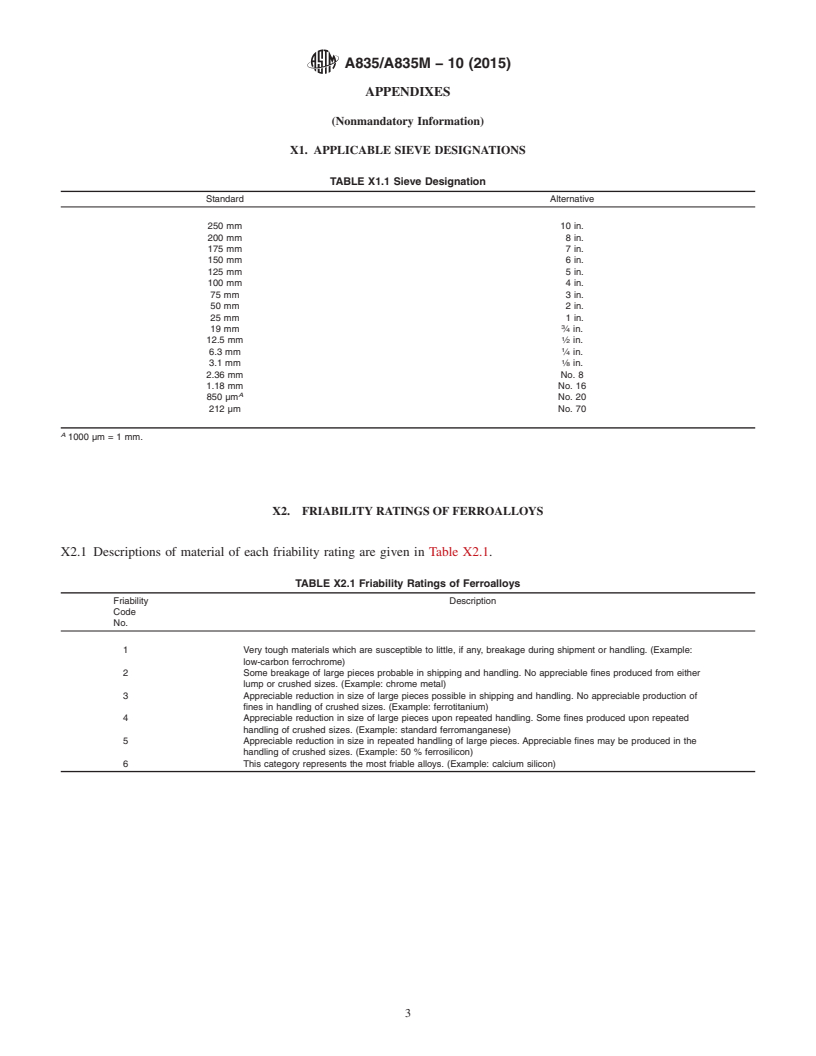
evaluation of each lot are described in Methods A610. Refer to Appendix X1 for applicable sieve designations (see Table X1.1).
1.4 Units—The values stated in either SI units or inch-pound units are to be regarded separately as standard. The values stated
in each system may not be exact equivalents; therefore, each system shall be used independently of the other. Combining values
from the two systems may result in non-conformance with the standard.
1.4.1 This specification is expressed in both inch-pound units and in SI units (Within the text, the SI units are shown in
brackets); however, unless the purchase order or contract specifies the applicable M specification designation (SI units), the
inch-pound units shall apply.
2. Referenced Documents
2
2.1 ASTM Standards:
A610 Test Methods for Sampling and Testing Ferroalloys for Determination of Size
E11 Specification for Woven Wire Test Sieve Cloth and Test Sieves
3. Dimensional Requirements
3.1 Screened products shall conform to the sizes given in Table 1.
3.1.1 The sizes listed in Table 1 are typical as shipped from the manufacturer’s plant. Ferroalloys exhibit varying degrees of
friability; therefore, some attrition may be expected in transit, storage, and handling. A quantitative test is not available for rating
relative friability of ferroalloys. A code system has been developed, therefore, for this purpose, and a number rating each product
type is given.
NOTE 1—For further description of friability ratings for ferroalloys, refer to Appendix X2.
1
This specification is under the jurisdiction of ASTM Committee A01 on Steel, Stainless Steel and Related Alloys and is the direct responsibility of Subcommittee A01.18
on Castings.
Current edition approved Oct. 1, 2010Nov. 1, 2015. Published November 2010November 2015. Originally approved in 1984. Last previous edition approved in 2010 as
A835/A835M - 84A835/A835M – 10. (2010). DOI: 10.1520/A0835_A0835M-10.10.1520/A0835_A0835M-10R15.
2
For referenced ASTM standards, visit the ASTM website, www.astm.org, or contact ASTM Customer Service at service@astm.org. For Annual Book of ASTM Standards
volume information, refer to the standard’s Document Summary page on the ASTM website.
*A Summary of Changes section appears at the end of this standard
Copyright © ASTM International, 100 Barr Harbor Drive, PO Box C700, West Conshohocken, PA 19428-2959. United States
1
---------------------- Page: 1 ----------------------
A835/A835M − 10 (2015)
A
TABLE 1 Requirements for Screened Products
Nominal Standard Maximum Maximum Friability
Size, Ordered Allowable Allowable Rating
in. Size, Oversize Undersize Code
B
[mm] in. No.
Size in. Percent Size in. Percent
[mm]
[mm] [mm]
Lump to Crushed Sizes:
6 [150] 8 [200] to 10 10 % through 10 % 1–6
by 4 [250] 4 [100]
[100]
5 [125] 8 [200] to 10 10 % through 10 % 1–6
by 2 [250] 2 [50]
[50]
4 [100] 6 [150] to 8 10 % through 10 % 1–6
by 2 [200] 2 [50]
[50]
1
3 ⁄2 [90] 5 [125] to 7 10 % through 10 % 1–6
by 2 [175] 2 [50]
[50]
3 [75] 5 [125] to 7 10 % through 10 % 1–6
(A) by 1 [175] 1 [25]
[25]
3 [75] 4 [100] to 6 10 % through 10 % 1–6
(B) by 2 [150] 2 [50]
[50]
1
2 ⁄2 [65] 4 [100] to 6 10 % through 10 % 1–6
by 1 [150] 1 [25]
[25]
1
2 ⁄4 [60] 4 [100] to 5 10 % through 10 % 1–6
1 1
by ⁄2 [125] ⁄2 [15]
[15]
2 [50] 3 [75] to 4 10 % through 10 % 1–6
by 1 [100] 1 [25]
[25]
1
1 ⁄2 [40] 3 [75] to 4 10 % through 10 % 1–6
1 1
by ⁄2 [100] ⁄2 [15]
[15]
1
1 ⁄4 [30] 2 [50] to 3 10 % through 10 % 1–6
1 1
by ⁄2 [75] ⁄2 [15]
[15]
1
1 ⁄8 [30] 2 [50] to 3 10 % t
...


Questions, Comments and Discussion
Ask us and Technical Secretary will try to provide an answer. You can facilitate discussion about the standard in here.