ASTM A352/A352M-06(2012)
(Specification)Standard Specification for Steel Castings, Ferritic and Martensitic, for Pressure-Containing Parts, Suitable for Low-Temperature Service
Standard Specification for Steel Castings, Ferritic and Martensitic, for Pressure-Containing Parts, Suitable for Low-Temperature Service
ABSTRACT
This specification covers steel castings for valves, flanges, fittings, and other pressure-containing parts intended primarily for low-temperature service. Several grades of ferritic steels and one grade of martensitic steel are covered. All castings shall receive a heat treatment proper to their design and chemical composition. It should be recognized that liquid quenching of the ferritic grades is normally required to meet the mechanical properties of heavier sections. The steel shall conform to the requirements as to chemical composition specified. Tensile test and impact test shall be made to conform to the requirements specified.
SCOPE
1.1 This specification covers steel castings for valves, flanges, fittings, and other pressure-containing parts intended primarily for low-temperature service.
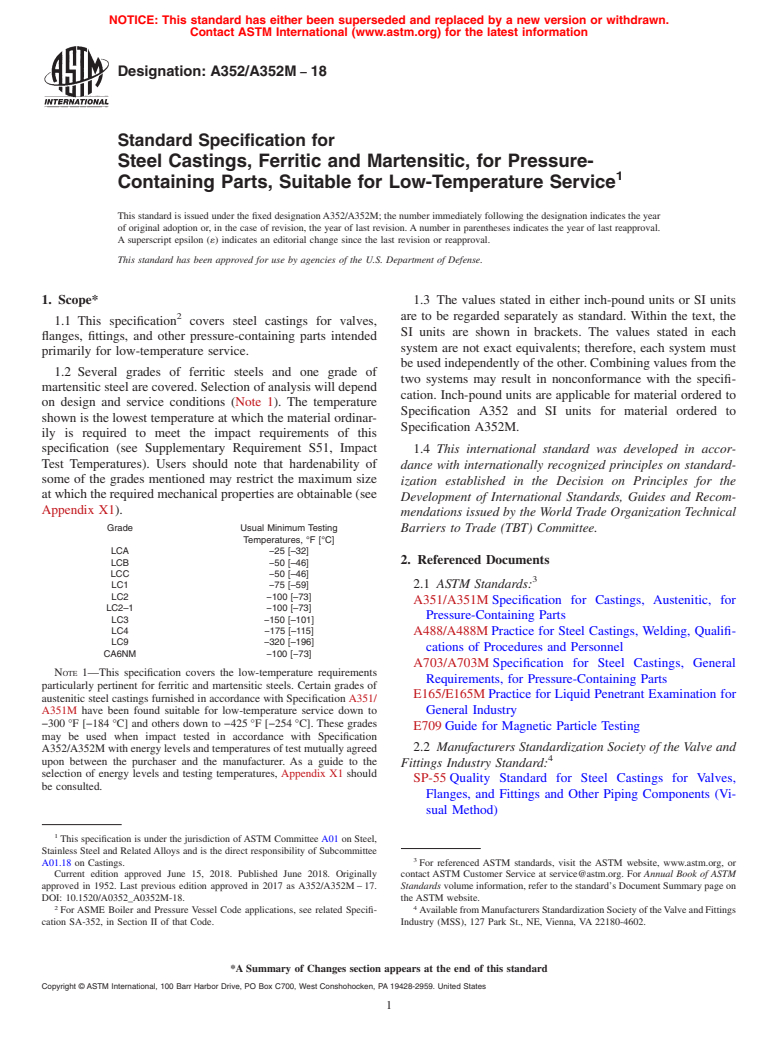
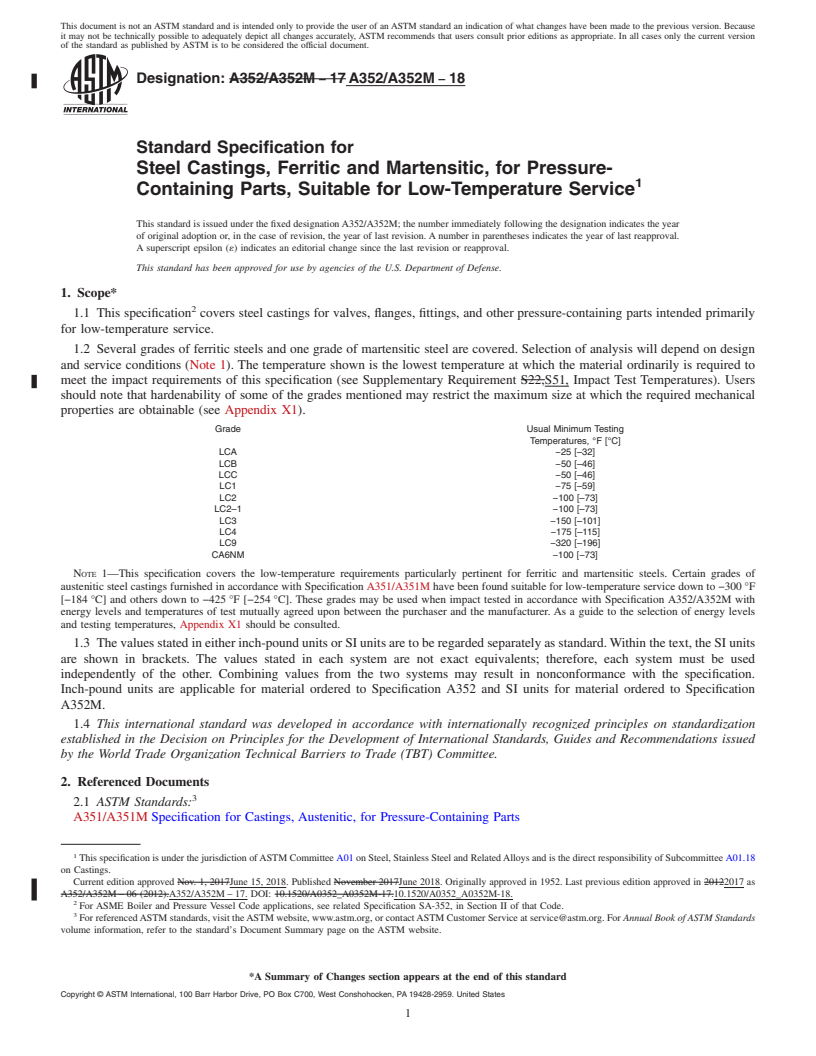
1.2 Several grades of ferritic steels and one grade of martensitic steel are covered. Selection of analysis will depend on design and service conditions (Note). The temperature shown is the lowest temperature at which the material ordinarily is required to meet the impact requirements of this specification (see Supplementary Requirement S22, Impact Test Temperatures). Users should note that hardenability of some of the grades mentioned may restrict the maximum size at which the required mechanical properties are obtainable (see Appendix X1).
GradeUsual Minimum Testing
Temperatures, °F [°C]
LCA−25 [–32] LCB−50 [–46] LCC−50 [–46] LC1−75 [–59] LC2−100 [–73] LC2–1−100 [–73] LC3−150 [–101] LC4−175 [–115] LC9−320 [–196] CA6NM−100 [−73]
Note 1—This specification covers the low-temperature requirements particularly pertinent for ferritic and martensitic steels. Certain of the grades of austenitic steel castings furnished in accordance with Specification A351/A351M have been found suitable for low-temperature service down to −300°F [−184°C] and others down to −425°F [−254°C]. These grades may be used when impact tested in accordance with Specification A352/A352M with energy levels and temperatures of test mutually agreed upon between the purchaser and the manufacturer. As a guide to the selection of energy levels and testing temperatures, Appendix X1 should be consulted.
1.3 The values stated in either inch-pound units or SI units are to be regarded separately as standard. Within the text, the SI units are shown in brackets. The values stated in each system are not exact equivalents; therefore, each system must be used independently of the other. Combining values from the two systems may result in nonconformance with the specification. Inch-pound units are applicable for material ordered to Specification A352 and SI units for material ordered to Specification A352M.
General Information
Relations
Buy Standard
Standards Content (Sample)
NOTICE: This standard has either been superseded and replaced by a new version or withdrawn.
Contact ASTM International (www.astm.org) for the latest information
Designation: A352/A352M −06 (Reapproved 2012)
Standard Specification for
Steel Castings, Ferritic and Martensitic, for Pressure-
Containing Parts, Suitable for Low-Temperature Service
This standard is issued under the fixed designationA352/A352M; the number immediately following the designation indicates the year
of original adoption or, in the case of revision, the year of last revision.Anumber in parentheses indicates the year of last reapproval.
A superscript epsilon (´) indicates an editorial change since the last revision or reapproval.
This standard has been approved for use by agencies of the Department of Defense.
1. Scope* 1.3 The values stated in either inch-pound units or SI units
2 are to be regarded separately as standard. Within the text, the
1.1 This specification covers steel castings for valves,
SI units are shown in brackets. The values stated in each
flanges, fittings, and other pressure-containing parts intended
system are not exact equivalents; therefore, each system must
primarily for low-temperature service.
beusedindependentlyoftheother.Combiningvaluesfromthe
1.2 Several grades of ferritic steels and one grade of
two systems may result in nonconformance with the specifi-
martensiticsteelarecovered.Selectionofanalysiswilldepend
cation. Inch-pound units are applicable for material ordered to
on design and service conditions (Note). The temperature
Specification A352 and SI units for material ordered to
shown is the lowest temperature at which the material ordinar-
Specification A352M.
ily is required to meet the impact requirements of this
specification (see Supplementary Requirement S22, Impact
2. Referenced Documents
Test Temperatures). Users should note that hardenability of 3
2.1 ASTM Standards:
some of the grades mentioned may restrict the maximum size
A351/A351MSpecification for Castings, Austenitic, for
atwhichtherequiredmechanicalpropertiesareobtainable(see
Pressure-Containing Parts
Appendix X1).
A370Test Methods and Definitions for Mechanical Testing
Grade Usual Minimum Testing
of Steel Products
Temperatures, °F [°C]
A488/A488MPractice for Steel Castings, Welding, Qualifi-
LCA −25 [–32]
LCB −50 [–46] cations of Procedures and Personnel
LCC −50 [–46]
A703/A703M Specification for Steel Castings, General
LC1 −75 [–59]
Requirements, for Pressure-Containing Parts
LC2 −100 [–73]
LC2–1 −100 [–73] E165Practice for Liquid Penetrant Examination for General
LC3 −150 [–101]
Industry
LC4 −175 [–115]
E709Guide for Magnetic Particle Testing
LC9 −320 [–196]
CA6NM −100 [−73] 2.2 Manufacturers’StandardizationSocietyoftheValveand
Fittings Industry Standard:
NOTE 1—This specification covers the low-temperature requirements
SP-55Quality Standard for Steel Castings for Valves,
particularly pertinent for ferritic and martensitic steels. Certain of the
grades of austenitic steel castings furnished in accordance with Specifi-
Flanges, and Fittings and Other Piping Components (Vi-
cationA351/A351Mhavebeenfoundsuitableforlow-temperatureservice
sual Method)
down to −300°F [−184°C] and others down to −425°F [−254°C]. These
grades may be used when impact tested in accordance with Specification
3. General Conditions for Delivery
A352/A352Mwithenergylevelsandtemperaturesoftestmutuallyagreed
upon between the purchaser and the manufacturer. As a guide to the
3.1 Material furnished to this specification shall conform to
selection of energy levels and testing temperatures, Appendix X1 should
the requirements of Specification A703/A703M including any
be consulted.
supplementary requirements that are indicated in the purchase
order. Failure to comply with the general requirements of
Specification A703/A703M constitutes nonconformance with
This specification is under the jurisdiction ofASTM Committee A01 on Steel,
Stainless Steel and RelatedAlloys and is the direct responsibility of Subcommittee
A01.18 on Castings. For referenced ASTM standards, visit the ASTM website, www.astm.org, or
Current edition approved March 1, 2012. Published April 2012. Originally contact ASTM Customer Service at service@astm.org. For Annual Book of ASTM
approved in 1952. Last previous edition approved in 2006 as A352/A352M-06. Standards volume information, refer to the standard’s Document Summary page on
DOI: 10.1520/A0352_A0352M-06R12. the ASTM website.
2 4
For ASME Boiler and Pressure Vessel Code applications, see related Specifi- AvailablefromManufacturersStandardizationSocietyoftheValveandFittings
cation SA-352, in Section II of that Code. Industry (MSS), 127 Park St., NE, Vienna, VA 22180-4602.
*A Summary of Changes section appears at the end of this standard
Copyright © ASTM International, 100 Barr Harbor Drive, PO Box C700, West Conshohocken, PA 19428-2959. United States
A352/A352M − 06 (2012)
this specification. In case of conflict between the requirements one value permitted below the average minimum specified and
of this specification and Specification A703/A703M, this no value permitted below the minimum specified for a single
specification shall prevail. specimen.
7.2.2 The notched bar impact test shall be made in accor-
4. Ordering Information
dance with Test Methods and Definitions A370.
7.2.3 Impact test specimens shall be machined to the form
4.1 The inquiry and order should include or indicate the
and dimensions shown in Test Methods and Definitions A370,
following:
Fig. 11.
4.1.1 A description of the casting by pattern number or
drawing (dimensional tolerances shall be included on the
8. Quality
casting drawing),
4.1.2 Grade of steel,
8.1 The surface of the casting shall be examined visually
4.1.3 Options in the specification, and
and shall be free of adhering sand, scale, cracks, and hot tears.
4.1.4 The supplementary requirements desired, including
Other surface discontinuities shall meet the visual acceptance
the standards of acceptance.
standards specified in the order. Visual Method SP-55 or other
visual standards may be used to define acceptable surface
5. Heat Treatment
discontinuities and finish. Unacceptable visual surface discon-
5.1 Allcastingsshallreceiveaheattreatmentpropertotheir tinuities shall be removed and their removal verified by visual
examination of the resultant cavities.When methods involving
design and chemical composition. It should be recognized that
liquid quenching of the ferritic grades is normally required to high temperature are used in the removal of discontinuities,
castings shall be preheated to at least the minimum tempera-
meet the mechanical properties of heavier sections and will
tures in Table 2.
greatly enhance the low-temperature properties of thinner
sections.
8.2 When additional inspection is desired, Supplementary
5.2 Ferriticcastingsshallbefurnishedinthenormalizedand Requirements S4, S5, and S10, may be ordered.
tempered or liquid-quenched and tempered condition, except
8.3 The castings shall not be peened, plugged, or impreg-
for Grade LC9, which shall be liquid-quenched and tempered.
nated to stop leaks.
Castings shall be tempered at a minimum of 1100°F [590°C],
except Grade LC4, which shall be 1050°F [565°C], and Grade
9. Repair by Welding
LC9, which shall be tempered in the range of 1050 to 1175°F
9.1 Repairs shall be made using procedures and welders in
[565 to 635°C], followed by cooling in air or liquid.
accordance with Practice A488/A488M.
5.3 CA6NM castings shall be heat-treated by heating to
9.2 Welding of Grade LC9 shall be accomplished using
1850°F [1010°C] minimum, and air cooling to 200°F [95°C]
nonmagnetic filler material of AWS classification ENiCrFe-2,
maximum before any optional intermediate temper, but shall
and shall require liquid penetrant inspection of the weld
cool to 100°F [40°C] maximum before the final temper, which
(Supplementary Requirement S6) when magnetic particle in-
shall be between 1050 and 1150°F [565 and 620°C].
spection (Supplementary Requirement S4) is specified for the
5.4 Castings shall be allowed to cool below the transforma-
casting.
tion range directly after pouring and solidification before they
9.3 Weld repairs shall be inspected to the same quality
are reheated for normalizing or liquid quenching.
standards that are used to inspect the castings. When castings
5.5 Temperature Control—Furnace temperature for heat
are produced with Supplementary Requirement S4 specified,
treating shall be controlled by use of pyrometers.
weld repairs shall be inspected by magnetic particle examina-
tion to the same standards that are used to inspect the castings.
6. Chemical Composition
When castings are produced with Supplementary Requirement
6.1 The steel shall conform to the requirements as to
S5 specified, weld repairs on castings that have leaked on
chemical composition for the grade ordered as specified in
hydrostatic tests, or on castings in which the depth of any
Table 1.
cavity prepared for repair welding exceeds 20% of the wall
thicknessor1in.[25mm]whicheverissmaller,oroncastings
7. Mechanical Requirements
in which any cavity prepared for welding is greater than
2 2
approximately 10 in. [65 cm shall be radiographed to the
7.1 Tension Test:
7.1.1 Tensile properties of steel used for the castings shall same standards that are used to inspect the castings.
conform to the requirements specified in Table 1.
9.4 Castings containing any repair weld that exceeds 20%
7.2 Impact Test: of the wall thickness, or 1 in. [25 mm], whichever is smaller,
2 2
7.2.1 Thenotchedbarimpactpropertiesofthematerialshall or that exceeds approximately 10 in. [65 cm ] in area, or that
be determined by testing a set of three Charpy V-notch impact was made to correct hydrostatic test defects shall be stress
specimensforeachheatatoneofthestandardtesttemperatures relieved or heat treated after welding. This mandatory stress
shown in Table 1, depending on the intended service tempera- relief or heat treatment shall be in accordance with the
ture (see Appendix X1).The average energy value of the three procedure qualification used. When stress relief is required for
specimens shall not be less than specified, with not more than Grade LC9, cooling shall be in still air.
A352/A352M − 06 (2012)
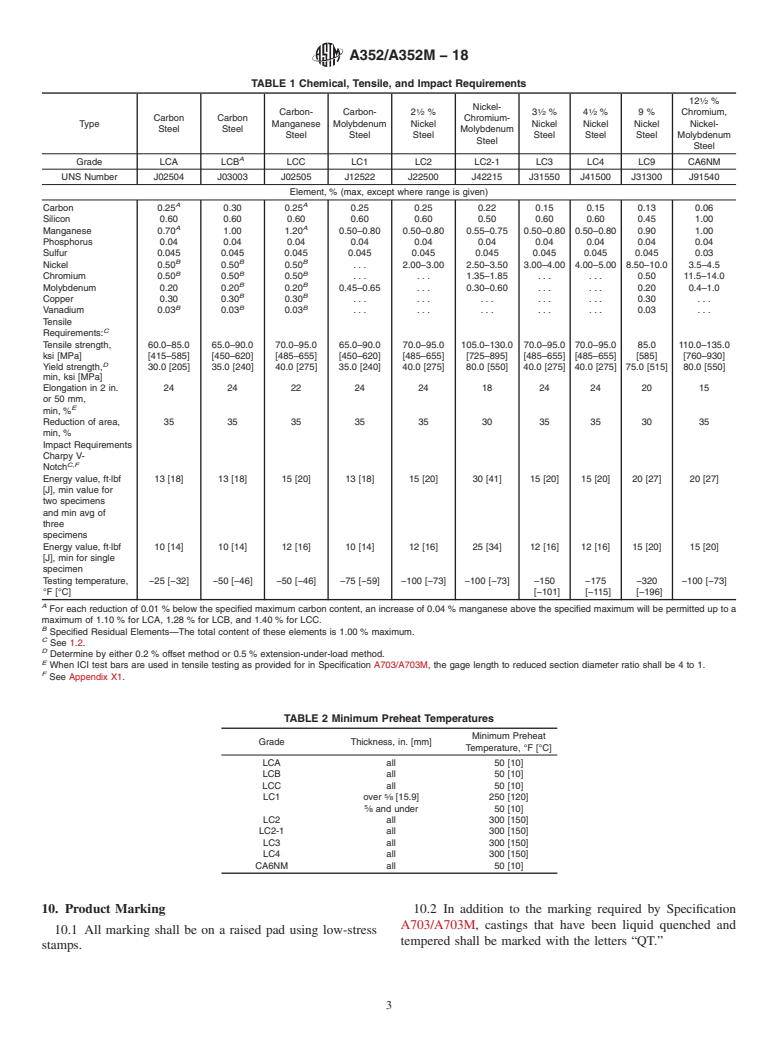
TABLE 1 Chemical, Tensile, and Impact Requirements
1 1 1 1
Type Carbon Carbon Carbon- Carbon- 2 ⁄2 % Nickel- 3 ⁄2 % 4 ⁄2 % 9% 12 ⁄2 %
Steel Steel Manganese Molybdenum Nickel Chromium- Nickel Nickel Nickel Chromium,
Steel Steel Steel Molybdenum Steel Steel Steel Nickel-
Steel Molybdenum
Steel
A
Grade LCA LCB LCC LC1 LC2 LC2-1 LC3 LC4 LC9 CA6NM
UNS Number J02504 J03003 J02505 J12522 J22500 J42215 J31550 J41500 J31300 J91540
Element, % (max, except where range is given)
A A
Carbon 0.25 0.30 0.25 0.25 0.25 0.22 0.15 0.15 0.13 0.06
Silicon 0.60 0.60 0.60 0.60 0.60 0.50 0.60 0.60 0.45 1.00
A A
Manganese 0.70 1.00 1.20 0.50-0.80 0.50-0.80 0.55-0.75 0.50-0.80 0.50-0.80 0.90 1.00
Phosphorus 0.04 0.04 0.04 0.04 0.04 0.04 0.04 0.04 0.04 0.04
Sulfur 0.045 0.045 0.045 0.045 0.045 0.045 0.045 0.045 0.045 0.03
B B B
Nickel 0.50 0.50 0.50 . . . 2.00-3.00 2.50-3.50 3.00-4.00 4.00-5.00 8.50-10.0 3.5-4.5
B B B
Chromium 0.50 0.50 0.50 . . . . . . 1.35-1.85 . . . . . . 0.50 11.5-14.0
B B
Molybdenum 0.20 0.20 0.20 0.45-0.65 . . . 0.30-0.60 . . . . . . 0.20 0. 4-1.0
B B
Copper 0.30 0.30 0.30 . . . . . 0.30 .
B B B
Vanadium 0.03 0.03 0.03 . . . . . 0.03 .
Tensile
C
Requirements:
Tensile strength, 60.0-85.0 65.0-90.0 70.0-95.0 65.0-90.0 70.0-95.0 105.0-130.0 70.0-95.0 70.0-95.0 85.0 110.0-135.0
ksi [MPa] [415-585] [450-620] [485-655] [450-620] [485-655] [725-895] [485-655] [485-655] [585] [760-930]
D
Yield strength, 30.0 [205] 35.0 [240] 40.0 [275] 35.0 [240] 40.0 [275] 80.0 [550] 40.0 [275] 40.0 [275] 75.0 [515] 80.0 [550]
min, ksi [MPa]
Elongation in 2 in. 24 24 22 24 24 18 24 24 20 15
or 50 mm,
E
min, %
Reduction of area, 35 35 35 35 35 30 35 35 30 35
min, %
Impact Requirements
Charpy V-
C,F
Notch
Energy value, ft·lbf 13 [18] 13 [18] 15 [20] 13 [18] 15 [20] 30 [41] 15 [20] 15 [20] 20 [27] 20 [27]
[J], min value for
two specimens
and min avg of
three
specimens
Energy value, ft·lbf 10 [14] 10 [14] 12 [16] 10 [14] 12 [16] 25 [34] 12 [16] 12 [16] 15 [20] 15 [20]
[J], min for single
specimen
Testing temperature, −25 [−32] −50 [−46] −50 [−46] −75 [−59] −100 [−73] −100 [−73] −150 −175 −320 −100 [−73]
°F [°C] [−101] [−115] [−196]
A
For each reduction of 0.01 % below the specified maximum carbon content, an increase of 0.04 % manganese above the specified maximum will be permitted up to
a maximum of 1.10 % for LCA, 1.28 % for LCB, and 1.40 % for LCC.
B
Specified Residual Elements—The total content of these elements is 1.00 % maximum.
C
See1.2.
D
Determine by either 0.2 % offset method or 0.5 % extension-under-load method.
E
When ICI test bars are used in tensile testing as provided for in Specification A703/A703M, the gage length to reduced section diameter ratio shall be 4 to 1.
F
See Appendix X1.
TABLE 2 Minimum Preheat Temperatures
Grade Thickness, in. [mm] Minimum Preheat
Temperature, °F [°C]
LCA all 50 [10]
LCB all 50 [10]
LCC all 50 [10]
LC1 over ⁄8 [15.9] 250 [120]
⁄8 and under 50 [10]
LC2 all 300 [150]
LC2-1 all 300 [150]
LC3 all 300 [150]
LC4 all 300 [150]
CA6NM all 50 [10]
10. Product Marking 10.2 In addition to the marking required by Specification
A703/A703M, castings that have been liquid quenched and
10.1 All marking shall be on a raised pad using low-stress
tempered shall be marked with the letters “QT”.
stamps.
A352/A352M − 06 (2012)
11. Keywords
11.1 alloy steel; carbon steel; ferritic steel; low temperature
applications; martensitic stainless steel; pressure containing
parts; stainless steel; steel castings
SUPPLEMENTARY REQUIREMENTS
Thefollowingsupplementaryrequirementsshallnotapplyunlessspecifiedinthepurchaseorder.A
list of standardized supplementary requirements for use at the option of the purchaser is included in
Specification A703/A703M. Those which are ordinarily considered suitable for use with this
specificationaregivenbelowtogetherwithadditionalsupplementaryrequirementsthatareapplicable
only to this specification. Other supplementary requirements enumerated in A703/A703M may be
used with this specification upon agreement between the manufacturer and purchaser.
S1. Unspecified Elements with low-stress stamps on a raised pad located immediately
S2. Destruction Tests ahead of the material symbol; for example, 25 LCB for +25°F
S4. Magnetic Particle Inspection [–4°C] and 025 LCB for –25°F [–32°C].
S5. Radiographic Inspection S22.2 Lateral expansion of V-notch specimens shall be
S9. Drop Weight Tests measured in accordance with 23.2.3.1 of Test Methods and
S10. Examination of Weld Preparation Definitions A370, and reported for information.
S10.1 The method of performing the magnetic pa
...
This document is not anASTM standard and is intended only to provide the user of anASTM standard an indication of what changes have been made to the previous version. Because
it may not be technically possible to adequately depict all changes accurately, ASTM recommends that users consult prior editions as appropriate. In all cases only the current version
of the standard as published by ASTM is to be considered the official document.
Designation:A352/A352M–06 Designation: A352/A352M – 06 (Reapproved 2012)
Standard Specification for
Steel Castings, Ferritic and Martensitic, for Pressure-
Containing Parts, Suitable for Low-Temperature Service
This standard is issued under the fixed designationA352/A352M; the number immediately following the designation indicates the year
of original adoption or, in the case of revision, the year of last revision.Anumber in parentheses indicates the year of last reapproval.
A superscript epsilon (´) indicates an editorial change since the last revision or reapproval.
This standard has been approved for use by agencies of the Department of Defense.
1. Scope*
1.1 This specification covers steel castings for valves, flanges, fittings, and other pressure-containing parts intended primarily
for low-temperature service.
1.2 Several grades of ferritic steels and one grade of martensitic steel are covered. Selection of analysis will depend on design
andserviceconditions(Note).Thetemperatureshownisthelowesttemperatureatwhichthematerialordinarilyisrequiredtomeet
the impact requirements of this specification (see Supplementary Requirement S22, ImpactTestTemperatures). Users should note
that hardenability of some of the grades mentioned may restrict the maximum size at which the required mechanical properties
are obtainable (see Appendix X1).
Grade Usual Minimum Testing
Temperatures, °F [°C]
LCA −25 [–32]
LCB −50 [–46]
LCC −50 [–46]
LC1 −75 [–59]
LC2 −100 [–73]
LC2–1 −100 [–73]
LC3 −150 [–101]
LC4 −175 [–115]
LC9 −320 [–196]
CA6NM −100 [−73]
NOTE 1—This specification covers the low-temperature requirements particularly pertinent for ferritic and martensitic steels. Certain of the grades of
austenitic steel castings furnished in accordance with SpecificationA351/A351M have been found suitable for low-temperature service down to −300°F
[−184°C]andothersdownto−425°F[−254°C].ThesegradesmaybeusedwhenimpacttestedinaccordancewithSpecificationA352/A352Mwithenergy
levelsandtemperaturesoftestmutuallyagreeduponbetweenthepurchaserandthemanufacturer.Asaguidetotheselectionofenergylevelsandtesting
temperatures, Appendix X1 should be consulted.
1.3 Thevaluesstatedineitherinch-poundunitsorSIunitsaretoberegardedseparatelyasstandard.Withinthetext,theSIunits
are shown in brackets. The values stated in each system are not exact equivalents; therefore, each system must be used
independently of the other. Combining values from the two systems may result in nonconformance with the specification.
Inch-pound units are applicable for material ordered to Specification A352 and SI units for material ordered to Specification
A352M.
2. Referenced Documents
2.1 ASTM Standards:
A351/A351M Specification for Castings, Austenitic, for Pressure-Containing Parts
A370 Test Methods and Definitions for Mechanical Testing of Steel Products
A488/A488M Practice for Steel Castings, Welding, Qualifications of Procedures and Personnel
A703/A703M Specification for Steel Castings, General Requirements, for Pressure-Containing Parts
E165 Practice for Liquid Penetrant Examination for General Industry
E709 Guide for Magnetic Particle Testing
This specification is under the jurisdiction ofASTM CommitteeA01 on Steel, Stainless Steel,Steel and RelatedAlloys and is the direct responsibility of Subcommittee
A01.18 on Castings.
Current edition approved March 1, 2006.2012. Published March 2006.April 2012. Originally approved in 1952. Last previous edition approved in 20032006 as
A352/A352M-036. DOI: 10.1520/A0352_A0352M-06R12.
For ASME Boiler and Pressure Vessel Code applications, see related Specification SA-352, in Section II of that Code.
ForreferencedASTMstandards,visittheASTMwebsite,www.astm.org,orcontactASTMCustomerServiceatservice@astm.org.For Annual Book ofASTM Standards
volume information, refer to the standard’s Document Summary page on the ASTM website.
*A Summary of Changes section appears at the end of this standard.
Copyright © ASTM International, 100 Barr Harbor Drive, PO Box C700, West Conshohocken, PA 19428-2959, United States.
A352/A352M – 06 (2012)
2.2 Manufacturers’ Standardization Society of the Valve and Fittings Industry Standard:
SP-55 Quality Standard for Steel Castings for Valves, Flanges, and Fittings and Other Piping Components (Visual Method)
3. General Conditions for Delivery
3.1 Material furnished to this specification shall conform to the requirements of Specification A703/A703M including any
supplementary requirements that are indicated in the purchase order. Failure to comply with the general requirements of
SpecificationA703/A703Mconstitutesnonconformancewiththisspecification.Incaseofconflictbetweentherequirementsofthis
specification and Specification A703/A703M, this specification shall prevail.
4. Ordering Information
4.1 The inquiry and order should include or indicate the following:
4.1.1 A description of the casting by pattern number or drawing (dimensional tolerances shall be included on the casting
drawing),
4.1.2 Grade of steel,
4.1.3 Options in the specification, and
4.1.4 The supplementary requirements desired, including the standards of acceptance.
5. Heat Treatment
5.1 All castings shall receive a heat treatment proper to their design and chemical composition. It should be recognized that
liquid quenching of the ferritic grades is normally required to meet the mechanical properties of heavier sections and will greatly
enhance the low-temperature properties of thinner sections.
5.2 Ferritic castings shall be furnished in the normalized and tempered or liquid-quenched and tempered condition, except for
Grade LC9, which shall be liquid-quenched and tempered. Castings shall be tempered at a minimum of 1100°F [590°C], except
Grade LC4, which shall be 1050°F [565°C], and Grade LC9, which shall be tempered in the range of 1050 to 1175°F [565 to
635°C], followed by cooling in air or liquid.
5.3 CA6NMcastingsshallbeheat-treatedbyheatingto1850°F[1010°C]minimum,andaircoolingto200°F[95°C]maximum
beforeanyoptionalintermediatetemper,butshallcoolto100°F[40°C]maximumbeforethefinaltemper,whichshallbebetween
1050 and 1150°F [565 and 620°C].
5.4 Castings shall be allowed to cool below the transformation range directly after pouring and solidification before they are
reheated for normalizing or liquid quenching.
5.5 Temperature Control—Furnace temperature for heat treating shall be controlled by use of pyrometers.
6. Chemical Composition
6.1 The steel shall conform to the requirements as to chemical composition for the grade ordered as specified in Table 1.
7. Mechanical Requirements
7.1 Tension Test:
7.1.1 Tensile properties of steel used for the castings shall conform to the requirements specified in Table 1.
7.2 Impact Test:
7.2.1 The notched bar impact properties of the material shall be determined by testing a set of three Charpy V-notch impact
specimens for each heat at one of the standard test temperatures shown inTable 1, depending on the intended service temperature
(seeAppendixX1).Theaverageenergyvalueofthethreespecimensshallnotbelessthanspecified,withnotmorethanonevalue
permitted below the average minimum specified and no value permitted below the minimum specified for a single specimen.
7.2.2 The notched bar impact test shall be made in accordance with Test Methods and Definitions A370.
7.2.3 Impact test specimens shall be machined to the form and dimensions shown in Test Methods and DefinitionsA370, Fig.
11.
8. Quality
8.1 The surface of the casting shall be examined visually and shall be free of adhering sand, scale, cracks, and hot tears. Other
surface discontinuities shall meet the visual acceptance standards specified in the order. Visual Method SP-55 or other visual
standards may be used to define acceptable surface discontinuities and finish. Unacceptable visual surface discontinuities shall be
removed and their removal verified by visual examination of the resultant cavities.When methods involving high temperature are
used in the removal of discontinuities, castings shall be preheated to at least the minimum temperatures in Table 2.
8.2 When additional inspection is desired, Supplementary Requirements S4, S5, and S10, may be ordered.
8.3 The castings shall not be peened, plugged, or impregnated to stop leaks.
Available from Manufacturers Standardization Society of the Valve and Fittings Industry (MSS), 127 Park St., NE, Vienna, VA 22180-4602.
A352/A352M – 06 (2012)
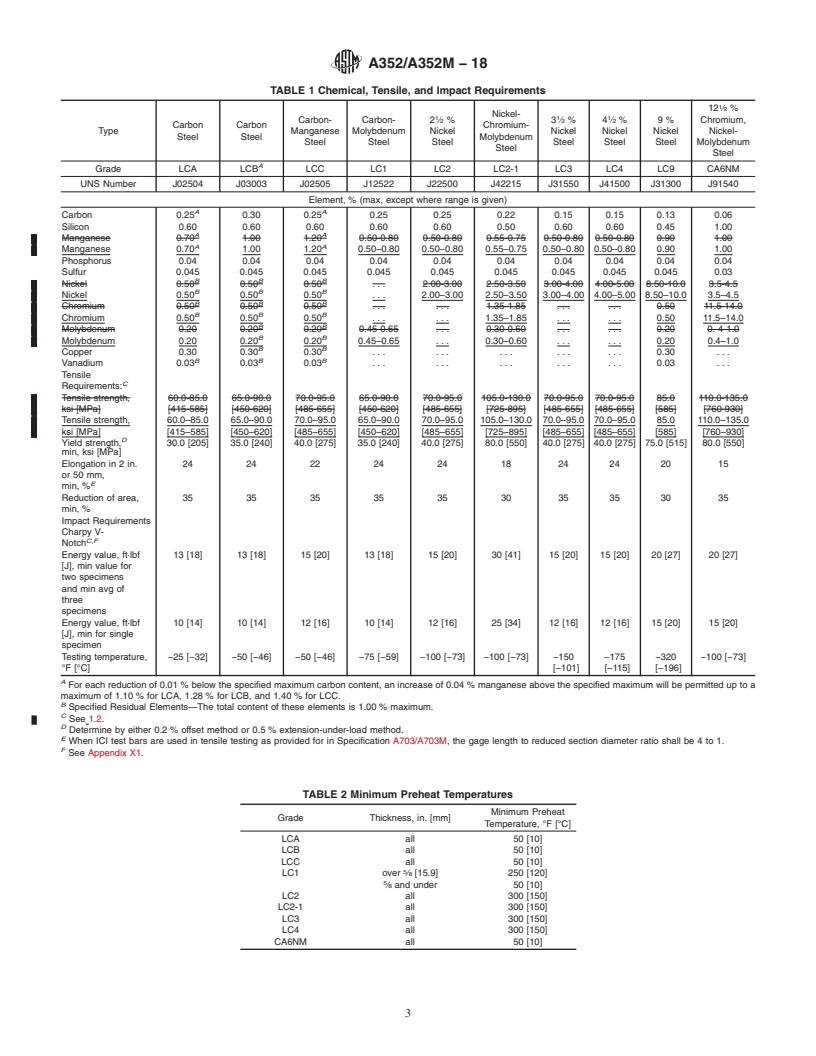
TABLE 1 Chemical, Tensile, and Impact Requirements
1 1 1 1
Type Carbon Carbon Carbon- Carbon- 2 ⁄2 % Nickel- 3 ⁄2 % 4 ⁄2 % 9% 12 ⁄2 %
Steel Steel Manganese Molybdenum Nickel Chromium- Nickel Nickel Nickel Chromium,
Steel Steel Steel Molybdenum Steel Steel Steel Nickel-
Steel Molybdenum
Steel
A
Grade LCA LCB LCC LC1 LC2 LC2-1 LC3 LC4 LC9 CA6NM
UNS Number J02504 J03003 J02505 J12522 J22500 J42215 J31550 J41500 J31300 J91540
Element, % (max, except where range is given)
A A
Carbon 0.25 0.30 0.25 0.25 0.25 0.22 0.15 0.15 0.13 0.06
Silicon 0.60 0.60 0.60 0.60 0.60 0.50 0.60 0.60 0.45 1.00
A A
Manganese 0.70 1.00 1.20 0.50-0.80 0.50-0.80 0.55-0.75 0.50-0.80 0.50-0.80 0.90 1.00
Phosphorus 0.04 0.04 0.04 0.04 0.04 0.04 0.04 0.04 0.04 0.04
Sulfur 0.045 0.045 0.045 0.045 0.045 0.045 0.045 0.045 0.045 0.03
B B B
Nickel 0.50 0.50 0.50 . . . 2.00-3.00 2.50-3.50 3.00-4.00 4.00-5.00 8.50-10.0 3.5-4.5
B B B
Chromium 0.50 0.50 0.50 . . . . . . 1.35-1.85 . . . . . . 0.50 11.5-14.0
B B
Molybdenum 0.20 0.20 0.20 0.45-0.65 . . . 0.30-0.60 . . . . . . 0.20 0. 4-1.0
B B
Copper 0.30 0.30 0.30 . . . . . 0.30 .
B B B
Vanadium 0.03 0.03 0.03 . . . . . 0.03 .
Tensile
C
Requirements:
Tensile strength, 60.0-85.0 65.0-90.0 70.0-95.0 65.0-90.0 70.0-95.0 105.0-130.0 70.0-95.0 70.0-95.0 85.0 110.0-135.0
ksi [MPa] [415-585] [450-620] [485-655] [450-620] [485-655] [725-895] [485-655] [485-655] [585] [760-930]
D
Yield strength, 30.0 [205] 35.0 [240] 40.0 [275] 35.0 [240] 40.0 [275] 80.0 [550] 40.0 [275] 40.0 [275] 75.0 [515] 80.0 [550]
min, ksi [MPa]
Elongation in 2 in. 24 24 22 24 24 18 24 24 20 15
or 50 mm,
E
min, %
Reduction of area, 35 35 35 35 35 30 35 35 30 35
min, %
Impact Requirements
Charpy V-
C,F
Notch
Energy value, ft·lbf 13 [18] 13 [18] 15 [20] 13 [18] 15 [20] 30 [41] 15 [20] 15 [20] 20 [27] 20 [27]
[J], min value for
two specimens
and min avg of
three
specimens
Energy value, ft·lbf 10 [14] 10 [14] 12 [16] 10 [14] 12 [16] 25 [34] 12 [16] 12 [16] 15 [20] 15 [20]
[J], min for single
specimen
Testing temperature, −25 [−32] −50 [−46] −50 [−46] −75 [−59] −100 [−73] −100 [−73] −150 −175 −320 −100 [−73]
°F [°C] [−101] [−115] [−196]
A
For each reduction of 0.01 % below the specified maximum carbon content, an increase of 0.04 % manganese above the specified maximum will be permitted up to
a maximum of 1.10 % for LCA, 1.28 % for LCB, and 1.40 % for LCC.
B
Specified Residual Elements—The total content of these elements is 1.00 % maximum.
C
See1.2.
D
Determine by either 0.2 % offset method or 0.5 % extension-under-load method.
E
When ICI test bars are used in tensile testing as provided for in Specification A703/A703M, the gage length to reduced section diameter ratio shall be 4 to1.
F
See Appendix X1.
TABLE 2 Minimum Preheat Temperatures
Grade Thickness, in. [mm] Minimum Preheat
Temperature, °F [°C]
LCA all 50 [10]
LCB all 50 [10]
LCC all 50 [10]
LC1 over ⁄8 [15.9] 250 [120]
⁄8 and under 50 [10]
LC2 all 300 [150]
LC2-1 all 300 [150]
LC3 all 300 [150]
LC4 all 300 [150]
CA6NM all 50 [10]
9. Repair by Welding
9.1 Repairs shall be made using procedures and welders in accordance with Practice A488/A488M.
9.2 WeldingofGradeLC9shallbeaccomplishedusingnonmagneticfillermaterialofAWSclassificationENiCrFe-2,andshall
require liquid penetrant inspection of the weld (Supplementary Requirement S6) when magnetic particle inspection (Supplemen-
tary Requirement S4) is specified for the casting.
A352/A352M – 06 (2012)
9.3 Weld repairs shall be inspected to the same quality standards that are used to inspect the castings. When castings are
produced with Supplementary Requirement S4 specified, weld repairs shall be inspected by magnetic particle examination to the
same standards that are used to inspect the castings. When castings are produced with Supplementary Requirement S5 specified,
weld repairs on castings that have leaked on hydrostatic tests, or on castings in which the depth of any cavity prepared for repair
welding exceeds 20% of the wall thickness or 1 in. [25 mm] whichever is smaller, or on castings in which any cavity prepared
2 2
for welding is greater than approximately 10 in. [65 cm shall be radiographed to the same standards that are used to inspect the
castings.
9.4 Castingscontaininganyrepairweldthatexceeds20%ofthewallthickness,or1in.[25mm],whicheverissmaller,orthat
2 2
exceeds approximately 10 in. [65 cm ] in area, or that was made to correct hydrostatic test defects shall be stress relieved or heat
treated after welding. This mandatory stress relief or heat treatment shall be in accordance with the procedure qualification used.
When stress relief is required for Grade LC9, cooling shall be in still air.
10. Product Marking
10.1 All marking shall be on a raised pad using low-stress stamps.
10.2 In addition to the marking required by SpecificationA703/A703M, castings that have been liquid quenched and tempered
shall be marked with the letters “QT”.
11. Keywords
11.1 alloy steel; carbon steel; ferritic steel; low temperature applications; martensitic stainless steel; pressure containing parts;
stainless steel; steel castings
SUPPLEMENTARY REQUIREMENTS
Thefollowingsupplementaryrequirementsshallnotapplyunlessspecifiedinthepurchaseorder.A
list of standardized supplementary requirements for use at the option of the purchaser is included in
Specification A703/A703M. Those which are ordinarily considered suitable for use with this
specificationaregivenbelowtogetherwithadditionalsupplementaryrequirementsthatareapplicable
only to this specification. Other supplementary requirements enumerated in A703/A703M may be
used with this specification upon agreement between the manufacturer and purchaser.
S1. Unspecified Elements
S2. Destruction Tests
S4. Magnetic Particle Inspection
S5. Radiographic Inspection
S9. Drop Weight Tests
S10. Examination of Weld Preparation
S10.1 The method of performing the magnetic particle or liquid penetrant test shall be in accordance with Practice E709 or
Practice E165.
S21. Heat Treatment
S21.1 C
...
Questions, Comments and Discussion
Ask us and Technical Secretary will try to provide an answer. You can facilitate discussion about the standard in here.