ASTM E430-05
(Test Method)Standard Test Methods for Measurement of Gloss of High-Gloss Surfaces by Abridged Goniophotometry
Standard Test Methods for Measurement of Gloss of High-Gloss Surfaces by Abridged Goniophotometry
SIGNIFICANCE AND USE
The gloss of metallic finishes is important commercially on metals for automotive, architectural, and other uses where these metals undergo special finishing processes to produce the appearances desired. It is important for the end-products, which use such finished metals that parts placed together have the same glossy appearance.
It is also important that automotive finishes and other high-gloss nonmetallic surfaces possess the desired finished appearance. The present method identifies by measurements important aspects of finishes. Those having identical sets of numbers normally have the same gloss characteristics. It usually requires more than one measurement to identify properly the glossy appearance of any finish (see Refs 3 and 4).
SCOPE
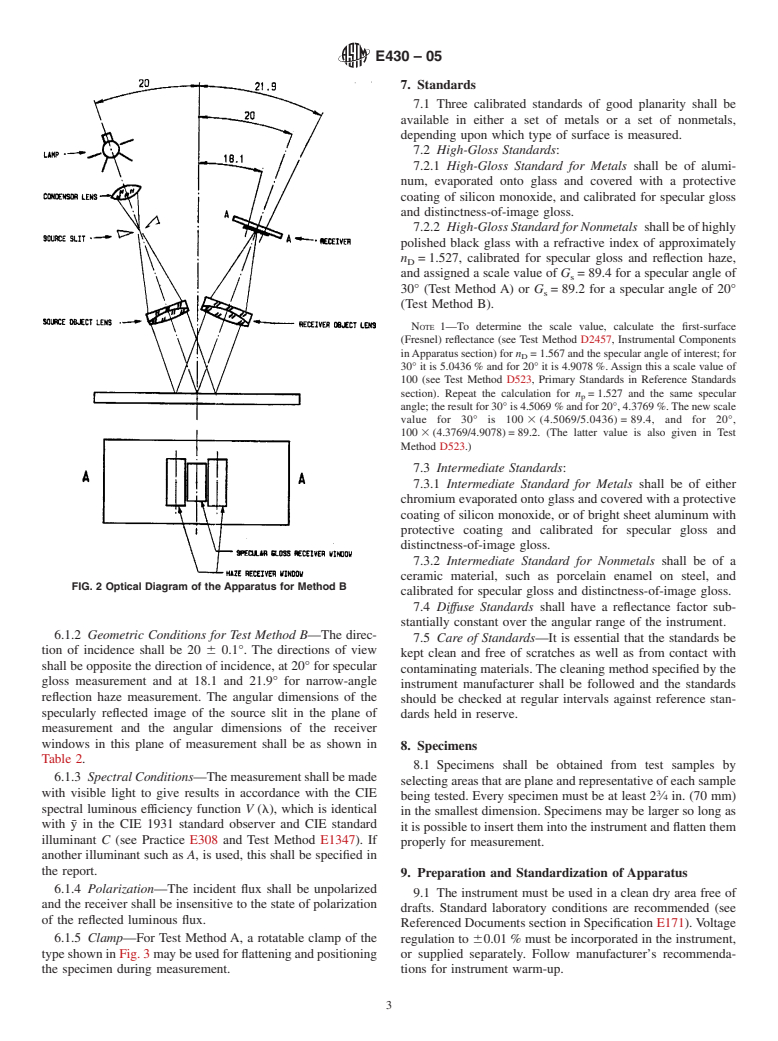
1.1 These test methods cover the measurement of the reflection characteristics responsible for the glossy appearance of high-gloss surfaces. Two test methods, A and B, are provided for evaluating such surface characteristics at specular angles of 30 and 20, respectively. These test methods are not suitable for diffuse finish surfaces nor do they measure color, another appearance attribute.
1.2 As originally developed by Tingle and others (see Refs 1 and 2),² the test methods were applied only to bright metals. Recently they have been applied to high-gloss automotive finishes and other nonmetallic surfaces.
General Information
Relations
Standards Content (Sample)
NOTICE: This standard has either been superseded and replaced by a new version or withdrawn.
Contact ASTM International (www.astm.org) for the latest information
Designation:E430–05
Standard Test Methods for
Measurement of Gloss of High-Gloss Surfaces by Abridged
1
Goniophotometry
This standard is issued under the fixed designation E430; the number immediately following the designation indicates the year of
original adoption or, in the case of revision, the year of last revision.Anumber in parentheses indicates the year of last reapproval.A
superscript epsilon (´) indicates an editorial change since the last revision or reapproval.
1. Scope 3.2 Terms that are defined in Terminology E284., but have
a specific definition in this method are:
1.1 These test methods cover the measurement of the
3.2.1 reflectance, p, n—ratio of the reflected radiant or
reflection characteristics responsible for the glossy appearance
luminous flux to the incident flux in the given conditions.
of high-gloss surfaces. Two test methods, A and B, are
(E284)
provided for evaluating such surface characteristics at specular
3.2.1.1 Discussion—The term reflectance is often used in a
angles of 30° and 20°, respectively.These test methods are not
general sense or as an abbreviation for reflectance factor. Such
suitable for diffuse finish surfaces nor do they measure color,
usage is not assumed in this method. The definition may
another appearance attribute.
require that the term be modified by adjectives denoting the
1.2 As originally developed by Tingle and others (see Refs
2
spectral and geometric conditions of measurement.
1 and 2), the test methods were applied only to bright metals.
3.3 Definitions of Terms Specific to This Standard:
Recently they have been applied to high-gloss automotive
3.3.1 reflection haze, H, n—for a specified specular angle,
finishes and other nonmetallic surfaces.
ratio of flux reflected at a specified angle (or angles) form the
2. Referenced Documents
specular direction to the flux similarly reflected at the specular
3
angle by a specified gloss standard.
2.1 ASTM Standards:
3.3.1.1 Discussion—Modifiers may be used to specify the
D523 Test Method for Specular Gloss
angles at which the haze is measured (for example, 2° or –5°);
D2457 Test Method for Specular Gloss of Plastic Films and
whether –H or a logarithmic form is to be stated; or whether H
Solid Plastics
is to be compensated for the luminance of the specimen by
E171 Specification for Atmospheres for Conditioning and
multiplication by Y /Y , where n denotes the reference
Testing Flexible Barrier Materials specimen n
white; or any combination of these.
E179 Guide for Selection of Geometric Conditions for
3.3.2 metallic brightness, n—freedom of a metal surface
Measurement of Reflection andTransmission Properties of
from diffuse haze or texture.
Materials
3.3.3 ‘with-machine’ direction, n—the axis of a specimen
E284 Terminology of Appearance
that is parallel to the direction of mill rolling or extrusion, or
E308 Practice for Computing the Colors of Objects by
other surface-finish texture.
Using the CIE System
3.3.4 ‘across-machine’ direction, n—the perpendicular to
E1347 Test Method for Color and Color-Difference Mea-
‘with-machine’ direction.
surement by Tristimulus Colorimetry
4. Summary of Test Method
3. Terminology
4.1 Several geometrically different measures of light re-
3.1 Definitions—Appearance terms in this test method are
flected by a surface are proposed for use in describing its gloss
in accordance with Terminology E284.
appearance. In Test Method A, gloss reflectance factor is
measured at 30° to the specimen normal using narrow illumi-
1
These test methods are under the jurisdiction of ASTM Committee E12 on
nator and receiver aperture angles (0.5° wide maximum).
Color andAppearance and are the direct responsibility of Subcommittee E12.03 on
Distinctness-of-image gloss is measured at 29.7 or 30.3° or
Geometry.
CurrenteditionapprovedJune1,2005.PublishedJuly2005.Originallyapproved
both. Narrow-angle (2°) reflection haze is measured at 28 or
in 1971. Last previous edition approved in 2003 as E430–97(2003). DOI:
32° or both, and wide-angle (5°) reflection haze at 25 or 35° or
10.1520/E0430-05.
2 both. The ratio of reflectance factors for 28 or 32° or both,
Theboldfacenumbersinparenthesesrefertothelistofreferencesattheendof
this method. perpendicular and parallel to the machine direction of the
3
For referenced ASTM standards, visit the ASTM website, www.astm.org, or
specimen, is computed as a measure of directionality. In
contact ASTM Customer Service at service@astm.org. For Annual Book of ASTM
Method B, specular gloss is measured at 20° in accordance
Standards volume information, refer to the standard’s Document Summary page on
with Test Method D523, and narrow-angle reflection haze is
the ASTM website.
Copyright © ASTM International, 100 Barr Harbor Drive, PO Box C700, West Conshohocken, PA 19428-2959, United States.
1
---------------------- Page: 1 ----------------------
E430–
...


Questions, Comments and Discussion
Ask us and Technical Secretary will try to provide an answer. You can facilitate discussion about the standard in here.