ASTM A716-08(2014)
(Specification)Standard Specification for Ductile Iron Culvert Pipe
Standard Specification for Ductile Iron Culvert Pipe
ABSTRACT
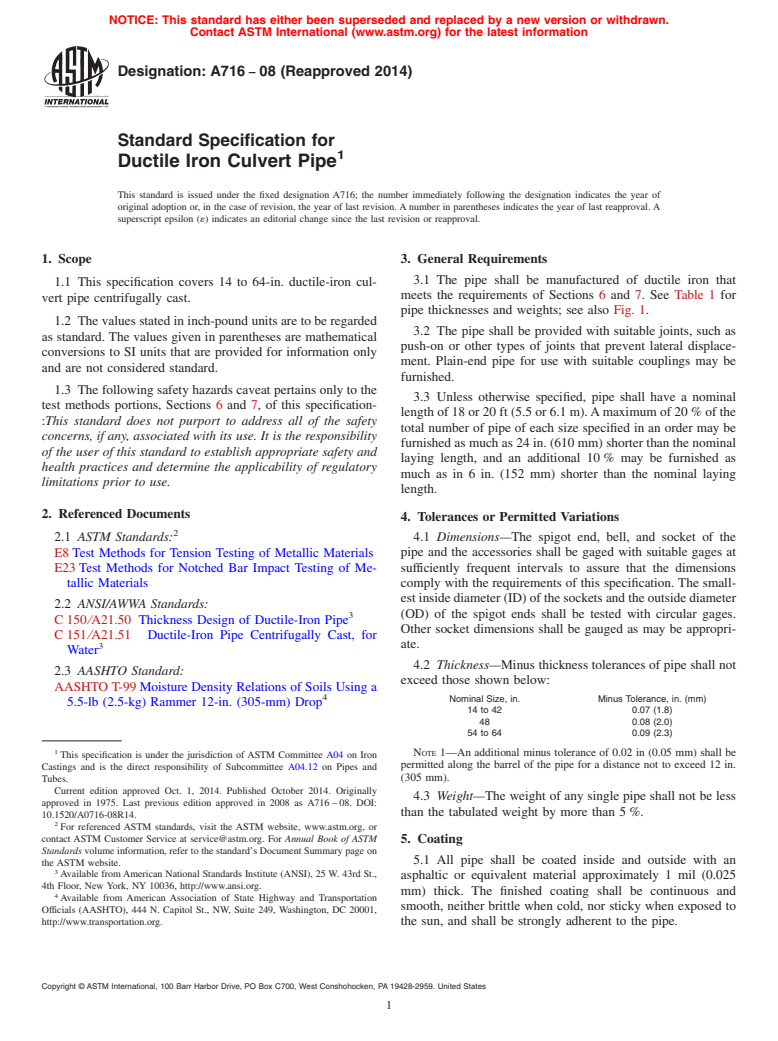
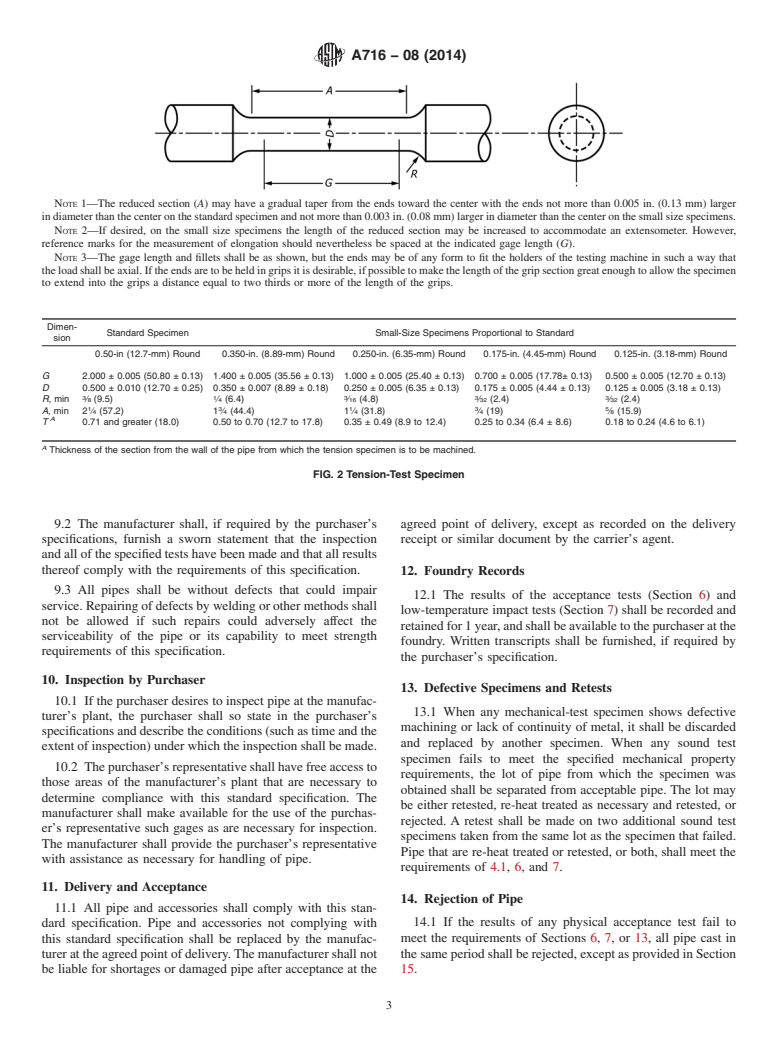
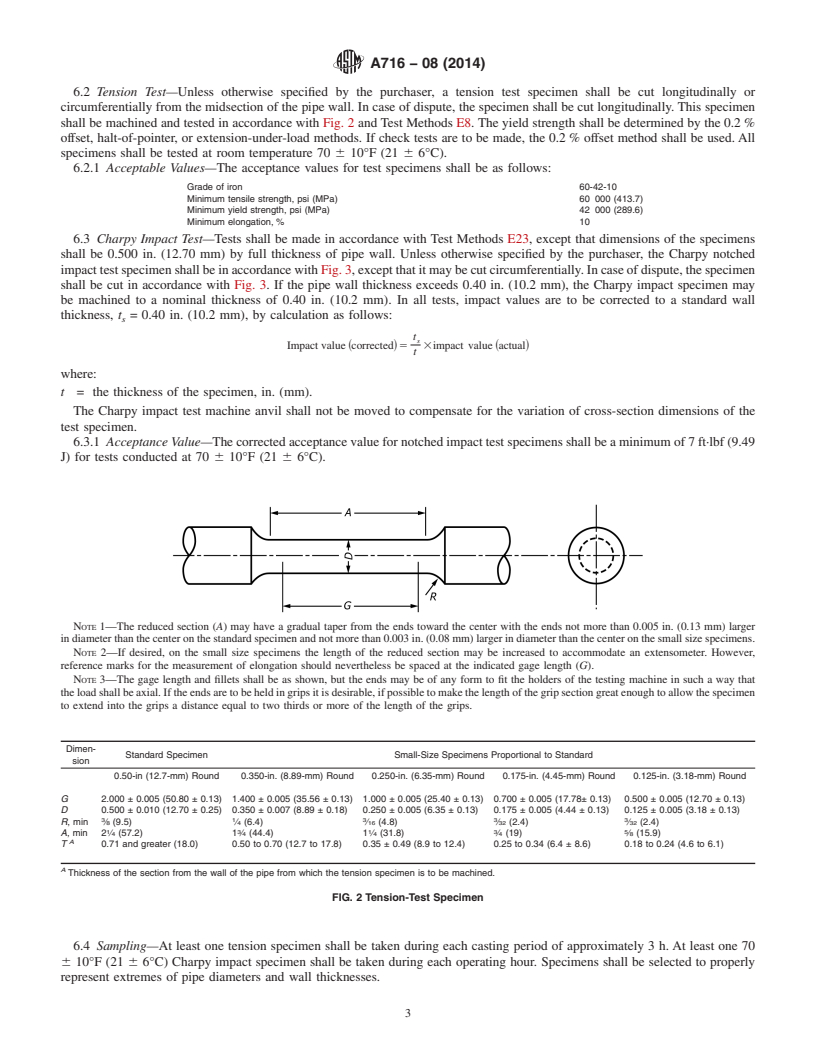
This specification covers ductile-iron culvert pipe centrifugally cast. The pipe shall be manufactured of ductile iron that meets the mechanical requirements such as tensile strength, yield strength, elongation, and impact value. The pipe shall be provided with suitable joints, such as push-on or other types of joints that prevent lateral displacement, but plain-end pipe for use with suitable couplings may be furnished. Standard wall thickness and weight values of push-on joint pipe are given. Pressure Class ductile iron pipe in Type 5 trench is illustrated. All pipe shall be coated inside and outside with an asphaltic material. Acceptance tests by tension and Charpy impact testing shall be performed. The standard test specimens for these testing methods are detailed.
SCOPE
1.1 This specification covers 14 to 64-in. ductile-iron culvert pipe centrifugally cast.
1.2 The values stated in inch-pound units are to be regarded as standard. The values given in parentheses are mathematical conversions to SI units that are provided for information only and are not considered standard.
1.3 The following safety hazards caveat pertains only to the test methods portions, Sections 6 and 7, of this specification: This standard does not purport to address all of the safety concerns, if any, associated with its use. It is the responsibility of the user of this standard to establish appropriate safety and health practices and determine the applicability of regulatory limitations prior to use.
General Information
Relations
Buy Standard
Standards Content (Sample)
NOTICE: This standard has either been superseded and replaced by a new version or withdrawn.
Contact ASTM International (www.astm.org) for the latest information
Designation:A716 −08 (Reapproved 2014)
Standard Specification for
Ductile Iron Culvert Pipe
This standard is issued under the fixed designation A716; the number immediately following the designation indicates the year of
original adoption or, in the case of revision, the year of last revision.Anumber in parentheses indicates the year of last reapproval.A
superscript epsilon (´) indicates an editorial change since the last revision or reapproval.
1. Scope 3. General Requirements
3.1 The pipe shall be manufactured of ductile iron that
1.1 This specification covers 14 to 64-in. ductile-iron cul-
meets the requirements of Sections 6 and 7. See Table 1 for
vert pipe centrifugally cast.
pipe thicknesses and weights; see also Fig. 1.
1.2 The values stated in inch-pound units are to be regarded
3.2 The pipe shall be provided with suitable joints, such as
as standard. The values given in parentheses are mathematical
push-on or other types of joints that prevent lateral displace-
conversions to SI units that are provided for information only
ment. Plain-end pipe for use with suitable couplings may be
and are not considered standard.
furnished.
1.3 The following safety hazards caveat pertains only to the
3.3 Unless otherwise specified, pipe shall have a nominal
test methods portions, Sections 6 and 7, of this specification-
lengthof18or20ft(5.5or6.1m).Amaximumof20%ofthe
:This standard does not purport to address all of the safety
total number of pipe of each size specified in an order may be
concerns, if any, associated with its use. It is the responsibility
furnishedasmuchas24in.(610mm)shorterthanthenominal
of the user of this standard to establish appropriate safety and
laying length, and an additional 10% may be furnished as
health practices and determine the applicability of regulatory
much as in 6 in. (152 mm) shorter than the nominal laying
limitations prior to use.
length.
2. Referenced Documents
4. Tolerances or Permitted Variations
2.1 ASTM Standards: 4.1 Dimensions—The spigot end, bell, and socket of the
E8Test Methods for Tension Testing of Metallic Materials pipe and the accessories shall be gaged with suitable gages at
E23Test Methods for Notched Bar Impact Testing of Me- sufficiently frequent intervals to assure that the dimensions
comply with the requirements of this specification. The small-
tallic Materials
estinsidediameter(ID)ofthesocketsandtheoutsidediameter
2.2 ANSI/AWWA Standards:
(OD) of the spigot ends shall be tested with circular gages.
C150⁄A21.50 Thickness Design of Ductile-Iron Pipe
Other socket dimensions shall be gauged as may be appropri-
C151⁄A21.51 Ductile-Iron Pipe Centrifugally Cast, for
ate.
Water
4.2 Thickness—Minus thickness tolerances of pipe shall not
2.3 AASHTO Standard:
exceed those shown below:
AASHTO T-99Moisture Density Relations of Soils Using a
Nominal Size, in. Minus Tolerance, in. (mm)
5.5-lb (2.5-kg) Rammer 12-in. (305-mm) Drop
14 to 42 0.07 (1.8)
48 0.08 (2.0)
54 to 64 0.09 (2.3)
NOTE 1—An additional minus tolerance of 0.02 in (0.05 mm) shall be
This specification is under the jurisdiction of ASTM Committee A04 on Iron
permitted along the barrel of the pipe for a distance not to exceed 12 in.
Castings and is the direct responsibility of Subcommittee A04.12 on Pipes and
Tubes. (305 mm).
Current edition approved Oct. 1, 2014. Published October 2014. Originally
4.3 Weight—The weight of any single pipe shall not be less
approved in 1975. Last previous edition approved in 2008 as A716–08. DOI:
than the tabulated weight by more than 5%.
10.1520/A0716-08R14.
For referenced ASTM standards, visit the ASTM website, www.astm.org, or
contact ASTM Customer Service at service@astm.org. For Annual Book of ASTM
5. Coating
Standards volume information, refer to the standard’s Document Summary page on
5.1 All pipe shall be coated inside and outside with an
the ASTM website.
Available fromAmerican National Standards Institute (ANSI), 25 W. 43rd St.,
asphaltic or equivalent material approximately 1 mil (0.025
4th Floor, New York, NY 10036, http://www.ansi.org.
mm) thick. The finished coating shall be continuous and
Available from American Association of State Highway and Transportation
smooth, neither brittle when cold, nor sticky when exposed to
Officials (AASHTO), 444 N. Capitol St., NW, Suite 249, Washington, DC 20001,
http://www.transportation.org. the sun, and shall be strongly adherent to the pipe.
Copyright © ASTM International, 100 Barr Harbor Drive, PO Box C700, West Conshohocken, PA 19428-2959. United States
A716−08 (2014)
A
TABLE 1 Standard Wall Thickness and Weight of Push-On Joint
6.2.1 Acceptable Values—The acceptance values for test
Ductile-Iron Culvert Pipe
specimens shall be as follows:
20-ft (6.1
Grade of iron 60-42-10
mm) Laying
Minimum tensile strength, psi (MPa) 60 000 (413.7)
Maximum 18-ft (5.5mm) Length,
Minimum yield strength, psi (MPa) 42 000 (289.6)
Nominal Depth of Laying Length, Weight per,
Minimum elongation, % 10
Nominal Pressure Thickness, Cover, Ft. Weight per, Length, lb
Diam., in. Class in. (mm) (m) Length, lb (kg) (kg)
6.3 Charpy Impact Test—Tests shall be made in accordance
14 250 0.28 (7.1) 41 (12.5) 770 (349) 855 (388)
with Test Methods E23, except that dimensions of the speci-
16 250 0.30 (7.6) 41 (12.5) 940 (426) 1040 (472)
mens shall be 0.500 in. (12.70 mm) by full thickness of pipe
18 250 0.31 (7.9) 40 (12.2) 1090 (494) 1205 (547)
20 250 0.33 (8.4) 40 (12.2) 1290 (585) 1425 (646)
wall. Unless otherwise specified by the purchaser, the Charpy
24 200 0.33 (8.4) 37 (11.3) 1550 (703) 1710 (776)
notched impact test specimen shall be in accordance with Fig.
30 150 0.34 (8.6) 33 (10.1) 2000 (907) 2210 (1002)
3, except that it may be cut circumferentially. In case of
36 150 0.38 (9.7) 33 (10.1) 2675 (1213) 2955 (1340)
42 150 0.41 (10.4) 32 (9.8) 3415 (1549) 3765 (1708)
dispute, the specimen shall be cut in accordance with Fig. 3.If
48 150 0.46 (12.4) 33 (10.1) 4805 (2180)
thepipewallthicknessexceeds0.40in.(10.2mm),theCharpy
54 150 0.51 (13.0) 33 (10.1) 6035 (2737)
impact specimen may be machined to a nominal thickness of
60 150 0.54 (13.7) 33 (10.1) 6930 (3143)
64 150 0.56 (14.2) 33 (10.1) 7680 (3484)
0.40 in. (10.2 mm). In all tests, impact values are to be
A
Nominal thickness is based on the minimum Pressure Class ductile iron pipe
corrected to a standard wall thickness, t = 0.40 in. (10.2 mm),
s
available installed in Type 5 trench condition in accordance with ANSI/AWWA
by calculation as follows:
C150/A21.50, as shown in Fig. 1, with a maximum ring deflection of 5 % and
maximum ring stress of 48,000 psi (331 MPa). Wall thickness of pipe to serve at
t
s
other depths of cover may be calculated in accordance with ANSI/AWWA Impactvalue ~corrected! 5 3impact value ~actual!
t
C150/A21.50, allowing 5 % maximum ring deflection.
where:
t = the thickness of the specimen, in. (mm).
The Charpy impact test machine anvil shall not be moved to
compensateforthevariationofcross-sectiondimensionsofthe
test specimen.
6.3.1 Acceptance Value—The corrected acceptance value
for notched impact test specimens shall be a minimum of 7
ft·lbf (9.49 J) for tests conducted at 70 6 10°F (21 6 6°C).
6.4 Sampling—At least one tension specimen shall be taken
during each casting period of approximately 3 h. At least one
70 6 10°F (21 6 6°C) Charpy impact specimen shall be taken
during each operating hour. Specimens shall be selected to
properly represent extremes of pipe diameters and wall thick-
nesses.
NOTE1—Pipeisbeddedtoitscenterlineincompactedgranularmaterial 7. Additional Control Tests by Manufacturer
withaminimumof4in.(102mm)underthepipe.Compactedgranularor
7.1 Anadditionallow-temperatureimpacttestshallbemade
A
select material is used to the top of the pipe. (Material is compacted to
fromatleast10%ofthesamplecouponstakenfortherequired
approximately 90% Standard Proctor in accordance with AASHTO
Standard T-99.) 70 6 10°F (21 6 6°C) Charpy impact test specified in 6.4 to
A
Loose soil or select material is defined as native soil excavated from
check compliance with a minimum corrected value of 3 ft·lbf
the trench, free of rocks, foreign material, and frozen earth.
(4.07 J) for tests conducted at −40°F 6 2°F (−40°C 6 1°C).
FIG. 1 Type 5 Trench
Testspecimensshallbepreparedandtestedinaccordancewith
6.3.
7.2 In addition, the manufacturer shall conduct such other
6. Acceptance Tests
tests as may be necessary to ensure compliance with this
6.1 The standard acceptance tests for the physical charac-
specification.
teristics of the pipe shall be as follows:
6.2 Tension Test—Unless otherwise
...
This document is not an ASTM standard and is intended only to provide the user of an ASTM standard an indication of what changes have been made to the previous version. Because
it may not be technically possible to adequately depict all changes accurately, ASTM recommends that users consult prior editions as appropriate. In all cases only the current version
of the standard as published by ASTM is to be considered the official document.
Designation: A716 − 08 A716 − 08 (Reapproved 2014)
Standard Specification for
Ductile Iron Culvert Pipe
This standard is issued under the fixed designation A716; the number immediately following the designation indicates the year of
original adoption or, in the case of revision, the year of last revision. A number in parentheses indicates the year of last reapproval. A
superscript epsilon (´) indicates an editorial change since the last revision or reapproval.
1. Scope
1.1 This specification covers 14 to 64-in. ductile-iron culvert pipe centrifugally cast.
1.2 The values stated in inch-pound units are to be regarded as standard. The values given in parentheses are mathematical
conversions to SI units that are provided for information only and are not considered standard.
1.3 The following safety hazards caveat pertains only to the test methods portions, Sections 6 and 7, of this specification:This
standard does not purport to address all of the safety concerns, if any, associated with its use. It is the responsibility of the user
of this standard to establish appropriate safety and health practices and determine the applicability of regulatory limitations prior
to use.
2. Referenced Documents
2.1 ASTM Standards:
E8 Test Methods for Tension Testing of Metallic Materials
E23 Test Methods for Notched Bar Impact Testing of Metallic Materials
2.2 ANSI/AWWA Standards:
C 150 ⁄A21.50 Thickness Design of Ductile-Iron Pipe
C 151 ⁄A21.51 Ductile-Iron Pipe Centrifugally Cast, for Water
2.3 AASHTO Standard:
AASHTO T-99 Moisture Density Relations of Soils Using a 5.5-lb (2.5-kg) Rammer 12-in. (305-mm) Drop
3. General Requirements
3.1 The pipe shall be manufactured of ductile iron that meets the requirements of Sections 6 and 7. See Table 1 for pipe
thicknesses and weights; see also Fig. 1.
3.2 The pipe shall be provided with suitable joints, such as push-on or other types of joints that prevent lateral displacement.
Plain-end pipe for use with suitable couplings may be furnished.
3.3 Unless otherwise specified, pipe shall have a nominal length of 18 or 20 ft (5.5 or 6.1 m). A maximum of 20 % of the total
number of pipe of each size specified in an order may be furnished as much as 24 in. (610 mm) shorter than the nominal laying
length, and an additional 10 % may be furnished as much as in 6 in. (152 mm) shorter than the nominal laying length.
4. Tolerances or Permitted Variations
4.1 Dimensions—The spigot end, bell, and socket of the pipe and the accessories shall be gaged with suitable gages at
sufficiently frequent intervals to assure that the dimensions comply with the requirements of this specification. The smallest inside
diameter (ID) of the sockets and the outside diameter (OD) of the spigot ends shall be tested with circular gages. Other socket
dimensions shall be gauged as may be appropriate.
4.2 Thickness—Minus thickness tolerances of pipe shall not exceed those shown below:
This specification is under the jurisdiction of ASTM Committee A04 on Iron Castings and is the direct responsibility of Subcommittee A04.12 on Pipes and Tubes.
Current edition approved Oct. 1, 2008Oct. 1, 2014. Published October 2008 October 2014. Originally approved in 1975. Last previous edition approved in 20032008 as
A716 – 03.A716 – 08. DOI: 10.1520/A0716-08.10.1520/A0716-08R14.
For referenced ASTM standards, visit the ASTM website, www.astm.org, or contact ASTM Customer Service at service@astm.org. For Annual Book of ASTM Standards
volume information, refer to the standard’s Document Summary page on the ASTM website.
Available from American National Standards Institute (ANSI), 25 W. 43rd St., 4th Floor, New York, NY 10036, http://www.ansi.org.
Available from American Association of State Highway and Transportation Officials (AASHTO), 444 N. Capitol St., NW, Suite 249, Washington, DC 20001,
http://www.transportation.org.
Copyright © ASTM International, 100 Barr Harbor Drive, PO Box C700, West Conshohocken, PA 19428-2959. United States
A716 − 08 (2014)
A
TABLE 1 Standard Wall Thickness and Weight of Push-On Joint
Ductile-Iron Culvert Pipe
20-ft (6.1
mm) Laying
Maximum 18-ft (5.5mm) Length,
Nominal Depth of Laying Length, Weight per,
Nominal Pressure Thickness, Cover, Ft. Weight per, Length, lb
Diam., in. Class in. (mm) (m) Length, lb (kg) (kg)
14 250 0.28 (7.1) 41 (12.5) 770 (349) 855 (388)
16 250 0.30 (7.6) 41 (12.5) 940 (426) 1040 (472)
18 250 0.31 (7.9) 40 (12.2) 1090 (494) 1205 (547)
20 250 0.33 (8.4) 40 (12.2) 1290 (585) 1425 (646)
24 200 0.33 (8.4) 37 (11.3) 1550 (703) 1710 (776)
30 150 0.34 (8.6) 33 (10.1) 2000 (907) 2210 (1002)
36 150 0.38 (9.7) 33 (10.1) 2675 (1213) 2955 (1340)
42 150 0.41 (10.4) 32 (9.8) 3415 (1549) 3765 (1708)
48 150 0.46 (12.4) 33 (10.1) 4805 (2180)
54 150 0.51 (13.0) 33 (10.1) 6035 (2737)
60 150 0.54 (13.7) 33 (10.1) 6930 (3143)
64 150 0.56 (14.2) 33 (10.1) 7680 (3484)
A
Nominal thickness is based on the minimum Pressure Class ductile iron pipe
available installed in Type 5 trench condition in accordance with ANSI/AWWA
C150/A21.50, as shown in Fig. 1, with a maximum ring deflection of 5 % and
maximum ring stress of 48,000 psi (331 MPa). Wall thickness of pipe to serve at
other depths of cover may be calculated in accordance with ANSI/AWWA
C150/A21.50, allowing 5 % maximum ring deflection.
NOTE 1—Pipe is bedded to its centerline in compacted granular material with a minimum of 4 in. (102 mm) under the pipe. Compacted granular or
A
select material is used to the top of the pipe. (Material is compacted to approximately 90 % Standard Proctor in accordance with AASHTO Standard
T-99.)
A
Loose soil or select material is defined as native soil excavated from the trench, free of rocks, foreign material, and frozen earth.
FIG. 1 Type 5 Trench
Nominal Size, in. Minus Tolerance, in. (mm)
14 to 42 0.07 (1.8)
48 0.08 (2.0)
54 to 64 0.09 (2.3)
NOTE 1—An additional minus tolerance of 0.02 in (0.05 mm) shall be permitted along the barrel of the pipe for a distance not to exceed 12 in. (305
mm).
4.3 Weight—The weight of any single pipe shall not be less than the tabulated weight by more than 5 %.
5. Coating
5.1 All pipe shall be coated inside and outside with an asphaltic or equivalent material approximately 1 mil (0.025 mm) thick.
The finished coating shall be continuous and smooth, neither brittle when cold, nor sticky when exposed to the sun, and shall be
strongly adherent to the pipe.
6. Acceptance Tests
6.1 The standard acceptance tests for the physical characteristics of the pipe shall be as follows:
A716 − 08 (2014)
6.2 Tension Test—Unless otherwise specified by the purchaser, a tension test specimen shall be cut longitudinally or
circumferentially from the midsection of the pipe wall. In case of dispute, the specimen shall be cut longitudinally. This specimen
shall be machined and tested in accordance with Fig. 2 and Test Methods E8. The yield strength shall be determined by the 0.2 %
offset, halt-of-pointer, or extension-under-load methods. If check tests are to be made, the 0.2 % offset method shall be used. All
specimens shall be tested at room temperature 70 6 10°F (21 6 6°C).
6.2.1 Acceptable Values—The acceptance values for test specimens shall be as follows:
Grade of iron 60-42-10
Minimum tensile strength, psi (MPa) 60 000 (413.7)
Minimum yield strength, psi (MPa) 42 000 (289.6)
Minimum elongation, % 10
6.3 Charpy Impact Test—Tests shall be made in accordance with Test Methods E23, except that dimensions of the specimens
shall be 0.500 in. (12.70 mm) by full thickness of pipe wall. Unless otherwise specified by the purchaser, the Charpy notched
impact test specimen shall be in accordance with Fig. 3, except that it may be cut circumferentially. In case of dispute, the specimen
shall be cut in accordance with Fig. 3. If the pipe wall thickness exceeds 0.40 in. (10.2 mm), the Charpy impact specimen may
be machined to a nominal thickness of 0.40 in. (10.2 mm). In all tests, impact values are to be corrected to a standard wall
thickness, t = 0.40 in. (10.2 mm), by calculation as follows:
s
t
s
Impact value ~corrected!5 3impact value ~actual!
t
where:
t = the thickness of the specimen, in. (mm).
The Charpy impact test machine anvil shall not be moved to compensate for the variation of cross-section dimensions of the
test specimen.
6.3.1 Acceptance Value—The corrected acceptance value for notched impact test specimens shall be a minimum of 7 ft·lbf (9.49
J) for tests conducted at 70 6 10°F (21 6 6°C).
NOTE 1—The reduced section (A) may have a gradual taper from the ends toward the center with the ends not more than 0.005 in. (0.13 mm) lar
...


Questions, Comments and Discussion
Ask us and Technical Secretary will try to provide an answer. You can facilitate discussion about the standard in here.