ASTM A624/A624M-98
(Specification)Standard Specification for Tin Mill Products, Electrolytic Tin Plate, Single Reduced
Standard Specification for Tin Mill Products, Electrolytic Tin Plate, Single Reduced
SCOPE
1.1 This specification covers single-reduced electrolytic tin plate produced from low-carbon cold-reduced steel furnished in coils and cut sizes for use in the manufacture of cans, closures, crowns, and other products. It is furnished in commercially available tin coatings, and is normally supplied with a trimmed edge.
1.2 This specification is applicable to orders in either inch-pound units (as A624) which is supplied in nominal thicknesses from 0.0061 in. to 0.0149 in. or SI units [as A624M] which is supplied in nominal thicknesses from 0.15 mm to 0.38 mm.
1.3 The values stated in either inch-pound or SI units are to be regarded as standard within the text, the SI units are shown in parentheses. The values stated in each system are not exact equivalents. Therefore, each system must be used independently of the other. Combining values from the two systems may result in nonconformance with this specification.
General Information
Relations
Standards Content (Sample)
NOTICE: This standard has either been superceded and replaced by a new version or discontinued.
Contact ASTM International (www.astm.org) for the latest information.
Designation: A 624/A 624M – 98
Standard Specification for
Tin Mill Products, Electrolytic Tin Plate, Single Reduced
This standard is issued under the fixed designation A 624/A 624M; the number immediately following the designation indicates the year
of original adoption or, in the case of revision, the year of last revision. A number in parentheses indicates the year of last reapproval.
A superscript epsilon (e) indicates an editorial change since the last revision or reapproval.
This standard has been approved for use by agencies of the Department of Defense.
1. Scope B 339 Specification for Pig Tin
1.1 This specification covers single-reduced electrolytic tin
3. Ordering Information
plate produced from low-carbon cold-reduced steel furnished
3.1 Orders for product under this specification shall include
in coils and cut sizes for use in the manufacture of cans,
the following information, as required and applicable, to
closures, crowns, and other products. It is furnished in com-
describe adequately the desired product:
mercially available tin coatings, and is normally supplied with
3.1.1 Name of product (single-reduced electrolytic tin plate)
a trimmed edge.
(Section 1),
1.2 This specification is applicable to orders in either
3.1.2 Tin coating weight [mass] designation and marking, if
inch-pound units (as A 624) which is supplied in nominal
any (Section 4, Table 1, and Fig. 1 and Fig. 2),
thicknesses from 0.0061 to 0.0149 in. or SI units [as A 624M]
3.1.3 Surface appearance and finish (Section 5),
which is supplied in nominal thicknesses from 0.15 to 0.38
3.1.4 Chemical treatment (Section 6),
mm.
3.1.5 Oiling (Section 7),
1.3 The values stated in either inch-pound or SI units are to
3.1.6 Thickness (Specification A 623 [A 623M]) (this must
be regarded as standard within the text, the SI units are shown
be consistent with the intended application),
in parentheses. The values stated in each system are not exact
3.1.7 Coil width or cut size,
equivalents. Therefore, each system must be used indepen-
3.1.8 Where required, rolling direction will be specified on
dently of the other. Combining values from the two systems
cut sizes and will be indicated by underlining the slit (rolling
may result in nonconformance with this specification.
width) dimension,
1.4 This standard does not purport to address all of the
3.1.9 Steel type (Specification A 623 [A 623M]),
safety concerns, if any, associated with its use. It is the
3.1.10 Temper designation (Specification A 623 [A 623M])
responsibility of the user of this standard to establish appro-
(this must be consistent with the intended application),
priate safety and health practices and determine the applica-
3.1.11 Intended application,
bility of regulatory limitations prior to use.
3.1.12 Quantity in base boxes (SITAS) (see Note 4),
2. Referenced Documents 3.1.13 On coils, specify minimum or range of acceptable
inside diameters. The standard inside diameter is approxi-
2.1 ASTM Standards:
mately 16 in. if ordered as A 624 [410 mm if ordered as A
A 623 Specification for Tin Mill Products, General Require-
2 624M]. Coils should be specified to a maximum coil weight if
ments
ordered as A 624 [mass if ordered as A 624M], or maximum
A 623M Specification for Tin Mill Products, General Re-
2 outside diameter or both,
quirements (Metric)
3.1.14 Packaging,
A 630 Test Methods for Determination of Tin Coating
3.1.15 Special requirements where applicable, J = plate or K
Weights for Hot-Dip and Electrolytic Tin Plate
= plate, and
A 754 Test Method for Coating Thickness by X-Ray Fluo-
3.1.16 ASTM specification designation and year of issue.
rescence
NOTE 1—A typical ordering description for coils is as follows: 1250
base boxes, single reduced, electrolytic tin plate, No. 20, DOS, L, T-5, 7C,
0.0088 in. thickness 31 ⁄16 in. by coil, 16 in. inside diameter, 65 in.
maximum outside diameter, 25 000 lbs maximum coil weight, for 300
This specification is under the jurisdiction of ASTM Committee A-1 on Steel,
Stainless Steel and Related Alloys and is the direct responsibility of Subcommittee diameter sanitary open top ends in accordance with Specification A 624.
A01.20 on Tin Mill Products.
Current edition approved Nov. 10, 1998. Published March 1999. Originally
published as A 624 – 68. Last previous edition A 624 – 95.
2 3
Annual Book of ASTM Standards, Vol 01.06. Annual Book of ASTM Standards, Vol 02.04.
Copyright © ASTM International, 100 Barr Harbor Drive, PO Box C700, West Conshohocken, PA 19428-2959, United States.
NOTICE: This standard has either been superceded and replaced by a new version or discontinued.
Contact ASTM International (www.astm.org) for the latest information.
A 624/A 624M – 98
TABLE 1 Electrolytic Tin Plate Coating Weight [Mass]
4.1.1 Electrolytic tin plate is commonly produced to the
class designations shown in Table 1. Other combinations of
NOTE 1—Listed below are commonly produced coating weights
coatings may be specified by agreement between the producer
[masses]. By agreement between the producer and the purchaser, other
combinations of the coatings may be specified and the appropriate and the purchaser.
minimum average test values will apply.
4.1.2 Differentially coated tin plate is a product having one
Nominal Tin Coating Minimum Average
surface more heavily tin coated than the opposite. The class
Weight [Mass] each Sur- Coating Weight [Mass]
designation is expressed by showing the two tin coating
Designation No. face, lb/base box [g/m ] each Surface Test
A
weights [masses] separated by a slash mark, for example, 50/25
Value, lb/base box
[g/m ]
D 5.6/28. The first number will represent the coating weight
B
5 [0.6/0.6] 0.025/0.025 [0.6/0.6] 0.02/0.02 [0.5/0.5] [mass] on the outside of the coil or the top surface of the cut
10 [1.1/1.1] 0.05/0.05 [1.1/1.1] 0.04/0.04 [0.9/0.9]
sizes.
15 [1.7/1.7] 0.075/0.075 [1.7/1.7] 0.06/0.06 [1.4/1.4]
4.1.3 In order to distinguish material having differential
20 [2.2/2.2] 0.10/0.10 [2.2/2.2] 0.08/0.08 [1.8/1.8]
25 [2.8/2.8] 0.125/0.125 [2.8/2.8] 0.11/0.11 [2.5/2.5]
coatings, the face with the heavier coating is normally marked.
35 [3.9/3.9] 0.175/0.175 [3.9/3.9] 0.16/0.16 [3.6/3.6]
By arrangement, a special marking can be supplied on the
50 [5.6/5.6] 0.25/0.25 [5.6/5.6] 0.23/0.23 [5.2/5.2]
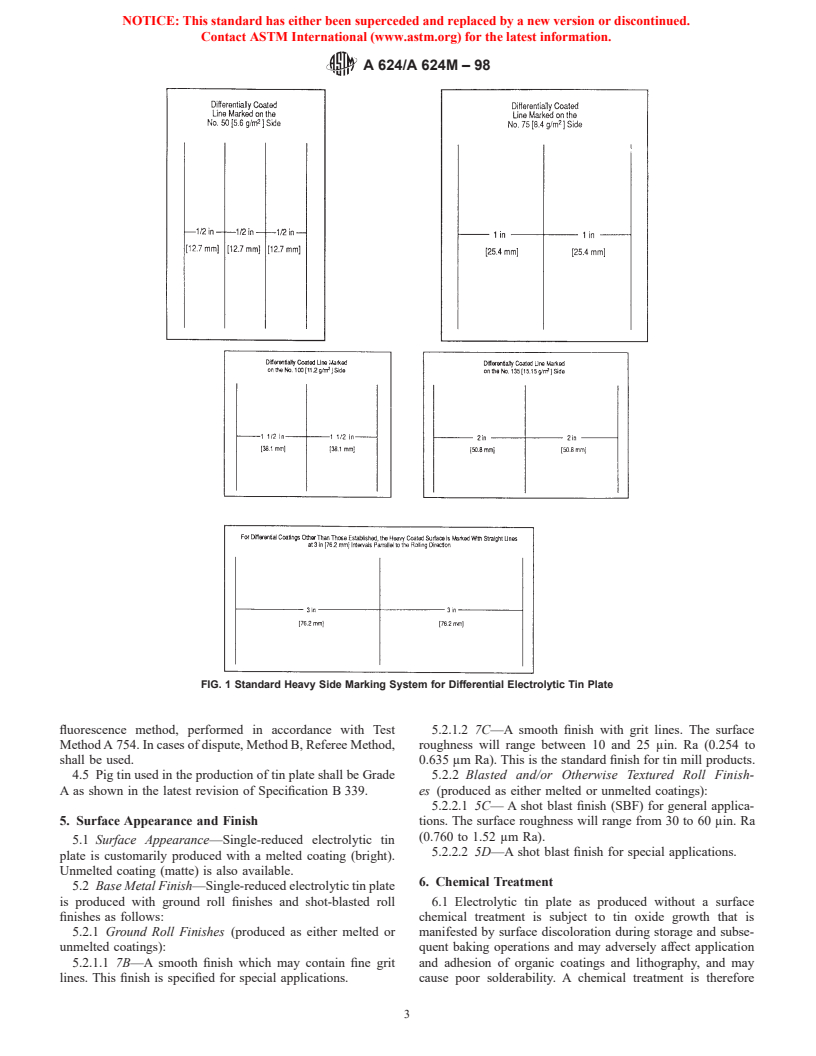
light-coated face (see Fig. 1 and Fig. 2). The letter D is shown
75 [8.4/8.4] 0.375/0.375 [8.4/8.4] 0.35/0.35 [7.8/7.8]
100 [11.2/11.2] 0.50/0.50 [11.2/11.2] 0.45/0.45 [10.1/10.1]
along with the coating number to indicate the side of the plate
C
D 50/25 [D 5.6/2.8] 0.25/0.125 [5.6/2.8] 0.23/0.11 [5.2/2.5]
to be marked.
D 75/25 [D 8.4/2.8] 0.375/0.125 [8.4/2.8] 0.35/0.11 [7.8/2.5]
D 100/25 [D 11.2/2.8] 0.50/0.125 [11.2/2.8] 0.45/0.11 [10.1/2.5] 4.2 Sampling for Tin Coating Weights [Masses]:
D 100/50 [D 11.2/5.6] 0.50/0.25 [11.2/5.6] 0.45/0.23 [10.1/5.2]
4.2.1 When the purchaser wishes to make tests to ascertain
D 135/25 [D 15.2/2.8] 0.675/0.125 [15.2/2.8] 0.62/0.11 [14.0/2.5]
compliance with the requirements of this specification for tin
A
The minimum spot value shall be not less than 80 % of the minimum average
coating weight [mass] on a lot of any specific item of
coating weight [mass] (see 4.3 and 4.4).
B
Some No. 5 melted applications may require revised minimum and maximum electrolytic tin plate, the following procedure shall be used:
levels for fully alloyed end uses.
4.2.1.1 Coils—One test strip shall be taken at random from
C
The letter D on differentially coated tin plate indicates the coated surface to be
a representative section of each coil across its width. A
marked. For example, the examples indicate that the heavy-coated side is marked
(see 4.1.2 and 4.1.3).
minimum of three test strips, each taken from different coils
from any one item of a specific lot shall be selected.
[250 SITAS, single reduced electrolytic tin plate, 2.2/2.2, DOS, L, T-5, 7C,
4.2.1.2 From one or two coil lots, each coil shall be
0.22 mm thickness, 794 mm by coil, 410 mm inside diameter, 1650 mm
sampled. A minimum of three randomly selected test strips
maximum outside diameter, 11 500 kg maximum coil mass, for 73-mm
shall represent the lot.
diameter sanitary open top ends in accordance with Specification
4.2.1.3 Cut Sizes—One sheet shall be taken at random from
A 624M.]
NOTE 2—A typical ordering description for cut sizes is as follows: 500 each 50 packages, or part thereof, with a minimum of three
base boxes, single reduced electrolytic tin plate, No. 25, DOS, MR, T-2,
different sample plates, each taken from different bundles from
12 7
7C, 0.0110 in. thickness, 30 ⁄16 in. by 30 ⁄16 in., for 307 diameter general
any one item of a specific shipment.
line rings in accordance with Specification A 624. [100 SITAS, single
4.2.2 Each test sheet shall be spot tested at a minimum of
reduced electrolytic tin plate, 2.8/2.8, DOS, MR, T-2, 7C, 0.28 mm
three locations across the rolling direction of the sheet. S
...


Questions, Comments and Discussion
Ask us and Technical Secretary will try to provide an answer. You can facilitate discussion about the standard in here.