ASTM F421-00
(Test Method)Standard Test Method for Measuring Groove and Void Depth in Passenger Car Tires
Standard Test Method for Measuring Groove and Void Depth in Passenger Car Tires
SCOPE
1.1 This test method describes standard procedures for measuring the groove and void depth in passenger car tires.
1.2 Any mechanical, optical, or electronic device capable of measuring groove (void) depth can be used, but only the contact methodology is described here. Noncontact methodology is beyond the scope of this test method.
1.3 The values stated in inch-pound units are to be regarded as the standard. The values given in parentheses are for information only.
1.4 This standard does not purport to address all of the safety concerns, if any, associated with its use. It is the responsibility of the user of this standard to establish appropriate safety and health practices and determine the applicability of regulatory limitations prior to use.
General Information
Relations
Standards Content (Sample)
NOTICE: This standard has either been superseded and replaced by a new version or withdrawn.
Contact ASTM International (www.astm.org) for the latest information
Designation:F421–00
Standard Test Method for
Measuring Groove and Void Depth in Passenger Car Tires
This standard is issued under the fixed designation F 421; the number immediately following the designation indicates the year of
original adoption or, in the case of revision, the year of last revision. A number in parentheses indicates the year of last reapproval. A
superscript epsilon (e) indicates an editorial change since the last revision or reapproval.
1. Scope 3.1.5.1 Discussion—The reader is cautioned that the probe
tip used for the depth measurement must have a sufficiently
1.1 This test method describes standard procedures for
small cross-section compared to the width of the void being
measuring the groove and void depth in passenger car tires.
measured. The probe must be able to reach the bottom of the
1.2 Any mechanical, optical, or electronic device capable of
void without contacting the tread elements that form the sides
measuring groove (void) depth can be used, but only the
of the void.
contact methodology is described here. Noncontact methodol-
Special consideration should be given to measuring sipes. (See
ogy is beyond the scope of this test method.
definitioninTerminologyF 538.)Sincethesipeissubstantially
1.3 The values stated in inch-pound units are to be regarded
narrower than a major groove, a very small diameter probe tip
as the standard. The values given in parentheses are for
must be used to achieve an accurate measurement of sipe
information only.
depth.
1.4 This standard does not purport to address all of the
3.1.6 irregular wear, n—a type of treadwear characterized
safety concerns, if any, associated with its use. It is the
by substantial variations of tread loss both from projection to
responsibility of the user of this standard to establish appro-
projection and frequently from point to point on a given
priate safety and health practices and determine the applica-
projection.
bility of regulatory limitations prior to use.
3.1.7 projection, n—a pavement contacting area of the tread
2. Referenced Documents
band, bounded by void.
3.1.8 rib, n—a continuous circumferential projection.
2.1 ASTM Standards:
3.1.9 treadwear indicator, n—a raised portion of a groove
F 1082 Practice for Tires—Determining Precision for Test
bottom or void bottom that is molded in a tire at fairly regular
Method Standards
intervals around the circumference to provide a visual indica-
3. Terminology
tion that most of a tread has been worn away.
3.1.10 uniform wear, n—a type of treadwear characterized
3.1 Definitions:
by equal tread loss both from projection to projection and from
3.1.1 circumferential line, n— on a tire, any real or imagi-
point to point on a given projection, resulting in a smooth
nary circle on the surface of a tire, lying in a plane that is
appearance of all parts of the tread pattern.
perpendicular to the spin axis.
3.1.11 void, n—a volume (in the tread band) defined by the
3.1.2 element, n—an isolated (totally bounded by void)
lack of rubber, the depth dimension of this volume may vary
projection.
from point to point in (on) the tread band.
3.1.3 groove, n—a void that is relatively narrow compared
to its length.
4. Summary of Test Method
3.1.4 groove average depth, [L], n—the average of all tire
4.1 This test method gives the detailed procedures and the
groove depth measurements in a single groove.
needed precautions for the measurement of the groove or void
3.1.5 groove (void) depth, [L], n—a measurement of the
depth of the tread pattern in a tire. Calculations for various
perpendiculardistancefromarealorcalculatedreferenceplane
types of average groove or void depths are given in addition to
defined by edges of two adjacent ribs (lugs) to the lowest point
the required nomenclature for effective communication of the
of contact in the groove (void).
groove or void measurement results.
1 5. Significance and Use
ThistestmethodisunderthejurisdictionofASTMCommitteeF-9onTiresand
is the direct responsibility of Subcommittee F09.30 on Laboratory (Non-Vehicular)
5.1 The groove (void) depth affects the tire’s ability to
Testing.
develop tractive forces on wet pavements, snow, and soil, and
Current edition approved May 10, 2000. Published May 2000. Originally
its ability to resist hydroplaning. Groove (void) depth also
published as F 421 – 75. Last previous edition F 421 – 95b.
Annual Book of ASTM Standards, Vol 09.02.
Copyright © ASTM International, 100 Barr Harbor Drive, PO Box C700, West Conshohocken, PA 19428-2959, United States.
F421
defines the state of wear of a tire and is used in the 7. Preparation
determination of the rate of wear.
7.1 Gage Zero Adjustment—Place the foot of the gage
against a nondeformable flat surface such as a glass plate and
6. Apparatus
adjust dial to zero.
7.2 Preparation of Tire:
6.1 Gage, meeting the specifications of the American Gage
7.2.1 Mount the tire on an approved width rim and inflate to
Design Committee.
the required pressure.
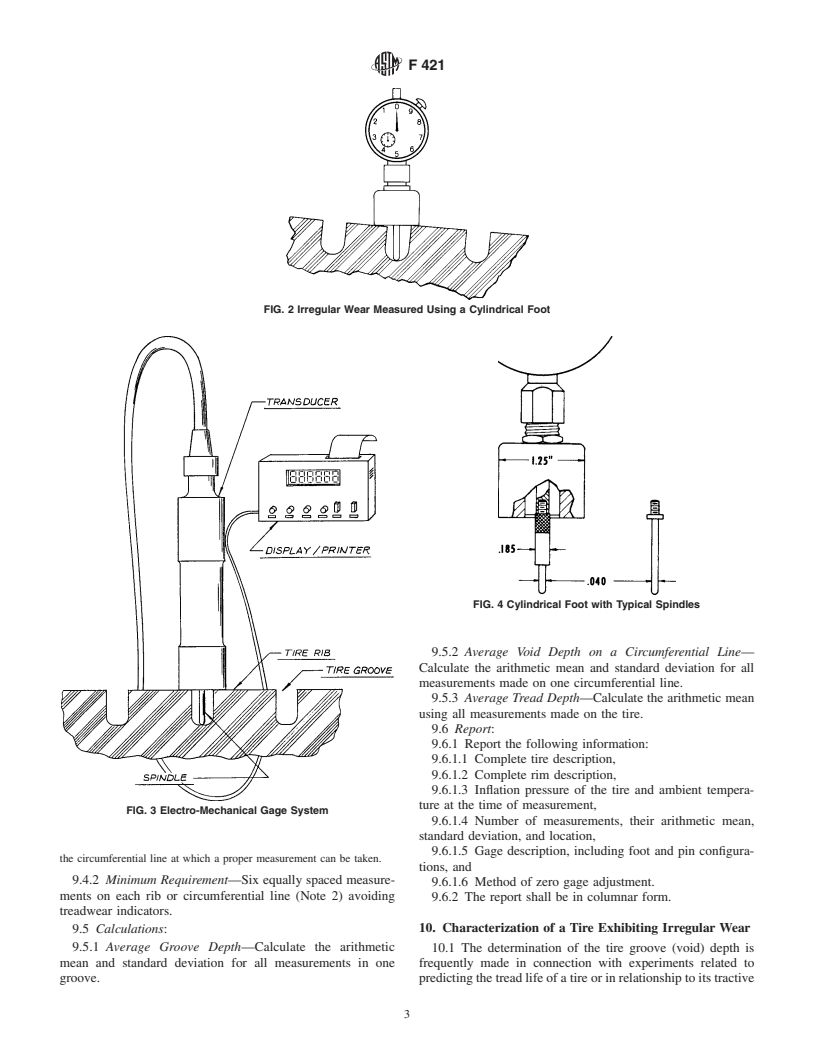
6.1.1 The apparatus shall consist of a mechanical or electro-
7.2.2 The tire shall be in temperature equilibrium with the
mechanical depth gage fitted with a foot through which a
environment in which it is measured.
spindle passes. The foot may have any of a variety of shapes,
including but not limited to cylindrical, semi-cylindrical, and
NOTE 1—For purposes of this test method, temperature equilibrium
rectangular. The reference surface of the foot shall be ground exists if the gage pressure remains within 1 psi (6.9 kPa) of the required
inflation pressure during the complete measurement process.
planar and perpendicular to the gage spindle. Examples of
mechanical gages and typical available gage feet are illustrated
7.2.3 The tire must be dry and free of any foreign material
in Figs. 1 and 2. A typical electro-mechanical gage system is
that would interfere with accurate measurement.
illustrated in Fig. 3.
7.2.4 Avoid the rubber vents on the tread during measure-
6.1.2 The reading of the depth gage shall be accurate to
ment or remove them, leaving no projections above the tread
within 6 0.001 in. (0.025 mm) over a range of 1 in. (25 mm). surface.
The smallest scale division on the gage shall be at least 0.001
8. Procedure
in (0.025 mm).
8.1 Tires with Uniform Wear—Place the foot of the gage so
6.1.3 The gage spindle shall extend at least 1 in. (25 mm)
that it bridges adjacent ribs or lugs over the area to be
beyond the reference surface of the foot. Spindles may have
meas
...


Questions, Comments and Discussion
Ask us and Technical Secretary will try to provide an answer. You can facilitate discussion about the standard in here.