ASTM E2582-21
(Practice)Standard Practice for Infrared Flash Thermography of Composite Panels and Repair Patches Used in Aerospace Applications
Standard Practice for Infrared Flash Thermography of Composite Panels and Repair Patches Used in Aerospace Applications
SIGNIFICANCE AND USE
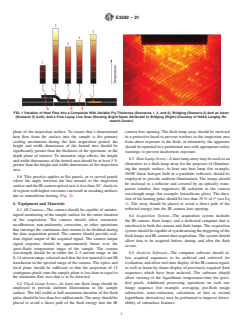
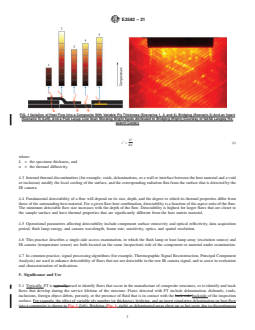
5.1 Typically, FT is used to identify flaws that occur in the manufacture of composite structures, or to identify and track flaws that develop during the service lifetime of the structure. Flaws detected with FT include delamination, disbonds, voids, inclusions, foreign object debris, porosity, or the presence of fluid that is in contact with the backside of the inspection surface. For example, the effect of variable ply number (or thickness), bridging, and an insert simulating delamination on heat flow into a composite is shown in Fig. 1 (left). Bridging (Fig. 1, right) or delaminated areas show up as hot spots due to discontinuous heat flow, causing heating to be localized close to the inspection surface. With dedicated signal processing and the use of representative test samples, characterization of flaw depth and size, or measurement of component thickness and thermal diffusivity, may be performed.
FIG. 1 Variation of Heat Flow Into a Composite With Variable Ply Thickness (Scenarios 1, 3, and 4), Bridging (Scenario 2) And an Insert (Scenario 5) (Left), And a Post Layup Line Scan Showing Bright Spots Attributed to Bridging (Right) (Courtesy of NASA Langley Research Center)
5.2 Since FT is based on the diffusion of thermal energy from the inspection surface of the specimen to the opposing surface (or the depth plane of interest), the practice requires that data acquisition allows sufficient time for this process to occur, and that at the completion of the acquisition process, the radiated surface temperature signal collected by the IR camera is strong enough to be distinguished from spurious IR contributions from background sources or system noise.
5.3 This method is based on accurate detection of changes in the emitted IR energy emanating from the inspection surface during the cooling process. As the emissivity of the inspection surface falls below that of an ideal blackbody (blackbody emissivity = 1), the signal detected by the IR camera may include comp...
SCOPE
1.1 This practice describes a procedure for detecting subsurface flaws in composite panels and repair patches using Flash Thermography (FT), in which an infrared (IR) camera is used to detect anomalous cooling behavior of a sample surface after it has been heated with a spatially uniform light pulse from a flash lamp array.
1.2 This practice describes established FT test methods that are currently used by industry, and have demonstrated utility in quality assurance of composite structures during post-manufacturing and in-service examinations.
1.3 This practice has utility for testing of polymer composite panels and repair patches containing, but not limited to, bismaleimide, epoxy, phenolic, poly(amide imide), polybenzimidazole, polyester (thermosetting and thermoplastic), poly(ether ether ketone), poly(ether imide), polyimide (thermosetting and thermoplastic), poly(phenylene sulfide), or polysulfone matrices; and alumina, aramid, boron, carbon, glass, quartz, or silicon carbide fibers. Typical as-fabricated geometries include uniaxial, cross ply, and angle ply laminates; as well as honeycomb core sandwich core materials.
1.4 This practice has utility for testing of ceramic matrix composite panels containing, but not limited to, silicon carbide, silicon nitride, and carbon matrix and fibers.
1.5 This practice applies to polymer or ceramic matrix composite structures with inspection surfaces that are sufficiently optically opaque to absorb incident light, and that have sufficient emissivity to allow monitoring of the surface temperature with an IR camera. Excessively thick samples, or samples with low thermal diffusivities, require long acquisition periods and yield weak signals approaching background and noise levels, and may be impractical for this technique.
1.6 This practice applies to detection of flaws in a composite panel or repair patch, or at the bonded interface between the panel and a supporting ...
General Information
- Status
- Published
- Publication Date
- 31-Jan-2021
- Technical Committee
- E07 - Nondestructive Testing
- Drafting Committee
- E07.10 - Specialized NDT Methods
Relations
- Effective Date
- 01-Feb-2024
- Effective Date
- 01-Dec-2019
- Effective Date
- 15-Oct-2019
- Effective Date
- 15-Apr-2019
- Effective Date
- 01-Mar-2019
- Effective Date
- 01-Apr-2018
- Effective Date
- 01-Jan-2018
- Effective Date
- 15-Jun-2017
- Effective Date
- 01-Feb-2017
- Effective Date
- 01-Aug-2016
- Effective Date
- 01-Aug-2016
- Effective Date
- 01-Feb-2016
- Effective Date
- 01-Dec-2015
- Effective Date
- 01-Sep-2015
- Effective Date
- 01-Jul-2015
Overview
ASTM E2582-21: Standard Practice for Infrared Flash Thermography of Composite Panels and Repair Patches Used in Aerospace Applications specifies procedures for detecting subsurface flaws in polymer and ceramic matrix composite panels and repair areas using infrared (IR) flash thermography (FT). This nondestructive testing (NDT) method leverages the surface cooling response observed via IR cameras after a uniform heat pulse from a flash lamp or heat lamp array. ASTM E2582-21 is widely recognized as an essential standard in aerospace quality assurance, helping identify manufacturing defects and service-induced damage such as delamination, voids, disbonds, and inclusions in advanced composite materials.
Key Topics
Flash Thermography (FT) Process
- A brief, intense pulse of light heats the inspection surface.
- An IR camera monitors the sample’s surface temperature as it cools.
- Subsurface flaws affect local heat diffusion, creating distinctive thermal patterns detectable by the camera.
Flaw Detection
- Identifies defects such as delamination, porosity, inclusions, voids, disbonds, bridging, and foreign object debris.
- Detectable flaws typically present as “hot spots” due to altered heat flow pathways.
Applicable Materials and Geometries
- Suited for polymer matrix composites (epoxy, polyester, phenolic, polyimide, etc.) and ceramic matrix composites (silicon carbide, silicon nitride, carbon).
- Applies to composites reinforced with fibers like carbon, glass, aramid, boron, quartz, and silicon carbide.
- Effective for flat or moderately curved panels, including honeycomb and sandwich panel structures.
Test Method Considerations
- Single-side access methodology (both flash and IR camera on one side).
- Requires surfaces to be optically opaque and have sufficient emissivity to ensure meaningful IR measurement.
- Excessively thick or low-diffusivity materials may not be suitable due to weak signals.
Data Analysis
- Utilizes advanced signal processing (e.g., thermographic signal reconstruction, principal component analysis) to enhance flaw detectability.
- Analysis includes temperature-time plots, derivative imaging, and numerical contrast methods.
Applications
Aerospace Manufacturing and Maintenance
- Ensures quality control for new composite panels during manufacturing.
- Inspects repair patches and verifies bond integrity during maintenance operations.
- Tracks and assesses in-service degradation, such as impact damage or developing delaminations.
Other Industrial Composite Testing
- Can be adapted for use with a wide range of composite structural components in automotive, marine, and civil engineering fields.
Material Qualification and Design Verification
- Assists in qualifying new composite systems for critical aerospace and industrial applications by revealing hidden flaws without destructive testing.
Related Standards
ASTM D3878 – Terminology for Composite Materials
Provides definitions and terminology relevant to composite material testing.ASTM E1316 – Terminology for Nondestructive Examinations
Standardizes terminology for various NDT methods, including thermography.Other Relevant NDT Standards
Includes guidance on ultrasonic, radiographic, and acoustic emissions testing for composite materials in aerospace and related industries.
Keywords: ASTM E2582-21, infrared flash thermography, nondestructive testing, composite panels, repair patches, aerospace composites, flaw detection, IR camera, delamination, voids, inclusions, composite quality assurance, signal processing, surface emissivity, polymer matrix composites, ceramic matrix composites.
Buy Documents
ASTM E2582-21 - Standard Practice for Infrared Flash Thermography of Composite Panels and Repair Patches Used in Aerospace Applications
REDLINE ASTM E2582-21 - Standard Practice for Infrared Flash Thermography of Composite Panels and Repair Patches Used in Aerospace Applications
Get Certified
Connect with accredited certification bodies for this standard

DEKRA North America
DEKRA certification services in North America.

Eagle Registrations Inc.
American certification body for aerospace and defense.

Element Materials Technology
Materials testing and product certification.
Sponsored listings
Frequently Asked Questions
ASTM E2582-21 is a standard published by ASTM International. Its full title is "Standard Practice for Infrared Flash Thermography of Composite Panels and Repair Patches Used in Aerospace Applications". This standard covers: SIGNIFICANCE AND USE 5.1 Typically, FT is used to identify flaws that occur in the manufacture of composite structures, or to identify and track flaws that develop during the service lifetime of the structure. Flaws detected with FT include delamination, disbonds, voids, inclusions, foreign object debris, porosity, or the presence of fluid that is in contact with the backside of the inspection surface. For example, the effect of variable ply number (or thickness), bridging, and an insert simulating delamination on heat flow into a composite is shown in Fig. 1 (left). Bridging (Fig. 1, right) or delaminated areas show up as hot spots due to discontinuous heat flow, causing heating to be localized close to the inspection surface. With dedicated signal processing and the use of representative test samples, characterization of flaw depth and size, or measurement of component thickness and thermal diffusivity, may be performed. FIG. 1 Variation of Heat Flow Into a Composite With Variable Ply Thickness (Scenarios 1, 3, and 4), Bridging (Scenario 2) And an Insert (Scenario 5) (Left), And a Post Layup Line Scan Showing Bright Spots Attributed to Bridging (Right) (Courtesy of NASA Langley Research Center) 5.2 Since FT is based on the diffusion of thermal energy from the inspection surface of the specimen to the opposing surface (or the depth plane of interest), the practice requires that data acquisition allows sufficient time for this process to occur, and that at the completion of the acquisition process, the radiated surface temperature signal collected by the IR camera is strong enough to be distinguished from spurious IR contributions from background sources or system noise. 5.3 This method is based on accurate detection of changes in the emitted IR energy emanating from the inspection surface during the cooling process. As the emissivity of the inspection surface falls below that of an ideal blackbody (blackbody emissivity = 1), the signal detected by the IR camera may include comp... SCOPE 1.1 This practice describes a procedure for detecting subsurface flaws in composite panels and repair patches using Flash Thermography (FT), in which an infrared (IR) camera is used to detect anomalous cooling behavior of a sample surface after it has been heated with a spatially uniform light pulse from a flash lamp array. 1.2 This practice describes established FT test methods that are currently used by industry, and have demonstrated utility in quality assurance of composite structures during post-manufacturing and in-service examinations. 1.3 This practice has utility for testing of polymer composite panels and repair patches containing, but not limited to, bismaleimide, epoxy, phenolic, poly(amide imide), polybenzimidazole, polyester (thermosetting and thermoplastic), poly(ether ether ketone), poly(ether imide), polyimide (thermosetting and thermoplastic), poly(phenylene sulfide), or polysulfone matrices; and alumina, aramid, boron, carbon, glass, quartz, or silicon carbide fibers. Typical as-fabricated geometries include uniaxial, cross ply, and angle ply laminates; as well as honeycomb core sandwich core materials. 1.4 This practice has utility for testing of ceramic matrix composite panels containing, but not limited to, silicon carbide, silicon nitride, and carbon matrix and fibers. 1.5 This practice applies to polymer or ceramic matrix composite structures with inspection surfaces that are sufficiently optically opaque to absorb incident light, and that have sufficient emissivity to allow monitoring of the surface temperature with an IR camera. Excessively thick samples, or samples with low thermal diffusivities, require long acquisition periods and yield weak signals approaching background and noise levels, and may be impractical for this technique. 1.6 This practice applies to detection of flaws in a composite panel or repair patch, or at the bonded interface between the panel and a supporting ...
SIGNIFICANCE AND USE 5.1 Typically, FT is used to identify flaws that occur in the manufacture of composite structures, or to identify and track flaws that develop during the service lifetime of the structure. Flaws detected with FT include delamination, disbonds, voids, inclusions, foreign object debris, porosity, or the presence of fluid that is in contact with the backside of the inspection surface. For example, the effect of variable ply number (or thickness), bridging, and an insert simulating delamination on heat flow into a composite is shown in Fig. 1 (left). Bridging (Fig. 1, right) or delaminated areas show up as hot spots due to discontinuous heat flow, causing heating to be localized close to the inspection surface. With dedicated signal processing and the use of representative test samples, characterization of flaw depth and size, or measurement of component thickness and thermal diffusivity, may be performed. FIG. 1 Variation of Heat Flow Into a Composite With Variable Ply Thickness (Scenarios 1, 3, and 4), Bridging (Scenario 2) And an Insert (Scenario 5) (Left), And a Post Layup Line Scan Showing Bright Spots Attributed to Bridging (Right) (Courtesy of NASA Langley Research Center) 5.2 Since FT is based on the diffusion of thermal energy from the inspection surface of the specimen to the opposing surface (or the depth plane of interest), the practice requires that data acquisition allows sufficient time for this process to occur, and that at the completion of the acquisition process, the radiated surface temperature signal collected by the IR camera is strong enough to be distinguished from spurious IR contributions from background sources or system noise. 5.3 This method is based on accurate detection of changes in the emitted IR energy emanating from the inspection surface during the cooling process. As the emissivity of the inspection surface falls below that of an ideal blackbody (blackbody emissivity = 1), the signal detected by the IR camera may include comp... SCOPE 1.1 This practice describes a procedure for detecting subsurface flaws in composite panels and repair patches using Flash Thermography (FT), in which an infrared (IR) camera is used to detect anomalous cooling behavior of a sample surface after it has been heated with a spatially uniform light pulse from a flash lamp array. 1.2 This practice describes established FT test methods that are currently used by industry, and have demonstrated utility in quality assurance of composite structures during post-manufacturing and in-service examinations. 1.3 This practice has utility for testing of polymer composite panels and repair patches containing, but not limited to, bismaleimide, epoxy, phenolic, poly(amide imide), polybenzimidazole, polyester (thermosetting and thermoplastic), poly(ether ether ketone), poly(ether imide), polyimide (thermosetting and thermoplastic), poly(phenylene sulfide), or polysulfone matrices; and alumina, aramid, boron, carbon, glass, quartz, or silicon carbide fibers. Typical as-fabricated geometries include uniaxial, cross ply, and angle ply laminates; as well as honeycomb core sandwich core materials. 1.4 This practice has utility for testing of ceramic matrix composite panels containing, but not limited to, silicon carbide, silicon nitride, and carbon matrix and fibers. 1.5 This practice applies to polymer or ceramic matrix composite structures with inspection surfaces that are sufficiently optically opaque to absorb incident light, and that have sufficient emissivity to allow monitoring of the surface temperature with an IR camera. Excessively thick samples, or samples with low thermal diffusivities, require long acquisition periods and yield weak signals approaching background and noise levels, and may be impractical for this technique. 1.6 This practice applies to detection of flaws in a composite panel or repair patch, or at the bonded interface between the panel and a supporting ...
ASTM E2582-21 is classified under the following ICS (International Classification for Standards) categories: 49.035 - Components for aerospace construction. The ICS classification helps identify the subject area and facilitates finding related standards.
ASTM E2582-21 has the following relationships with other standards: It is inter standard links to ASTM E1316-24, ASTM E1316-19b, ASTM D3878-19a, ASTM D3878-19, ASTM E1316-19, ASTM D3878-18, ASTM E1316-18, ASTM E1316-17a, ASTM E1316-17, ASTM E1316-16a, ASTM D3878-16, ASTM E1316-16, ASTM E1316-15a, ASTM E1316-15, ASTM D3878-15. Understanding these relationships helps ensure you are using the most current and applicable version of the standard.
ASTM E2582-21 is available in PDF format for immediate download after purchase. The document can be added to your cart and obtained through the secure checkout process. Digital delivery ensures instant access to the complete standard document.
Standards Content (Sample)
This international standard was developed in accordance with internationally recognized principles on standardization established in the Decision on Principles for the
Development of International Standards, Guides and Recommendations issued by the World Trade Organization Technical Barriers to Trade (TBT) Committee.
Designation: E2582 − 21
Standard Practice for
Infrared Flash Thermography of Composite Panels and
Repair Patches Used in Aerospace Applications
This standard is issued under the fixed designation E2582; the number immediately following the designation indicates the year of
original adoption or, in the case of revision, the year of last revision. A number in parentheses indicates the year of last reapproval. A
superscript epsilon (´) indicates an editorial change since the last revision or reapproval.
This standard has been approved for use by agencies of the U.S. Department of Defense.
1. Scope 1.6 Thispracticeappliestodetectionofflawsinacomposite
panel or repair patch, or at the bonded interface between the
1.1 This practice describes a procedure for detecting sub-
panel and a supporting sandwich core or solid substrate. It does
surface flaws in composite panels and repair patches using
not apply to discontinuities in the sandwich core, or at the
Flash Thermography (FT), in which an infrared (IR) camera is
interface between the sandwich core and a second panel on the
used to detect anomalous cooling behavior of a sample surface
far side of the core (with respect to the inspection apparatus).
after it has been heated with a spatially uniform light pulse
1.7 This practice does not specify accept-reject criteria and
from a flash lamp array.
is not intended to be used as a basis for approving composite
1.2 This practice describes established FT test methods that
structures for service.
are currently used by industry, and have demonstrated utility in
1.8 This standard does not purport to address all of the
quality assurance of composite structures during post-
safety concerns, if any, associated with its use. It is the
manufacturing and in-service examinations.
responsibility of the user of this standard to establish appro-
1.3 This practice has utility for testing of polymer compos-
priate safety, health, and environmental practices and deter-
ite panels and repair patches containing, but not limited to,
mine the applicability of regulatory limitations prior to use.
bismaleimide, epoxy, phenolic, poly(amide imide),
1.9 This international standard was developed in accor-
polybenzimidazole, polyester (thermosetting and
dance with internationally recognized principles on standard-
thermoplastic), poly(ether ether ketone), poly(ether imide),
ization established in the Decision on Principles for the
polyimide (thermosetting and thermoplastic), poly(phenylene
Development of International Standards, Guides and Recom-
sulfide), or polysulfone matrices; and alumina, aramid, boron,
mendations issued by the World Trade Organization Technical
carbon, glass, quartz, or silicon carbide fibers. Typical as-
Barriers to Trade (TBT) Committee.
fabricated geometries include uniaxial, cross ply, and angle ply
laminates; as well as honeycomb core sandwich core materials.
2. Referenced Documents
1.4 This practice has utility for testing of ceramic matrix
2.1 ASTM Standards:
compositepanelscontaining,butnotlimitedto,siliconcarbide,
D3878 Terminology for Composite Materials
silicon nitride, and carbon matrix and fibers.
E1316 Terminology for Nondestructive Examinations
1.5 This practice applies to polymer or ceramic matrix
3. Terminology
composite structures with inspection surfaces that are suffi-
ciently optically opaque to absorb incident light, and that have
3.1 Definitions—Terminology in accordance with Termi-
sufficient emissivity to allow monitoring of the surface tem-
nologies D3878 and E1316 and shall be used where applicable.
perature with an IR camera. Excessively thick samples, or
3.2 Definitions of Terms Specific to This Standard:
samples with low thermal diffusivities, require long acquisition
3.2.1 aspect ratio, n—the diameter to depth ratio of a flaw;
periods and yield weak signals approaching background and
for irregularly shaped flaws, diameter refers to the minor axis
noise levels, and may be impractical for this technique.
ofanequivalentrectanglethatapproximatestheflawshapeand
area.
This practice is under the jurisdiction of ASTM Committee E07 on Nonde-
structive Testing and is the direct responsibility of Subcommittee E07.10 on
Specialized NDT Methods. For referenced ASTM standards, visit the ASTM website, www.astm.org, or
Current edition approved Feb. 1, 2021. Published March 2021. Originally contact ASTM Customer Service at service@astm.org. For Annual Book of ASTM
approved in 2007. Last previous edition approved in 2019 as E2582 – 19. DOI: Standards volume information, refer to the standard’s Document Summary page on
10.1520/E2582-21. the ASTM website.
Copyright © ASTM International, 100 Barr Harbor Drive, PO Box C700, West Conshohocken, PA 19428-2959. United States
E2582 − 21
3.2.2 discrete discontinuity, n—a thermal discontinuity flaws that are closer to the sample surface and have thermal
whoseprojectionontotheinspectionsurfaceissmallerthanthe properties that are significantly different from the host matrix
field of view of the inspection apparatus. material.
4.5 Operational parameters affecting detectability include
3.2.3 extended discontinuity, n—a thermal discontinuity
component surface emissivity and optical reflectivity, data
whose projection onto the inspection surface completely fills
acquisition period, flash lamp energy, and camera wavelength,
the field of view of the inspection apparatus.
frame rate, sensitivity, optics, and spatial resolution.
3.2.4 first logarithmic derivative, n—the rate of change of
4.6 This practice describes a single-side access
the natural logarithm of temperature (with preflash temperature
examination, in which the flash lamp or heat lamp array
subtracted) with respect to the natural logarithm of time.
(excitation source) and IR camera (temperature sensor) are
3.2.5 inspection surface, n—thesurfaceofthespecimenthat
both located on the same (inspection) side of the component or
is exposed to the FT apparatus.
material under examination.
3.2.6 logarithmic temperature-time plot, n—a plot of the
4.7 In common practice, signal processing algorithms (for
natural logarithm of the surface temperature with preflash
example, Thermographic Signal Reconstruction, Principal
temperature subtracted on the y-axis versus the natural loga-
ComponentAnalysis)areusedtoenhancedetectabilityofflaws
rithm of time on the x-axis, where time t=0 is taken to be the
thatarenotdetectableintherawIRcamerasignal,andtoassist
midpoint of the flash event; either temperature or radiance may
in evaluation and characterization of indications.
be used to create the plot.
5. Significance and Use
3.2.7 log plot, n—see logarithmic temperature-time plot.
5.1 Typically, FT is used to identify flaws that occur in the
3.2.8 second logarithmic derivative, n—the rate of change
manufacture of composite structures, or to identify and track
of the first logarithmic derivative with respect to the natural
flaws that develop during the service lifetime of the structure.
logarithm of time.
Flaws detected with FT include delamination, disbonds, voids,
3.2.9 thermal diffusivity, n—the ratio of thermal conductiv-
inclusions, foreign object debris, porosity, or the presence of
ity to the product of density and specific heat; a measure of the
fluid that is in contact with the backside of the inspection
rate at which heat propagates in a material; units [length /
surface. For example, the effect of variable ply number (or
time].
thickness), bridging, and an insert simulating delamination on
heat flow into a composite is shown in Fig. 1 (left). Bridging
3.2.10 thermal discontinuity, n—a change in the thermo-
(Fig. 1, right) or delaminated areas show up as hot spots due to
physical properties of a specimen that disrupts the diffusion of
discontinuous heat flow, causing heating to be localized close
heat.
to the inspection surface. With dedicated signal processing and
the use of representative test samples, characterization of flaw
4. Summary of Practice
depth and size, or measurement of component thickness and
4.1 In FT, a brief pulse of light energy from a flash lamp
thermal diffusivity, may be performed.
arrayheatstheinspectionsurfaceofacompositespecimen,and
5.2 Since FT is based on the diffusion of thermal energy
an IR camera monitors the surface temperature (or radiance) as
from the inspection surface of the specimen to the opposing
the sample cools.
surface (or the depth plane of interest), the practice requires
4.2 The surface temperature falls predictably as heat from that data acquisition allows sufficient time for this process to
the surface diffuses into the sample bulk over a period t* (Eq
occur, and that at the completion of the acquisition process, the
1). radiated surface temperature signal collected by the IR camera
2 is strong enough to be distinguished from spurious IR contri-
L
*
t 5 (1)
butions from background sources or system noise.
πα
5.3 This method is based on accurate detection of changes
where:
in the emitted IR energy emanating from the inspection surface
L = the specimen thickness, and
during the cooling process.As the emissivity of the inspection
α = the thermal diffusivity.
surface falls below that of an ideal blackbody (blackbody
emissivity = 1), the signal detected by the IR camera may
4.3 Internal thermal discontinuities (for example, voids,
include components that are reflected from the inspection
delaminations, or a wall or interface between the host material
surface. Most composite materials can be examined without
andavoidorinclusion)modifythelocalcoolingofthesurface,
special surface preparation. However, it may be necessary to
and the corresponding radiation flux from the surface that is
coat low-emissivity, optically translucent inspection surfaces
detected by the IR camera.
with an optically opaque, high-emissivity water-washable
4.4 Fundamental detectability of a flaw will depend on its
paint.
size,depth,andthedegreetowhichitsthermalpropertiesdiffer
5.4 This practice applies to the detection of flaws with
from those of the surrounding host material. For a given
aspect ratio greater than one.
flaw-host combination, detectability is a function of the aspect
ratio of the flaw. The minimum detectable flaw size increases 5.5 This practice is based on the thermal response of a
with the depth of the flaw. Detectability is highest for larger specimen to a light pulse that is uniformly distributed over the
E2582 − 21
FIG. 1 Variation of Heat Flow Into a Composite With Variable Ply Thickness (Scenarios 1, 3, and 4), Bridging (Scenario 2) And an Insert
(Scenario 5) (Left), And a Post Layup Line Scan Showing Bright Spots Attributed to Bridging (Right) (Courtesy of NASA Langley Re-
search Center)
plane of the inspection surface. To ensure that 1-dimensional camera lens opening. The flash lamp array should be enclosed
heat flow from the surface into the sample is the primary
in a protective hood to prevent workers in the inspection area
cooling mechanism during the data acquisition period, the
from direct exposure to the flash, or alternately, the apparatus
height and width dimensions of the heated area should be
should be operated in a partitioned area with appropriate safety
significantly greater than the thickness of the specimen, or the
warnings to prevent inadvertent exposure.
depth plane of interest. To minimize edge effects, the height
6.3 Heat LampArray—Aheat lamp array may be used as an
and width dimensions of the heated area should be at least 5 %
alternative to a flash lamp array for the purposes of illuminat-
greater than the height and width dimensions of the inspection
ing the sample surface. At least one heat lamp (for example,
area.
500W linear halogen bulb in a parabolic reflector) should be
5.6 This practice applies to flat panels, or to curved panels
employed to provide uniform illumination. The lamps should
where the angle between the line normal to the inspection
be enclosed in a reflector and covered by an optically trans-
surfaceandtheIRcameraopticalaxisislessthan30°.Analysis
parent window that suppresses IR radiation in the camera
ofregionswithhighercurvaturecanresultinstreakingartifacts
wavelength range (for example, borosilicate glass). The dura-
due to nonuniform heating (Fig. 2).
tion of the heating pulse should be less than 25 % of t* (see Eq
6. Equipment and Materials 1). The array should be placed to avoid a direct path of the
reflected energy into the IR camera lens opening.
6.1 IR Camera—The camera should be capable of uninter-
rupted monitoring of the sample surface for the entire duration
6.4 Acquisition System—The acquisition system includes
of the acquisition. The camera should allow automatic
the IR camera, flash lamps, and a dedicated computer that is
recalibration, non-uniformity correction, or other operations
interfaced to both the camera and flash lamps. The acquisition
that interrupt the continuous data stream to be disabled during
systemshouldbecapableofsynchronizingthetriggeringofthe
the data acquisition period. The camera should provide real-
flash lamps and IR camera data acquisition. The system should
time digital output of the acquired signal. The camera output
allow data to be acquired before, during, and after the flash
signal response should be approximately linear over the
occurs.
(post-flash) temperature range of the sample. The camera
wavelength should be in either the 2–5 micron range or the 6.5 Analysis Software—The computer software should al-
8–14micronrange,selectedsuchthatthetestmaterialisnotIR low acquired sequences to be archived and retrieved for
translucent in the spectral range of the camera. The optics and
evaluation, and allow real time display of the IR camera signal,
focal plane should be sufficient so that the projection of 15
as well as frame-by-frame display of previously acquired flash
contiguous pixels onto the sample plane is less than or equal to
sequences which have been archived. The software should
the minimum flaw area that is to be detected.
allow viewing of the logarithmic temperature-time for speci-
fied pixels. Additional processing operations on each raw
6.2 Flash Lamp Array—At least one flash lamp should be
image sequence (for example, averaging, pre-flash image
employed to provide uniform illumination to the sample
subtraction, noise-reduction, calculation of first or second
surface. The full width at half maximum duration of the flash
logarithmic derivatives) may be performed to improve detect-
pulseshouldbelessthanfivemilliseconds.Thearrayshouldbe
placed to avoid a direct path of the flash energy into the IR ability of subsurface features.
E2582 − 21
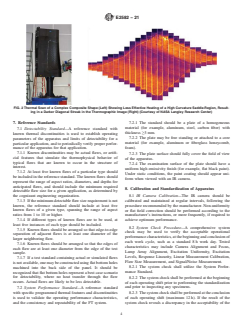
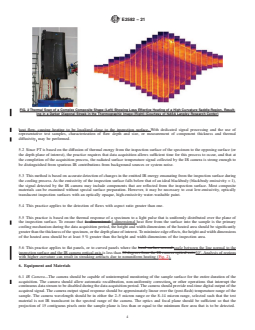
FIG. 2 Thermal Scan of a Complex Composite Shape (Left) Showing Less Effective Heating of a High Curvature Saddle-Region, Result-
ing in a Darker Diagonal Streak in the Thermographic Image (Right) (Courtesy of NASA Langley Research Center)
7. Reference Standards 7.2.1 The standard should be a plate of a homogeneous
material (for example, aluminum, steel, carbon fiber) with
7.1 Detectability Standard—A reference standard with
thickness ≥3 mm.
known ther
...
This document is not an ASTM standard and is intended only to provide the user of an ASTM standard an indication of what changes have been made to the previous version. Because
it may not be technically possible to adequately depict all changes accurately, ASTM recommends that users consult prior editions as appropriate. In all cases only the current version
of the standard as published by ASTM is to be considered the official document.
Designation: E2582 − 19 E2582 − 21
Standard Practice for
Infrared Flash Thermography of Composite Panels and
Repair Patches Used in Aerospace Applications
This standard is issued under the fixed designation E2582; the number immediately following the designation indicates the year of
original adoption or, in the case of revision, the year of last revision. A number in parentheses indicates the year of last reapproval. A
superscript epsilon (´) indicates an editorial change since the last revision or reapproval.
This standard has been approved for use by agencies of the U.S. Department of Defense.
1. Scope
1.1 This practice describes a procedure for detecting subsurface flaws in composite panels and repair patches using Flash
Thermography (FT), in which an infrared (IR) camera is used to detect anomalous cooling behavior of a sample surface after it
has been heated with a spatially uniform light pulse from a flash lamp array.
1.2 This practice describes established FT test methods that are currently used by industry, and have demonstrated utility in quality
assurance of composite structures during post-manufacturing and in-service examinations.
1.3 This practice has utility for testing of polymer composite panels and repair patches containing, but not limited to,
bismaleimide, epoxy, phenolic, poly(amide imide), polybenzimidazole, polyester (thermosetting and thermoplastic), poly(ether
ether ketone), poly(ether imide), polyimide (thermosetting and thermoplastic), poly(phenylene sulfide), or polysulfone matrices;
and alumina, aramid, boron, carbon, glass, quartz, or silicon carbide fibers. Typical as-fabricated geometries include uniaxial, cross
ply, and angle ply laminates; as well as honeycomb core sandwich core materials.
1.4 This practice has utility for testing of ceramic matrix composite panels containing, but not limited to, silicon carbide, silicon
nitride, and carbon matrix and fibers.
1.5 This practice applies to polymer or ceramic matrix composite structures with inspection surfaces that are sufficiently optically
opaque to absorb incident light, and that have sufficient emissivity to allow monitoring of the surface temperature with an IR
camera. Excessively thick samples, or samples with low thermal diffusivities, require long acquisition periods and yield weak
signals approaching background and noise levels, and may be impractical for this technique.
1.6 This practice applies to detection of flaws in a composite panel or repair patch, or at the bonded interface between the panel
and a supporting sandwich core or solid substrate. It does not apply to discontinuities in the sandwich core, or at the interface
between the sandwich core and a second panel on the far side of the core (with respect to the inspection apparatus).
1.7 This practice does not specify accept-reject criteria and is not intended to be used as a basis for approving composite structures
for service.
This practice is under the jurisdiction of ASTM Committee E07 on Nondestructive Testing and is the direct responsibility of Subcommittee E07.10 on Specialized NDT
Methods.
Current edition approved July 1, 2019Feb. 1, 2021. Published August 2019March 2021. Originally approved in 2007. Last previous edition approved in 20142019 as
E2582E2582 – 19.- 07(2014). DOI: 10.1520/E2582-19.10.1520/E2582-21.
Copyright © ASTM International, 100 Barr Harbor Drive, PO Box C700, West Conshohocken, PA 19428-2959. United States
E2582 − 21
1.8 This standard does not purport to address all of the safety concerns, if any, associated with its use. It is the responsibility
of the user of this standard to establish appropriate safety, health, and environmental practices and determine the applicability of
regulatory limitations prior to use.
1.9 This international standard was developed in accordance with internationally recognized principles on standardization
established in the Decision on Principles for the Development of International Standards, Guides and Recommendations issued
by the World Trade Organization Technical Barriers to Trade (TBT) Committee.
2. Referenced Documents
2.1 ASTM Standards:
D3878 Terminology for Composite Materials
E1316 Terminology for Nondestructive Examinations
3. Terminology
3.1 Definitions—Terminology in accordance with Terminologies D3878 and E1316 and shall be used where applicable.
3.2 Definitions of Terms Specific to This Standard:
3.2.1 aspect ratio, n—the diameter to depth ratio of a flaw; for irregularly shaped flaws, diameter refers to the minor axis of an
equivalent rectangle that approximates the flaw shape and area.
3.2.2 discrete discontinuity, n—a thermal discontinuity whose projection onto the inspection surface is smaller than the field of
view of the inspection apparatus.
3.2.3 extended discontinuity, n—a thermal discontinuity whose projection onto the inspection surface completely fills the field of
view of the inspection apparatus.
3.2.4 first logarithmic derivative, n—the rate of change of the natural logarithm of temperature (with preflash temperature
subtracted) with respect to the natural logarithm of time.
3.2.5 inspection surface, n—the surface of the specimen that is exposed to the FT apparatus.
3.2.6 logarithmic temperature-time plot, n—a plot of the natural logarithm of the surface temperature with preflash temperature
subtracted on the y-axis versus the natural logarithm of time on the x-axis, where time t=0 is taken to be the midpoint of the flash
event; either temperature or radiance may be used to create the plot.
3.2.7 log plot, n—see logarithmic temperature-time plot.
3.2.8 second logarithmic derivative, n—the rate of change of the first logarithmic derivative with respect to the natural logarithm
of time.
3.2.9 thermal diffusivity, n—the ratio of thermal conductivity to the product of density and specific heat; a measure of the rate at
which heat propagates in a material; units [length /time].
3.2.10 thermal discontinuity, n—a change in the thermophysical properties of a specimen that disrupts the diffusion of heat.
4. Summary of Practice
4.1 In FT, a brief pulse of light energy from a flash lamp array heats the inspection surface of a composite specimen, and an IR
camera monitors the surface temperature (or radiance) as the sample cools.
4.2 The surface temperature falls predictably as heat from the surface diffuses into the sample bulk over a period t* (Eq 1).
For referenced ASTM standards, visit the ASTM website, www.astm.org, or contact ASTM Customer Service at service@astm.org. For Annual Book of ASTM Standards
volume information, refer to the standard’s Document Summary page on the ASTM website.
E2582 − 21
FIG. 1 Variation of Heat Flow Into a Composite With Variable Ply Thickness (Scenarios 1, 3, and 4), Bridging (Scenario 2) And an Insert
(Scenario 5) (Left), And a Post Layup Line Scan Showing Bright Spots Attributed to Bridging (Right) (Courtesy of NASA Langley Re-
search Center)
L
*
t 5 (1)
πα
where:
L = the specimen thickness, and
α = the thermal diffusivity.
4.3 Internal thermal discontinuities (for example, voids, delaminations, or a wall or interface between the host material and a void
or inclusion) modify the local cooling of the surface, and the corresponding radiation flux from the surface that is detected by the
IR camera.
4.4 Fundamental detectability of a flaw will depend on its size, depth, and the degree to which its thermal properties differ from
those of the surrounding host material. For a given flaw-host combination, detectability is a function of the aspect ratio of the flaw.
The minimum detectable flaw size increases with the depth of the flaw. Detectability is highest for larger flaws that are closer to
the sample surface and have thermal properties that are significantly different from the host matrix material.
4.5 Operational parameters affecting detectability include component surface emissivity and optical reflectivity, data acquisition
period, flash lamp energy, and camera wavelength, frame rate, sensitivity, optics, and spatial resolution.
4.6 This practice describes a single-side access examination, in which the flash lamp or heat lamp array (excitation source) and
IR camera (temperature sensor) are both located on the same (inspection) side of the component or material under examination.
4.7 In common practice, signal processing algorithms (for example, Thermographic Signal Reconstruction, Principal Component
Analysis) are used to enhance detectability of flaws that are not detectable in the raw IR camera signal, and to assist in evaluation
and characterization of indications.
5. Significance and Use
5.1 Typically, FT is typically used to identify flaws that occur in the manufacture of composite structures, or to identify and track
flaws that develop during the service lifetime of the structure. Flaws detected with FT include delamination, disbonds, voids,
inclusions, foreign object debris, porosity, or the presence of fluid that is in contact with the back side backside of the inspection
surface. For example, the effect of variable ply number (or thickness), bridging, and an insert simulating delamination on heat flow
into a composite is shown in Fig. 1 (left). Bridging (Fig. 1, right) or delaminated areas show up as hot spots due to discontinuous
E2582 − 21
FIG. 2 Thermal Scan of a Complex Composite Shape (Left) Showing Less Effective Heating of a High Curvature Saddle-Region, Result-
ing in a Darker Diagonal Streak in the Thermographic Image (Right) (Courtesy of NASA Langley Research Center)
heat flow, causing heating to be localized close to the inspection surface. With dedicated signal processing and the use of
representative test samples, characterization of flaw depth and size, or measurement of component thickness and thermal
diffusivity, may be performed.
5.2 Since FT is based on the diffusion of thermal energy from the inspection surface of the specimen to the opposing surface (or
the depth plane of interest), the practice requires that data acquisition allows sufficient time for this process to occur, and that at
the completion of the acquisition process, the radiated surface temperature signal collected by the IR camera is strong enough to
be distinguished from spurious IR contributions from background sources or system noise.
5.3 This method is based on accurate detection of changes in the emitted IR energy emanating from the inspection surface during
the cooling process. As the emissivity of the inspection surface falls below that of an ideal blackbody (blackbody emissivity = 1),
the signal detected by the IR camera may include components that are reflected from the inspection surface. Most composite
materials can be examined without special surface preparation. However, it may be necessary to coat low-emissivity, optically
translucent inspection surfaces with an optically opaque, high-emissivity water-washable paint.
5.4 This practice applies to the detection of flaws with aspect ratio greater than one.
5.5 This practice is based on the thermal response of a specimen to a light pulse that is uniformly distributed over the plane of
the inspection surface. To ensure that 1- dimensional 1-dimensional heat flow from the surface into the sample is the primary
cooling mechanism during the data acquisition period, the height and width dimensions of the heated area should be significantly
greater than the thickness of the specimen, or the depth plane of interest. To minimize edge effects, the height and width dimensions
of the heated area should be at least 5 % greater than the height and width dimensions of the inspection area.
5.6 This practice applies to flat panels, or to curved panels where the local surface normal angle between the line normal to the
inspection surface and the IR camera optical axis is less than 30 degrees from the IR camera optical axis.30°. Analysis of regions
with higher curvature can result in streaking artifacts due to nonuniform heating (Fig. 2).
6. Equipment and Materials
6.1 IR Camera—The camera should be capable of uninterrupted monitoring of the sample surface for the entire duration of the
acquisition. The camera should allow automatic recalibration, non-uniformity correction, or other operations that interrupt the
continuous data stream to be disabled during the data acquisition period. The camera should provide real-time digital output of the
acquired signal. The camera output signal response should be approximately linear over the (post-flash) temperature range of the
sample. The camera wavelength should be in either the 2–5 micron range or the 8–14 micron range, selected such that the test
material is not IR translucent in the spectral range of the camera. The optics and focal plane should be sufficient so that the
projection of 15 contiguous pixels onto the sample plane is less than or equal to the minimum flaw area that is to be detected.
E2582 − 21
6.2 Flash Lamp Array—At least one flash lamp should be employed to provide uniform illumination to the sample surface. The
full width at half maximum duration of the flash pulse should be less than five milliseconds. The array should be placed to avoid
a direct path of the flash energy into the IR camera lens opening. The flash lamp array should be enclosed in a protective hood
to prevent workers in the inspection area from direct exposure to the flash, or alternately, the apparatus should be operated in a
partitioned area with appropriate safety warnings to prevent inadvertent exposure.
6.3 Heat Lamp Array—A heat lamp array may be used as an alternative to a flash lamp array for the purposes of illuminating the
sample surface. At least one heat lamp (for example, 500W linear halogen bulb in a parabolic reflector) should be employed to
provide uniform illumination. The lamps should be enclosed in a reflector and covered by an optically transparent window that
suppresses IR radiation in the camera wavelength range (for example, borosilicate glass). The duration of the heating pulse should
be less than 25 % of t* (see Eq 1). The array should be placed to avoid a direct path of the reflected energy into the IR camera
lens opening.
6.4 Acquisition System—The acquisition system includes the IR camera, flash lamps, and a dedicated computer that is interfaced
to both the camera and flash lamps. The acquisition system should be capable of synchronizing the triggering of the flash lamps
and IR camera data acquisition. The system should allow data to be acquired before, during, and after the flash occurs.
6.5 Analysis Software—The computer software should allow acquired sequences to be archived and retrieved for evaluation, and
allow real time display of the IR camera signal, as well as frame-by-frame display of previously acquired flash sequences which
have been archived. The software should allow viewing of the logarithmic temperature-time for specified pixels. Additional
processing operations on each raw image sequence (for example, averaging, pre-flash image subtraction, noise-reduction,
calculation of first or second logarithmic derivatives) may be performed to improve detectability of subsurface features.
7. Reference Standards
7.1 Detectability Standard—A reference standard with known thermal discontinuities
...
Questions, Comments and Discussion
Ask us and Technical Secretary will try to provide an answer. You can facilitate discussion about the standard in here.
Loading comments...