ASTM F682-82a(2023)
(Specification)Standard Specification for Wrought Carbon Steel Sleeve-Type Pipe Couplings
Standard Specification for Wrought Carbon Steel Sleeve-Type Pipe Couplings
ABSTRACT
This specification covers wrought carbon steel sleeve type pipe couplings suitable for joining carbon steel pipes. Couplings are furnished in two types as follows: Type I couplings are intended for use on all schedules of pipe in which the pipe wall thickness does not exceed the wall thickness of standard weight pipe. Type II couplings are intended for use on all schedules of pipe in which the pipe wall thickness does not exceed the wall thickness of extra strong pipe. The couplings shall be manufactured from material having a chemical composition conforming to the requirements specified. Couplings made from plate or tubular products need not to be heat treated. Hot-formed couplings finished at a temperature in excess of a certain value shall subsequently be annealed, normalized, or normalized and tempered. Cold-formed couplings upon which the final forming operation is completed at a temperature below a certain quantity shall be normalized or shall be stress-relieved. Carbon steel couplings made from forgings shall subsequently be annealed, normalized, or normalized and tempered. Mechanical properties of steel such as tensile strength, yield strength, yield point, and elongation shall be determined.
SCOPE
1.1 This specification covers wrought carbon steel sleeve-type pipe couplings suitable for joining carbon steel pipes.
1.2 Type I couplings are intended for use on all schedules of pipe in which the pipe wall thickness does not exceed the wall thickness of standard weight pipe. Type II couplings are intended for use on all schedules of pipe in which the pipe wall thickness does not exceed the wall thickness of extra strong pipe.
1.3 This specification does not cover cast steel couplings.
Note 1: See Appendix X1 for rationale used to develop this specification.
1.4 The values stated in inch-pound units are to be regarded as standard. The values given in parentheses are mathematical conversions to SI units that are provided for information only and are not considered standard.
1.5 This international standard was developed in accordance with internationally recognized principles on standardization established in the Decision on Principles for the Development of International Standards, Guides and Recommendations issued by the World Trade Organization Technical Barriers to Trade (TBT) Committee.
General Information
- Status
- Published
- Publication Date
- 30-Apr-2023
- Technical Committee
- F25 - Ships and Marine Technology
- Drafting Committee
- F25.11 - Machinery and Piping Systems
Relations
- Effective Date
- 01-Mar-2024
- Effective Date
- 01-Mar-2024
- Effective Date
- 01-Nov-2019
- Effective Date
- 01-Jul-2019
- Effective Date
- 01-Sep-2018
- Effective Date
- 01-Mar-2018
- Refers
ASTM A370-17a - Standard Test Methods and Definitions for Mechanical Testing of Steel Products - Effective Date
- 15-Nov-2017
- Effective Date
- 15-May-2017
- Effective Date
- 01-Jan-2017
- Effective Date
- 01-Dec-2016
- Effective Date
- 01-Nov-2015
- Effective Date
- 01-Oct-2014
- Effective Date
- 01-Jun-2014
- Effective Date
- 15-May-2014
- Effective Date
- 15-Nov-2013
Overview
ASTM F682-82a(2023) is the standard specification for wrought carbon steel sleeve-type pipe couplings designed for joining carbon steel pipes. Developed by ASTM International, this specification covers two key coupling types, each suited to different pipe wall thicknesses, ensuring robust, reliable connections in piping systems. It provides requirements for material composition, mechanical properties, dimensional tolerances, manufacture, heat treatment, and marking. The standard is widely referenced in shipbuilding, industrial, and mechanical piping applications.
Key Topics
Types of Couplings:
- Type I Couplings: Intended for use with all schedules of carbon steel pipe where the wall thickness does not exceed that of standard weight pipe.
- Type II Couplings: Suitable for schedules where the pipe wall thickness does not exceed that of extra strong pipe, offering a solution for more demanding applications.
Material Requirements:
- Couplings must be made from carbon steel conforming to specific chemical composition limits for carbon, manganese, phosphorus, and sulfur.
- Various forms of raw stock are permissible, such as plate, tubular products, or forgings, provided all requirements are met.
Heat Treatment and Manufacturing:
- Specifies manufacturing options including use of plate, tubular, or forged stock.
- Different heat treatment processes apply depending on the forming method: annealing, normalizing, tempering, or stress-relief.
- Welded couplings require welders and procedures qualified under ASME codes and may mandate postweld heat treatment.
Mechanical Properties:
- Defined requirements for tensile strength, yield point, and elongation, ensuring durability and performance in service.
Dimensional and Quality Control:
- Prescribes nominal dimensions and tolerances for both coupling types.
- Emphasizes workmanship, finish, and marking for traceability in industrial practice.
Applications
ASTM F682-82a(2023) sleeve-type pipe couplings provide essential solutions for secure joining of carbon steel pipes in a wide range of industries:
Shipbuilding and Marine Engineering:
Frequently referenced by the U.S. Department of Defense and U.S. Coast Guard regulations, these couplings are suited for marine and shipboard piping systems where reliable mechanical connections are critical.Industrial Piping Systems:
Utilized in process and utility pipelines within facilities such as refineries, chemical plants, and power generation stations.Pressure Vessels and Boiler Applications:
Compatible with ASME Section VIII and IX requirements, supporting high-pressure and high-temperature service.Infrastructure Projects:
Relevant for municipal water, wastewater, and general pipeline construction where carbon steel pipe systems are specified.
The standard ensures compatibility, interchangability, and performance for both new installations and maintenance operations.
Related Standards
For a comprehensive approach to carbon steel pipe couplings and related piping components, the following standards and codes are often referenced alongside ASTM F682-82a(2023):
- ASTM A53/A53M: Specification for Pipe, Steel, Black and Hot-Dipped, Zinc-Coated, Welded and Seamless
- ASTM A106/A106M: Specification for Seamless Carbon Steel Pipe for High-Temperature Service
- ASTM A234/A234M: Specification for Piping Fittings of Wrought Carbon Steel and Alloy Steel
- ASME Boiler and Pressure Vessel Code, Section VIII & IX: Boiler construction and welding qualifications
- ASME B16.5: Pipe Flanges and Flanged Fittings
- MSS SP-25: Standard Marking System for Valves, Fittings, Flanges, and Unions
- Title 46 CFR Parts 41-69: Federal regulations specific to marine and shipboard systems
These references ensure an integrated solution for engineers, fabricators, and specifiers seeking reliable and code-compliant carbon steel sleeve-type pipe couplings.
Keywords: ASTM F682, carbon steel pipe coupling, sleeve-type couplings, Type I coupling, Type II coupling, piping specifications, marine piping, industrial pipe fittings, ASME codes, wrought carbon steel.
Buy Documents
ASTM F682-82a(2023) - Standard Specification for Wrought Carbon Steel Sleeve-Type Pipe Couplings
Get Certified
Connect with accredited certification bodies for this standard

Institut za varilstvo d.o.o. (Welding Institute)
Slovenia's leading welding institute since 1952. ISO 3834, EN 1090, pressure equipment certification, NDT personnel, welder qualification. Only IIW Au
Sponsored listings
Frequently Asked Questions
ASTM F682-82a(2023) is a technical specification published by ASTM International. Its full title is "Standard Specification for Wrought Carbon Steel Sleeve-Type Pipe Couplings". This standard covers: ABSTRACT This specification covers wrought carbon steel sleeve type pipe couplings suitable for joining carbon steel pipes. Couplings are furnished in two types as follows: Type I couplings are intended for use on all schedules of pipe in which the pipe wall thickness does not exceed the wall thickness of standard weight pipe. Type II couplings are intended for use on all schedules of pipe in which the pipe wall thickness does not exceed the wall thickness of extra strong pipe. The couplings shall be manufactured from material having a chemical composition conforming to the requirements specified. Couplings made from plate or tubular products need not to be heat treated. Hot-formed couplings finished at a temperature in excess of a certain value shall subsequently be annealed, normalized, or normalized and tempered. Cold-formed couplings upon which the final forming operation is completed at a temperature below a certain quantity shall be normalized or shall be stress-relieved. Carbon steel couplings made from forgings shall subsequently be annealed, normalized, or normalized and tempered. Mechanical properties of steel such as tensile strength, yield strength, yield point, and elongation shall be determined. SCOPE 1.1 This specification covers wrought carbon steel sleeve-type pipe couplings suitable for joining carbon steel pipes. 1.2 Type I couplings are intended for use on all schedules of pipe in which the pipe wall thickness does not exceed the wall thickness of standard weight pipe. Type II couplings are intended for use on all schedules of pipe in which the pipe wall thickness does not exceed the wall thickness of extra strong pipe. 1.3 This specification does not cover cast steel couplings. Note 1: See Appendix X1 for rationale used to develop this specification. 1.4 The values stated in inch-pound units are to be regarded as standard. The values given in parentheses are mathematical conversions to SI units that are provided for information only and are not considered standard. 1.5 This international standard was developed in accordance with internationally recognized principles on standardization established in the Decision on Principles for the Development of International Standards, Guides and Recommendations issued by the World Trade Organization Technical Barriers to Trade (TBT) Committee.
ABSTRACT This specification covers wrought carbon steel sleeve type pipe couplings suitable for joining carbon steel pipes. Couplings are furnished in two types as follows: Type I couplings are intended for use on all schedules of pipe in which the pipe wall thickness does not exceed the wall thickness of standard weight pipe. Type II couplings are intended for use on all schedules of pipe in which the pipe wall thickness does not exceed the wall thickness of extra strong pipe. The couplings shall be manufactured from material having a chemical composition conforming to the requirements specified. Couplings made from plate or tubular products need not to be heat treated. Hot-formed couplings finished at a temperature in excess of a certain value shall subsequently be annealed, normalized, or normalized and tempered. Cold-formed couplings upon which the final forming operation is completed at a temperature below a certain quantity shall be normalized or shall be stress-relieved. Carbon steel couplings made from forgings shall subsequently be annealed, normalized, or normalized and tempered. Mechanical properties of steel such as tensile strength, yield strength, yield point, and elongation shall be determined. SCOPE 1.1 This specification covers wrought carbon steel sleeve-type pipe couplings suitable for joining carbon steel pipes. 1.2 Type I couplings are intended for use on all schedules of pipe in which the pipe wall thickness does not exceed the wall thickness of standard weight pipe. Type II couplings are intended for use on all schedules of pipe in which the pipe wall thickness does not exceed the wall thickness of extra strong pipe. 1.3 This specification does not cover cast steel couplings. Note 1: See Appendix X1 for rationale used to develop this specification. 1.4 The values stated in inch-pound units are to be regarded as standard. The values given in parentheses are mathematical conversions to SI units that are provided for information only and are not considered standard. 1.5 This international standard was developed in accordance with internationally recognized principles on standardization established in the Decision on Principles for the Development of International Standards, Guides and Recommendations issued by the World Trade Organization Technical Barriers to Trade (TBT) Committee.
ASTM F682-82a(2023) is classified under the following ICS (International Classification for Standards) categories: 23.040.40 - Metal fittings. The ICS classification helps identify the subject area and facilitates finding related standards.
ASTM F682-82a(2023) has the following relationships with other standards: It is inter standard links to ASTM A370-24, ASTM A53/A53M-24, ASTM A106/A106M-19a, ASTM A370-19, ASTM A234/A234M-18a, ASTM A234/A234M-18, ASTM A370-17a, ASTM A234/A234M-17, ASTM A370-17, ASTM A234/A234M-16, ASTM A370-15, ASTM A234/A234M-14, ASTM A106/A106M-14, ASTM A370-14, ASTM A370-13. Understanding these relationships helps ensure you are using the most current and applicable version of the standard.
ASTM F682-82a(2023) is available in PDF format for immediate download after purchase. The document can be added to your cart and obtained through the secure checkout process. Digital delivery ensures instant access to the complete standard document.
Standards Content (Sample)
This international standard was developed in accordance with internationally recognized principles on standardization established in the Decision on Principles for the
Development of International Standards, Guides and Recommendations issued by the World Trade Organization Technical Barriers to Trade (TBT) Committee.
Designation: F682 − 82a (Reapproved 2023) An American National Standard
Standard Specification for
Wrought Carbon Steel Sleeve-Type Pipe Couplings
This standard is issued under the fixed designation F682; the number immediately following the designation indicates the year of original
adoption or, in the case of revision, the year of last revision. A number in parentheses indicates the year of last reapproval. A superscript
epsilon (´) indicates an editorial change since the last revision or reapproval.
This standard has been approved for use by agencies of the U.S. Department of Defense.
1. Scope Temperature Service
A370 Test Methods and Definitions for Mechanical Testing
1.1 This specification covers wrought carbon steel sleeve-
of Steel Products
type pipe couplings suitable for joining carbon steel pipes.
E59 Practice for Sampling Steel and Iron for Determination
1.2 Type I couplings are intended for use on all schedules of 3
of Chemical Composition (Withdrawn 1996)
pipe in which the pipe wall thickness does not exceed the wall 4
2.2 MMS Standards:
thickness of standard weight pipe. Type II couplings are
MSS-SP-25 Standard Marking System for Valves, Fittings,
intended for use on all schedules of pipe in which the pipe wall
Flanges, and Unions
thickness does not exceed the wall thickness of extra strong
2.3 ASME Boiler and Pressure Vessel Codes:
pipe.
Section VIII Unfired Pressure Vessels
1.3 This specification does not cover cast steel couplings.
Section IX Welding Qualifications
2.4 ASME Standards:
NOTE 1—See Appendix X1 for rationale used to develop this specifi-
B16.5 Pipe Flanges and Flanged Fittings: NPS 1/2 through
cation.
NPS 24 Metric/Inch Standard
1.4 The values stated in inch-pound units are to be regarded
2.5 Federal Regulations:
as standard. The values given in parentheses are mathematical
Title 46 Code of Federal Regulations (CFR), Shipping, Parts
conversions to SI units that are provided for information only
41 to 69
and are not considered standard.
1.5 This international standard was developed in accor-
3. Classification
dance with internationally recognized principles on standard-
3.1 Couplings are furnished in two types as follows:
ization established in the Decision on Principles for the
3.1.1 Type I—Couplings (see 1.2).
Development of International Standards, Guides and Recom-
3.1.2 Type II—Couplings (see 1.2).
mendations issued by the World Trade Organization Technical
NOTE 2—Type II couplings may be used in place of Type I couplings for
Barriers to Trade (TBT) Committee.
all schedules of pipe in which the pipe wall thickness does not exceed the
wall thickness of standard weight piping through 18 in. or Schedule 40
2. Referenced Documents
piping through 16 in.
2.1 ASTM Standards:
4. Ordering Information
A53/A53M Specification for Pipe, Steel, Black and Hot-
Dipped, Zinc-Coated, Welded and Seamless
4.1 Orders for material under this specification shall include
A106/A106M Specification for Seamless Carbon Steel Pipe
the following information:
for High-Temperature Service
4.1.1 Quantity (number of couplings of each size and type),
A234/A234M Specification for Piping Fittings of Wrought
4.1.2 Name of material (sleeve-type pipe couplings),
Carbon Steel and Alloy Steel for Moderate and High
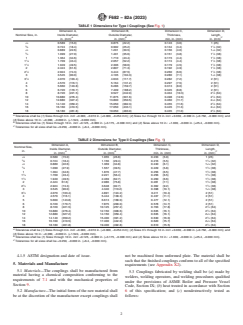
4.1.3 Size (nominal, see Table 1 and Table 2 and Fig. 1),
4.1.4 Type (see 3.1),
This specification is under the jurisdiction of ASTM Committee F25 on Ships
and Marine Technology and is the direct responsibility of Subcommittee F25.11 on The last approved version of this historical standard is referenced on
Machinery and Piping Systems. www.astm.org.
Current edition approved May 1, 2023. Published May 2023. Originally Available from Manufacturers Standardization Society of the Valve and Fittings
approved in 1980. Last previous edition approved in 2018 as F682 – 82a (2018). Industry (MSS), 127 Park St., NE, Vienna, VA 22180-4602, http://www.mss-hq.org.
DOI: 10.1520/F0682-82AR23. Available from American Society of Mechanical Engineers (ASME), ASME
For referenced ASTM standards, visit the ASTM website, www.astm.org, or International Headquarters, Two Park Ave., New York, NY 10016-5990, http://
contact ASTM Customer Service at service@astm.org. For Annual Book of ASTM www.asme.org.
Standards volume information, refer to the standard’s Document Summary page on Available from DLA Document Services, Building 4/D, 700 Robbins Ave.,
the ASTM website. Philadelphia, PA 19111-5094, http://quicksearch.dla.mil.
Copyright © ASTM International, 100 Barr Harbor Drive, PO Box C700, West Conshohocken, PA 19428-2959. United States
F682 − 82a (2023)
TABLE 1 Dimensions for Type I Couplings (See Fig. 1)
Dimension A, Dimension B, Dimension C, Dimension D,
Nominal Size, in. Inside Diameter, Outside Diameter, Thickness, Length,
A B C
in. (mm) in. (mm) min, in. (mm) in. (mm)
⁄4 0.589 (15.0) 0.875 (22.2) 0.143 (3.6) 1 (25)
3 1
⁄8 0.724 (18.4) 0.992 (25.2) 0.134 (3.4) 1 ⁄4 (32)
1 1
⁄2 0.889 (22.6) 1.201 (30.5) 0.156 (4.0) 1 ⁄4 (32)
3 1
⁄4 1.099 (27.9) 1.401 (35.6) 0.151 (3.8) 1 ⁄2 (38)
1 1.364 (34.6) 1.710 (43.4) 0.173 (4.4) 1 ⁄2 (38)
1 1
1 ⁄4 1.709 (43.4) 2.057 (52.2) 0.174 (4.4) 1 ⁄2 (38)
1 1
1 ⁄2 1.949 (49.5) 2.306 (58.6) 0.179 (4.5) 1 ⁄2 (38)
2 2.424 (61.6) 2.807 (71.3) 0.192 (4.9) 1 ⁄2 (38)
1 1
2 ⁄2 2.924 (74.3) 3.444 (87.5) 0.260 (6.6) 1 ⁄2 (38)
3 3.545 (90.0) 4.105 (104.3) 0.280 (7.1) 1 ⁄2 (38)
3 ⁄2 4.070 (103.4) 4.633 (117.7) 0.282 (7.2) 2 (51)
4 4.570 (116.1) 5.164 (131.2) 0.297 (7.5) 2 (51)
5 5.660 (143.8) 6.286 (159.7) 0.313 (8.0) 2 (51)
6 6.720 (170.7) 7.409 (188.2) 0.345 (8.8) 2 (51)
8 8.720 (221.5) 9.527 (242.0) 0.404 (10.3) 2 ⁄2 (64)
10 10.880 (276.4) 11.875 (301.6) 0.498 (12.6) 2 ⁄2 (64)
12 12.880 (327.2) 13.800 (350.5) 0.460 (11.7) 2 ⁄2 (64)
14 14.140 (359.2) 15.050 (382.3) 0.455 (11.6) 2 ⁄2 (64)
16 16.160 (410.5) 17.050 (433.1) 0.445 (11.3) 2 ⁄2 (64)
18 18.180 (461.8) 19.050 (483.9) 0.435 (11.0) 2 ⁄2 (64)
A
Tolerances shall be (1) Sizes through 3 in. incl: +0.000, −0.010 in. (+0.000, −0.254 mm); (2) Sizes 3 ⁄2 through 10 in. incl: +0.030, −0.000 in. (+0.762, −0.000 mm); and
(3) Sizes above 10 in.: +0.060, −0.000 in. (+1.524, −0.000 mm).
B
Tolerances shall be (1) Sizes through 10 in. incl: +0.125, −0.000 in. (+3.175, −0.000 mm) and (2) Sizes above 10 in.: +1.000, −0.000 in. (+25.4, −0.000 mm).
C
Tolerances for all sizes shall be +0.250, −0.000 in. (+6.4, −0.000 mm).
TABLE 2 Dimensions for Type II Couplings (See Fig. 1)
Dimension A, Dimension B, Dimension C, Dimension D,
Nominal Size,
Inside Diameter, Outside Diameter, Thickness, Length,
in.
A B C
in. (mm) in. (mm) min, in. (mm) in. (mm)
⁄4 0.589 (15.0) 1.055 (26.8) 0.233 (5.9) 1 (25)
3 1
⁄8 0.724 (18.4) 1.156 (29.4) 0.216 (5.5) 1 ⁄4 (32)
1 1
⁄2 0.889 (22.6) 1.369 (34.8) 0.240 (6.1) 1 ⁄4 (32)
3 1
⁄4 1.099 (27.9) 1.557 (39.5) 0.229 (5.8) 1 ⁄2 (38)
1 1.364 (34.6) 1.876 (47.7) 0.256 (6.5) 1 ⁄2 (38)
1 1
1 ⁄4 1.709 (43.4) 2.221 (56.4) 0.256 (6.5) 1 ⁄2 (38)
1 1
1 ⁄2 1.949 (49.5) 2.469 (62.7) 0.260 (6.6) 1 ⁄2 (38)
2 2.424 61.6) 2.986 (75.8) 0.281 (7.1) 1 ⁄2 (38)
1 1
2 ⁄2 2.924 (74.3) 3.648 (92.7) 0.362 (9.2) 1 ⁄2 (38)
3 3.545 (90.0) 4.340 (110.2) 0.398 (10.1) 1 ⁄2 (38)
3 ⁄2 4.070 (103.4) 4.891 (124.2) 0.411 (10.4) 2 (51)
4 4.570 (116.1) 5.444 (138.3) 0.437 (11.1) 2 (51)
5 5.660 (143.8) 6.613 (168.0) 0.477 (12.1) 2 (51)
6 6.720 (170.7) 7.875 (200.0) 0.578 (14.7) 2 (51)
8 8.720 (221.5) 10.125 (257.2) 0.703 (17.8) 2 ⁄2 (64)
10 10.880 (276.4) 12.150 (308.6) 0.635 (16.1) 2 ⁄2 (64)
12 12.880 (327.2) 14.150 (359.4) 0.635 (16.1) 2 ⁄2 (64)
14 14.140 (359.2) 15.400 (391.2) 0.630 (16.0) 2 ⁄2 (64)
16 16.160 (410.5) 17.400 (442.0) 0.620 (15.7) 2 ⁄2 (64)
18 18.180 (461.8) 19.400 (492.8) 0.610 (15.5) 2 ⁄2 (64)
A
Tolerances shall be (1) Sizes through 3 in. incl: +0.000, −0.010 in. (+0.000, −0.254 mm); (2) Sizes 3 ⁄2 through 10 in. incl: +0.030, −0.000 in. (+0.762, −0.000 mm); and
(3) Sizes above 10 in.: +0.060, −0.000 in. (+1.524, −0.000 mm).
B
Tolerances shall be (1) Sizes through 10 in. incl: +0.125, −0.000 in. (+3.175, −0.000 mm) and (2) Sizes above 10 in.: +1.000, −0.000 in. (+25.4, −0.000 mm).
C
Tolerances for all sizes shall be +0.250, −0.000 in. (+6.4, −0.000 mm).
4.1.5 ASTM designation and date of issue. not be machined from unformed plate. The material shall be
such that the finished couplings conform to all of the specified
5. Materials and Manufacture
requirements (see Appendix X2).
5.1 Materials—The couplings shall be manufactured from
5.3 Couplings fabricated by welding shall be (a) made by
material having a chemical composition conforming to the
welders, welding operators, and welding procedures qualified
requirements of 7.1 and with the mechanical properties of
under the provisions of ASME Boiler and Pressure Vessel
Section 9.
Code, Section IX; (b) heat treated in accordance with Section
5.2 Manufacture—The initial form of the raw material shall 6 of this specification; and (c) nondestructively tested as
be at the discretion of the manufacturer except couplings shall follows:
F682 − 82a (2023)
6.1.4 Cold-formed couplings upon which the final forming
operation is completed at a temperature below 1150 °F
(621 °C) shall be normalized or shall be stress-relieved at
1100 °F to 1250 °F (593 °C to 677 °C) for 1 h/in. of thickness.
6.1.5 Couplings produced by fusion welding shall be
postweld heat treated at 1100 °F to 1250 °F (593 °C to 677 °C),
when the nominal wall thickness at the welded joint is ⁄4 in. or
greater.
6.2 Carbon Steel Couplings Made from Forgings—
Couplings made from forgings shall subsequently be annealed,
normalized, or normalized and tempered.
6.3 Heat Treatment Procedures—Couplings after forming at
an elevated temperature shall be cooled to a temperature below
the critical range under suitable conditions to prevent injuries
by too rapid cooling, but in no case more rapidly than the
cooling rate in still air. Couplings that are to be heat treated
shall be treated as follows:
6.3.1 Full Annealing—Couplings shall be uniformly re-
FIG. 1 Sleeve-Type Pipe Coupling
heated to a temperature above the transformation range and,
after being held for a sufficient time at this temperature, cooled
TABLE 3 Chemical Requirements
slowly to a temperature below the transformation range.
Composition, max, %
6.3.2
...


Questions, Comments and Discussion
Ask us and Technical Secretary will try to provide an answer. You can facilitate discussion about the standard in here.
Loading comments...