ASTM E796-94(2000)
(Test Method)Standard Test Method for Ductility Testing of Metallic Foil (Withdrawn 2009)
Standard Test Method for Ductility Testing of Metallic Foil (Withdrawn 2009)
SIGNIFICANCE AND USE
For bulk specimens, tension tests provide an adequate means to determine the ductility of materials either through the measurement of elongation or reduction of area. For foil specimens, however, tension tests are not very useful for the determination of ductility. This test method, employing low-cycle fatigue, circumvents the difficulties arising from the continuous application of strain until fracture and determines the ductility indirectly from empirical low-cycle fatigue relationships for metals.
The results of ductility tests from selected portions of a metallic foil may not totally represent the ductility of the entire foil or its in-service behavior in different environments.
This test method is considered satisfactory for acceptance testing of commercial shipments, design purposes, service evaluation, manufacturing control, and research and development.
SCOPE
1.1 This test method covers the determination of ductility, that is, the ability to undergo plastic deformation in tension or bending before fracturing, of metallic foil in thicknesses up through 0.150 mm (0.0059 in.).
1.2 Values stated in SI units are to be regarded as the standard. Inch-pound units are provided for information only.
1.3 This standard does not purport to address all of the safety concerns, if any, associated with its use. It is the responsibility of the user of this standard to establish appropriate safety and health practices and determine the applicability of regulatory limitations prior to use.
WITHDRAWN RATIONALE
This test method covers the determination of ductility, that is, the ability to undergo plastic deformation in tension or bending before fracturing, of metallic foil in thicknesses up through 0.150 mm (0.0059 in.).
Formerly under the jurisdiction of Committee E28 on Mechanical Testing, this test method was withdrawn in March 2009 in accordance with section 10.5.3.1 of the Regulations Governing ASTM Technical Committees, which requires that standards shall be updated by the end of the eighth year since the last approval date.
General Information
Relations
Standards Content (Sample)
NOTICE: This standard has either been superseded and replaced by a new version or withdrawn.
Contact ASTM International (www.astm.org) for the latest information
Designation:E796–94(Reapproved 2000)
Standard Test Method for
Ductility Testing of Metallic Foil
This standard is issued under the fixed designation E796; the number immediately following the designation indicates the year of
original adoption or, in the case of revision, the year of last revision.Anumber in parentheses indicates the year of last reapproval.A
superscript epsilon (e) indicates an editorial change since the last revision or reapproval.
NOTE 1—Fatigue ductility is usually expressed in percent in direct
1. Scope
analogy with elongation and reduction of area ductility measures.
1.1 This test method covers the determination of ductility,
NOTE 2—The fatigue ductility corresponds to the fracture ductility, the
that is, the ability to undergo plastic deformation in tension or
true tensile strain at fracture. Elongation and reduction of area represent
bending before fracturing, of metallic foil in thicknesses up
the engineering tensile strain after fracture.
through 0.150 mm (0.0059 in.). NOTE 3—For the purpose of this definition the fatigue ductility expo-
nent, c, is defined as c=−0.60 (see equation in 9.1).
1.2 Values stated in SI units are to be regarded as the
standard. Inch-pound units are provided for information only.
4. Summary of Test Method
1.3 This standard does not purport to address all of the
4.1 The specimen is subjected to a fatigue test which
safety concerns, if any, associated with its use. It is the
employs precisely controlled, symmetric, cyclic, constant-
responsibility of the user of this standard to establish appro-
amplitude, flexural strains of a magnitude that will cause
priate safety and health practices and determine the applica-
fracture in the low-cycle fatigue regime.
bility of regulatory limitations prior to use.
4.2 The fatigue ductility is determined from an equation
2. Referenced Documents
derived from universal, empirical, relationships between ten-
sile properties and fatigue behavior which utilizes the strain
2.1 ASTM Standards:
rangeemployedandthefatiguelifeobtainedinthefatiguetest,
E3 Methods of Preparation of Metallographic Specimens
as well as the modulus of elasticity, the tensile strength and the
E6 Terminology Relating to Methods of Mechanical Test-
fracture strength determined in accordance with Test Method
ing
E111 and Test Methods E8, with the provisions in Test
E8 TestMethodsforTensionTestingofMetallicMaterials
Methods E345 and in this standard.
E111 TestMethodforYoung’sModulus,TangentModulus,
and Chord Modulus
5. Significance and Use
E345 Test Methods of Tension Testing of Metallic Foil
5.1 For bulk specimens, tension tests provide an adequate
E513 DefinitionsofTermsRelatingtoConstant-Amplitude
meanstodeterminetheductilityofmaterialseitherthroughthe
Low-Cycle Fatigue Testing
measurement of elongation or reduction of area. For foil
E606 Practice for Strain Controlled Fatigue Testing
specimens, however, tension tests are not very useful for the
E1150 Definitions of Terms Relating to Fatigue
determination of ductility. This test method, employing low-
3. Terminology
cycle fatigue, circumvents the difficulties arising from the
continuous application of strain until fracture and determines
3.1 Definitions:
the ductility indirectly from empirical low-cycle fatigue rela-
3.1.1 The definitions of terms appearing in Definitions E6,
tionships for metals.
E1150, E513, and Practice E606, shall be considered as
5.2 The results of ductility tests from selected portions of a
applying to the terms used in this test method.
metallicfoilmaynottotallyrepresenttheductilityoftheentire
3.1.2 fatigue ductility, D —the ability of a material to
f
foil or its in-service behavior in different environments.
deform plastically before fracturing, determined from a
5.3 This test method is considered satisfactory for accep-
constant-strain amplitude, low-cycle fatigue test.
tance testing of commercial shipments, design purposes, ser-
vice evaluation, manufacturing control, and research and
This test method is under the jurisdiction of ASTM Committee E28 on
development.
Mechanical Testing and is the direct responsibility of Subcommittee E28.02 on
Ductility and Flexure Testing.
Current edition approved Feb. 15, 1994. Published April 1994. Originally
published as E796–81. Last previous edition E796–88(1993).
2 4
Annual Book of ASTM Standards, Vol 03.01. Engelmaier,W.,“AMethodfortheDeterminationofDuctilityforThinMetallic
Discontinued—See 1986 Annual Book of ASTM Standards, Vol 03.01. Materials,” Formability 2000 A.D., ASTM STP 753, ASTM, 1981, in press.
Copyright © ASTM International, 100 Barr Harbor Drive, PO Box C700, West Conshohocken, PA 19428-2959, United States.
E796
6. Apparatus
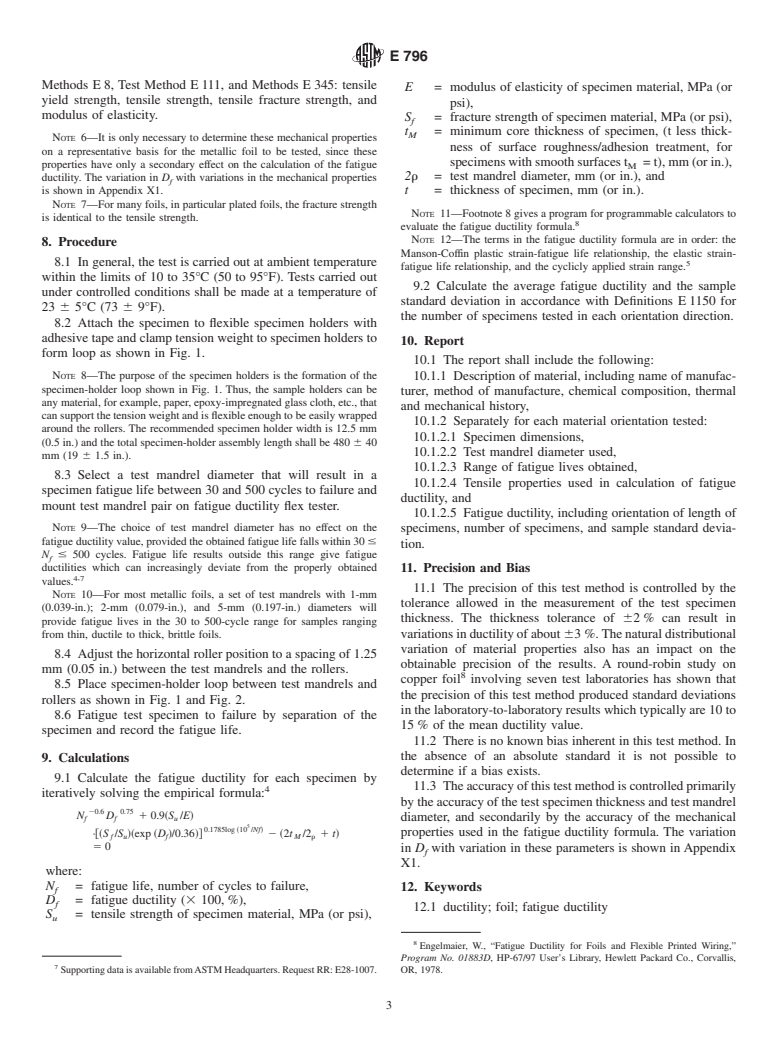
6.1 Fatigue Ductility Flex Tester asschematicallyshownin
Fig.1.AphotographofthetesterisshowninFig.2. Thetester
consistsofajuxtaposedpairofprecisiontestmandrelsmoving
1 1
verticallyatotalof38 63mm(1 ⁄2 6 ⁄8in.)at50cycles/min.
The specimen, held in a horizontal position by six rollers and
positionedbetweenthetwotestmandrels,issubjectedtocyclic
flexural strains by being bent alternately around the two test
mandrels. The precision test mandrels shall have uniform
roundness, a maximum surface roughness height of 0.25 µm
(10 µin.), and a minimum surface hardness of 60 HRC. The
diameter of the test mandrels used shall be measured within
1%. The specimen is held in an invariant position relative to
the test mandrels by a tension weight. The tension weight,
together with the specimen-holder loop (see Fig. 1), provides
for precisely repeated contact between the specimen and the
test mandrels. The weight tension also serves to assure con-
formance of the specimen to the test mandrel curvature. The
tensile stress due to the tension weight shall not exceed 10%
of the yield strength (0.2% offset, determined in accordance
FIG. 2 Fatigue Ductility Flex Tester, Model 2 FDF
with Test Methods E8 with the provisions in Test Methods
E345) of the material. A 100-g (3-oz) tension weight is
suitable for most specimens; however, for very thin foil
mens, with the dimensions as specified herein. The specimens
specimensitmightbenecessarytousealightertensionweight.
6 may be prepared individually by use of a double-bladed cutter.
6.2 Double-Bladed Specimen Cutter, as required in Test
The cutting edges of the blades should be lubricated with a
Methods E345, but capable of cutting specimens to the width
material such as stearic acid in alcohol or other suitable
required herein (Section 7).
material. The finished specimens shall be examined under
7. Test Specimens
about 20 3magnification to ascertain that the edges are
7.1 Specimen Preparation—Test specimens shall be pre- smooth and that there are no surface scratches or creases.
Specimens showing discernible surface scratches, creases, or
pared in accordance with Test Methods E345, Type B speci-
edge discontinuities shall be rejected.
Model 2 FDF Flex Ductility Tester, manufactured in accordance with the 7.2 Specimen Thickness—Specimen thickness shall be de-
original Bell Laboratories design, available from UniversalTool and Machine, Inc.,
termined in accordance with Test Methods E345. The thick-
171 Coit St., Irvington, NJ 07111, has been found satisfactory.
ness of each specimen may be determined by any suitable
The Model JDC-125 Precision Sample Cutter, available from Thwing-Albert
means, provided that the thickness of each specimen is
Instrument Co., 10960 Dutton Road, Philadelphia, PA 19154, has been found
satisfactory.
measured to an accuracy of 2%.
NOTE 4—For specimens for which the density is not known, for
example, plated foil, the thickness of the specimens will have to be
measured directly even for soft materials or materials thinner than 0.025
mm (0.001 in.).
NOTE 5—For specimens with rough surfaces, it is necessary to deter-
mine the minimum core thickness, that is, the specimen thickness without
the rough surface features, from a metallographic cross section, prepared
in accordance with Methods E3.
7.3 Specimen Dimensions—The test specimens shall have
the following dimensions:
7.3.1 Width—2.5 to 7.5 mm (0.1 to 0.3 in.) with 3.2 mm
(0.125 in.) the preferred width.
7.3.2 Length—30 mm (1.2 in.) minimum.
7.4 Number of Specimens—It is recommended that at least
three specimens in both the main orientation direction (direc-
tion of rolling for wrought foil, direction of plating solution
agitation for plated foil) and the orthogonal direction be tested.
7.5 Mechanical Properties—Forpurposesofperformingthe
test and calculat
...


Questions, Comments and Discussion
Ask us and Technical Secretary will try to provide an answer. You can facilitate discussion about the standard in here.