ASTM D3464-96
(Test Method)Standard Test Method for Average Velocity in a Duct Using a Thermal Anemometer
Standard Test Method for Average Velocity in a Duct Using a Thermal Anemometer
SCOPE
1.1 This test method describes the measurement of the average velocity with a thermal anemometer for the purpose of determining gas flow in a stack, duct, or flue (1-5). It is limited to those applications where the gas is essentially air at ambient conditions and the temperature, moisture, and contaminant loading are insignificant as sources of error compared to the basic accuracy of the typical field situation.
1.2 The range of the test method is from 1 to 30 m/s (3 to 100 ft/s).
1.3 The values stated in SI units are to be regarded as the standard.
1.4 This standard does not purport to address all of the safety concerns, if any, associated with its use. It is the responsibility of the user of this standard to establish appropriate safety and health practices and determine the applicability of regulatory limitations prior to use.
General Information
Relations
Standards Content (Sample)
NOTICE: This standard has either been superseded and replaced by a new version or discontinued.
Contact ASTM International (www.astm.org) for the latest information.
Designation: D 3464 – 96 An American National Standard
Standard Test Method for
Average Velocity in a Duct Using a Thermal Anemometer
This standard is issued under the fixed designation D 3464; the number immediately following the designation indicates the year of
original adoption or, in the case of revision, the year of last revision. A number in parentheses indicates the year of last reapproval. A
superscript epsilon (e) indicates an editorial change since the last revision or reapproval.
This standard has been approved for use by agencies of the Department of Defense.
1. Scope ity and calculation of the average velocity of air or gas flows in
flues, ducts, or stacks utilizing a thermal anemometer.
1.1 This test method describes the measurement of the
average velocity with a thermal anemometer for the purpose of
5. Significance and Use
determining gas flow in a stack, duct, or flue (1-5). It is limited
5.1 The method presented is a “short method” that may be
to those applications where the gas is essentially air at ambient
used where contamination levels are less than 5000 ppm by
conditions and the temperature, moisture, and contaminant
weight or volume, temperatures are between 0°C (32°F) and
loading are insignificant as sources of error compared to the
65°C (150°F), and the humidity is not considered. The gas is
basic accuracy of the typical field situation.
considered as standard air and the velocity is read directly from
1.2 The range of the test method is from 1 to 30 m/s (3 to
the instrument.
100 ft/s).
5.2 This test method is useful for determining air velocities
1.3 The values stated in SI units are to be regarded as the
in HVAC ducts, fume hoods, vent stacks of nuclear power
standard.
stations, and in performing model studies of pollution control
1.4 This standard does not purport to address all of the
devices.
safety concerns, if any, associated with its use. It is the
responsibility of the user of this standard to establish appro-
6. Apparatus
priate safety and health practices and determine the applica-
6.1 Thermal Anemometer—A commercially available elec-
bility of regulatory limitations prior to use.
trically operated hot sensor anemometer with direct readout. A
thermal anemometer senses the cooling effect of a moving gas
2. Referenced Documents
stream passing over an electrically heated sensor. This cooling
2.1 ASTM Standards:
effect or heat transfer rate is correlated to the velocity of the gas
D 1356 Terminology Relating to Sampling and Analysis of
3 stream. The instrument is calibrated to display a direct readout
Atmospheres
3 in terms of velocity.
D 3796 Practice for Calibration of Type S Pitot Tubes
6.2 Sensors and Probes—There are a number of different
2.2 Other Standards:
types of sensors available for thermal anemometry including
ASME PTC 19.5-72 Application of Fluid Meters, Sixth Ed.
the hot-wire sensor, the hot-film sensor, and the quartz-coated
1971 (Interim Supplement 19.5 on Instruments & Appa-
4 sensor. Probes are available in many different shapes depend-
ratus)
ing upon application.
3. Terminology 6.3 Temperature Compensation—If the temperature of the
gas stream changes during velocity measurements, the an-
3.1 For definitions of terms used in this test method, refer to
emometer reading will change accordingly unless a constant-
Terminology D 1356.
temperature or “temperature-compensated” anemometer is uti-
4. Summary of Test Method lized. This type of instrument shall be specified for most
applications of this measurement standard.
4.1 This test method describes the operational and calibra-
6.3.1 Temperature-Compensated Anemometer—A
tion procedures necessary for the measurement of point veloc-
temperature-compensated anemometer has a temperature-
sensing probe within the instrument sensor that automatically
This test method is under the jurisdiction of ASTM Committee D-22 on
corrects errors caused by changes in temperature in the gas
Sampling and Analysis of Atmospheres, and is the direct responsibility of Subcom-
stream. For temperature-compensated anemometers, a change
mittee D22.03 on Ambient Atmospheres and Source Emissions.
Current edition approved Apr. 10, 1996. Published June 1996. Originally
in temperature (DT) of 28°C (50°F) typically produces an error
published as D 3464 – 75. Last previous edition D 3464 – 91.
of 2 %.
The boldface numbers in parentheses refer to the references listed at the end of
6.3.2 Temperature-Uncompensated Anemometer—For a
this method.
Annual Book of ASTM Standards, Vol 11.03. “constant-current” or uncompensated anemometer a change in
Available from The American Society of Mechanical Engineers, 345 East 47th
temperature (DT) of 28°C (50°F) typically produces a 25 %
Street, New York, NY 10017.
Copyright © ASTM, 100 Barr Harbor Drive, West Conshohocken, PA 19428-2959, United States.
D 3464
error. For laboratory work where this type of anemometer
might be preferred, the output data shall be corrected for
temperature changes in the gas stream.
6.4 Calibration Apparatus:
6.4.1 Flows above 3 m/s (10 ft/s)—See Section 6, Practice
D 3796.
6.4.2 Flows below 3 m/s (10 ft/s)—See PTC 19.5-72.
7. Calibration
FIG. 1 Traverse Positions for Rectangular Flue
7.1 For velocities in excess of 3 m/s (10 ft/s) calibrate the
thermal anemometer with a standard pitot tube, in accordance
TABLE 1 Minimum Number of Measurements for
with Practice D 3796. It is preferable to make these calibrations
Rectangular Ducts
under laboratory conditions; however, where expediency dic-
Cross Sectional Area of Number of
2 2
tates, field calibration at the sampling site is permissible. Sampling Sites m (ft ) Measurements
7.2 For velocities below 3 m/s (10 ft/s) calibrate in the
Less than 0.2 (2) 4
0.2 to 2.3 (2 to 25) 12
laboratory using a calibrated orifice or nozzle in accordance
Greater than 2.3 (25) 20
with PTC 19.5-72.
7.3 Calibrate the thermal anemometer for a minimum of
three velocities covering the range of velocities which are
equivalent diameter can be determined as follows:
anticipated for a particular test. Calibrate an increased number
D 5 2LW/~L 1 W! (1)
of points, typically five to seven, for the complete range of the
e
instrument if the anticipated test velocity range is not known.
where:
NOTE 1—Caution: If this test method is used for gases other than air, D = equivalent diameter, m (ft),
e
calibrate using the test gas.
L = duct length, m (ft), and
W = duct width, m (ft).
8. Single-Point Velocity Measurement
If a site less than eight diameters downstream and two
8.1 Velocity—The hot-wire anemometer is effective for
diameters upstream from a flow disturbance, such as a bend,
measuring velocities over a range from 1 m/s (3 ft/s) to 30 m/s
expansion or contraction is used increase the number of
(100 ft/s). Record measurements at specific points within the
sampling points in accordance with 9.2.4.
flue in accordance with a plan determined by the flue size.
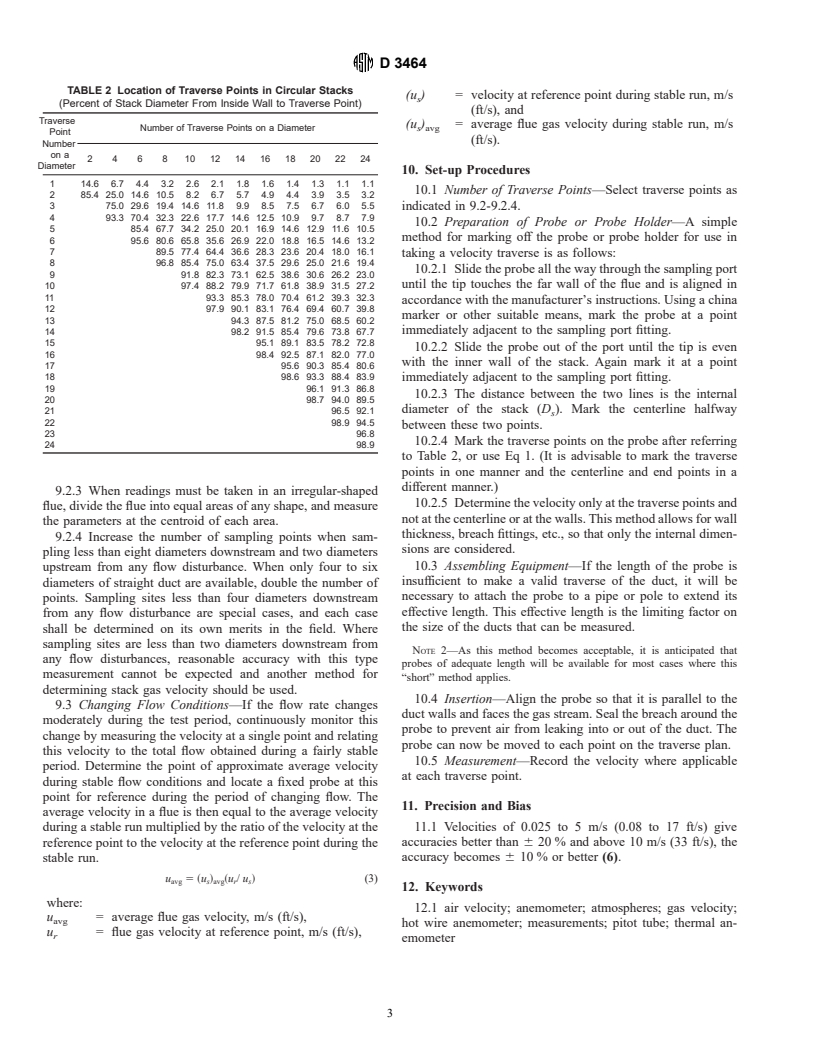
9.2.2 In circular flues divide the area concentrically as
Place marks on the instrument probe or probe extension to aid
shown in Fig. 2. The minimum number areas to be used and the
in locating the sampling points at which the velocity is to be
distance to the test point are shown in Table 2 or calculate as
measured.
follows:
9. Average Velocity Measurements r 5 D ~2n 2 1!/4N (2)
=
n s
9.1 Average Velocity—Average flue gas velocity is equal to
where:
the algebraic average of the single point velocity measurements
D = internal diameter of flue, cm (in.),
s
made in accordance with 9.2-9.2.4.
r = radial distance from center of flue to nth sampling
n
9.2 To determine the average velocity in a flue it is
point, cm (in.),
necessary to record several velocities. This is true even if the
n = nth sampling point from center of flue, and
flow does not vary with time. Velocities in any flue cannot be
N = number of sampling points across a diameter.
assumed to be uniform across any large cross-sectional area.
Conduct traverses across two diameter axes right angles to
However, in any single subarea, one may assume a constant
each other. Again, if a site less than eight diameters down-
rate of change of velocity over the area with average velocity
stream and two diameters upstream from a flow disturbance is
at the centroid of this area. Determine the number of points and
used, increase the number of sampling points
...


Questions, Comments and Discussion
Ask us and Technical Secretary will try to provide an answer. You can facilitate discussion about the standard in here.