ASTM A1056-20
(Specification)Standard Specification for Cast Iron Couplings Used for Joining Hubless Cast Iron Soil Pipe and Fittings
Standard Specification for Cast Iron Couplings Used for Joining Hubless Cast Iron Soil Pipe and Fittings
SCOPE
1.1 This specification covers the materials and testing of cast iron couplings for joining hubless cast iron soil pipe and fittings for sizes 11/2 to 10 in.
1.2 It is the purpose of this specification to furnish information as to the characteristics of a particular sleeve type coupling when applied to cast iron soil pipe and fittings manufactured in accordance with Specification A888, latest revision, and CISPI Designation 301, latest revision.
1.3 The values stated in inch-pound units are to be regarded as standard. The values given in parentheses are mathematical conversions to SI units that are provided for information only and are not considered standard.
1.4 The following precautionary caveat pertains only to the test method portion, Section 8, of this specification. This standard does not purport to address all of the safety concerns, if any, associated with its use. It is the responsibility of the user of this standard to establish appropriate safety, health, and environmental practices and determine the applicability of regulatory limitations prior to use.
1.5 This international standard was developed in accordance with internationally recognized principles on standardization established in the Decision on Principles for the Development of International Standards, Guides and Recommendations issued by the World Trade Organization Technical Barriers to Trade (TBT) Committee.
General Information
- Status
- Published
- Publication Date
- 30-Apr-2020
- Technical Committee
- A04 - Iron Castings
- Drafting Committee
- A04.75 - Gaskets and Coupling for Plumbing and Sewer Piping
Relations
- Effective Date
- 01-May-2020
- Effective Date
- 01-Jan-2024
- Effective Date
- 01-Nov-2023
- Refers
ASTM C564-20a - Standard Specification for Rubber Gaskets for Cast Iron Soil Pipe and Fittings - Effective Date
- 01-May-2020
- Effective Date
- 15-Mar-2020
- Effective Date
- 15-Nov-2018
- Effective Date
- 01-Mar-2018
- Effective Date
- 01-Nov-2017
- Effective Date
- 01-Oct-2017
- Effective Date
- 01-Jun-2017
- Effective Date
- 15-Jul-2016
- Effective Date
- 15-Sep-2015
- Effective Date
- 01-Feb-2015
- Effective Date
- 01-Oct-2014
- Effective Date
- 01-May-2014
Overview
ASTM A1056-20 is the standard specification developed by ASTM International for cast iron couplings used in joining hubless cast iron soil pipes and fittings. This standard covers the material requirements, dimensional specifications, and testing procedures for sleeve-type couplings ranging from 1 1/2 to 10 inches in size. The purpose of ASTM A1056-20 is to ensure compatibility and optimal performance when connecting hubless cast iron soil pipe systems, in accordance with ASTM A888 and CISPI 301 standards.
Key Topics
Material Requirements
- Gaskets must comply with ASTM C564 for physical properties and be free of defects.
- Clamp assemblies are made from minimum class 25 cast iron, tested for mechanical properties and tensile strength.
- Nuts and bolts must be stainless steel Grade 304, conforming to ASME B18.2.1 and B18.2.2, with no screwdriver slots.
Product Dimensions and Tolerances
- Detailed dimensional tolerances are specified for gaskets, clamp assemblies, and hubless pipes, ensuring interchangeability and fit.
- Clamp assemblies and gaskets are subject to rigorous dimensional requirements to maintain performance.
Performance Testing
- Each coupling undergoes a series of tests, including:
- Deflection and shear tests to check joint integrity under simulated loads and misalignment.
- Unrestrained hydrostatic pressure testing to verify sealing ability against leakage at specified pressures.
- All testing procedures are designed to ensure the coupling maintains a watertight and stable joint.
- Each coupling undergoes a series of tests, including:
Certification and Marking
- Manufacturers must provide certification records upon request, verifying compliance with ASTM A1056-20.
- Gaskets and clamp assemblies require clear and durable markings, including pipe size, country of origin, manufacturer identification, and relevant specification numbers.
Applications
ASTM A1056-20 couplings are mainly used for:
Sanitary and Storm Drainage Systems
- Reliable joining of hubless cast iron soil pipes in residential, commercial, and institutional buildings.
- Ensures watertight and durable connections for waste, vent, and drain lines.
Sewer Systems
- Commonly used in municipal and private sewer installations where hubless cast iron pipes are specified.
Renovation and Repair Work
- Ideal for replacements or repairs in existing cast iron drainage systems due to compatibility with standard hubless pipes and fittings.
Practical benefits include:
- Simplified assembly and installation due to standardized gasket and clamp designs.
- Long service life with robust material requirements and corrosion-resistant hardware.
- Reliable performance with comprehensive testing for mechanical integrity and leakage resistance.
Related Standards
For full system compatibility and compliance, ASTM A1056-20 references and works alongside several related standards:
- ASTM A888 - Specification for hubless cast iron soil pipes and fittings for drain, waste, and vent applications.
- CISPI 301 - Covers hubless cast iron soil pipes and fittings for similar sanitary and storm drain uses.
- ASTM C564 - Specification for rubber gaskets used in cast iron pipe fittings.
- ASTM A48/A48M - Specification for gray iron castings, applicable for clamp assemblies.
- ASME B18.2.1 & B18.2.2 - Standards governing dimensions and properties of bolts and nuts used in the assembly.
- ASTM D2240 - Test method for durometer hardness, relevant to elastomeric gasket qualifications.
Conclusion
Following ASTM A1056-20 ensures that cast iron couplings used for hubless cast iron soil pipes and fittings are manufactured and tested to the highest levels of safety and quality. Compliance with this standard supports durable, leak-free, and long-lasting plumbing and drainage installations in a variety of construction and municipal applications. For optimal results, it is essential to use couplings, pipes, and fittings that are all manufactured and tested under the aligned standards referenced above.
Keywords: ASTM A1056-20, cast iron couplings, hubless pipes, soil pipe, fittings, drainage, sewer, gaskets, plumbing standards, mechanical testing, compliance.
Buy Documents
ASTM A1056-20 - Standard Specification for Cast Iron Couplings Used for Joining Hubless Cast Iron Soil Pipe and Fittings
REDLINE ASTM A1056-20 - Standard Specification for Cast Iron Couplings Used for Joining Hubless Cast Iron Soil Pipe and Fittings
Get Certified
Connect with accredited certification bodies for this standard

Institut za varilstvo d.o.o. (Welding Institute)
Slovenia's leading welding institute since 1952. ISO 3834, EN 1090, pressure equipment certification, NDT personnel, welder qualification. Only IIW Au
Sponsored listings
Frequently Asked Questions
ASTM A1056-20 is a technical specification published by ASTM International. Its full title is "Standard Specification for Cast Iron Couplings Used for Joining Hubless Cast Iron Soil Pipe and Fittings". This standard covers: SCOPE 1.1 This specification covers the materials and testing of cast iron couplings for joining hubless cast iron soil pipe and fittings for sizes 11/2 to 10 in. 1.2 It is the purpose of this specification to furnish information as to the characteristics of a particular sleeve type coupling when applied to cast iron soil pipe and fittings manufactured in accordance with Specification A888, latest revision, and CISPI Designation 301, latest revision. 1.3 The values stated in inch-pound units are to be regarded as standard. The values given in parentheses are mathematical conversions to SI units that are provided for information only and are not considered standard. 1.4 The following precautionary caveat pertains only to the test method portion, Section 8, of this specification. This standard does not purport to address all of the safety concerns, if any, associated with its use. It is the responsibility of the user of this standard to establish appropriate safety, health, and environmental practices and determine the applicability of regulatory limitations prior to use. 1.5 This international standard was developed in accordance with internationally recognized principles on standardization established in the Decision on Principles for the Development of International Standards, Guides and Recommendations issued by the World Trade Organization Technical Barriers to Trade (TBT) Committee.
SCOPE 1.1 This specification covers the materials and testing of cast iron couplings for joining hubless cast iron soil pipe and fittings for sizes 11/2 to 10 in. 1.2 It is the purpose of this specification to furnish information as to the characteristics of a particular sleeve type coupling when applied to cast iron soil pipe and fittings manufactured in accordance with Specification A888, latest revision, and CISPI Designation 301, latest revision. 1.3 The values stated in inch-pound units are to be regarded as standard. The values given in parentheses are mathematical conversions to SI units that are provided for information only and are not considered standard. 1.4 The following precautionary caveat pertains only to the test method portion, Section 8, of this specification. This standard does not purport to address all of the safety concerns, if any, associated with its use. It is the responsibility of the user of this standard to establish appropriate safety, health, and environmental practices and determine the applicability of regulatory limitations prior to use. 1.5 This international standard was developed in accordance with internationally recognized principles on standardization established in the Decision on Principles for the Development of International Standards, Guides and Recommendations issued by the World Trade Organization Technical Barriers to Trade (TBT) Committee.
ASTM A1056-20 is classified under the following ICS (International Classification for Standards) categories: 23.040.60 - Flanges, couplings and joints. The ICS classification helps identify the subject area and facilitates finding related standards.
ASTM A1056-20 has the following relationships with other standards: It is inter standard links to ASTM A1056-12(2017), ASTM E8/E8M-24, ASTM A888-23, ASTM C564-20a, ASTM C564-20, ASTM A888-18a, ASTM A888-18, ASTM A644-17, ASTM A888-17a, ASTM A888-17, ASTM E8/E8M-16, ASTM A888-15, ASTM E8/E8M-15, ASTM A644-14, ASTM C564-14. Understanding these relationships helps ensure you are using the most current and applicable version of the standard.
ASTM A1056-20 is available in PDF format for immediate download after purchase. The document can be added to your cart and obtained through the secure checkout process. Digital delivery ensures instant access to the complete standard document.
Standards Content (Sample)
This international standard was developed in accordance with internationally recognized principles on standardization established in the Decision on Principles for the
Development of International Standards, Guides and Recommendations issued by the World Trade Organization Technical Barriers to Trade (TBT) Committee.
Designation:A1056 −20
Standard Specification for
Cast Iron Couplings Used for Joining Hubless Cast Iron Soil
Pipe and Fittings
This standard is issued under the fixed designation A1056; the number immediately following the designation indicates the year of
original adoption or, in the case of revision, the year of last revision. A number in parentheses indicates the year of last reapproval. A
superscript epsilon (´) indicates an editorial change since the last revision or reapproval.
1. Scope A888 Specification for Hubless Cast Iron Soil Pipe and
Fittings for Sanitary and Storm Drain, Waste, and Vent
1.1 This specification covers the materials and testing of
Piping Applications
cast iron couplings for joining hubless cast iron soil pipe and
C564 Specification for Rubber Gaskets for Cast Iron Soil
fittings for sizes 1 ⁄2 to 10 in.
Pipe and Fittings
1.2 It is the purpose of this specification to furnish informa-
D2240 Test Method for Rubber Property—Durometer Hard-
tionastothecharacteristicsofaparticularsleevetypecoupling
ness
when applied to cast iron soil pipe and fittings manufactured in
E8/E8M Test Methods for Tension Testing of Metallic Ma-
accordance with Specification A888, latest revision, and CISPI
terials
Designation 301, latest revision.
2.2 ASME Standards:
1.3 The values stated in inch-pound units are to be regarded ASMEB18.2.1 SquareandHexBoltandScrewsInchSeries
ASME B18.1.2 Square and Hex Nuts (Inch Series)
as standard. The values given in parentheses are mathematical
conversions to SI units that are provided for information only 2.3 CISPI Standard:
CISPI 301 Specification for Hubless Cast Iron Soil Pipe and
and are not considered standard.
Fittings for Sanitary and Storm Drain, Waste and Vent
1.4 The following precautionary caveat pertains only to the
Piping Applications
test method portion, Section 8, of this specification. This
standard does not purport to address all of the safety concerns,
3. Terminology
if any, associated with its use. It is the responsibility of the user
3.1 Definitions:
of this standard to establish appropriate safety, health, and
3.1.1 Definitions of the following terms used in this speci-
environmental practices and determine the applicability of
fication are found in Terminology A644: elastomeric,
regulatory limitations prior to use.
durometer, and dynamic.
1.5 This international standard was developed in accor-
3.2 Definitions of Terms Specific to This Standard:
dance with internationally recognized principles on standard-
3.2.1 center stop, n—an integral part of the gasket centered
ization established in the Decision on Principles for the
on the axial length of the gasket intended to limit the insertion
Development of International Standards, Guides and Recom-
depth of the pipe and/or fitting to be coupled.
mendations issued by the World Trade Organization Technical
3.2.2 clamp assembly, n—that portion of the coupling ex-
Barriers to Trade (TBT) Committee.
cluding the gasket, nuts, and bolts.
2. Referenced Documents
3.2.3 coupling, n—the complete assembly.
2.1 ASTM Standards:
3.2.4 fitting, n—parts of a pipeline other than straight pipes,
A48/A48M Specification for Gray Iron Castings
valves, or couplings.
A644 Terminology Relating to Iron Castings
3.2.5 gasket, n—the elastomeric portion of the coupling.
3.2.6 joint, n—the point of assembly consisting of the
coupling and the joined pipes or fittings, or both.
This specification is under the jurisdiction of ASTM Committee A04 on Iron
3.2.7 manufacturer of the clamp assembly, n—theentitythat
Castings and is the direct responsibility of Subcommittee A04.75 on Gaskets and
Coupling for Plumbing and Sewer Piping.
casts the clamp assembly.
Current edition approved May 1, 2020. Published May 2020. Originally
approved in 2008. Last previous edition approved in 2017 as A1056 – 12 (2017).
DOI: 10.1520/A1056-20. Available from American Society of Mechanical Engineers (ASME), ASME
For referenced ASTM standards, visit the ASTM website, www.astm.org, or International Headquarters, Three Park Ave., New York, NY 10016-5990, http://
contact ASTM Customer Service at service@astm.org. For Annual Book of ASTM www.asme.org.
Standards volume information, refer to the standard’s Document Summary page on Available from Cast Iron Soil Pipe Institute (CISPI), 5959 Shallowford Rd.,
the ASTM website. Suite 419, Chattanooga, TN 37421, http://www.cispi.org.
Copyright © ASTM International, 100 Barr Harbor Drive, PO Box C700, West Conshohocken, PA 19428-2959. United States
A1056−20
3.2.8 manufacturer of the coupling, n—the entity that as- 4. Materials and Manufacture
sembles the components of the coupling such as the gasket and
4.1 Physical properties of gaskets shall comply with Speci-
the clamp assembly.
fication C564 and the dimensions, material specifications, and
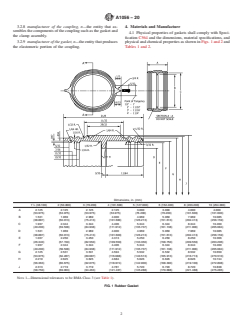
3.2.9 manufacturerofthegasket,n—theentitythatproduces physical and chemical properties as shown in Figs. 1 and 2 and
the elastomeric portion of the coupling. Tables 1 and 2.
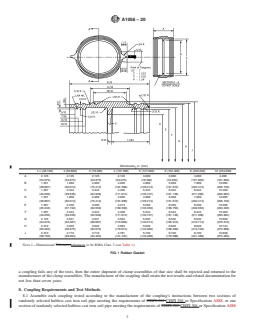
Dimensions, in. (mm)
1 ⁄2 (38.100) 2 (50.800) 3 (76.200) 4 (101.600) 5 (127.000) 6 (152.400) 8 (203.200) 10 (254.000)
A 2.125 2.125 2.125 2.125 3.000 3.000 4.000 4.000
(53.975) (53.975) (53.975) (53.975) (76.200) (76.200) (101.600) (101.600)
B 1.531 1.969 2.969 4.000 4.969 5.969 7.969 10.085
(38.887) (50.013) (75.413) (101.600) (126.213) (151.613) (202.413) (256.159)
C 1.937 2.344 3.344 4.406 5.344 6.344 8.344 10.460
(49.200) (59.538) (84.938) (111.912) (135.737) (161.138) (211.938) (265.684)
D 1.531 1.969 2.969 4.000 4.969 5.969 7.969 10.085
(38.887) (50.013) (75.413) (101.600) (126.213) (151.613) (202.413) (256.159)
E 1.037 2.250 3.250 4.313 5.250 6.250 8.250 10.366
(26.340) (57.150) (82.550) (109.550) (133.350) (158.750) (209.550) (263.296)
F 1.937 2.344 3.344 4.406 5.344 6.344 8.344 10.460
(49.200) (59.538) (84.938) (111.912) (135.737) (161.138) (211.938) (265.684)
G 2.125 2.531 3.531 4.594 5.532 6.532 8.532 10.650
(53.975) (64.287) (89.687) (116.688) (140.513) (165.913) (216.713) (270.510)
H 2.219 2.625 3.625 4.684 5.626 6.626 8.626 10.744
(56.363) (66.675) (92.075) (118.974) (142.900) (168.300) (219.100) (272.898)
J 2.313 2.719 3.719 4.781 5.720 6.720 8.720 10.838
(58.750) (69.063) (94.463) (121.437) (145.288) (170.688) (221.488) (275.285)
NOTE 1—Dimensional tolerances to be RMA Class 3 (see Table 1).
FIG. 1Rubber Gasket
A1056−20
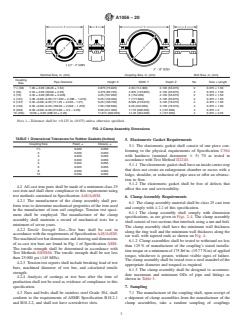
Nominal Size, in. (mm) Coupling Size, in. (mm) Bolt Size, in. (mm)
Coupling
Pipe Diameter Height X Width Y Depth Z No. Size × Length
Size
1 ⁄2 (38) 1.90 ± 0.06 (48.26 ± 1.52) 2.875 (73.025) 4.50 (114.300) 2.125 (53.975) 2 0.375 × 1.50
2 (50) 2.35 ± 0.09 (59.69 ± 2.29) 3.375 (85.725) 4.875 (123.825) 2.125 (53.975) 2 0.375 × 1.50
3 (76) 3.35 ± 0.09 (85.09 ± 2.229) 4.25 (107.950) 6 (152.400) 2.125 (53.975) 2 0.375 × 1.50
4 (101) 4.38 +0.09/–0.05 (111.252 + 2.286 – 1.270) 5.25 (133.350) 7 (177.800) 2.125 (53.975) 2 0.375 × 1.50
5 (127) 5.30 +0.09/–0.05 (111.25 + 2.229 – 1.27) 6.25 (158.750) 8.625 (219.075) 3.125 (79.375) 4 0.375 × 1.50
6 (152) 6.30 +0.09/–0.05 (160.02 + 2.229 – 1.270) 7.50 (190.500) 9.25 (234.950) 3.125 (79.375) 4 0.375 × 1.50
8 (203) 8.38 +0.09/–0.09 (212.85 + 3.3 – 2.29) 9.50 (241.300) 11.75 (298.450) 4 (101.600) 4 0.375 × 2
10 (254) 10.56 ± 0.09 (268.22 ± 2.29) 11.813 (300.203) 14.33 (364.058) 4 (101.600) 4 0.375 × 2.25
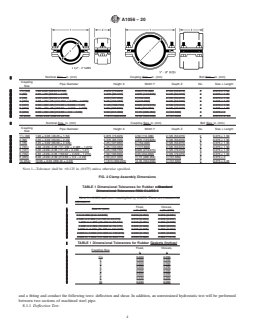
NOTE 1—Tolerance shall be 60.125 in. (0.975) unless otherwise specified.
FIG. 2Clamp Assembly Dimensions
TABLE 1 Dimensional Tolerances for Rubber Gaskets (Inches)
5. Elastomeric Gasket Requirements
Coupling Size Fixed, ± Closure, ±
5.1 The elastomeric gasket shall consist of one piece con-
1 ⁄2 0.020 0.050
forming to the physical requirements of Specification C564
2 0.020 0.050
with hardness (nominal durometer 6 5) 70 as tested in
3 0.020 0.050
4 0.020 0.050
accordance with Test Method D2240.
5 0.025 0.055
5.1.1 Theelastomericgasketshallhaveaninsidecenterstop
6 0.025 0.055
that does not create an enlargement chamber or recess with a
8 0.030 0.063
10 0.030 0.063
ledge, shoulder, or reduction of pipe area or offer an obstruc-
tion to flow.
5.1.2 The elastomeric gasket shall be free of defects that
4.2 All cast iron parts shall be made of a minimum class 25
affect the use and serviceability.
cast iron and shall show compliance to this requirement using
test methods contained in Specification A48/A48M.
6. Clamp Assembly Requirements
4.2.1 The manufacturer of the clamp assembly shall per-
6.1 The clamp assembly material shall be class 25 cast iron
form tests to determine mechanical properties of the iron used
and comply with 4.2.2 of this specification.
in the manufacture of iron soil couplings. Tension test speci-
6.1.1 The clamp assembly shall comply with dimension
mens shall be employed. The manufacturer of the clamp
specifications, as are given in Figs. 2-4. The clamp assembly
assembly shall maintain a record of mechanical tests for a
shall consist of two sections that interlock using a nut and bolt.
minimum of seven years.
The clamp assembly shall have the minimum wall thickness
4.2.2 Tensile Strength Test—Test bars shall be cast in
along the ring wall and the minimum wall thickness along the
accordance with the requirements of Specification A48/A48M.
ear wall, with tapered ends as shown on Fig. 4.
Themachinedtestbardimensionsanddrawinganddimensions
6.1.2 Clamp assemblies shall be tested to withstand no less
of as-cast test bars are found in Fig. 1 of Specification A888.
than 125 % of manufacturer of the coupling’s stated installa-
The tensile strength shall be determined in accordance with
tion torque or a minimum of 175 lbf·in. (19.77 N·m) of applied
Test Methods E8/E8M. The tensile strength shall be not less
torque, whichever is greater, without visible signs of failure.
than 25 000 psi (145 MPa).
The clamp assembly shall be tested over a steel mandrel of the
4.2.3 Tension test reports shall include breaking load of test
appropriate diameter and torqued as required.
bars, machined diameter of test bar, and calculated tensile
6.1.3 The clamp assembly shall be designed to accommo-
strength.
date maximum and minimum ODs of pipe and fittings as
4.2.4 Analysis of castings or test bars after the time of
shown in Table 3.
production shall not be used as evidence of compliance to this
specification. 7. Sampling
4.3 Nuts and bolts shall be stainless steel Grade 304, shall 7.1 The manufacturer of the coupling shall, upon receipt of
conform to the requirements of ASME Specification B18.2.1 a shipment of clamp assemblies from the manufacturer of the
and B18.2.2, and shall not have screwdriver slots. clamp assemblies, take a random sampling of couplings
A1056−20
TABLE 2 Rubber Gasket Physical Requirements
NOTE 1—Material: The sealing sleeve shall be made from an elastomeric compound that meets the requirements of Specification C564.
NOTE2—PhysicalTests:Thetestspecimensshallbeobtainedfromfinishedsleevesandtestedpursuanttothemethodsdescribedinthefollowingtable.
Physical Tests,
Test ASTM Method
Min or Max Requirements
Tensile Strength 1500 psi (105.49 kg/cm) min D412
Elongation 250 min D412
Durometer (Shore A) 70±5at76±5 D2240
Accelerated Aging 15 % max tensile and 20 % max elongation deterioration, 10 points max; increase in hardness, all D573
determinations after oven aging for 96 h at 158 °F (70 °C)
Compression Set 25 % max after 22 h at 158 °F (70 °C) D395 Method B
Oil Immersion 80 % max volume change after immersion in ASTM oil no. IRM903 for 70 h at 212 °F (100 °C) D471
Ozone Cracking No visible cracking at 2 times magnification of the gasket after 100 h. Exposure in 1.5 ppm ozone D1149
concentration at 100 °F (37.778 °C). Testing and inspection to be on gasket which is loop
mounted to give approximately 20 % elongation of outer surface
Tear Resistance Die C; 150 lb (68.089 mm) min per in. (25.400 mm) of thickness D624
Water Absorption 20 % max by weight after 7 days at 158 °F (70 °C) D471
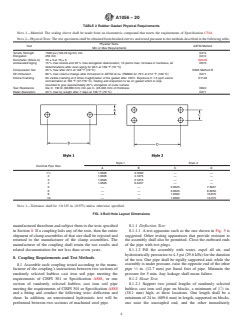
Style 1 Style 2
Nominal Pipe Size
AB C D
1 ⁄2 1.0625 3.7600 — —
2 1.0625 4.1875 — —
3 1.0625 5.1875 — —
4 1.0625 6.3437 — —
5 — — 2.0625 7.5937
6 — — 2.0625 8.6250
8 — — 1.6562 10.875
10 — — 1.6562 13.315
NOTE 1—Tolerance shall be 60.125 in. (0.975) unless otherwise specified.
FIG. 3Bolt Hole Layout Dimensions
manufactured therefrom and subject them to the tests specified 8.1.1 Deflection Test:
in
...
This document is not an ASTM standard and is intended only to provide the user of an ASTM standard an indication of what changes have been made to the previous version. Because
it may not be technically possible to adequately depict all changes accurately, ASTM recommends that users consult prior editions as appropriate. In all cases only the current version
of the standard as published by ASTM is to be considered the official document.
Designation: A1056 − 12 (Reapproved 2017) A1056 − 20
Standard Specification for
Cast Iron Couplings Used for Joining Hubless Cast Iron Soil
Pipe and Fittings
This standard is issued under the fixed designation A1056; the number immediately following the designation indicates the year of
original adoption or, in the case of revision, the year of last revision. A number in parentheses indicates the year of last reapproval. A
superscript epsilon (´) indicates an editorial change since the last revision or reapproval.
1. Scope
1.1 This specification covers the materials and testing of cast iron couplings for joining hubless cast iron soil pipe and fittings
for sizes 1 ⁄2 to 10 in.
1.2 It is the purpose of this specification to furnish information as to the characteristics of a particular sleeve type coupling when
applied to cast iron soil pipe and fittings manufactured in accordance with Specification A888, latest revision, and CISPI
Designation 301, latest revision.
1.3 The values stated in inch-pound units are to be regarded as standard. The values given in parentheses are mathematical
conversions to SI units that are provided for information only and are not considered standard.
1.4 The following precautionary caveat pertains only to the test method portion, Section 8, of this specification. This standard
does not purport to address all of the safety concerns, if any, associated with its use. It is the responsibility of the user of this
standard to establish appropriate safety, health, and environmental practices and determine the applicability of regulatory
limitations prior to use.
1.5 This international standard was developed in accordance with internationally recognized principles on standardization
established in the Decision on Principles for the Development of International Standards, Guides and Recommendations issued
by the World Trade Organization Technical Barriers to Trade (TBT) Committee.
2. Referenced Documents
2.1 ASTM Standards:
A48/A48M Specification for Gray Iron Castings
A644 Terminology Relating to Iron Castings
A888 Specification for Hubless Cast Iron Soil Pipe and Fittings for Sanitary and Storm Drain, Waste, and Vent Piping
Applications
C564 Specification for Rubber Gaskets for Cast Iron Soil Pipe and Fittings
D2240 Test Method for Rubber Property—Durometer Hardness
E8E8/E8M Test Methods for Tension Testing of Metallic Materials [Metric] E0008_E0008M
2.2 ASME Standards:
ASME B18.2.1 Square and Hex Bolt and Screws Inch Series
ASME B18.1.2 Square and Hex Nuts (Inch Series)
2.3 CISPI Standard:
CISPI-301CISPI 301 Specification for Hubless Cast Iron Soil Pipe and Fittings for Sanitary and Storm Drain, Waste and Vent
Piping Applications
3. Terminology
3.1 Definitions:
This specification is under the jurisdiction of ASTM Committee A04 on Iron Castings and is the direct responsibility of Subcommittee A04.75 on Gaskets and Coupling
for Plumbing and Sewer Piping.
Current edition approved Oct. 1, 2017May 1, 2020. Published October 2017May 2020. Originally approved in 2008. Last previous edition approved in 20122017 as A1056
– 12. 12 (2017). DOI: 10.1520/A1056-12R17.10.1520/A1056-20.
For referenced ASTM standards, visit the ASTM website, www.astm.org, or contact ASTM Customer Service at service@astm.org. For Annual Book of ASTM Standards
volume information, refer to the standard’s Document Summary page on the ASTM website.
Available from American Society of Mechanical Engineers (ASME), ASME International Headquarters, Three Park Ave., New York, NY 10016-5990, http://
www.asme.org.
Available from Cast Iron Soil Pipe Institute (CISPI), 5959 Shallowford Rd., Suite 419, Chattanooga, TN 37421, http://www.cispi.org.
Copyright © ASTM International, 100 Barr Harbor Drive, PO Box C700, West Conshohocken, PA 19428-2959. United States
A1056 − 20
3.1.1 Definitions of the following terms used in this specification are found in Terminology A644: elastomeric, durometer, and
dynamic.
3.2 Definitions of Terms Specific to This Standard:
3.2.1 center stop, n—an integral part of the gasket centered on the axial length of the gasket intended to limit the insertion depth
of the pipe and/or fitting to be coupled.
3.2.2 clamp assembly, n—that portion of the coupling excluding the gasket, nuts, and bolts.
3.2.3 coupling, n—the complete assembly.
3.2.4 fitting, n—parts of a pipeline other than straight pipes, valves, or couplings.
3.2.5 gasket, n—the elastomeric portion of the coupling.
3.2.6 joint, n—the point of assembly consisting of the coupling and the joined pipes or fittings, or both.
3.2.7 manufacturer of the clamp assembly, n—the entity that casts the clamp assembly.
3.2.8 manufacturer of the coupling, n—the entity that assembles the components of the coupling such as the gasket and the
clamp assembly.
3.2.9 manufacturer of the gasket, n—the entity that produces the elastomeric portion of the coupling.
4. Materials and Manufacture
4.1 Physical properties of gaskets shall comply with Specification C564 and the dimensions, material specifications, and
physical and chemical properties as shown in Figs. 1 and 2 and Tables 1 and 2.
4.2 All cast iron parts shall be made of a minimum class 25 cast iron and shall show compliance to this requirement using test
methods contained in Specification A48/A48M.
4.2.1 The manufacturer of the clamp assembly shall perform tests to determine mechanical properties of the iron used in the
manufacture of iron soil couplings. Tension test specimens shall be employed. The manufacturer of the clamp assembly shall
maintain a record of mechanical tests for a minimum of seven years.
4.2.2 Tensile Strength Test—Test bars shall be cast in accordance with the requirements of Specification A48/A48M. The
machined test bar dimensions and drawing and dimensions of as-cast test bars are found in Fig. 1 of Specification A888. The tensile
strength shall be determined in accordance with Test Methods E8E8/E8M. The tensile strength shall be not less than 25 000 psi
(145 MPa).
4.2.3 Tension test reports shall include breaking load of test bars, machined diameter of test bar, and calculated tensile strength.
4.2.4 Analysis of castings or test bars after the time of production shall not be used as evidence of compliance to this
specification.
4.3 Nuts and bolts shall be stainless steel Grade 304, shall conform to the requirements of ASME Specification B18.2.1 and
B18.2.2, and shall not have screwdriver slots.
5. Elastomeric Gasket Requirements
5.1 The elastomeric gasket shall consist of one piece conforming to the physical requirements of Specification C564 with
hardness (nominal durometer 6 5) 70 as tested in accordance with Test Method D2240.
5.1.1 The elastomeric gasket shall have an inside center stop that does not create an enlargement chamber or recess with a ledge,
shoulder, or reduction of pipe area or offer an obstruction to flow.
5.1.2 The elastomeric gasket shall be free of defects that affect the use and serviceability.
6. Clamp Assembly Requirements
6.1 The clamp assembly material shall be class 25 cast iron and comply with 4.2.2 of this specification.
6.1.1 The clamp assembly shall comply with dimension specifications, as are given in Figs. 2-4. The clamp assembly shall
consist of two sections that interlock using a nut and bolt. The clamp assembly shall have the minimum wall thickness along the
ring wall and the minimum wall thickness along the ear wall, with tapered ends as shown on Fig. 4.
6.1.2 Clamp assemblies shall be tested to withstand no less than 125 % of manufacturer of the coupling’s stated installation
torque or a minimum of 175 lbf·in. (19.77 N·m) of applied torque, whichever is greater, without visible signs of failure. The clamp
assembly shall be tested over a steel mandrel of the appropriate diameter and torqued as required.
6.1.3 The clamp assembly shall be designed to accommodate maximum and minimum OD’sODs of pipe and fittings as shown
in Table 3.
7. Sampling
7.1 The manufacturer of the coupling shall, upon receipt of a shipment of clamp assemblies from the manufacturer of the clamp
assemblies, take a random sampling of couplings manufactured therefrom and subject them to the tests specified in Section 8. If
A1056 − 20
Dimensions, in. (mm)
1 ⁄2 (38.100) 2 (50.800) 3 (76.200) 4 (101.600) 5 (127.000) 6 (152.400) 8 (203.200) 10 (254.000)
A 2.125 2.125 2.125 2.125 3.000 3.000 4.000 4.000
(53.975) (53.975) (53.975) (53.975) (76.200) (76.200) (101.600) (101.600)
B 1.531 1.969 2.969 4.000 4.969 5.969 7.969 10.085
(38.887) (50.013) (75.413) (101.600) (126.213) (151.613) (202.413) (256.159)
C 1.937 2.344 3.344 4.406 5.344 6.344 8.344 10.460
(49.200) (59.538) (84.938) (111.912) (135.737) (161.138) (211.938) (265.684)
D 1.531 1.969 2.969 4.000 4.969 5.969 7.969 10.085
(38.887) (50.013) (75.413) (101.600) (126.213) (151.613) (202.413) (256.159)
E 1.037 2.250 3.250 4.313 5.250 6.250 8.250 10.366
(26.340) (57.150) (82.550) (109.550) (133.350) (158.750) (209.550) (263.296)
F 1.937 2.344 3.344 4.406 5.344 6.344 8.344 10.460
(49.200) (59.538) (84.938) (111.912) (135.737) (161.138) (211.938) (265.684)
G 2.125 2.531 3.531 4.594 5.532 6.532 8.532 10.650
(53.975) (64.287) (89.687) (116.688) (140.513) (165.913) (216.713) (270.510)
H 2.219 2.625 3.625 4.684 5.626 6.626 8.626 10.744
(56.363) (66.675) (92.075) (118.974) (142.900) (168.300) (219.100) (272.898)
J 2.313 2.719 3.719 4.781 5.720 6.720 8.720 10.838
(58.750) (69.063) (94.463) (121.437) (145.288) (170.688) (221.488) (275.285)
NOTE 1—Dimensional Tolerancestolerances to be RMA Class 3 (see Table 1).
FIG. 1 Rubber Gasket
a coupling fails any of the tests, then the entire shipment of clamp assemblies of that size shall be rejected and returned to the
manufacturer of the clamp assemblies. The manufacturer of the coupling shall retain the test results and related documentation for
not less than seven years.
8. Coupling Requirements and Test Methods
8.1 Assemble each coupling tested according to the manufacturer of the coupling’s instructions between two sections of
randomly selected hubless cast iron soil pipe meeting the requirements of CISPI-301 CISPI 301 or Specification A888, or one
section of randomly selected hubless cast iron soil pipe meeting the requirements of CISPI-301 CISPI 301 or Specification A888
A1056 − 20
Nominal Size – in. (mm) Coupling Size – in. (mm) Bolt Size – in. (mm)
Coupling
Pipe Diameter Height X Width Y Depth Z No. Size × Length
Size
1 ⁄2 (38) 1.90 ±.06 (48.26 ±1.52) 2.875 (73.025) 4.50 (114.300) 2.125 (53.975) 2 0.375 × 1.50
2 (50) 2.35 ±.09 (59.69 ± 2.29) 3.375 (85.725) 4.875 (123.825) 2.125 (53.975) 2 0.375 × 1.50
3 (76) 3.35 ±.09 (85.09 ± 2.229) 4.25 (107.950) 6 (152.400) 2.125 (53.975) 2 0.375 × 1.50
4 (101) 4.38 +.09/-.05 (111.252 + 2.286 – 1.270) 5.25 (133.350) 7 (177.800) 2.125 (53.975) 2 0.375 × 1.50
5 (127) 5.30 +.09/-.05 (111.25 + 2.229 – 1.27) 6 .25 (158.750) 8.625 (219.075) 3.125 (79.375) 4 0.375 × 1.50
6 (152) 6.30 +.09/-.05 (160.02 + 2.229 – 1.270) 7.50 (190.500) 9.25 (234.950) 3.125 (79.375) 4 0.375 × 1.50
8 (203) 8.38 +.09/-.09 (212.85 + 3.3 – 2.29) 9.50 (241.300) 11.75 (298.450) 4 (101.600) 4 0.375 × 2
10 (254) 10.56 ±.09 (268.22 ±2.29) 11.813 (300.203) 14.33 (364.058) 4 (101.600) 4 0.375 × 2 .25
Nominal Size, in. (mm) Coupling Size, in. (mm) Bolt Size, in. (mm)
Coupling
Pipe Diameter Height X Width Y Depth Z No. Size × Length
Size
1 ⁄2 (38) 1.90 ± 0.06 (48.26 ± 1.52) 2.875 (73.025) 4.50 (114.300) 2.125 (53.975) 2 0.375 × 1.50
2 (50) 2.35 ± 0.09 (59.69 ± 2.29) 3.375 (85.725) 4.875 (123.825) 2.125 (53.975) 2 0.375 × 1.50
3 (76) 3.35 ± 0.09 (85.09 ± 2.229) 4.25 (107.950) 6 (152.400) 2.125 (53.975) 2 0.375 × 1.50
4 (101) 4.38 +0.09/–0.05 (111.252 + 2.286 – 1.270) 5.25 (133.350) 7 (177.800) 2.125 (53.975) 2 0.375 × 1.50
5 (127) 5.30 +0.09/–0.05 (111.25 + 2.229 – 1.27) 6.25 (158.750) 8.625 (219.075) 3.125 (79.375) 4 0.375 × 1.50
6 (152) 6.30 +0.09/–0.05 (160.02 + 2.229 – 1.270) 7.50 (190.500) 9.25 (234.950) 3.125 (79.375) 4 0.375 × 1.50
8 (203) 8.38 +0.09/–0.09 (212.85 + 3.3 – 2.29) 9.50 (241.300) 11.75 (298.450) 4 (101.600) 4 0.375 × 2
10 (254) 10.56 ± 0.09 (268.22 ± 2.29) 11.813 (300.203) 14.33 (364.058) 4 (101.600) 4 0.375 × 2.25
NOTE 1—Tolerance shall be 60.125 in. (0.975) unless otherwise specified.
FIG. 2 Clamp Assembly Dimensions
TABLE 1 Dimensional Tolerances for Rubber – Standard
Dimensional Tolerances RMA CLASS 3
NOTE 1—8.000 and over—multiplied by 0.0050. These are commercial
tolerances.
Fixed, Closure,
Size in. (mm)
± in. (mm) ± (in. (mm)
0 to 0.499 (0 to 12.675) 0.010 (0.254) 0.015 (0.381)
0.500 to 0.999 (12.700 to 25.375) 0.010 (0.254) 0.018 (0.457)
1.000 to 1.999 (25.400 to 50.744) 0.015 (0.381) 0.020 (0.508)
2.000 to 2.999 (50.800 to 76.175) 0.020 (0.508) 0.025 (0.635)
3.000 to 3.999 (76.200 to 101.575) 0.025 (0.635) 0.030 (0.762)
4.000 to 4.999 (101.600 to 126.975) 0.030 (0.762) 0.035 (0.889)
5.000 to 7.999 (127.000 to 203.175) 0.035 (0.889) 0.050 (1.270)
TABLE 1 Dimensional Tolerances for Rubber Gaskets (Inches)
Fixed, Closure,
Coupling Size
± ±
1 ⁄2 0.020 0.050
2 0.020 0.050
3 0.020 0.050
4 0.020 0.050
5 0.025 0.055
6 0.025 0.055
8 0.030 0.063
10 0.030 0.063
and a fitting and conduct the following tests: deflection and shear. In addition, an unrestrained hydrostatic test will be performed
between two sections of machined steel pipe.
8.1.1 Deflection Test:
A1056 − 20
TABLE 2 Rubber Gasket Physical Requirements
NOTE 1—Material: The sealing sleeve shall be made from an elastomeric compound that meets the requirements of Specification C564.
NOTE 2—Physical Tests: The test specimens shall be obtained from finished sleeves and tested pursuant to the methods
...
Questions, Comments and Discussion
Ask us and Technical Secretary will try to provide an answer. You can facilitate discussion about the standard in here.
Loading comments...