ASTM E455-19
(Test Method)Standard Test Method for Static Load Testing of Framed Floor or Roof Diaphragm Constructions for Buildings
Standard Test Method for Static Load Testing of Framed Floor or Roof Diaphragm Constructions for Buildings
SIGNIFICANCE AND USE
5.1 Framed floor and roof systems are tested by this test method for static shear capacity. This test method will help determine structural diaphragm properties needed for design purposes.
SCOPE
1.1 This test method covers procedures designed (1) to evaluate the static shear capacity of a typical segment of a framed diaphragm under simulated loading conditions, and (2) to provide a determination of the stiffness of the construction and its connections. A diaphragm construction is an assembly of materials designed to transmit shear forces in the plane of the construction.
1.2 No effort has been made to specify the test apparatus, as there are a number that can be used as long as the needs of the testing agency are met. If round-robin testing is to be conducted, test apparatus and testing procedures shall be mutually agreed upon in advance by the participants.
1.3 The text of this standard contains notes and footnotes that provide explanatory information and are not requirements of the standard. Notes and footnotes in tables and figures are requirements of this standard.
1.4 The values stated in inch-pound units are to be regarded as standard. The values given in parentheses are mathematical conversions to SI units that are provided for information only and are not considered standard.
1.5 This standard does not purport to address all of the safety concerns, if any, associated with its use. It is the responsibility of the user of this standard to establish appropriate safety, health, and environmental practices and determine the applicability of regulatory limitations prior to use. For specific precautionary statements, see Section 6.
1.6 This international standard was developed in accordance with internationally recognized principles on standardization established in the Decision on Principles for the Development of International Standards, Guides and Recommendations issued by the World Trade Organization Technical Barriers to Trade (TBT) Committee.
General Information
- Status
- Published
- Publication Date
- 31-Mar-2019
- Technical Committee
- E06 - Performance of Buildings
Relations
- Effective Date
- 01-Apr-2019
- Effective Date
- 01-Jul-2018
- Effective Date
- 01-Mar-2015
- Effective Date
- 01-Nov-2014
- Effective Date
- 01-Apr-2011
- Effective Date
- 01-Jun-2006
- Effective Date
- 01-Oct-2005
- Effective Date
- 28-Jul-2000
- Effective Date
- 10-Oct-1999
- Effective Date
- 01-Apr-2019
- Effective Date
- 01-Apr-2019
Overview
ASTM E455-19: Standard Test Method for Static Load Testing of Framed Floor or Roof Diaphragm Constructions for Buildings provides a comprehensive procedure for evaluating the static shear capacity and stiffness of floor and roof diaphragm assemblies. Developed by ASTM International, this standard is essential for determining the structural performance of diaphragms-critical horizontal or sloped systems designed to transmit lateral and in-plane shear forces to a building’s vertical resisting elements, such as shear walls and frames.
This method offers a framework for simulating real-world loading conditions and assessing how assemblies behave under static load. With applications across building construction, engineering, and structural performance, ASTM E455-19 supports code compliance, risk mitigation, and optimized structural design.
Key Topics
- Static Shear Capacity: The standard provides test methods to measure how much shear force a diaphragm assembly can withstand before failure. This ensures that floor and roof systems meet required safety and performance benchmarks.
- Stiffness Evaluation: Testing also delivers a precise determination of the diaphragm and connection stiffness, which influences the structural integrity and serviceability under load.
- Test Procedures: ASTM E455-19 outlines test setups using simple beam or cantilever-type specimens, loading protocols, and measurement techniques for displacement and load-deformation relationships.
- Apparatus Flexibility: The method allows for various test apparatus as long as results meet the needs of the testing agency and, for comparative (round-robin) studies, are agreed upon in advance.
- Deflection and Displacement: In-plane deflections and total diaphragm movement under load are recorded, capturing both the bending of structural members and deformation at connections.
- Reporting Requirements: The standard specifies clear reporting of test details, calibration, specimen construction, data results, and observations, supporting transparency and repeatability.
Applications
- Building Design Optimization: Structural engineers use ASTM E455-19 to verify that framed floors and roofs achieve the necessary shear strength and stiffness, allowing for optimized material use and reliable performance in buildings.
- Code Compliance: Test results support compliance with building codes and engineering guidelines that demand specific diaphragm capabilities for wind, seismic, and other lateral loading.
- Safety Assurance: By providing clear criteria and methodologies, this standard helps ensure that floor and roof systems are thoroughly tested for failure modes, preventing unexpected performance issues and enhancing occupant safety.
- Manufacturer Quality Control: Manufacturers of construction materials and assemblies apply this method as part of their quality assurance programs, confirming that products meet intended specifications in real-world scenarios.
- Research and Development: ASTM E455-19 is valuable in R&D for developing new materials and connection details, providing a benchmark for comparing the performance of innovative diaphragm systems.
Related Standards
- ASTM E575 – Practice for Reporting Data from Structural Tests of Building Constructions, Elements, Connections, and Assemblies: Offers guidelines for documenting results from structural tests.
- ASTM E631 – Terminology of Building Constructions: Provides definitions of key terms used in building testing standards.
- AISI S310 – North American Standard for the Design of Profiled Steel Diaphragm Panels: Outlines requirements for steel diaphragm panel design.
- ANSI/AWC SDPWS – Special Design Provisions for Wind and Seismic: Specifies special requirements for wood and hybrid systems subjected to wind or seismic forces.
Keywords: static load testing, diaphragm construction, shear capacity, floor systems, roof systems, structural testing, building code compliance, ASTM E455, framed diaphragm, stiffness evaluation
By following ASTM E455-19, industry professionals ensure that critical structural diaphragm assemblies are robust, code-compliant, and trustworthy under expected service loads.
Buy Documents
ASTM E455-19 - Standard Test Method for Static Load Testing of Framed Floor or Roof Diaphragm Constructions for Buildings
REDLINE ASTM E455-19 - Standard Test Method for Static Load Testing of Framed Floor or Roof Diaphragm Constructions for Buildings
Get Certified
Connect with accredited certification bodies for this standard

ICC Evaluation Service
Building products evaluation and certification.

QAI Laboratories
Building and construction product testing and certification.

Aboma Certification B.V.
Specialized in construction, metal, and transport sectors.
Sponsored listings
Frequently Asked Questions
ASTM E455-19 is a standard published by ASTM International. Its full title is "Standard Test Method for Static Load Testing of Framed Floor or Roof Diaphragm Constructions for Buildings". This standard covers: SIGNIFICANCE AND USE 5.1 Framed floor and roof systems are tested by this test method for static shear capacity. This test method will help determine structural diaphragm properties needed for design purposes. SCOPE 1.1 This test method covers procedures designed (1) to evaluate the static shear capacity of a typical segment of a framed diaphragm under simulated loading conditions, and (2) to provide a determination of the stiffness of the construction and its connections. A diaphragm construction is an assembly of materials designed to transmit shear forces in the plane of the construction. 1.2 No effort has been made to specify the test apparatus, as there are a number that can be used as long as the needs of the testing agency are met. If round-robin testing is to be conducted, test apparatus and testing procedures shall be mutually agreed upon in advance by the participants. 1.3 The text of this standard contains notes and footnotes that provide explanatory information and are not requirements of the standard. Notes and footnotes in tables and figures are requirements of this standard. 1.4 The values stated in inch-pound units are to be regarded as standard. The values given in parentheses are mathematical conversions to SI units that are provided for information only and are not considered standard. 1.5 This standard does not purport to address all of the safety concerns, if any, associated with its use. It is the responsibility of the user of this standard to establish appropriate safety, health, and environmental practices and determine the applicability of regulatory limitations prior to use. For specific precautionary statements, see Section 6. 1.6 This international standard was developed in accordance with internationally recognized principles on standardization established in the Decision on Principles for the Development of International Standards, Guides and Recommendations issued by the World Trade Organization Technical Barriers to Trade (TBT) Committee.
SIGNIFICANCE AND USE 5.1 Framed floor and roof systems are tested by this test method for static shear capacity. This test method will help determine structural diaphragm properties needed for design purposes. SCOPE 1.1 This test method covers procedures designed (1) to evaluate the static shear capacity of a typical segment of a framed diaphragm under simulated loading conditions, and (2) to provide a determination of the stiffness of the construction and its connections. A diaphragm construction is an assembly of materials designed to transmit shear forces in the plane of the construction. 1.2 No effort has been made to specify the test apparatus, as there are a number that can be used as long as the needs of the testing agency are met. If round-robin testing is to be conducted, test apparatus and testing procedures shall be mutually agreed upon in advance by the participants. 1.3 The text of this standard contains notes and footnotes that provide explanatory information and are not requirements of the standard. Notes and footnotes in tables and figures are requirements of this standard. 1.4 The values stated in inch-pound units are to be regarded as standard. The values given in parentheses are mathematical conversions to SI units that are provided for information only and are not considered standard. 1.5 This standard does not purport to address all of the safety concerns, if any, associated with its use. It is the responsibility of the user of this standard to establish appropriate safety, health, and environmental practices and determine the applicability of regulatory limitations prior to use. For specific precautionary statements, see Section 6. 1.6 This international standard was developed in accordance with internationally recognized principles on standardization established in the Decision on Principles for the Development of International Standards, Guides and Recommendations issued by the World Trade Organization Technical Barriers to Trade (TBT) Committee.
ASTM E455-19 is classified under the following ICS (International Classification for Standards) categories: 91.060.20 - Roofs. The ICS classification helps identify the subject area and facilitates finding related standards.
ASTM E455-19 has the following relationships with other standards: It is inter standard links to ASTM E455-16, ASTM E575-05(2018), ASTM E631-15, ASTM E631-14, ASTM E575-05(2011), ASTM E631-06, ASTM E575-05, ASTM E631-93a(1998)e1, ASTM E575-99, ASTM E2322-22, ASTM E1803-14(2022). Understanding these relationships helps ensure you are using the most current and applicable version of the standard.
ASTM E455-19 is available in PDF format for immediate download after purchase. The document can be added to your cart and obtained through the secure checkout process. Digital delivery ensures instant access to the complete standard document.
Standards Content (Sample)
This international standard was developed in accordance with internationally recognized principles on standardization established in the Decision on Principles for the
Development of International Standards, Guides and Recommendations issued by the World Trade Organization Technical Barriers to Trade (TBT) Committee.
Designation: E455 − 19
Standard Test Method for
Static Load Testing of Framed Floor or Roof Diaphragm
Constructions for Buildings
This standard is issued under the fixed designation E455; the number immediately following the designation indicates the year of
original adoption or, in the case of revision, the year of last revision. A number in parentheses indicates the year of last reapproval. A
superscript epsilon (´) indicates an editorial change since the last revision or reapproval.
1. Scope 2. Referenced Documents
2.1 ASTM Standards:
1.1 This test method covers procedures designed (1)to
evaluate the static shear capacity of a typical segment of a E575 Practice for Reporting Data from Structural Tests of
Building Constructions, Elements, Connections, and As-
framed diaphragm under simulated loading conditions, and (2)
to provide a determination of the stiffness of the construction semblies
E631 Terminology of Building Constructions
and its connections. A diaphragm construction is an assembly
of materials designed to transmit shear forces in the plane of 2.2 Other Documents:
AISI S310 North American Standard for the Design of
the construction.
Profiled Steel Diaphragm Panels
1.2 No effort has been made to specify the test apparatus, as
ANSI/AWC SDPWS Special Design Provisions for Wind
there are a number that can be used as long as the needs of the
and Seismic
testing agency are met. If round-robin testing is to be
conducted, test apparatus and testing procedures shall be
3. Terminology
mutually agreed upon in advance by the participants.
3.1 For definitions of terms used in this standard, refer to
1.3 The text of this standard contains notes and footnotes
Terminology E631.
that provide explanatory information and are not requirements
3.2 Definitions of Terms Specific to This Standard:
of the standard. Notes and footnotes in tables and figures are
3.2.1 deflection—in-plane deformation (distortion) of a dia-
requirements of this standard.
phragm due to bending and shear excluding translational
1.4 The values stated in inch-pound units are to be regarded displacement due to movement of supports.
as standard. The values given in parentheses are mathematical
3.2.2 diaphragm—horizontal or sloped system acting to
conversions to SI units that are provided for information only
transmit lateral forces to the vertical resisting elements.
and are not considered standard.
3.2.2.1 Discussion—Adiaphragm is analogous to a horizon-
tal deep beam with interconnected membrane elements such as
1.5 This standard does not purport to address all of the
safety concerns, if any, associated with its use. It is the panels, sheathing, or cladding acting as the deep beam web,
intermediate elements such as joists acting as web stiffeners,
responsibility of the user of this standard to establish appro-
priate safety, health, and environmental practices and deter- andperimeterboundaryelementssuchasgirdersactingasdeep
beam chords.
mine the applicability of regulatory limitations prior to use.
For specific precautionary statements, see Section 6.
3.2.3 displacement—the distance between the initial and the
1.6 This international standard was developed in accor-
final position of a point on the diaphragm in a given direction.
dance with internationally recognized principles on standard-
3.3 Symbols Specific to This Standard:
ization established in the Decision on Principles for the
Development of International Standards, Guides and Recom-
E = modulus of elasticity of flange or web material,
mendations issued by the World Trade Organization Technical
depending upon which material is held constant in
Barriers to Trade (TBT) Committee.
a transformed section analysis, psi (or MPa).
For referenced ASTM standards, visit the ASTM website, www.astm.org, or
This test method is under the jurisdiction of ASTM Committee E06 on contact ASTM Customer Service at service@astm.org. For Annual Book of ASTM
Performance of Buildings and is the direct responsibility of Subcommittee E06.11 Standards volume information, refer to the standard’s Document Summary page on
on Horizontal and Vertical Structures/Structural Performance of Completed Struc- the ASTM website.
tures. Available from American Iron and Steel Institute (AISI), 25 Massachusetts
Current edition approved April 1, 2019. Published April 2019. Originally Ave., NW, Suite 800, Washington, DC 20001, http://www.steel.org.
approved in 1976. Last previous edition approved in 2016 as E455–16. DOI: Available fromAmerican National Standards Institute (ANSI), 25 W. 43rd St.,
10.1520/E0455–19. 4th Floor, New York, NY 10036, http://www.ansi.org.
Copyright © ASTM International, 100 Barr Harbor Drive, PO Box C700, West Conshohocken, PA 19428-2959. United States
E455 − 19
or roof diaphragm assembly by testing a simulation of the
G = shear modulus of the web material, psi (or MPa).
construction. The test method outlines basic procedures for the
G' = apparent shear stiffness of the diaphragm, which is
static load testing of these constructions using simple beam or
derived from the apparent shear deflection of the
cantilever-type test specimens. Suggested specimen and test
diaphragm, lbf/in. (or N/mm).
setup details are provided, along with loading procedures,
I = momentofinertiaofthetransformedsectionofthe
diaphragm based on webs or flanges, in. (or instrumentation, and evaluation methods.
mm ).
4.2 Construction:
L = total span of diaphragm, in. (or mm).
4.2.1 Diaphragm Performance Assumptions—These dia-
P = concentrated load, lbf (or N).
phragm assemblies, assumed to act as deep beams, span
P = maximum jack load applied to test frame, lbf (or
max
between shear walls, moment frame bents, or other construc-
N).
tions that furnish the end or intermediate reactions to the
R = maximum diaphragm reaction, lbf (or N).
u
S = ultimate shear strength of the diaphragm, lbf/ft (or system. The chord members of the assembly perpendicular to
u
N/m). the line of applied load act as the flanges of the deep beam, and
b = depth of diaphragm parallel to applied loads, in. the plate or panel elements act as the web of the deep beam,
(or mm).
and the framing members act as web stiffeners. A schematic
t = thickness of web material, in. (or mm).
drawing of a simple span diaphragm is shown in Fig. 1.
w = uniform load, lbf/in. (or N/mm).
4.2.2 Connections—The performance of the diaphragm is
∆ = portion of the diaphragm deflection attributed to
b
influencedbythetypeandspacingoftheplateorpanelelement
bending, in. (or mm).
attachments, framing connections, and perimeter anchorage at
∆ = portion of the diaphragm deflection attributed to
k
intermediate and perimeter supports. It is necessary to ensure
deformation of the diaphragm fasteners and
that the type of connection system used and its application as
connections, in. (or mm).
nearly as possible duplicate the system intended for use in the
∆ = portion of the diaphragm deflection attributed to
s
prototype construction.
shear deflection of the diaphragm web, in. (or
mm).
4.3 Displacements—To calculate deflections, the in-plane
∆ ' = apparent shear deflection of the diaphragm (see
s diaphragm displacement(s) shall be recorded. The total deflec-
10.1.2.2), which includes the deflection due to
tion of a diaphragm consists of bending deflection, shear
shear deflection of the diaphragm web and defor-
deflection of the diaphragm web, and any additional deflection
mation of the diaphragm fasteners and
attributed to deformation of the diaphragm fasteners and
connections, in. (or mm).
connections.Table1containssomeusefuldeflectionequations.
∆ = total deflection of diaphragm, in. (or mm).
t
∆ = displacement measured at Point i (i = 1,2, _ _ _),
i,___
5. Significance and Use
in. (or mm).
5.1 Framed floor and roof systems are tested by this test
4. Summary of Test Method
method for static shear capacity. This test method will help
4.1 The general purpose of this test method is to evaluate determine structural diaphragm properties needed for design
theshearforcesthatcanbecarriedbythewebofaframedfloor purposes.
FIG. 1 Schematic of Simple Span Diaphragm
E455 − 19
TABLE 1 Useful Deflection Equations
NOTE 1—Other equations may be applicable depending on the number of load points used.
A
Maximum Deflections
Type of Beam Loading Condition
∆ ∆ ∆ '
b s s
4 2 2
Simple beam uniform load 5wL /(384EI) wL /(8Gbt) wL /(8G'b)
B 3
Simple beam third-point load 23PL /(648EI) PL/(3Gbt) PL/(3G'b)
4 2 2
Cantilever beam uniform load wL /(8EI) wL /(2Gbt) wL /(2G'b)
Cantilever beam concentrated load at free end PL /(3EI) PL/(Gbt) PL/(G'b)
A
At midspan of simple beam and free end of cantilever beam.
B
For bending deflection at the load points under a third-point load, use the following equation:
∆ sat L/3d 5 5 PL /s 162 EId
b
6. Apparatus test objective is to force failure to occur elsewhere in the
assembly, make the test frame members stronger and note the
6.1 Test Assembly:
modification in the test report. The frame shall be calibrated to
6.1.1 General—The diaphragm test assembly consists of a
establish its load-deflection characteristics before attaching the
frame or framing system on which the elements comprising the
diaphragmelements.Iftheframehasastiffnessequaltoorless
web of the diaphragm are placed. The elements are fastened to
than2 %ofthetotaldiaphragmassembly,noadjustmentoftest
the frame in a manner equivalent to their attachment in the
results for frame resistance need be made. However, if the
field. The assembly may be tested horizontally or vertically.
framestiffnessisgreaterthan2 %ofthetotalassembly,thetest
Either a cantilever or a simple span diaphragm assembly may
results shall be adjusted to compensate for frame resistance.
be used, with concentrated or distributed loading.
6.1.2.1 Cantilever Frame (see Fig. 2)—A pinned frame
6.1.2 Frame Requirements—The frame is a part of the test
assembly and shall consist of members of the same or similar reaction at corner (C) shall be provided to transfer the
horizontal force (P) through the diaphragm into the support
materials as those intended for use in the prototype construc-
tion. The test frame members shall be of equal or less strength system. The pin shall be located as close as possible to the
than those intended for use in the prototype construction. If the diaphragm-to-frame contact plane to minimize warping of the
NOTE 1—
Dial gage or other displacement measuring device.
NOTE 2—Lateral restraint devices are not shown, and should not restrict movement in the plane of the diaphragm.
FIG. 2 Plan of a Cantilever Beam Diaphragm Test with a Concentrated Load
E455 − 19
diaphragm surface.Avertical reaction roller or rollers shall be 6.1.3.1 Cantilever Diaphragm—The diaphragm shall be
provided in the diaphragm plane at corner (H).The frame shall tested on a span L, as shown in Fig. 2, equal to or greater than
belaterallysupportedatadjacentcorners(D)and(E)onrollers
the typical support spacing likely to be used in the building.
and at other locations as necessary to prevent displacement of
The test assembly shall not be less than 8 ft (2.4 m) in either
the diaphragm from the plane of testing, but not to restrict
span L or depth b; nor shall it contain fewer than four elements
in-plane displacements.
if the diaphragm consists of individual elements. The dia-
6.1.2.2 Simple Span Frame (see Fig. 3)—In-plane reactions
phragm shall contain typical end and side joints for the
shall be provided at points (E) and (H) as shown to resist the
elements.
applied test load or loads. The frame shall be supported with
NOTE 1—When the web of the diaphragm is made of individual
rollers at points (C), (D), (E), and (H), and under each loading
elements, they might not be equally effective for the same span length if
point. Hold-downs with rollers shall be provided to prevent
laid perpendicular or parallel to the load direction.
displaceme
...
This document is not an ASTM standard and is intended only to provide the user of an ASTM standard an indication of what changes have been made to the previous version. Because
it may not be technically possible to adequately depict all changes accurately, ASTM recommends that users consult prior editions as appropriate. In all cases only the current version
of the standard as published by ASTM is to be considered the official document.
Designation: E455 − 16 E455 − 19
Standard Test Method for
Static Load Testing of Framed Floor or Roof Diaphragm
Constructions for Buildings
This standard is issued under the fixed designation E455; the number immediately following the designation indicates the year of
original adoption or, in the case of revision, the year of last revision. A number in parentheses indicates the year of last reapproval. A
superscript epsilon (´) indicates an editorial change since the last revision or reapproval.
1. Scope
1.1 This test method covers procedures designed (1) to evaluate the static shear capacity of a typical segment of a framed
diaphragm under simulated loading conditions, and (2) to provide a determination of the stiffness of the construction and its
connections. A diaphragm construction is an assembly of materials designed to transmit shear forces in the plane of the
construction.
1.2 No effort has been made to specify the test apparatus, as there are a number that can be used as long as the needs of the
testing agency are met. If round-robin testing is to be conducted, test apparatus and testing procedures shall be mutually agreed
upon in advance by the participants.
1.3 The text of this standard contains notes and footnotes that provide explanatory information and are not requirements of the
standard. Notes and footnotes in tables and figures are requirements of this standard.
1.4 The values stated in inch-pound units are to be regarded as standard. The values given in parentheses are mathematical
conversions to SI units that are provided for information only and are not considered standard.
1.5 This standard does not purport to address all of the safety concerns, if any, associated with its use. It is the responsibility
of the user of this standard to establish appropriate safety safety, health, and healthenvironmental practices and determine the
applicability of regulatory limitations prior to use. For specific precautionary statements, see Section 6.
1.6 This international standard was developed in accordance with internationally recognized principles on standardization
established in the Decision on Principles for the Development of International Standards, Guides and Recommendations issued
by the World Trade Organization Technical Barriers to Trade (TBT) Committee.
2. Referenced Documents
2.1 ASTM Standards:
E575 Practice for Reporting Data from Structural Tests of Building Constructions, Elements, Connections, and Assemblies
E631 Terminology of Building Constructions
2.2 Other Documents:
AISI S310 North American Standard for the Design of Profiled Steel Diaphragm Panels
ANSI/AWC SDPWS Special Design Provisions for Wind and Seismic
3. Terminology
3.1 For definitions of terms used in this standard, refer to Terminology E631.
3.2 Definitions of Terms Specific to This Standard:
3.2.1 deflection—in-plane deformation (distortion) of a diaphragm due to bending and shear excluding translational
displacement due to movement of supports.
3.2.2 diaphragm—horizontal or sloped system acting to transmit lateral forces to the vertical resisting elements.
This test method is under the jurisdiction of ASTM Committee E06 on Performance of Buildings and is the direct responsibility of Subcommittee E06.11 on Horizontal
and Vertical Structures/Structural Performance of Completed Structures.
Current edition approved April 1, 2016April 1, 2019. Published May 2016April 2019. Originally approved in 1976. Last previous edition approved in 20112016 as
E455 – 11.E455–16. DOI: 10.1520/E0455-16.10.1520/E0455–19.
For referenced ASTM standards, visit the ASTM website, www.astm.org, or contact ASTM Customer Service at service@astm.org. For Annual Book of ASTM Standards
volume information, refer to the standard’sstandard’s Document Summary page on the ASTM website.
Available from American Iron and Steel Institute (AISI), 25 Massachusetts Ave., NW, Suite 800, Washington, DC 20001, http://www.steel.org.
Available from American National Standards Institute (ANSI), 25 W. 43rd St., 4th Floor, New York, NY 10036, http://www.ansi.org.
Copyright © ASTM International, 100 Barr Harbor Drive, PO Box C700, West Conshohocken, PA 19428-2959. United States
E455 − 19
3.2.2.1 Discussion—
A diaphragm is analogous to a horizontal deep beam with interconnected membrane elements such as panels, sheathing, or
cladding acting as the deep beam web, intermediate elements such as joists acting as web stiffeners, and perimeter boundary
elements such as girders acting as deep beam chords.
3.2.3 displacement—the distance between the initial and the final position of a point on the diaphragm in a given direction.
3.3 Symbols Specific to This Standard:
E = modulus of elasticity of flange or web material, depending upon which material is held constant in a transformed
section analysis, psi (or MPa).
G = shear modulus of the web material, psi (or MPa).
G' = apparent shear stiffness of the diaphragm, which is derived from the apparent shear deflection of the diaphragm, lbf/in.
(or N/mm).
4 4
I = moment of inertia of the transformed section of the diaphragm based on webs or flanges, in. (or mm ).
L = total span of diaphragm, in. (or mm).
P = concentrated load, lbf (or N).
P = maximum jack load applied to test frame, lbf (or N).
max
R = maximum diaphragm reaction, lbf (or N).
u
S = ultimate shear strength of the diaphragm, lbf/ft (or N/m).
u
b = depth of diaphragm parallel to applied loads, in. (or mm).
t = thickness of web material, in. (or mm).
w = uniform load, lbf/in. (or N/mm).
Δ = portion of the diaphragm deflection attributed to bending, in. (or mm).
b
Δ = portion of the diaphragm deflection attributed to deformation of the diaphragm fasteners and connections, in. (or mm).
k
Δ = portion of the diaphragm deflection attributed to shear deflection of the diaphragm web, in. (or mm).
s
Δ ' = apparent shear deflection of the diaphragm (see 10.1.2.2), which includes the deflection due to shear deflection of the
s
diaphragm web and deformation of the diaphragm fasteners and connections, in. (or mm).
Δ = total deflection of diaphragm, in. (or mm).
t
Δ = displacement measured at Point i (i = 1,2, _ _ _), in. (or mm).
i, _ _ _
4. Summary of Test Method
4.1 The general purpose of this test method is to evaluate the shear forces that can be carried by the web of a framed floor or
roof diaphragm assembly by testing a simulation of the construction. The test method outlines basic procedures for the static load
testing of these constructions using simple beam or cantilever-type test specimens. Suggested specimen and test setup details are
provided, along with loading procedures, instrumentation, and evaluation methods.
4.2 Construction:
4.2.1 Diaphragm Performance Assumptions—These diaphragm assemblies, assumed to act as deep beams, span between shear
walls, moment frame bents, or other constructions that furnish the end or intermediate reactions to the system. The chord members
of the assembly perpendicular to the line of applied load act as the flanges of the deep beam, and the plate or panel elements act
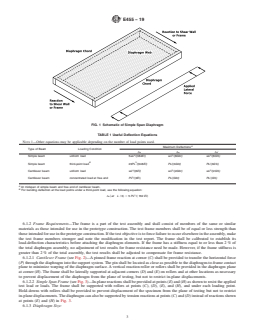
as the web of the deep beam, and the framing members act as web stiffeners. A schematic drawing of a simple span diaphragm
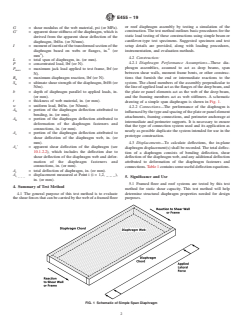
is shown in Fig. 1.
4.2.2 Connections—The performance of the diaphragm is influenced by the type and spacing of the plate or panel element
attachments, framing connections, and perimeter anchorage at intermediate and perimeter supports. It is necessary to ensure that
the type of connection system used and its application as nearly as possible duplicate the system intended for use in the prototype
construction.
4.3 Displacements—To calculate deflections, the in-plane diaphragm displacement(s) shall be recorded. The total deflection of
a diaphragm consists of bending deflection, shear deflection of the diaphragm web, and any additional deflection attributed to
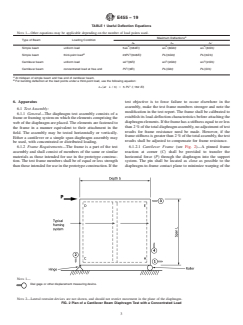
deformation of the diaphragm fasteners and connections. Table 1 contains some useful deflection equations.
5. Significance and Use
5.1 Framed floor and roof systems are tested by this test method for static shear capacity. This test method will help determine
structural diaphragm properties needed for design purposes.
6. Apparatus
6.1 Test Assembly:
6.1.1 General—The diaphragm test assembly consists of a frame or framing system on which the elements comprising the web
of the diaphragm are placed. The elements are fastened to the frame in a manner equivalent to their attachment in the field. The
assembly may be tested horizontally or vertically. Either a cantilever or a simple span diaphragm assembly may be used, with
concentrated or distributed loading.
E455 − 19
FIG. 1 Schematic of Simple Span Diaphragm
TABLE 1 Useful Deflection Equations
NOTE 1—Other equations may be applicable depending on the number of load points used.
A
Maximum Deflections
Type of Beam Loading Condition
Δ Δ Δ '
b s s
4 2 2
Simple beam uniform load 5wL /(384EI) wL /(8Gbt) wL /(8G'b)
B 3
Simple beam third-point load 23PL /(648EI) PL/(3Gbt) PL/(3G'b)
4 2 2
Cantilever beam uniform load wL /(8EI) wL /(2Gbt) wL /(2G'b)
Cantilever beam concentrated load at free end PL /(3EI) PL/(Gbt) PL/(G'b)
A
At midspan of simple beam and free end of cantilever beam.
B
For bending deflection at the load points under a third-point load, use the following equation:
Δ at L / 3d 5 5 PL /s 162 EId
s
b
6.1.2 Frame Requirements—The frame is a part of the test assembly and shall consist of members of the same or similar
materials as those intended for use in the prototype construction. The test frame members shall be of equal or less strength than
those intended for use in the prototype construction. If the test objective is to force failure to occur elsewhere in the assembly, make
the test frame members stronger and note the modification in the test report. The frame shall be calibrated to establish its
load-deflection characteristics before attaching the diaphragm elements. If the frame has a stiffness equal to or less than 2 % of
the total diaphragm assembly, no adjustment of test results for frame resistance need be made. However, if the frame stiffness is
greater than 2 % of the total assembly, the test results shall be adjusted to compensate for frame resistance.
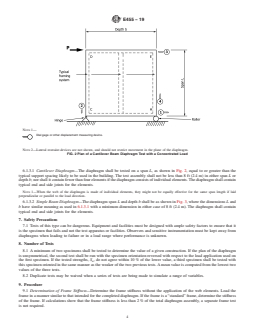
6.1.2.1 Cantilever Frame (see Fig. 2)—A pinned frame reaction at corner (C) shall be provided to transfer the horizontal force
(P) through the diaphragm into the support system. The pin shall be located as close as possible to the diaphragm-to-frame contact
plane to minimize warping of the diaphragm surface. A vertical reaction roller or rollers shall be provided in the diaphragm plane
at corner (H). The frame shall be laterally supported at adjacent corners (D) and (E) on rollers and at other locations as necessary
to prevent displacement of the diaphragm from the plane of testing, but not to restrict in-plane displacements.
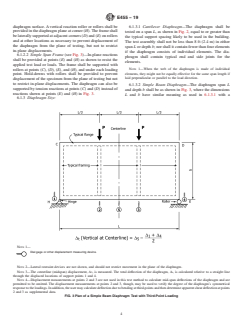
6.1.2.2 Simple Span Frame (see Fig. 3)—In-plane reactions shall be provided at points (E) and (H) as shown to resist the applied
test load or loads. The frame shall be supported with rollers at points (C), (D), (E), and (H), and under each loading point.
Hold-downs with rollers shall be provided to prevent displacement of the specimen from the plane of testing but not to restrict
in-plane displacements. The diaphragm can also be supported by tension reactions at points (C) and (D) instead of reactions shown
at points (E) and (H) in Fig. 3.
6.1.3 Diaphragm Size:
E455 − 19
NOTE 1—
Dial gage or other displacement measuring device.
NOTE 2—Lateral restraint devices are not shown, and should not restrict movement in the plane of the diaphragm.
FIG. 2 Plan of a Cantilever Beam Diaphragm Test with a Concentrated Load
6.1.3.1 Cantilever Diaphragm—The diaphragm shall be tested on a span L, as shown in Fig. 2, equal to or greater than the
typical support spacing likely to be used in the building. The test assembly shall not be less than 8 ft (2.4 m) in either span L or
depth b; nor shall it contain fewer than four elements if the diaphragm consists of individual elements. The diaphragm shall contain
typical end and side joints for the elements.
NOTE 1—When the web of the diaphragm is made of individual elements, they might not be equally effective for the same span length if laid
perpendicular or parallel to the load direction.
6.1.3.2 Si
...
Questions, Comments and Discussion
Ask us and Technical Secretary will try to provide an answer. You can facilitate discussion about the standard in here.
Loading comments...