ASTM D6098-16
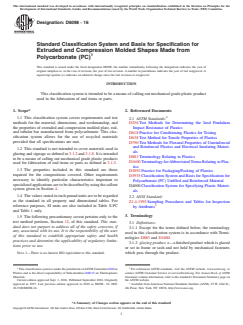
(Specification)Standard Classification System and Basis for Specification for Extruded and Compression Molded Shapes Made from Polycarbonate (PC)
Standard Classification System and Basis for Specification for Extruded and Compression Molded Shapes Made from Polycarbonate (PC)
ABSTRACT
This specification establishes the classification, requirements, and test methods for extruded and compression molded plates, rods, and tubular bars manufactured from polycarbonate or recycled plastics. This specification does not cover materials used in glazing and signage. Rather, it is intended to be a means of calling out mechanical grade plastic products used for fabrication of end items or parts. The polycarbonate shape products may be categorized by type, grade, and class depending on resin and filler compositions. Appropriately sampled specimens shall be tested and conform accordingly to the following properties: tensile strength at break, elongation at break, and tangent tensile modulus; size and dimensional stability; lengthwise camber and widthwise bow; squareness; flexural modulus; and Izod impact strength.
SCOPE
1.1 This classification system covers requirements and test methods for the material, dimensions, and workmanship, and the properties of extruded and compression molded plate, rod, and tubular bar manufactured from polycarbonate. This classification system allows for the use of recycled materials provided that all specifications are met.
1.2 This standard is not intended to cover materials used in glazing and signage as defined in 3.1.2 and 3.1.8. It is intended to be a means of calling out mechanical grade plastic products used for fabrication of end items or parts as defined in 3.1.3.
1.3 The properties included in this standard are those required for the compositions covered. Other requirements necessary to identify particular characteristics important to specialized applications are to be described by using the callout system given in Section 4.
1.4 The values stated in inch-pound units are to be regarded as the standard in all property and dimensional tables. For reference purposes, SI units are also included in Table S-PC and Table 1 only.
1.5 The following precautionary caveat pertains only to the test method portions, Section 12, of this standard. This standard does not purport to address all of the safety concerns, if any, associated with its use. It is the responsibility of the user of this standard to establish appropriate safety and health practices and determine the applicability of regulatory limitations prior to use.
Note 1: There is no known ISO equivalent to this standard.
General Information
- Status
- Published
- Publication Date
- 31-Aug-2016
- Technical Committee
- D20 - Plastics
- Drafting Committee
- D20.15 - Thermoplastic Materials
Relations
- Effective Date
- 01-Sep-2016
- Effective Date
- 01-Feb-2024
- Effective Date
- 01-Nov-2023
- Effective Date
- 01-Jan-2020
- Effective Date
- 01-Aug-2019
- Effective Date
- 15-Apr-2019
- Effective Date
- 01-Feb-2019
- Effective Date
- 01-Dec-2018
- Effective Date
- 01-Nov-2018
- Refers
ASTM D1600-18 - Standard Terminology for Abbreviated Terms Relating to Plastics (Withdrawn 2024) - Effective Date
- 01-Jan-2018
- Effective Date
- 15-Aug-2017
- Effective Date
- 01-Jul-2017
- Effective Date
- 01-Dec-2015
- Effective Date
- 01-Dec-2015
- Effective Date
- 01-Sep-2015
Overview
ASTM D6098-16 provides a comprehensive classification system and basis for specification for extruded and compression molded shapes made from polycarbonate (PC). Developed by ASTM International, this standard covers material requirements, dimensional tolerances, workmanship, and test methods relevant to polycarbonate plates, rods, and tubular bars. Its primary focus is on mechanical grade plastic products used in the fabrication of end items or parts, explicitly excluding applications in glazing and signage.
This standard also accounts for the use of recycled polycarbonate plastics, provided that the finished shapes meet all performance and dimensional requirements. ASTM D6098-16 helps manufacturers, purchasers, and specifiers ensure consistency, quality, and traceability for polycarbonate shapes in demanding industrial and engineering applications.
Key Topics
Scope and Purpose
- Applies to extruded and compression molded PC plates, rods, and tubular bars.
- Excludes materials intended for glazing and signage applications.
- Provides a means of designating mechanical grade plastic products for further fabrication.
Classification System
- Products are classified by type, grade, and class, based on resin composition and filler content.
- Allows for both virgin and up to 100% recycled polycarbonate content.
- Includes reinforced grades (glass, carbon, mineral, or other fillers) and their designated percentage by mass.
Callout Designation
- Uses a streamlined alphanumeric system for specifying resin type, filler, grade, and key physical properties.
- Enables precise ordering and traceability.
Physical and Dimensional Requirements
- Critical properties include:
- Tensile strength at break
- Elongation at break
- Tensile modulus
- Flexural modulus
- Dimensional stability
- Izod impact strength
- Tolerance tables address size, camber, bow, squareness, and roundness for rods and plates.
- Critical properties include:
Testing and Quality Assurance
- Prescribes standard test methods for evaluation:
- ASTM D638 (Tensile)
- ASTM D790 (Flexural)
- ASTM D256 (Impact)
- Practice D618 governs specimen conditioning to ensure fair measurement.
- Visual inspection used to detect defects, inclusions, or contamination.
- Sampling in accordance with ANSI Z1.4 for statistical adequacy.
- Prescribes standard test methods for evaluation:
Applications
The ASTM D6098-16 standard adds practical value for organizations in industries such as:
Machining and Fabrication
- Facilitates procurement of consistent raw polycarbonate shapes for CNC or manual machining into finished parts.
- Supports mechanical parts, bushings, spacers, and custom components.
Industrial Equipment
- Provides reliable specifications for components subjected to dynamic loads, requiring high impact resistance and durability.
OEM and Aftermarket Manufacturing
- Ensures traceability and repeatability for parts used in automotive, electrical, or heavy equipment industries.
Sustainable Manufacturing
- Allows for environmentally responsible production using recycled PC, supporting circular economy objectives.
Related Standards
When working with polycarbonate shapes, the following ASTM and ANSI standards are closely related to ASTM D6098-16:
- ASTM D3935: Classification system for unfilled and reinforced polycarbonate materials (resin-level specification).
- ASTM D638: Standard test method for tensile properties of plastics.
- ASTM D790: Standard test method for flexural properties of plastics.
- ASTM D256: Test methods for determining the Izod impact resistance of plastics.
- ASTM D618: Practice for conditioning plastics for testing.
- ASTM D883: Terminology relating to plastics.
- ASTM D3892: Packaging and packing of plastics.
- ANSI Z1.4: Sampling procedures and tables for inspection by attributes.
Keywords: polycarbonate shapes, ASTM D6098, compression molded polycarbonate, extruded polycarbonate, polycarbonate rod, polycarbonate plate, polycarbonate tubular bar, recycled polycarbonate specification
This standard ensures that polycarbonate shapes meet rigorous quality and dimensional requirements, providing confidence in mechanical performance for demanding engineered applications.
Buy Documents
ASTM D6098-16 - Standard Classification System and Basis for Specification for Extruded and Compression Molded Shapes Made from Polycarbonate (PC)
REDLINE ASTM D6098-16 - Standard Classification System and Basis for Specification for Extruded and Compression Molded Shapes Made from Polycarbonate (PC)
Get Certified
Connect with accredited certification bodies for this standard

Smithers Quality Assessments
US management systems and product certification.

DIN CERTCO
DIN Group product certification.
Sponsored listings
Frequently Asked Questions
ASTM D6098-16 is a technical specification published by ASTM International. Its full title is "Standard Classification System and Basis for Specification for Extruded and Compression Molded Shapes Made from Polycarbonate (PC)". This standard covers: ABSTRACT This specification establishes the classification, requirements, and test methods for extruded and compression molded plates, rods, and tubular bars manufactured from polycarbonate or recycled plastics. This specification does not cover materials used in glazing and signage. Rather, it is intended to be a means of calling out mechanical grade plastic products used for fabrication of end items or parts. The polycarbonate shape products may be categorized by type, grade, and class depending on resin and filler compositions. Appropriately sampled specimens shall be tested and conform accordingly to the following properties: tensile strength at break, elongation at break, and tangent tensile modulus; size and dimensional stability; lengthwise camber and widthwise bow; squareness; flexural modulus; and Izod impact strength. SCOPE 1.1 This classification system covers requirements and test methods for the material, dimensions, and workmanship, and the properties of extruded and compression molded plate, rod, and tubular bar manufactured from polycarbonate. This classification system allows for the use of recycled materials provided that all specifications are met. 1.2 This standard is not intended to cover materials used in glazing and signage as defined in 3.1.2 and 3.1.8. It is intended to be a means of calling out mechanical grade plastic products used for fabrication of end items or parts as defined in 3.1.3. 1.3 The properties included in this standard are those required for the compositions covered. Other requirements necessary to identify particular characteristics important to specialized applications are to be described by using the callout system given in Section 4. 1.4 The values stated in inch-pound units are to be regarded as the standard in all property and dimensional tables. For reference purposes, SI units are also included in Table S-PC and Table 1 only. 1.5 The following precautionary caveat pertains only to the test method portions, Section 12, of this standard. This standard does not purport to address all of the safety concerns, if any, associated with its use. It is the responsibility of the user of this standard to establish appropriate safety and health practices and determine the applicability of regulatory limitations prior to use. Note 1: There is no known ISO equivalent to this standard.
ABSTRACT This specification establishes the classification, requirements, and test methods for extruded and compression molded plates, rods, and tubular bars manufactured from polycarbonate or recycled plastics. This specification does not cover materials used in glazing and signage. Rather, it is intended to be a means of calling out mechanical grade plastic products used for fabrication of end items or parts. The polycarbonate shape products may be categorized by type, grade, and class depending on resin and filler compositions. Appropriately sampled specimens shall be tested and conform accordingly to the following properties: tensile strength at break, elongation at break, and tangent tensile modulus; size and dimensional stability; lengthwise camber and widthwise bow; squareness; flexural modulus; and Izod impact strength. SCOPE 1.1 This classification system covers requirements and test methods for the material, dimensions, and workmanship, and the properties of extruded and compression molded plate, rod, and tubular bar manufactured from polycarbonate. This classification system allows for the use of recycled materials provided that all specifications are met. 1.2 This standard is not intended to cover materials used in glazing and signage as defined in 3.1.2 and 3.1.8. It is intended to be a means of calling out mechanical grade plastic products used for fabrication of end items or parts as defined in 3.1.3. 1.3 The properties included in this standard are those required for the compositions covered. Other requirements necessary to identify particular characteristics important to specialized applications are to be described by using the callout system given in Section 4. 1.4 The values stated in inch-pound units are to be regarded as the standard in all property and dimensional tables. For reference purposes, SI units are also included in Table S-PC and Table 1 only. 1.5 The following precautionary caveat pertains only to the test method portions, Section 12, of this standard. This standard does not purport to address all of the safety concerns, if any, associated with its use. It is the responsibility of the user of this standard to establish appropriate safety and health practices and determine the applicability of regulatory limitations prior to use. Note 1: There is no known ISO equivalent to this standard.
ASTM D6098-16 is classified under the following ICS (International Classification for Standards) categories: 83.140.01 - Rubber and plastics products in general. The ICS classification helps identify the subject area and facilitates finding related standards.
ASTM D6098-16 has the following relationships with other standards: It is inter standard links to ASTM D6098-10, ASTM D883-24, ASTM D883-23, ASTM D883-20, ASTM D883-19c, ASTM D883-19a, ASTM D883-19, ASTM D883-18a, ASTM D883-18, ASTM D1600-18, ASTM D883-17, ASTM D790-17, ASTM D790-15e1, ASTM D790-15, ASTM D3892-15. Understanding these relationships helps ensure you are using the most current and applicable version of the standard.
ASTM D6098-16 is available in PDF format for immediate download after purchase. The document can be added to your cart and obtained through the secure checkout process. Digital delivery ensures instant access to the complete standard document.
Standards Content (Sample)
This international standard was developed in accordance with internationally recognized principles on standardization established in the Decision on Principles for the
Development of International Standards, Guides and Recommendations issued by the World Trade Organization Technical Barriers to Trade (TBT) Committee.
Designation: D6098 −16
Standard Classification System and Basis for Specification for
Extruded and Compression Molded Shapes Made from
Polycarbonate (PC)
This standard is issued under the fixed designation D6098; the number immediately following the designation indicates the year of
original adoption or, in the case of revision, the year of last revision. A number in parentheses indicates the year of last reapproval. A
superscript epsilon (´) indicates an editorial change since the last revision or reapproval.
INTRODUCTION
This classification system is intended to be a means of calling out mechanical grade plastic product
used in the fabrication of end items or parts.
1. Scope* 2. Referenced Documents
1.1 This classification system covers requirements and test
2.1 ASTM Standards:
methods for the material, dimensions, and workmanship, and
D256 Test Methods for Determining the Izod Pendulum
the properties of extruded and compression molded plate, rod,
Impact Resistance of Plastics
and tubular bar manufactured from polycarbonate. This clas-
D618 Practice for Conditioning Plastics for Testing
sification system allows for the use of recycled materials
D638 Test Method for Tensile Properties of Plastics
provided that all specifications are met.
D790 Test Methods for Flexural Properties of Unreinforced
and Reinforced Plastics and Electrical Insulating Materi-
1.2 This standard is not intended to cover materials used in
als
glazing and signage as defined in 3.1.2 and 3.1.8. It is intended
D883 Terminology Relating to Plastics
to be a means of calling out mechanical grade plastic products
D1600 Terminology forAbbreviatedTerms Relating to Plas-
used for fabrication of end items or parts as defined in 3.1.3.
tics
1.3 The properties included in this standard are those
D3892 Practice for Packaging/Packing of Plastics
required for the compositions covered. Other requirements
D3935 Classification System and Basis for Specification for
necessary to identify particular characteristics important to
Polycarbonate (PC) Unfilled and Reinforced Material
specializedapplicationsaretobedescribedbyusingthecallout
D4000 Classification System for Specifying Plastic Materi-
system given in Section 4.
als
1.4 The values stated in inch-pound units are to be regarded
2.2 ANSI Standard:
as the standard in all property and dimensional tables. For
Z1.4-1993 Sampling Procedures and Tables for Inspection
reference purposes, SI units are also included in Table S-PC
by Attributes
and Table 1 only.
3. Terminology
1.5 The following precautionary caveat pertains only to the
test method portions, Section 12, of this standard. This stan-
3.1 Definitions:
dard does not purport to address all of the safety concerns, if
3.1.1 Except for the terms defined below, the terminology
any, associated with its use. It is the responsibility of the user
used in this classification system is in accordance with Termi-
of this standard to establish appropriate safety and health
nologies D883 and D1600.
practices and determine the applicability of regulatory limita-
3.1.2 glazing product, n—a finished product which is glazed
tions prior to use.
or set in frame or sash and not held by mechanical fasteners
NOTE 1—There is no known ISO equivalent to this standard. which pass through the product.
1 2
ThisclassificationsystemisunderthejurisdictionofASTMCommitteeD20on For referenced ASTM standards, visit the ASTM website, www.astm.org, or
Plastics and is the direct responsibility of Subcommittee D20.15 on Thermoplastic contact ASTM Customer Service at service@astm.org. For Annual Book of ASTM
Materials. Standards volume information, refer to the standard’s Document Summary page on
Current edition approved Sept. 1, 2016. Published September 2016. Originally the ASTM website.
approved in 1997. Last previous edition approved in 2010 as D6098 - 10. DOI: Available from American National Standards Institute (ANSI), 25 W. 43rd St.,
10.1520/D6098-16. 4th Floor, New York, NY 10036, http://www.ansi.org.
*A Summary of Changes section appears at the end of this standard
Copyright © ASTM International, 100 Barr Harbor Drive, PO Box C700, West Conshohocken, PA 19428-2959. United States
D6098 − 16
3.1.3 mechanical grade plastic product, n—extruded or 4.2.1 The polycarbonate shape product is categorized by
compression molded shapes made from polycarbonate used for type, class, and grade depending on resin and filler composi-
fabrication of end items or parts. tions as defined in Table 1 S-PC.
1 4.2.2 Each polycarbonate shape is categorized into one of
3.1.4 plate, n—flat stock greater than ⁄4 in.
several grades:
3.1.5 recycled-plastic shape, n—a product made from up to
4.2.2.1 Grade 1—General Purpose—Extruded or compres-
100 % recycled plastic.
sion molded product made using only 100 % virgin polycar-
3.1.6 regrind plastic, n—a product or scrap such as sprues
bonate resin.
and runners and edge trim that have been reclaimed by
4.2.2.2 Grade 2—Recycled—Extruded or compression
shredding and granulating for use in-house.
molded product made using any amount up to 100 % recycled
3.1.7 rod, n—an extruded solid cylindrical shape with a polycarbonate plastics.
minimum diameter of ⁄8 in.
4.3 The type, class and grade is further differentiated based
3.1.8 signage product, n—a fabricated sign or outdoor/
on dimensional stability (elevated temperature excursion test),
indoor structure, consisting of any letter, figure, character,
Table 1 S-PC, and dimensional requirements, Table 2 A-1,
mark, point, plane, marquee sign, design, poster, pictorial,
Table 3 B-1, and Table 4 B-2.
picture, stripe, line, trademark, reading matter or illuminating
4.4 Property Tables:
device, which is constructed, attached, erected, fastened, or
4.4.1 Table 1 S-PC is used to describe both extruded and
manufactured in any manner so that the same shall be used for
compression molded products.
the attraction of the public to any place, subject, person, firm,
4.4.2 Table 5 is used to describe extruded or compression
corporation, public performance, article, machine or
molded products not included in Table 1 S-PC via a cell callout
merchandise, and displayed in any manner for recognized
that includes the applicable Table 1 S-PC polycarbonate type
advertising purposes.
and specific properties (Designations 1-7).
3.1.9 tubular bar, n—an extruded annular shape with mini-
4.4.3 To facilitate the incorporation of future or special
mum inside diameter of ⁄8 in. and minimum wall thickness of
materials not covered by Table 1 S-PC, the “as specified”
⁄16 in.
category (00) for type, class and grade is shown in the table
with the basic properties to be obtained from Table 5, as they
4. Classification and Material
apply.
4.1 Product shape and size as defined in the applicable
4.4.4 Reinforcements and Additive Materials—A symbol
purchase order.
(single-letter) is used for the major reinforcement or
4.2 This classification system covers product extruded and combination, or both, along with two numbers that indicate the
compression molded as listed in Table 1 S-PC. Products percentage of reinforcement and/or additive by mass with the
included in the designations refer to specification callouts from tolerances as tabulated below. This must be included in all
D3935 where applicable. Table 5 callouts (Specifications).
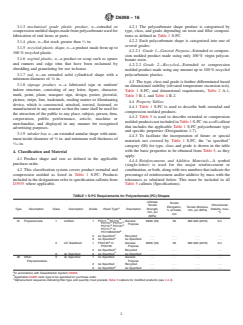
TABLE 1 S-PC Requirements for Polycarbonate (PC) Shapes
Ultimate
Tensile
Tensile Dimensional
Elongation, Tensile Modulus,
A
Type Description Class Description Grade Resin Type Description Strength, Stability, max,
% at break, min, psi (MPa)
min, psi %
min
(MPa)
B B
01 Polycarbonate 1 Unfilled 1 PC111, PC112, General 8000 (55) 50 300 000 (2070) 0.4
B B
PC113, PC114,
Purpose
B B
PC115, PC116,
B
PC117, or
B
PC110B34720
C
2 As Specified Recycled . . . . . . . . . . . .
C
0 As Specified As Specified . . . . . . . . . . . .
B
2 UV Stabilized 1 PC0135 or General 8000 (55) 50 300 000 (2070) 0.4
PC0136
Purpose
C
2 As Specified Recycled . . . . . . . . . . . .
C
0 As Specified 0 As Specified As Specified . . . . . . . . . . . .
00 Other 0 As Specified 1 As Specified General . . . .
Polycarbonates Purpose
2 As Specified Recycled . . . . . . . . . . . .
C
0 As Specified As Specified . . . . . . . . . . . .
A
In accordance with Classification System D3935.
B
Applicable D3935 resin type to be specified on purchase order.
C
Alphanumeric sequence indicating filler type and quantity must precede Table 5 callouts for modified products (see 4.4.4).
D6098 − 16
A
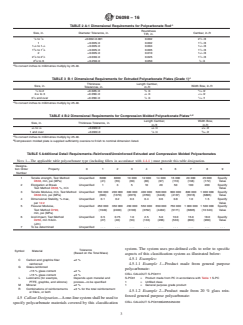
TABLE 2 A-1 Dimensional Requirements for Polycarbonate Rod
Roundness
Size, in. Diameter Tolerance, in. Camber, in./ft
TIR, in.
1 7 1
⁄8 to ⁄8 +0.002/-0.001 0.002 2 ⁄2 /8
1 +0.005/-0 0.002 1 ⁄4 /8
1 1 1
1 ⁄8 to 1 ⁄4 +0.005/-0 0.004 1 ⁄4 /8
3 7 1
1 ⁄8 to 1 ⁄8 +0.005/-0 0.005 1 ⁄4 /8
2 +0.005/-0 0.010 1 ⁄4 /8
1 1 1
2 ⁄8 to 2 ⁄2 +0.030/-0 0.025 1 ⁄4 /8
5 1
2 ⁄8 to 6 +0.250/-0 0.050 ⁄4 /4
A
To convert inches to millimetres multiply by 25.40.
A
TABLE 3 B-1 Dimensional Requirements for Extruded Polycarbonate Plates (Grade 1)
Thickness Length Camber,
Size, in. Width Bow, in./ft
Tolerances, in. in./ft
1 3 3
⁄4 to 2 +0.025/-0 ⁄4 /4 ⁄16 /2
1 1 1
2 ⁄8 to 3 +0.050/-0 ⁄4 /4 ⁄16 /2
1 1 1
3 ⁄8 and over +0.050/-0 ⁄4 /4 ⁄16 /1
A
To convert inches to millimetres multiply by 25.40.
A,B
TABLE 4 B-2 Dimensional Requirements for Compression Molded Polycarbonate Plates
Length Camber, Width Bow,
Size, in. Thickness Tolerance, in.
in./ft in./ft
3 7 3 3
⁄8 to ⁄8 +0.090/-0 ⁄8 /4 ⁄32 /2
1 3
1 and over +0.090/-0 ⁄8 /4 ⁄64 /2
A
To convert inches to millimetres multiply by 25.40.
B
Compression molded plate is supplied sufficiently oversize to finish to nominal dimension listed.
TABLE 5 Additional Detail Requirements–Reinforced/Unreinforced Extruded and Compression Molded Polycarbonates
NOTE 1—The applicable table polycarbonate type (including fillers in accordance with 4.4.4 ) must precede this table designation.
Designa-
tion Order Property 0 123456 7 8 9
Number
1 Tensile strength, Test Method Unspecified 6000 8000 10 000 12 000 14 000 16 000 20 000 25 000 Specify
D638, min, psi (MPa) (41) (55) (69) (83) (97) (110) (138) (172) Value
2 Elongation at Break Unspecified 1 3 5 10 20 50 100 200 Specify
Test Method D638,%,min Value
3 Tensile Modulus, min, Test Method Unspecified 100 000 200 000 300 000 400 000 500 000 600 000 800 000 1 000 000 Specify
D638 min, psi (MPa) (690) (1379) (2073) (2760) (3448) (4137) (5516) (6895) Value
4 Dimensional Stability, % max, Unspecified 0.1 0.2 0.3 0.4 0.6 0.8 1.0 1.5 Specify
per 12.2 Value
5 Flexural Modulus, Unspecified 250 000 350 000 450 000 550 000 650 000 750 000 1 000 000 1 500 000 Specify
Test Method D790, (1649) (2400) (3100) (3792) (4482) (5171) (6895) (10 343) Value
min, psi (MPa)
6 Izod impact, Test Method Unspecified 0.5 0.75 1.0 2.5 5.0 10.0 15.0 18.0 Specify
D256, min ft·lb/in. (27) (40) (53) (133) (266) (533) (800) (960) Value
(J/m)
7 To be determined Unspecified . . . . . . . . . . . . . . . . . . . . . . . . . . .
system. The system uses pre-defined cells to refer to specific
Tolerance
Symbol Material
(Based on the Total Mass)
aspects of this classification system as illustrated below:
4.5.1 Examples:
C Carbon and graphite fiber ±2 %
reinforced
4.5.1.1 Example 1—Product made from general purpose
G Glass-reinforced
polycarbonate:
<15 % glass content ±2 %
>15 % glass content ±3 % CELL CALLOUT: S-PC0111
L Lubricants (for example, Depends upon material and S-PC01 = Product made from PC in accordance with T
...
This document is not an ASTM standard and is intended only to provide the user of an ASTM standard an indication of what changes have been made to the previous version. Because
it may not be technically possible to adequately depict all changes accurately, ASTM recommends that users consult prior editions as appropriate. In all cases only the current version
of the standard as published by ASTM is to be considered the official document.
Designation: D6098 − 10 D6098 − 16
Standard Classification System and Basis for Specification for
Extruded and Compression Molded Shapes Made from
Polycarbonate (PC)
This standard is issued under the fixed designation D6098; the number immediately following the designation indicates the year of
original adoption or, in the case of revision, the year of last revision. A number in parentheses indicates the year of last reapproval. A
superscript epsilon (´) indicates an editorial change since the last revision or reapproval.
INTRODUCTION
This specification classification system is intended to be a means of calling out mechanical grade
plastic product used in the fabrication of end items or parts.
1. Scope
1.1 This specification covers requirements and test methods for the material, dimensions, and workmanship, and the properties
of extruded and compression molded plate, rod, and tubular bar manufactured from polycarbonate.
1.2 This specification is not intended to cover materials used in glazing and signage as defined in 3.2.1 and 3.2.6. It is intended
to be a means of calling out mechanical grade plastic products used for fabrication of end items or parts as defined in 3.2.2.
1.3 The properties included in this specification are those required for the compositions covered. Requirements necessary to
identify particular characteristics important to specialized applications are to be described by using the classification system given
in Section 4.
1.4 This specification allows for the use of recycled plastics as defined in Guide D7209.
1.5 The values stated in inch-pound units are to be regarded as the standard in all property and dimensional tables. For reference
purposes, SI units are also included in Table S-PC and Table 1 only.
1.6 The following precautionary caveat pertains only to the test method portions, Section 12, of this specification.This standard
does not purport to address all of the safety concerns, if any, associated with its use. It is the responsibility of the user of this
standard to establish appropriate safety and health practices and determine the applicability of regulatory limitations prior to use.
NOTE 1—There is no known ISO equivalent to this standard.
2. Referenced Documents
2.1 ASTM Standards:
D256 Test Methods for Determining the Izod Pendulum Impact Resistance of Plastics
D618 Practice for Conditioning Plastics for Testing
D638 Test Method for Tensile Properties of Plastics
D790 Test Methods for Flexural Properties of Unreinforced and Reinforced Plastics and Electrical Insulating Materials
D883 Terminology Relating to Plastics
D3892 Practice for Packaging/Packing of Plastics
D3935 Classification System and Basis for Specification for Polycarbonate (PC) Unfilled and Reinforced Material
D4000 Classification System for Specifying Plastic Materials
D7209 Guide for Waste Reduction, Resource Recovery, and Use of Recycled Polymeric Materials and Products (Withdrawn
2015)
This specification classification system is under the jurisdiction of ASTM Committee D20 on Plastics and is the direct responsibility of Subcommittee D20.15 on
Thermoplastic Materials.
Current edition approved Dec. 1, 2010Sept. 1, 2016. Published January 2011September 2016. Originally approved in 1997. Last previous edition approved in 20032010
as D6098 - 97D6098 - 10.(2003). DOI: 10.1520/D6098-10.10.1520/D6098-16.
For referenced ASTM standards, visit the ASTM website, www.astm.org, or contact ASTM Customer Service at service@astm.org. For Annual Book of ASTM Standards
volume information, refer to the standard’s Document Summary page on the ASTM website.
Copyright © ASTM International, 100 Barr Harbor Drive, PO Box C700, West Conshohocken, PA 19428-2959. United States
D6098 − 16
2.2 ANSI Standard:
Z1.4-1993 Sampling Procedures and Tables for Inspection by Attributes
3. Terminology
3.1 Definitions:
3.1.1 For definitions of other technical terms pertaining to plastics used in this specification, see Terminology D883 or Guide
D7209.
3.1.2 regrind plastic, n—a product or scrap such as sprues and runners and edge trim that have been reclaimed by shredding
and granulating for use in-house.
3.2 Definitions of Terms Specific to This Standard:
3.2.1 glazing product, n—a finished product which is glazed or set in frame or sash and not held by mechanical fasteners which
pass through the product.
3.2.2 mechanical grade plastic product, n—extruded or compression molded shapes made from polycarbonate used for
fabrication of end items or parts.
3.2.3 plate, n—flat stock greater than ⁄4 in.
3.2.4 recycled-plastic shape, n—a product made from up to 100 % recycled plastic.
3.2.5 rod, n—an extruded solid cylindrical shape with a minimum diameter of ⁄8 in.
3.2.6 signage product, n—a fabricated sign or outdoor/indoor structure, consisting of any letter, figure, character, mark, point,
plane, marquee sign, design, poster, pictorial, picture, stripe, line, trademark, reading matter or illuminating device, which is
constructed, attached, erected, fastened, or manufactured in any manner so that the same shall be used for the attraction of the
public to any place, subject, person, firm, corporation, public performance, article, machine or merchandise, and displayed in any
manner for recognized advertising purposes.
3 1
3.2.7 tubular bar, n—an extruded annular shape with minimum inside diameter of ⁄8 in. and minimum wall thickness of ⁄16 in.
4. Classification and Material
4.1 Product shape and size as defined in the applicable purchase order.
4.2 This specification covers product extruded and compression molded as listed in Table S-PC. Products included in the
designations refer to Specification D3935 callouts where applicable.
4.2.1 The type of polycarbonate shape product can be categorized by type, grade and class depending on resin and filler
compositions as defined in Table S-PC.
4.2.2 Each type of polycarbonate shape can be categorized into one of several grades as follows:
4.2.2.1 Grade 1—General Purpose—Extruded or compression molded product made using only 100 % virgin polycarbonate
resin.
4.2.2.2 Grade 2—Recycled—Extruded or compression molded product made using any amount up to 100 % recycled
polycarbonate plastics.
4.3 The type, class and grade is further differentiated based on dimensional stability (elevated temperature excursion test), Table
S-PC, and dimensional requirements, Tables A and B.
4.4 Property Tables:
4.4.1 Table S-PC is used to describe both extruded or compression molded products.
4.4.2 Table 1 is used to describe extruded or compression molded products not included in Table S-PC via a cell callout that
includes the applicable Table S-PC polycarbonate type and specific properties (Designations 1–7).
4.4.3 To facilitate the incorporation of future or special materials not covered by Table S-PC, the “as specified” category (00)
for type, class and grade is shown in the table with the basic properties to be obtained from Table 1, as they apply.
4.4.4 Reinforcements and Additive Materials—A symbol (single-letter) will be used for the major reinforcement or combination,
or both, along with two numbers that indicate the percentage of addition by mass with the tolerances as tabulated below. This must
be included in all Table 1 callouts.
Tolerance
Symbol Material
(Based on the Total Mass)
C Carbon and graphite fiber ±2 %
reinforced
G Glass-reinforced
<15 % glass content ±2 %
>15 % glass content ±3 %
L Lubricants (for example, Depends upon material and
Available from American National Standards Institute (ANSI), 25 W. 43rd St., 4th Floor, New York, NY 10036, http://www.ansi.org.
D6098 − 16
Tolerance
Symbol Material
(Based on the Total Mass)
PTFE, graphite, and silicone) process—to be specified
M Mineral ±2 %
R Combinations of reinforcements ±3 % for the total reinforcement
or fillers, or both
4.5 Callout Designation—A one-line system shall be used to specify polycarbonate materials covered by this specification. The
system uses pre-defined cells to refer to specific aspects of this specification as illustrated below:
4.5.1 Examples:
4.5.1.1 Example 1—Product made from general purpose polycarbonate:
CELL CALLOUT: S-PC0111
S-PC01 = Product made from PC in accordance with Table S-PC
1 = Unfilled class
1 = General purpose grade product
4.5.1.2 Example 2—Product made from 20 % glass reinforced general purpose polycarbonate:
CELL CALLOUT: S-PC0100G20I3454430
S-PC0100 = Product made from PC in accordance with Table S-PC
G20 = 20 % glass
1 = Table 1 properties
3 = Tensile strength (10,000 psi)
4 = Elongation at break (10 %)
5 = Tensile Modulus (500,000 psi)
4 = Dimensional stability (0.4 %)
4 = Flexural Modulus (550,000 psi)
3 = Izod Impact (1.0 ft-lb/in. of notch)
0 = Unspecified
4.5.2 These two examples illustrate how a one-line, alpha-numeric sequence can identify the product composition, commercial
parameters and physical characteristics of extruded or compression molded product. A space must be used as a separator between
the specification number and the type designation. No separators are needed between type, class and grade. When special notes
are to be included, such information should be preceded by a comma. Special tolerances must be noted at the time of order and
are inserted after the grade in parenthesis and preceded by a comma.
5. Ordering Information
5.1 All shapes covered by this specification shall be ordered using the proper callout designation (see 4.5).
6. Physical Property Requirements
6.1 The physical property values listed within this specification’s tables are to be considered minimum specification values. Any
requirement for specific test data for a given production lot should be specified at the time of order. Physical properties for products
not yet included in Table S-PC are specified using Table 1 for extruded or compression molded products.
7. Dimensional Requirements
7.1 The type, class and grade is differentiated based on dimensional stability (elevated temperature excursion test), as indicated
in Table S-PC.
7.2 Products shall be produced within commercial tolerances and with the lowest stress levels for machined parts as delineated
in Tables A-1, B-1, and B-2.
7.3 Tubular bar dimensions shall be supplied in the unfinished condition, unless otherwise specified at time of order, sufficient
to finish to the nominal dimension ordered.
7.4 The maximum allowable camber and/or bow shall be within the limits referenced in Tables A-1, B-1, and B-2.
8. Workmanship, Finish, and Appearance
8.1 Appearance—The resin material color is transparent with water-white or light straw color. Natural resin is also offered with
various amounts of blue tinting. The product color shall be as published by the shapes manufacturer. They shall be uniform in color
throughout the thickness. Specific colors and color matching only as agreed to by order.
8.1.1 Physical properties, although unaffected by tinting, can be affected if coloring by other means.
8.2 Finish—All products shall be free of blisters, wrinkles, cracks, gouges and defects that restrict commercial use of the
product. Special surface finish shall be supplied only when specified in the purchase order or contract.
8.3 Defects—All products shall be free of voids, dirt, foreign material and embedded particles exceeding 0.040 in. maximum
diameter as defined in 8.3.1.
D6098 − 16
8.3.1 The criteria for determining the internal cleanliness shall be external visual inspection. A maximum number of two internal
defects per square foot of plate and one foot length of rod and tubular bar are allowed. Clusters of defects less than 0.040 in.
diameter are to be counted as a single defect.
8.3.2 For compression molded products, four defects up to 0.080 in. diameter per square foot of plate are allowed.
9. Sampling
9.1 Sampling shall be statistically adequate to satisfy the requirements of this specification as applicable (see ANSI Z1.4 - 1993).
9.2 For purposes of sampling, an inspection lot for examination and tests shall consist of all material of the same type, class,
grade and nominal size submitted for inspection at one time.
10. Number of Tests
10.1 Routine lot inspection shall consist of all the criteria specified in the applicable product tables.
10.2 The criteria listed in these product tables and definitions are sufficient to establish conformity of the sheet, plate, rod or
tubular bars to this specification. When the number of test specimens is not stated in the test method, a single determination is
sufficient. If more than single determinations and separate portions of the same sample are made, the results shall be averaged. The
final result shall conform to the requirements prescribed in this specification.
11. Test Conditions
11.1 Conditioning of Specimens—The specification values and dimensions are based on conditioning techniques outlined in
Procedure A of Practice D618.
11.2 Standard Temperature—The tests shall be conducted at the standard laboratory temperature of 73.4 6 3.6°F (23 6 2°C)
and 50 6 5 % relative humidity.
12. Test Methods
12.1 Test tensile strength at break, elongation at break, and tensile modulus (tangent) in accordance with Test Method D638,
at the rate of 0.2 in./min.
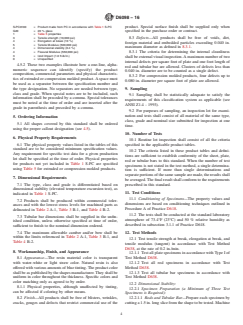
12.1.1 Test all plate specimens in accordance with Type I of Test Method D638.
12.1.2 Test all rod specimens in accordance with Test Method D638.
12.1.3 Test all tubular bar specimens in accordance with Test Method D638.
12.2 Dimensional Stability:
12.2.1 Specimen Preparation (a Minimum of Three Test Samples Required):
12.2.1.1 Rods and Tubular Bar—Prepare each specimen by cutting a 1.5 in. long slice from the shape to be tested. Machine the
slice using a coolant and good machining practices to a length of 1.000 6 0.005 in. Each end of the specimen shall have a machined
surface.
12.2.1.2 Plate—Each specimen shall consist of a 2 in. diameter disc machined from the flat (diameter shall equal test specimen
thickness with a minimum of 2.0 in.). The same care shall be used in the machining as described in 12.1.1. The thickness of the
specimen shall be that of the original flat from which it was cut, no machining being done on the top or bottom faces.
12.2.2 Testing Procedure—Measure the outside diameter and thickness or length of the specimen as applicable at 73.4 6 1.8°F
(23 6 1°C) to the nearest 0.0001 in. All measurements shall be done on the centerline and 90° from the center line for plate. Also
take measurements for thickness halfway to center, and for diameter at mid-point. Place the specimen in a bath consisting of
polyalkylene glycol or an air circulating oven heated to 250 6 5°F (121 6 3°C). After 6 h, allow the specimen to slowly cool to
room temperature at a rate not to exceed 40°F (22°C) / h. Measure the specimen at 73.4 6 1.8°F (23 6 1°C) and calculate the
percent change in each dimension.
12.3 Lengthwise Camber and Widthwise Bow—
12.3.1 Make all measurements for camber and bow using the maximum distance rod, sheet or plate deviates from the straight
line extended from edge to edge when measured in accordance with 12.3.2. The shape shall be oriented such that the weight of
the product does not influence the results.
12.3.2 Rod and Plate:
12.3.2.1 Rod—Lay each rod on its side and measure it with concave side facing a straight edge. Measure camber from the
straight edge to the maximum concave point on the rod. Camber shall not exceed the values of Table A-1.
12.3.2.2 Plate—Plate shall not exceed the requirements of Tables B-1 and B-2 on the lengthwise ends and widthwise edges
when laid on a flat surface (crown side up).
12.4 Squareness (Based on a 4 ft Nominal Length):
12.4.1 Measure and compare diagonal lengths (corner to corner). Accept the product if the difference is ⁄16 in. or less and the
measured minimums diagonal meets the following requirements:
12.4.1.1 1 ft wide is 49 ⁄2 in. minimum,
D6098 − 16
12.4.1.2 2 ft wide is 53 ⁄4 in. minimum, and
12.4.1.3 4 ft wide is 68 in. minimum.
12.4.2 If the diagonal difference exceeds ⁄16 in., proceed to measure the gap (that is, the deviation from a 2 ft square). The
1 1
maximum allowable gap shall not exceed ⁄8 in. except for the 1 ft wide sizes of sheet and plate which should not exceed ⁄16 in.
12.5 Test flexural modulus in accordance with Test Method D790, specimen ⁄4 in. thick maximum, testing speed 0.11 in./min.
12.6 Test Izod impact, in accordance with Test Method D256, Method A, Fig 4, notched, ⁄4 in. thick maximum specimen.
13. Certification
13.1 When requested at the time of order, the purchaser shall be furnished a certification that the lot is made from the required
polycarbonate plastic (percent recycle, if applicable) and meets the requirements of this specification.
14. Packing, Packaging, and Package Marking
14.1 All packing, packaging, and marking provisions of Practice D3892 shall apply to this specification.
15. Ordering Information
15.1 All shapes covered by this specification shall be ordered using the proper callout designation (see 4.5).
16. Keywords
16.1 polycarbonate; plates, polycarbonate; rod, polycarbonate; shapes, polycarbonate; tubular bar, polycarbonate; recycled
plastic, polycarbonate
TABLE 1 S-PC Requirements for Polycarbonate (PC) Shapes
Ultimate
Tensile
Tensile Dimensional
Elongation, Tensile Modulus,
A
Type Description Class Description Grade Resin Type Description Strength, Stability, max,
% at break, min, psi (MPa)
min, psi %
min
(MPa)
B B
01 Polycarbonate 1 Unfilled 1 PC111, PC112, General 8000 (55) 50 300 000 (2070) 0.4
B B
PC113, PC114,
Purpose
B B
PC115, PC116,
B
PC117, or
B
PC110B34720
C
2 As Specified Recycled . . . . . . . . . . . .
C
0 As Specified As Specified . . . . . . . . . . . .
B
2 UV Stabilized 1 PC0135 or General 8000 (55) 50 300 000 (2070) 0.4
PC0136
Purpose
C
0 As Specified Recycled . . . . . . . . . . . .
C
0 As Specified 0 As Specified As Specified . . . . . . . . . . . .
00 Other 0 As Specified 1 As Specified General . . . . . . . . . . . .
Polycarbonates Purpose
2 As Specified Recycled . . . . . . . . . . . .
C
0 As Specified As Specified . . . . . . . . . . . .
A
In accordance with Specification D3935.
B
Applicable Specification D3935 resin type to be specified on purchase order.
C
Alphanumeric sequence indicating filler type and quantity must precede Table 1 callouts for modified products (see 4.4.4).
A
TABLE 2 A-1 Dimensional Requirements for Polycarbonate Rod
Roundness
Size, in. Diameter Tolerance, in. Camber, in./ft
TIR, in.
1 7 1
⁄8 to ⁄8 +0.002/-0.001 0.002 2 ⁄2 /8
1 +0.005/-0 0.002 1 ⁄4 /8
1 1 1
1 ⁄8 to 1 ⁄4 +0.005/-0 0.004 1 ⁄4 /8
3 7 1
1 ⁄8 to 1 ⁄8 +0.005/-0 0.005 1 ⁄4 /8
2 +0.005/-0 0.010 1 ⁄4 /8
1 1 1
2 ⁄8 to 2 ⁄2 +0.030/-0 0.025 1 ⁄4 /8
5 1
2 ⁄8 to 6 +0.250/-0 0.050 ⁄4 /4
A
To convert inches to millimetres multiply by 25.40.
A
TABLE 3 B-1 Dimensional Requirements for Extruded Polycarbonate Plates (Grade 1)
Thickness Length Camber,
Size, in. Width Bow, in./ft
Tolerances, in. in./ft
1 3 3
⁄4 to 2 +0.025/-0 ⁄4 /4 ⁄16 /2
1 1 1
2 ⁄8 to 3 +0.050/-0 ⁄4 /4 ⁄16 /2
1 1 1
3 ⁄8 and over +0.050/-0 ⁄4 /4 ⁄16 /1
D6098 − 16
A
To convert inches to millimetres multiply by 25.40.
A,B
TABLE 4 B-2 Dimensional Requirements for Compression Molded Polycarbonate Plates
Length Camber, Width Bow,
Size, in. Thickness Tolerance, in.
in./ft in./ft
3 7 3 3
⁄8 to ⁄8 +0.090/-0 ⁄8 /4 ⁄32 /2
1 3
1 and over +0.090/-0 ⁄8 /4 ⁄64 /2
A
To convert inches to millimetres multiply by 25.40.
B
Compression molded plate is supplied sufficiently oversize to finish to nominal dimension listed.
TABLE 5 Additional Detail Requirements–Reinforced/Unreinforced Extruded and Compression Molded Polycarbonates
NOTE 1—The applicable table polycarbonate type (including fillers in accordance with 4.4.4 ) must precede this table designation.
Designa-
tion Order Property 0 1 2 3 4 5 6 7 8 9
Number
1 Tensile strength, Test Method Unspecified 6000 8000 10 000 12 000 14 000 16 000 20 000 25 000 Specify
D638, min, psi (MPa) (41) (55) (69) (83) (97) (110) (138) (172) Value
2 Elongation at Break Unspecified 1 3 5 10 20 50 100 200 Specify
Test Method D638, %, min Value
3 Tensile Modulus, min, Test Method Unspecified 100 000 200 000 300 000 400 000 500 000 600 000 800 000 1 000 000 Specify
D638 min, psi (MPa) (690) (1379) (2073) (2760) (3448) (4137) (5516) (6895) Value
4 Dimensional Stability, % max, Unspecified 0.1 0.2 0.3 0.4 0.6 0.8 1.0 1.5 Specify
per 12.2 Value
5 Flexural Modulus, Unspecified 250 000 350 000 450 000 550 000 650 000 750 000 1 000 000 1 500 000 Specify
Test Method D790, (1649) (2400) (3100) (3792) (4482) (5171) (6895) (10 343) Value
min, psi (MPa)
6 Izod impact, Test Method Unspecified 0.5 0.75 1.0 2.5 5.0 10.0 15.0 18.0 Specify
D256, min ft·lb/in. of notch (27) (40) (53) (133) (266) (533) (800) (960) Value
(J/m of notch)
7 To be determined Unspecified . . . . . . . . . . . . . . . . . . . . . . . . . . .
1. Scope*
1.1 This classification system covers requirements and test methods for the material, dimensions, and workmanship, and the
properties of extruded and compression molded plate, rod, and tubular bar manufactured from polycarbonate. This classification
system allows for the use of recycled materials provided that all specifications are met.
1.2 This standard is not intended to cover materials used in glazing and signage as defined in 3.1.2 and 3.1.8. It is intended to
be a means of calling out mechanical grade plastic products used for fabrication of end items or parts as defined in 3.1.3.
1.3 The properties included in this standard are those required for the compositions covered. Other requirements necessary to
identify particular characteristics important to specialized applications are to be described by using the callout system given in
Section 4.
1.4 The values stated in inch-pound units are to be regarded as the standard in all property and dimensional tables. For reference
purposes, SI units are also included in Table S-PC and Table 1 only.
1.5
...
Questions, Comments and Discussion
Ask us and Technical Secretary will try to provide an answer. You can facilitate discussion about the standard in here.
Loading comments...