ASTM E384-17
(Test Method)Standard Test Method for Microindentation Hardness of Materials
Standard Test Method for Microindentation Hardness of Materials
SIGNIFICANCE AND USE
5.1 Hardness tests have been found to be very useful for materials evaluation, quality control of manufacturing processes and research and development efforts. Hardness, although empirical in nature, can be correlated to tensile strength for many metals and alloys, and is also an indicator of machinability, wear resistance, toughness and ductility.
5.2 Microindentation tests are utilized to evaluate and quantify hardness variations that occur over a small distance. These variations may be intentional, such as produced by localized surface hardening, for example, from shot blasting, cold drawing, flame hardening, induction hardening, etc., or from processes such as carburization, nitriding, carbonitriding, etc.; or, they may be unintentional variations due to problems, such as decarburization, localized softening in service, or from compositional/microstructural segregation problems. Low test forces also extend hardness testing to materials too thin or too small for macroindentation tests. Microindentation tests permit hardness testing of specific phases or constituents and regions or gradients too small for evaluation by macroindentation tests.
5.3 Because microindentation hardness tests will reveal hardness variations that commonly exist within most materials, a single test value may not be representative of the bulk hardness. Vickers tests at 1000 gf can be utilized for determination of the bulk hardness, but, as for any hardness test, it is recommended that a number of indents are made and the average and standard deviation are calculated, as needed or as required.
5.4 Microindentation hardness testing is generally performed to quantify variations in hardness that occur over small distances. To determine these differences requires a very small physical indentation. Testers that create indents at very low test forces must be carefully constructed to accurately apply the test forces exactly at the desired location and must have a high-quality optical syste...
SCOPE
1.1 This test method covers determination of the microindentation hardness of materials.
1.2 This test method covers microindentation tests made with Knoop and Vickers indenters under test forces in the range from 9.8 × 10⁻³ to 9.8 N (1 to 1000 gf).
1.3 This test method includes an analysis of the possible sources of errors that can occur during microindentation testing and how these factors affect the precision, bias, repeatability, and reproducibility of test results.
1.4 Information pertaining to the requirements for direct verification and calibration of the testing machine and the requirements for the manufacture and calibration of Vickers and Knoop reference hardness test blocks are in Test Method E92.
Note 1: While Committee E04 is primarily concerned with metals, the test procedures described are applicable to other materials.
1.5 Units—The values stated in SI units are to be regarded as standard. No other units of measurement are included in this standard.
1.6 This standard does not purport to address all of the safety concerns, if any, associated with its use. It is the responsibility of the user of this standard to establish appropriate safety and health practices and determine the applicability of regulatory limitations prior to use.
1.7 This international standard was developed in accordance with internationally recognized principles on standardization established in the Decision on Principles for the Development of International Standards, Guides and Recommendations issued by the World Trade Organization Technical Barriers to Trade (TBT) Committee.
General Information
Buy Standard
Standards Content (Sample)
NOTICE: This standard has either been superseded and replaced by a new version or withdrawn.
Contact ASTM International (www.astm.org) for the latest information
Designation: E384 − 17
Standard Test Method for
1
Microindentation Hardness of Materials
This standard is issued under the fixed designation E384; the number immediately following the designation indicates the year of
original adoption or, in the case of revision, the year of last revision.Anumber in parentheses indicates the year of last reapproval.A
superscript epsilon (´) indicates an editorial change since the last revision or reapproval.
This standard has been approved for use by agencies of the U.S. Department of Defense.
1. Scope* 2. Referenced Documents
2
1.1 This test method covers determination of the microin-
2.1 ASTM Standards:
dentation hardness of materials.
C1326Test Method for Knoop Indentation Hardness of
Advanced Ceramics
1.2 This test method covers microindentation tests made
withKnoopandVickersindentersundertestforcesintherange C1327Test Method for Vickers Indentation Hardness of
-3
from 9.8 × 10 to 9.8 N (1 to 1000 gf). Advanced Ceramics
E3Guide for Preparation of Metallographic Specimens
1.3 This test method includes an analysis of the possible
E7Terminology Relating to Metallography
sourcesoferrorsthatcanoccurduringmicroindentationtesting
E92Test Methods for Vickers Hardness and Knoop Hard-
and how these factors affect the precision, bias, repeatability,
ness of Metallic Materials
and reproducibility of test results.
E140Hardness Conversion Tables for Metals Relationship
1.4 Information pertaining to the requirements for direct
Among Brinell Hardness, Vickers Hardness, Rockwell
verification and calibration of the testing machine and the
Hardness, Superficial Hardness, Knoop Hardness, Sclero-
requirements for the manufacture and calibration of Vickers
scope Hardness, and Leeb Hardness
and Knoop reference hardness test blocks are in Test Method
3
E175Terminology of Microscopy (Withdrawn 2019)
E92.
E177Practice for Use of the Terms Precision and Bias in
NOTE1—WhileCommitteeE04isprimarilyconcernedwithmetals,the
ASTM Test Methods
test procedures described are applicable to other materials.
E691Practice for Conducting an Interlaboratory Study to
1.5 Units—The values stated in SI units are to be regarded
Determine the Precision of a Test Method
asstandard.Nootherunitsofmeasurementareincludedinthis
E766Practice for Calibrating the Magnification of a Scan-
standard.
ning Electron Microscope
1.6 This standard does not purport to address all of the
E1268Practice for Assessing the Degree of Banding or
safety concerns, if any, associated with its use. It is the
Orientation of Microstructures
responsibility of the user of this standard to establish appro-
E2554Practice for Estimating and Monitoring the Uncer-
priate safety and health practices and determine the applica-
tainty of Test Results of a Test Method Using Control
bility of regulatory limitations prior to use.
Chart Techniques
1.7 This international standard was developed in accor-
E2587Practice for Use of Control Charts in Statistical
dance with internationally recognized principles on standard-
Process Control
ization established in the Decision on Principles for the
4
2.2 ISO Standard:
Development of International Standards, Guides and Recom-
ISO/IEC 17025 General Requirements for the Competence
mendations issued by the World Trade Organization Technical
Barriers to Trade (TBT) Committee. of Testing and Calibration Laboratories
1 2
This test method is under the jurisdiction of ASTM Committee E04 on For referenced ASTM standards, visit the ASTM website, www.astm.org, or
Metallography and is the direct responsibility of Subcommittee E04.05 on Micro- contact ASTM Customer Service at service@astm.org. For Annual Book of ASTM
indentation Hardness Testing. With this revision the test method was expanded to Standards volume information, refer to the standard’s Document Summary page on
include the requirements previously defined in E28.92, Standard Test Method for the ASTM website.
3
Vickers Hardness Testing of Metallic Material that was under the jurisdiction of The last approved version of this historical standard is referenced on
E28.06 www.astm.org.
4
Current edition approved June 1, 2017. Published August 2017. Originally Available from International Organization for Standardization (ISO), 1, ch. de
approved in 1969. Last previous edition approved in 2016 as E384–16. DOI: la Voie-Creuse, Case postale 56, CH-1211, Geneva 20, Switzerland, http://
10.1520/E0384-17 www.iso.org.
*A Summary of Changes section appears at the end of this standard
Copyright © ASTM International, 100 Barr Harbor Drive, PO Box C700, West Conshohocken, PA 19428-2959. United States
1
---------------------- Page: 1 ----------------------
E384 − 17
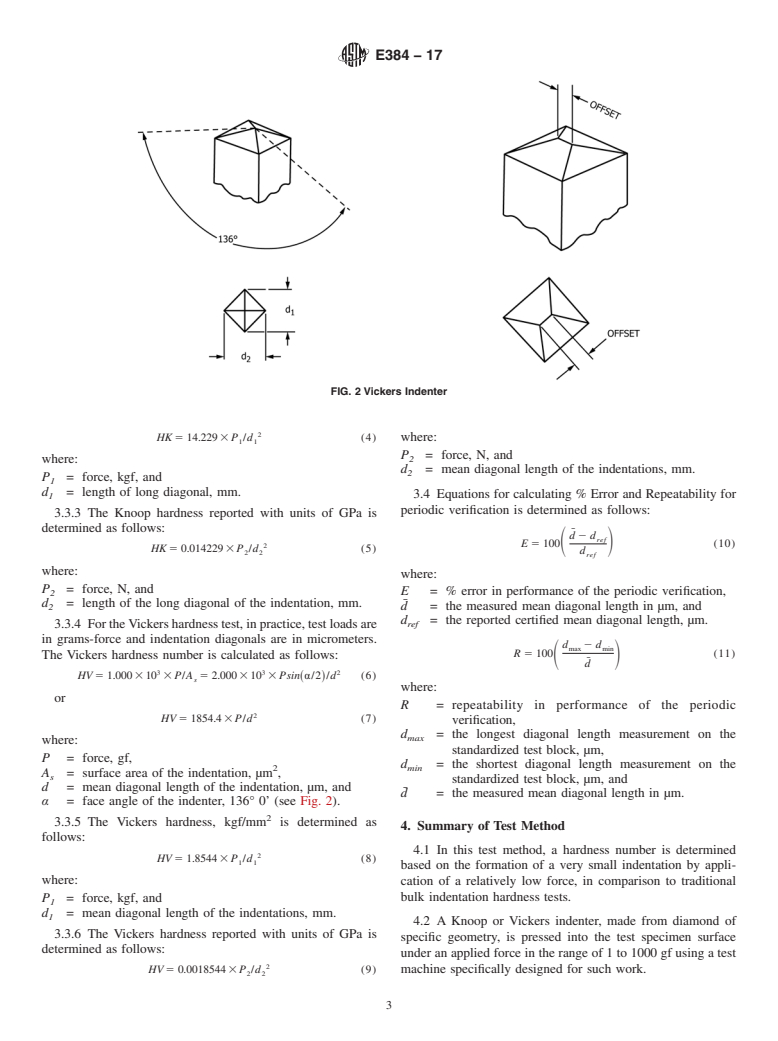
3. Terminology 3.3 Formulae—The formulae presented in 3.3.1 – 3.3.4 for
calculating microindentation hardness are based upon an ideal
3.1 Definitions—For definitions of
...
This document is not an ASTM standard and is intended only to provide the user of an ASTM standard an indication of what changes have been made to the previous version. Because
it may not be technically possible to adequately depict all changes accurately, ASTM recommends that users consult prior editions as appropriate. In all cases only the current version
of the standard as published by ASTM is to be considered the official document.
Designation: E384 − 16 E384 − 17
Standard Test Method for
1
Microindentation Hardness of Materials
This standard is issued under the fixed designation E384; the number immediately following the designation indicates the year of
original adoption or, in the case of revision, the year of last revision. A number in parentheses indicates the year of last reapproval. A
superscript epsilon (´) indicates an editorial change since the last revision or reapproval.
This standard has been approved for use by agencies of the U.S. Department of Defense.
1. Scope*
1.1 This test method covers determination of the microindentation hardness of materials.
1.2 This test method covers microindentation tests made with Knoop and Vickers indenters under test forces in the range from
-3
9.8 × 10 to 9.8 N (1 to 1000 gf).
1.3 This test method includes an analysis of the possible sources of errors that can occur during microindentation testing and
how these factors affect the precision, bias, repeatability, and reproducibility of test results.
1.4 Information pertaining to the requirements for direct verification and calibration of the testing machine and the requirements
for the manufacture and calibration of Vickers and Knoop reference hardness test blocks are in Test Method E92.
NOTE 1—While Committee E04 is primarily concerned with metals, the test procedures described are applicable to other materials.
1.5 Units—The values stated in SI units are to be regarded as standard. No other units of measurement are included in this
standard.
1.6 This standard does not purport to address all of the safety concerns, if any, associated with its use. It is the responsibility
of the user of this standard to establish appropriate safety and health practices and determine the applicability of regulatory
limitations prior to use.
1.7 This international standard was developed in accordance with internationally recognized principles on standardization
established in the Decision on Principles for the Development of International Standards, Guides and Recommendations issued
by the World Trade Organization Technical Barriers to Trade (TBT) Committee.
2. Referenced Documents
2
2.1 ASTM Standards:
C1326 Test Method for Knoop Indentation Hardness of Advanced Ceramics
C1327 Test Method for Vickers Indentation Hardness of Advanced Ceramics
E3 Guide for Preparation of Metallographic Specimens
E7 Terminology Relating to Metallography
E92 Test Method For Vickers Hardness of Metallic Materials
E140 Hardness Conversion Tables for Metals Relationship Among Brinell Hardness, Vickers Hardness, Rockwell Hardness,
Superficial Hardness, Knoop Hardness, Scleroscope Hardness, and Leeb Hardness
E175 Terminology of Microscopy
E177 Practice for Use of the Terms Precision and Bias in ASTM Test Methods
E691 Practice for Conducting an Interlaboratory Study to Determine the Precision of a Test Method
E766 Practice for Calibrating the Magnification of a Scanning Electron Microscope
E1268 Practice for Assessing the Degree of Banding or Orientation of Microstructures
E2554 Practice for Estimating and Monitoring the Uncertainty of Test Results of a Test Method Using Control Chart Techniques
E2587 Practice for Use of Control Charts in Statistical Process Control
1
This test method is under the jurisdiction of ASTM Committee E04 on Metallography and is the direct responsibility of Subcommittee E04.05 on Microindentation
Hardness Testing. With this revision the test method was expanded to include the requirements previously defined in E28.92, Standard Test Method for Vickers Hardness
Testing of Metallic Material that was under the jurisdiction of E28.06
Current edition approved Feb. 1, 2016June 1, 2017. Published April 2016August 2017. Originally approved in 1969. Last previous edition approved in 20102016 as
ε1
E384 – 11E384 – 16. . DOI: 10.1520/E0384-1610.1520/E0384-17
2
For referenced ASTM standards, visit the ASTM website, www.astm.org, or contact ASTM Customer Service at service@astm.org. For Annual Book of ASTM Standards
volume information, refer to the standard’s Document Summary page on the ASTM website.
*A Summary of Changes section appears at the end of this standard
Copyright © ASTM International, 100 Barr Harbor Drive, PO Box C700, West Conshohocken, PA 19428-2959. United States
1
---------------------- Page: 1 ----------------------
E384 − 17
3
2.2 ISO Standard:
ISO/IEC 17025 General Requirements for the Competence of Testing and Calibration Laboratories
3. Terminology
3.1 Definitions—For definitions of terms used in this test method, se
...


Questions, Comments and Discussion
Ask us and Technical Secretary will try to provide an answer. You can facilitate discussion about the standard in here.