ASTM F433-02(2009)
(Practice)Standard Practice for Evaluating Thermal Conductivity of Gasket Materials
Standard Practice for Evaluating Thermal Conductivity of Gasket Materials
SIGNIFICANCE AND USE
This practice is designed to compare related materials under controlled conditions and their ability to maintain a minimum amount of thermal conductance. Test results should be correlated with field results in order to predict heat transfer properties in particular applications.
This practice may be used as a routine test when agreed upon by the user and the producer.
SCOPE
1.1 This practice covers a means of measuring the amount of heat transfer quantitatively through a material or system.
1.2 This practice is similar to the Heat Flow Meter System of Test Method C 518, but modified to accommodate small test samples of higher thermal conductance.
1.3 The values stated in SI units are to be regarded as the standard. The values given in parentheses are for information only.
1.4 This standard does not purport to address all of the safety concerns, if any, associated with its use. It is the responsibility of the user of this standard to establish appropriate safety and health practices and determine the applicability of regulatory limitations prior to use.
General Information
Relations
Buy Standard
Standards Content (Sample)
NOTICE: This standard has either been superseded and replaced by a new version or withdrawn.
Contact ASTM International (www.astm.org) for the latest information
Designation: F433 − 02(Reapproved 2009)
Standard Practice for
Evaluating Thermal Conductivity of Gasket Materials
ThisstandardisissuedunderthefixeddesignationF433;thenumberimmediatelyfollowingthedesignationindicatestheyearoforiginal
adoptionor,inthecaseofrevision,theyearoflastrevision.Anumberinparenthesesindicatestheyearoflastreapproval.Asuperscript
epsilon (´) indicates an editorial change since the last revision or reapproval.
1. Scope perpendicular to an isothermal surface °C/m (or °F/in.). The
k-factor is expressed W/m·K (Btu·in./h·ft ·°F).
1.1 This practice covers a means of measuring the amount
of heat transfer quantitatively through a material or system.
3.2 Symbols:
1.2 This practice is similar to the Heat Flow Meter System
k = thermal conductivity, W/m·K (Btu·in./h·ft ·°F)
ofTest Method C518, but modified to accommodate small test 2 2
C = thermal conductance, W/m ·K (Btu/h·ft ·°F)
samples of higher thermal conductance.
∆x = sample thickness, mm (in.)
2 2
A = sample cross-sectional area, m (ft )
1.3 The values stated in SI units are to be regarded as the
q = heat flow, W (Btu/h)
standard. The values given in parentheses are for information
φ = heat flow transducer output, mV
only.
N = heat flow transducer calibration constant,
1.4 This standard does not purport to address all of the
2 2
W/m ·mV (Btu/h·ft ·mV)
safety concerns, if any, associated with its use. It is the 2 2
Nφ = heat flux, W/m (Btu/h·ft )
responsibility of the user of this standard to establish appro-
∆T = temperature difference, °C (°F) or mV
priate safety and health practices and determine the applica-
T = temperatureoflowersamplesurface,°C(°F)or
bility of regulatory limitations prior to use.
mV
T = temperature of upper sample surface, °C (°F)
2. Referenced Documents
or mV
2.1 ASTM Standards:
T = temperature of HFT surface facing sample,° C
h
C518Test Method for Steady-State Thermal Transmission (°F) or mV
Properties by Means of the Heat Flow Meter Apparatus T = temperature of upper heater surface facing
c
D2214Test Method for Estimating the Thermal Conductiv- sample, °C (°F) or mV
T = temperature, °C (°F)
ityofLeatherwiththeCenco-FitchApparatus(Withdrawn
δ = total temperature drop across interfaces be-
2008)
tweensampleandadjacentsurfaces,°C(°F)or
F104Classification System for Nonmetallic Gasket Materi-
mV
als
ρ = coefficient of thermal resistance at interfaces,
2 2
3. Terminology
m ·K/W (h·ft ·°F/Btu)
α = correction constant
3.1 Definitions:
subscript s = unknown sample
3.1.1 thermal conductivity, k, of a solid material—the time
subscript r = known calibration sample
rate of steady heat flow, watts (or Btu/h), through a unit area,
2 2
m (or ft ), per unit temperature gradient in the direction
4. Summary of Practice
4.1 The sample and the heat flow transducer (HFT) are
ThispracticeisunderthejurisdictionofASTMCommitteeF03onGasketsand
is the direct responsibility of Subcommittee F03.10 on Composite Gaskets.
sandwiched between two controlled heater plates. The lower
Current edition approved May 1, 2009. Published May 2009. Originally
heater is set at a higher temperature than the upper plate to
approved in 1964. Last previous edition approved in 2002 as F433–02. DOI:
produce a flow of heat through the sample. The differential of
10.1520/F0433-02R09.
For referenced ASTM standards, visit the ASTM website, www.astm.org, or
these two temperatures, ∆ T, sensed by thermocouples, is
contact ASTM Customer Service at service@astm.org. For Annual Book of ASTM
amplifiedalongwiththeelectricaloutput, φ,oftheHFTandis
Standards volume information, refer to the standard’s Document Summary page on
directly proportional to the heat flow through the sample,
the ASTM website.
3 2 2
The last approved version of this historical standard is referenced on
expressed as W/m (Btu/h·ft ). See Appendix for further
www.astm.org.
Copyright © ASTM International, 100 Barr Harbor Drive, PO Box C700, West Conshohocken, PA 19428-2959. United States
F433 − 02 (2009)
FIG. 1 Heat Flow Meter Assembly With Water-Cooled Heat Sink
information. This recommended practice can be used for
measuring heat transfer at a hot side temperature up to 200°C
(392°F). See Figs. 1-5.
5. Significance and Use
5.1 This practice is designed to compare related materials
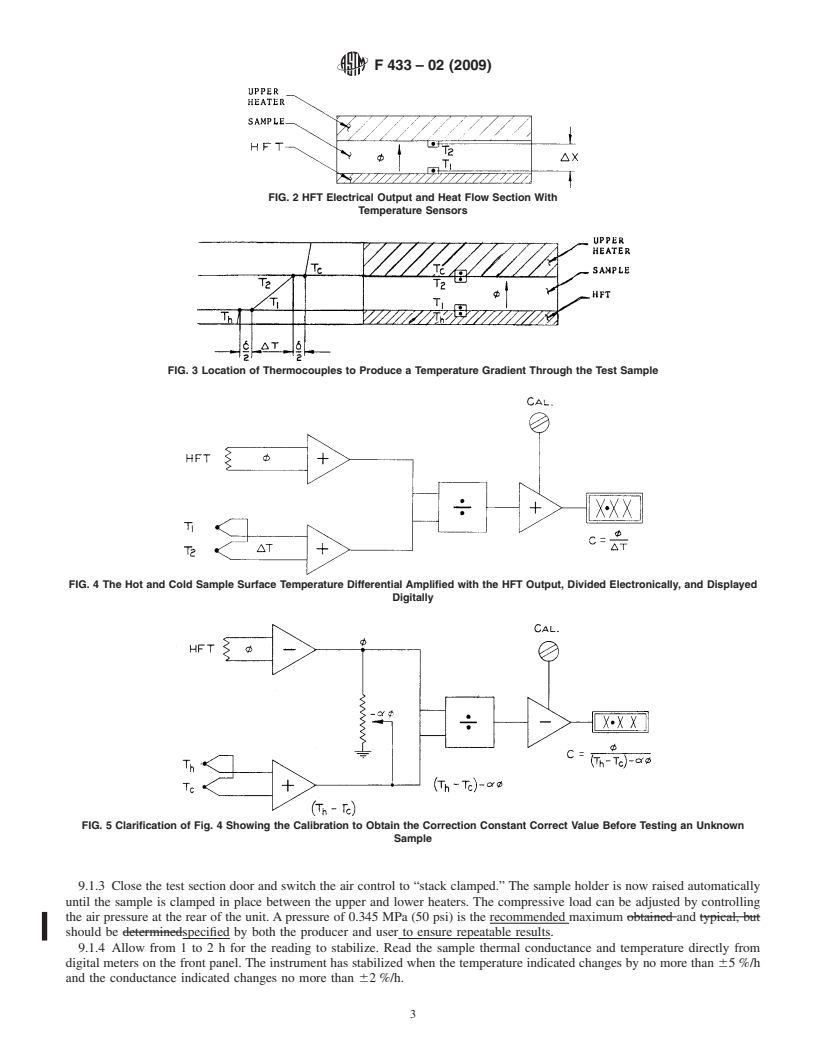
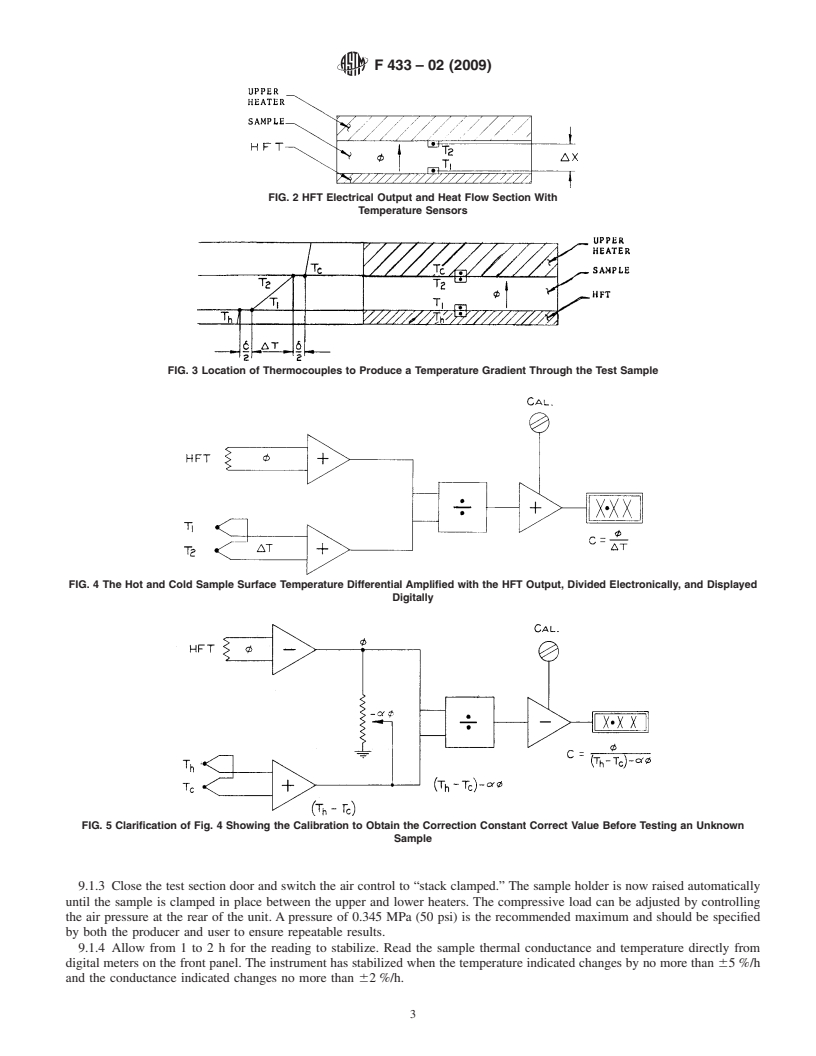
FIG. 2 HFT Electrical Output and Heat Flow Section With Tem-
under controlled conditions and their ability to maintain a
perature Sensors
minimum amount of thermal conductance. Test results should
be correlated with field results in order to predict heat transfer
properties in particular applications. user. (The guard heater is usually set at or near the average
sample temperature between the lower and upper heater
5.2 This practice may be used as a routine test when agreed
plates.)
upon by the user and the producer.
9.1.1 Release the compressive load, pull out the tray, and
load the sample. Care must be maintained to ensure that the
6. Apparatus
tray compartment is free of any foreign matter. Clean as
6.1 Heat Flow Transducer (HFT), with controlled heater
required.
plates, thermocouples, and an analog computer module.
9.1.2 Push the tray back into the chamber with a ball and
plunger locking the tray into position.
7. Test Specimen
9.1.3 Closethetestsectiondoorandswitchtheaircontrolto
7.1 The sample size shall be a 50.8-mm (2-in.) diameter
“stack clamped.” The sample holder is now raised automati-
disk 60.25 mm (60.010 in.) from 2.29 to 12.7 mm (0.090 to
cally until the sample is clamped in place between the upper
0.500 in.) thick.
and lower heaters. The compressive load can be adjusted by
controllingtheairpressureattherearoftheunit.Apressureof
8. Conditioning
0.345 MPa (50 psi) is the recommended maximum and should
8.1 Condition the cut specimens in accordance with their bespecifiedbyboththeproducerandusertoensurerepeatable
classification, as required in Classification F104.
results.
9.1.4 Allow from 1 to 2 h for the reading to stabilize. Read
9. Procedure
the sample thermal conductance and temperature directly from
digital meters on the front panel.The instrument has stabilized
9.1 Testtemperaturesaresuggestedfrom100to175°C(212
when the temperature indicated changes by no more than
to347°F)orwhateverisagreeduponbetweentheproducerand
65%/h and the conductance indicated changes no more than
62%/h.
The sole source of supply of the apparatus known to the committee at this time
is Holometrix, Inc., 25 Wiggins Avenue, Bedford, MA 01730–2323. If you are 10. Report
aware of alternative suppliers, please provide this information toASTM Headquar-
10.1 The report shall include the following:
ters. Your comments will receive careful consideration at a meeting of the
responsible technical committee, which you may attend. 10.1.1 Sample conditioning procedure,
F433 − 02 (2009)
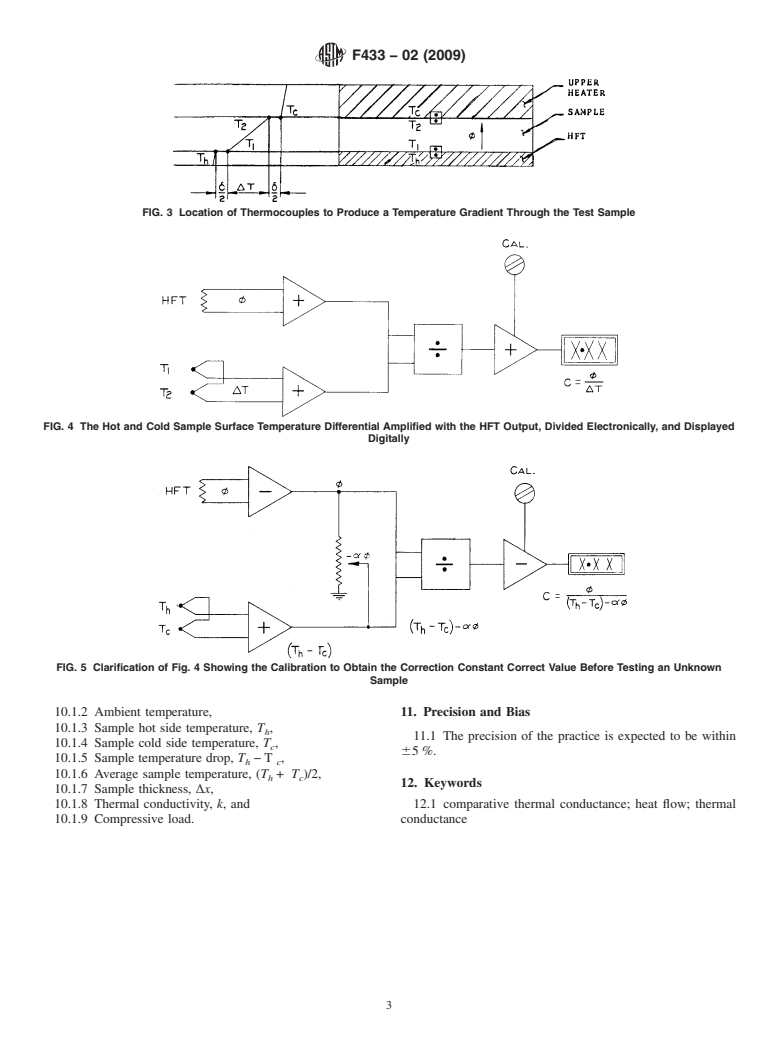
FIG. 3 Location of Thermocouples to Produce a Temperature Gradient Through the Test Sample
FIG. 4 The Hot and Cold Sample Surface Temperature Differential Amplified with the HFT Output, Divided Electronically, and Displayed
Digitally
FIG. 5 Clarification of Fig. 4 Showing the Calibration to Obtain the Correction Constant Correct Value Before Testing an Unknown
Sample
10.1.2 Ambient temperature, 11. Precision and Bias
10.1.3 Sample hot side temperature, T ,
h
11.1 The precision of the practice is expected to be within
10.1.4 Sample cold side temperature, T ,
c
65%.
10.1.5 Sample temperature drop, T −T ,
h c
10.1.6 Average sample temperature, (T + T )/2,
h c
12. Keywords
10.1.7 Sample thickness, ∆x,
10.1.8 Thermal conductivity, k, and 12.1 comparative thermal conductance; heat flow; thermal
10.1.9 Compressive load. conductance
F433 − 02 (2009)
APPENDIXES
(Nonmandatory Information)
X1. GENERAL INFORMATION
X1.1 Ifatestspecimenintheformofadiskisheldbetween X1.2 The heat flow per unit area is measured with a heat
two flat surfaces, each controlled at a different temperature, a
flow transducer, a sensitive device producing an electrical
flowofheatpassesthroughthesamplefromthehottothecold
output that is directly proportional to the heat flux, q/A. If the
surface.The thermal conductivity is determined by the follow-
output of the heat flow transducer (HFT) is called φ than the k
ing equation:
-factor can be calculated from:
q ∆x
∆x
k 5 W/m·K or Btu·in./h·ft ·°F (X1.1)
@ # @ #
k 5 Nφ (X1.2)
A ∆T
∆T
X1.3 In this equation φ, ∆T, and ∆x can be measured by
where:
simple means, while the calibration constant, N, can be
q = heat flow through the sample, watt (Btu/h),
2 2
determinedbytestingasampleofknownthermalconductivity.
A = cross-sectional area of the sample, m (ft ),
∆x = sample thickness, mm (in.), and
∆T = temperature difference across the sample, °C (°F).
X2. CALCULATIONS
X2.1 After thermal equilibrium has been established, the acrossthesampleitselfduetocontactresistance.(Acorrection
various sensors may be read and recorded. Data reduction is factor can be obtained from the calibration test data.)
dependent upon the positions of the thermocouples for mea-
X2.1.4 The calibration sample must have a set of thermo-
suring the sample ∆T, as follows:
couples installed in grooves in the upper and lower surfaces.
During calibration the following results are obtained:
X2.1.1 If thermocouples are installed in the sample surface
then:
∆x
r
k 5 Nφ (X2.5)
r r
∆T 5 T 2 T mV (X2.1) ∆T
~ !
1 2 r
where:
NOTE X2.1—The sample thickness must be adjusted to account for the
thermocouples being slightly below the surface, see Fig. 2.
∆T 5 T 2 T (X2.6)
r 1 2
X2.1.2 Acalibration run must first be made using a calibra-
X2.1.5 From the various thermocouple readings we can
tion standard of known thermal conductivity, k . This proce-
r
calculate the total interfacial temperature drop as follows:
dure is identical to the procedure for the unknown sample as
δ 5 ~T 2 T ! 2 ∆T (X2.7)
h c r
r
follows:
X2.1.2.1 k-factor, unknown sample:
The interfacial temperature drop, δ, is proportional to the
∆x
s
k 5 Nφ (X2.2) heat flux, Nφ as follows:
s s r
∆T
s
δ 5 ρNφ (X2.8)
r
X2.1.2.2 k-factor, known sample:
where ρ is a proportionality constant and depends mostly on
∆x
r
the surface conditions and on the applied pressure on the test
k 5 Nφ (X2.3)
r r
∆T
r
stack. It is assumed that ρ remains essen
...
This document is not anASTM standard and is intended only to provide the user of anASTM standard an indication of what changes have been made to the previous version. Because
it may not be technically possible to adequately depict all changes accurately, ASTM recommends that users consult prior editions as appropriate. In all cases only the current version
of the standard as published by ASTM is to be considered the official document.
Designation:F433–98 Designation: F 433 – 02 (Reapproved 2009)
Standard Practice for
Evaluating Thermal Conductivity of Gasket Materials
This standard is issued under the fixed designation F433; the number immediately following the designation indicates the year of
original adoption or, in the case of revision, the year of last revision.Anumber in parentheses indicates the year of last reapproval.A
superscript epsilon (´) indicates an editorial change since the last revision or reapproval.
1. Scope
1.1 This practice covers a means of measuring the amount of heat transfer quantitatively through a material or system.
1.2 This practice is similar to the Heat Flow Meter System of Test Method C518, but modified to accommodate small test
samples of higher thermal conductance.
1.3 The values stated in SI units are to be regarded as the standard. The values given in parentheses are for information only.
1.4 This standard does not purport to address all of the safety concerns, if any, associated with its use. It is the responsibility
of the user of this standard to establish appropriate safety and health practices and determine the applicability of regulatory
limitations prior to use.
2. Referenced Documents
2.1 ASTM Standards:
C518 TestMethodforSteady-StateHeatFluxMeasurementsandThermalTransmissionPropertiesbyMeansoftheHeatFlow
Meter Apparatus
D2214 Test Method for Estimating the Thermal Conductivity of Leather with the Cenco-Fitch Apparatus
F104 Classification System for Nonmetallic Gasket Materials
3. Terminology
3.1 Definitions:
3.1.1 thermal conductivity, k, of a solid material—the time rate of steady heat flow, watts (or Btu/h), through a unit area, m
(or ft ), per unit temperature gradient in the direction perpendicular to an isothermal surface °C/m (or °F/in.). The k-factor is
expressed W/m·K (Btu·in./h·ft ·°F).
3.2 Symbols:Symbols: Symbols:
k = thermal conductivity, W/m·K (Btu·in./h·ft ·°F)
2 2
C = thermal conductance, W/m ·K (Btu/h·ft ·°F)
Dx = sample thickness, mm (in.)
2 2
A = sample cross-sectional area, m (ft )
q = heat flow, W (Btu/h)
f = heat flow transducer output, mV
2 2
N = heat flow transducer calibration constant, W/m ·mV (Btu/h·ft ·mV)
2 2
Nf = heat flux, W/m (Btu/h·ft )
DT = temperature difference, °C (°F) or mV
T = temperature of lower sample surface,°C (°F) or mV
T = temperature of upper sample surface, °C (°F) or mV
T = temperature of HFT surface facing sample,° C (°F) or mV
h
T = temperature of upper heater surface facing sample, °C (°F) or mV
c
T = temperature, °C (°F)
d = total temperature drop across interfaces between sample and adjacent surfaces, °C (°F) or mV
2 2
r = coefficient of thermal resistance at interfaces, m ·K/W (h·ft ·°F/Btu)
a = correction constant
This practice is under the jurisdiction of ASTM Committee F-3 F03 on Gaskets and is the direct responsibility of Subcommittee F03.10 on Composite Gaskets .
Current edition approved Nov. 10, 1998. Published January 1999.
Current edition approved May 1, 2009. Published May 2009. Originally approved in 1964. Last previous edition approved in 2002 as F433–02.
ForreferencedASTMstandards,visittheASTMwebsite,www.astm.org,orcontactASTMCustomerServiceatservice@astm.org.For Annual Book of ASTM Standards
, Vol 04.06.volume information, refer to the standard’s Document Summary page on the ASTM website.
Copyright © ASTM International, 100 Barr Harbor Drive, PO Box C700, West Conshohocken, PA 19428-2959, United States.
F 433 – 02 (2009)
subscript s = unknown sample
subscript r = known calibration sample
4. Summary of Practice
4.1 The sample and the heat flow transducer (HFT) are sandwiched between two controlled heater plates. The lower heater is
set at a higher temperature than the upper plate to produce a flow of heat through the sample. The differential of these two
temperatures, D T,sensedbythermocouples,isamplifiedalongwiththeelectricaloutput, f,oftheHFTandisdirectlyproportional
2 2
to the heat flow through the sample, expressed as W/m (Btu/h·ft ). See Appendix for further information. This recommended
practice can be used for measuring heat transfer at a hot side temperature up to 200°C (392°F). See Figs. 1-5.
5. Significance and Use
5.1 This practice is designed to compare related materials under controlled conditions and their ability to maintain a minimum
amount of thermal conductance. Test results should be correlated with field results in order to predict heat transfer properties in
particular applications.
5.2 This practice may be used as a routine test when agreed upon by the user and the producer.
6. Apparatus
6.1 Heat Flow Transducer (HFT), with controlled heater plates, thermocouples, and an analog computer module.
7. Test Specimen
7.1 The sample size shall be a 50.8-mm (2-in.) diameter disk 60.25 mm (60.010 in.) from 2.29 to 12.7 mm (0.090 to 0.500
in.) thick.
8. Conditioning
8.1 Condition the cut specimens in accordance with their classification, as required in Classification F104.
9. Procedure
9.1 Test temperatures are suggested from 100 to 175°C (212 to 347°F) or whatever is agreed upon between the producer and
user. (The guard heater is usually set at or near the average sample temperature between the lower and upper heater plates.)
9.1.1 Release the compressive load, pull out the tray, and load the sample. Care must be maintained to ensure that the tray
compartment is free of any foreign matter. Clean as required.
9.1.2 Push the tray back into the chamber with a ball and plunger locking the tray into position.
Annual Book of ASTM Standards, Vol 15.04.
The sole source of supply of the apparatus known to the committee at this time is Holometrix, Inc., 25 Wiggins Avenue, Bedford, MA 01730–2323. If you are aware
of alternative suppliers, please provide this information toASTM Headquarters. Your comments will receive careful consideration at a meeting of the responsible technical
committee, which you may attend.
FIG. 1 Heat Flow Meter Assembly With Water-Cooled Heat Sink
F 433 – 02 (2009)
FIG. 2 HFT Electrical Output and Heat Flow Section With
Temperature Sensors
FIG. 3 Location of Thermocouples to Produce a Temperature Gradient Through the Test Sample
FIG. 4 The Hot and Cold Sample Surface Temperature Differential Amplified with the HFT Output, Divided Electronically, and Displayed
Digitally
FIG. 5 Clarification of Fig. 4 Showing the Calibration to Obtain the Correction Constant Correct Value Before Testing an Unknown
Sample
9.1.3 Close the test section door and switch the air control to “stack clamped.” The sample holder is now raised automatically
until the sample is clamped in place between the upper and lower heaters. The compressive load can be adjusted by controlling
the air pressure at the rear of the unit.Apressure of 0.345 MPa (50 psi) is the recommended maximum obtained and typical, but
should be determinedspecified by both the producer and user to ensure repeatable results.
9.1.4 Allow from 1 to 2 h for the reading to stabilize. Read the sample thermal conductance and temperature directly from
digital meters on the front panel. The instrument has stabilized when the temperature indicated changes by no more than 65%/h
and the conductance indicated changes no more than 62%/h.
F 433 – 02 (2009)
10. Report
10.1 The report shall include the following:
10.1.1 Sample conditioning procedure,
10.1.2 Ambient temperature,
10.1.3 Sample hot side temperature, T ,
h
10.1.4 Sample cold side temperature, T ,
c
10.1.5 Sample temperature drop, T −T ,
h c
10.1.6 Average sample temperature, ( T + T )/2,
h c
10.1.7 Sample thickness, Dx,
10.1.8 Thermal conductivity, k, and
10.1.9 Compressive load.
F 433 – 02 (2009)
11. Precision and Bias
11.1 The precision of the practice is expected to be within 65%.
F 433 – 02 (2009)
12. Keywords
12.1 comparative thermal conductance; heat flow; thermal conductance
APPENDIXES
(Nonmandatory Information)
X1. GENERAL INFORMATION
X1.1 Ifatestspecimenintheformofadiskisheldbetweentwoflatsurfaces,eachcontrolledatadifferenttemperature,aflow
of heat passes through the sample from the hot to the cold surface. The thermal conductivity is determined by the following
equation:
q Dx
k 5 [W/m·K]or[Btu·in./h·ft ·°F] (X1.1)
A DT
where:
q = heat flow through the sample, watt (Btu/h),
2 2
A = cross-sectional area of the sample, m (ft ),
Dx = sample thickness, mm (in.), and
DT = temperature difference across the sample, °C (°F).
X1.2 The heat flow per unit area is measured with a heat flow transducer, a sensitive device producing an electrical output that
is directly proportional to the heat flux, q/A. If the output of the heat flow transducer (HFT) is called f than the k -factor can be
calculated from:
Dx
k 5 Nf (X1.2)
DT
X1.3 In this equation f, DT, and Dx can be measured by simple means, while the calibration constant, N, can be determined
by testing a sample of known thermal conductivity.
X2. CALCULATIONS
X2.1 Afterthermalequilibriumhasbeenestablished,thevarioussensorsmaybereadandrecorded.Datareductionisdependent
upon the positions of the thermocouples for measuring the sample DT, as follows:
X2.1.1 If thermocouples are installed in the sample surface then:
DT 5 T 2 T ~mV! (X2.1)
1 2
NOTE X2.1—The sample thickness must be adjusted to account for the thermocouples being slightly below the surface, see Fig. 2.
X2.1.2 Acalibration run must first be made using a calibration standard of known thermal conductivity, k . This procedure is
r
identical to the procedure for the unknown sample as follows:
X2.1.2.1 k-factor, unknown sample:
Dx
s
k 5 Nf (X2.2)
s s
DT
s
X2.1.2.2 k-factor, known sample:
Dx
r
k 5 Nf (X2.3)
r r
DT
r
X2.1.2.3 Combining the unknown and known samples:
f Dx DT
s s r
k 5 k (X2.4)
s r
f Dx DT
r r s
X2.1.3 If thermocouples are located permanently in the surface adjacent to the sample, then, in accordance with Fig. 3, the DT
obtained by subtracting T and T is not equal to the DT across the sample itself due to contact resistance. (Acorrection factor can
h c
be obtained from the calibration test data.)
Annual Book of ASTM Standards, Vol 09.02.
Borosilicate No. 7740 has been found to be a suitable reference standard material. This can be purchased with the test equipment. The reference standard used should
be documented i
...
This document is not anASTM standard and is intended only to provide the user of anASTM standard an indication of what changes have been made to the previous version. Because
it may not be technically possible to adequately depict all changes accurately, ASTM recommends that users consult prior editions as appropriate. In all cases only the current version
of the standard as published by ASTM is to be considered the official document.
Designation:F433–02 Designation: F 433 – 02 (Reapproved 2009)
Standard Practice for
Evaluating Thermal Conductivity of Gasket Materials
This standard is issued under the fixed designation F433; the number immediately following the designation indicates the year of
original adoption or, in the case of revision, the year of last revision.Anumber in parentheses indicates the year of last reapproval.A
superscript epsilon (´) indicates an editorial change since the last revision or reapproval.
1. Scope
1.1 This practice covers a means of measuring the amount of heat transfer quantitatively through a material or system.
1.2 This practice is similar to the Heat Flow Meter System of Test Method C518, but modified to accommodate small test
samples of higher thermal conductance.
1.3 The values stated in SI units are to be regarded as the standard. The values given in parentheses are for information only.
1.4 This standard does not purport to address all of the safety concerns, if any, associated with its use. It is the responsibility
of the user of this standard to establish appropriate safety and health practices and determine the applicability of regulatory
limitations prior to use.
2. Referenced Documents
2.1 ASTM Standards:
C518 Test Method for Steady-State Thermal Transmission Properties by Means of the Heat Flow Meter Apparatus
D2214 Test Method for Estimating the Thermal Conductivity of Leather with the Cenco-Fitch Apparatus
F104 Classification System for Nonmetallic Gasket Materials
3. Terminology
3.1 Definitions:
3.1.1 thermal conductivity, k, of a solid material—the time rate of steady heat flow, watts (or Btu/h), through a unit area, m
(or ft ), per unit temperature gradient in the direction perpendicular to an isothermal surface °C/m (or °F/in.). The k-factor is
expressed W/m·K (Btu·in./h·ft ·°F).
3.2 Symbols:
k = thermal conductivity, W/m·K (Btu·in./h·ft ·°F)
2 2
C = thermal conductance, W/m ·K (Btu/h·ft ·°F)
Dx = sample thickness, mm (in.)
2 2
A = sample cross-sectional area, m (ft )
q = heat flow, W (Btu/h)
f = heat flow transducer output, mV
2 2
N = heat flow transducer calibration constant, W/m ·mV (Btu/h·ft ·mV)
2 2
Nf = heat flux, W/m (Btu/h·ft )
DT = temperature difference, °C (°F) or mV
T = temperature of lower sample surface,°C (°F) or mV
T = temperature of upper sample surface, °C (°F) or mV
T = temperature of HFT surface facing sample,° C (°F) or mV
h
T = temperature of upper heater surface facing sample, °C (°F) or mV
c
T = temperature, °C (°F)
d = total temperature drop across interfaces between sample and adjacent surfaces, °C (°F) or mV
2 2
r = coefficient of thermal resistance at interfaces, m ·K/W (h·ft ·°F/Btu)
a = correction constant
subscript s = unknown sample
This practice is under the jurisdiction of ASTM Committee F03 on Gaskets and is the direct responsibility of Subcommittee F03.10 on Composite Gaskets .
Current edition approved October 10, 2002. Published October 2002.
Current edition approved May 1, 2009. Published May 2009. Originally approved in 1964. Last previous edition approved in 2002 as F433–02.
ForreferencedASTMstandards,visittheASTMwebsite,www.astm.org,orcontactASTMCustomerServiceatservice@astm.org.For Annual Book of ASTM Standards
, Vol 04.06.volume information, refer to the standard’s Document Summary page on the ASTM website.
Copyright © ASTM International, 100 Barr Harbor Drive, PO Box C700, West Conshohocken, PA 19428-2959, United States.
F 433 – 02 (2009)
subscript r = known calibration sample
4. Summary of Practice
4.1 The sample and the heat flow transducer (HFT) are sandwiched between two controlled heater plates. The lower heater is
set at a higher temperature than the upper plate to produce a flow of heat through the sample. The differential of these two
temperatures, D T,sensedbythermocouples,isamplifiedalongwiththeelectricaloutput, f,oftheHFTandisdirectlyproportional
2 2
to the heat flow through the sample, expressed as W/m (Btu/h·ft ). See Appendix for further information. This recommended
practice can be used for measuring heat transfer at a hot side temperature up to 200°C (392°F). See Figs. 1-5.
5. Significance and Use
5.1 This practice is designed to compare related materials under controlled conditions and their ability to maintain a minimum
amount of thermal conductance. Test results should be correlated with field results in order to predict heat transfer properties in
particular applications.
5.2 This practice may be used as a routine test when agreed upon by the user and the producer.
6. Apparatus
6.1 Heat Flow Transducer (HFT), with controlled heater plates, thermocouples, and an analog computer module.
7. Test Specimen
7.1 The sample size shall be a 50.8-mm (2-in.) diameter disk 60.25 mm (60.010 in.) from 2.29 to 12.7 mm (0.090 to 0.500
in.) thick.
8. Conditioning
8.1 Condition the cut specimens in accordance with their classification, as required in Classification F104.
9. Procedure
9.1 Test temperatures are suggested from 100 to 175°C (212 to 347°F) or whatever is agreed upon between the producer and
user. (The guard heater is usually set at or near the average sample temperature between the lower and upper heater plates.)
9.1.1 Release the compressive load, pull out the tray, and load the sample. Care must be maintained to ensure that the tray
compartment is free of any foreign matter. Clean as required.
9.1.2 Push the tray back into the chamber with a ball and plunger locking the tray into position.
Annual Book of ASTM Standards, Vol 15.04.
The sole source of supply of the apparatus known to the committee at this time is Holometrix, Inc., 25 Wiggins Avenue, Bedford, MA 01730–2323. If you are aware
of alternative suppliers, please provide this information toASTM Headquarters. Your comments will receive careful consideration at a meeting of the responsible technical
committee, which you may attend.
FIG. 1 Heat Flow Meter Assembly With Water-Cooled Heat Sink
F 433 – 02 (2009)
FIG. 2 HFT Electrical Output and Heat Flow Section With
Temperature Sensors
FIG. 3 Location of Thermocouples to Produce a Temperature Gradient Through the Test Sample
FIG. 4 The Hot and Cold Sample Surface Temperature Differential Amplified with the HFT Output, Divided Electronically, and Displayed
Digitally
FIG. 5 Clarification of Fig. 4 Showing the Calibration to Obtain the Correction Constant Correct Value Before Testing an Unknown
Sample
9.1.3 Close the test section door and switch the air control to “stack clamped.” The sample holder is now raised automatically
until the sample is clamped in place between the upper and lower heaters. The compressive load can be adjusted by controlling
the air pressure at the rear of the unit. A pressure of 0.345 MPa (50 psi) is the recommended maximum and should be specified
by both the producer and user to ensure repeatable results.
9.1.4 Allow from 1 to 2 h for the reading to stabilize. Read the sample thermal conductance and temperature directly from
digital meters on the front panel. The instrument has stabilized when the temperature indicated changes by no more than 65%/h
and the conductance indicated changes no more than 62%/h.
F 433 – 02 (2009)
10. Report
10.1 The report shall include the following:
10.1.1 Sample conditioning procedure,
10.1.2 Ambient temperature,
10.1.3 Sample hot side temperature, T ,
h
10.1.4 Sample cold side temperature, T ,
c
10.1.5 Sample temperature drop, T −T ,
h c
10.1.6 Average sample temperature, ( T + T )/2,
h c
10.1.7 Sample thickness, Dx,
10.1.8 Thermal conductivity, k, and
10.1.9 Compressive load.
F 433 – 02 (2009)
11. Precision and Bias
11.1 The precision of the practice is expected to be within 65%.
F 433 – 02 (2009)
12. Keywords
12.1 comparative thermal conductance; heat flow; thermal conductance
APPENDIXES
(Nonmandatory Information)
X1. GENERAL INFORMATION
X1.1 Ifatestspecimenintheformofadiskisheldbetweentwoflatsurfaces,eachcontrolledatadifferenttemperature,aflow
of heat passes through the sample from the hot to the cold surface. The thermal conductivity is determined by the following
equation:
q Dx
k 5 [W/m·K]or[Btu·in./h·ft ·°F] (X1.1)
A DT
where:
q = heat flow through the sample, watt (Btu/h),
2 2
A = cross-sectional area of the sample, m (ft ),
Dx = sample thickness, mm (in.), and
DT = temperature difference across the sample, °C (°F).
X1.2 The heat flow per unit area is measured with a heat flow transducer, a sensitive device producing an electrical output that
is directly proportional to the heat flux, q/A. If the output of the heat flow transducer (HFT) is called f than the k -factor can be
calculated from:
Dx
k 5 Nf (X1.2)
DT
X1.3 In this equation f, DT, and Dx can be measured by simple means, while the calibration constant, N, can be determined
by testing a sample of known thermal conductivity.
X2. CALCULATIONS
X2.1 Afterthermalequilibriumhasbeenestablished,thevarioussensorsmaybereadandrecorded.Datareductionisdependent
upon the positions of the thermocouples for measuring the sample DT, as follows:
X2.1.1 If thermocouples are installed in the sample surface then:
DT 5 T 2 T ~mV! (X2.1)
1 2
NOTE X2.1—The sample thickness must be adjusted to account for the thermocouples being slightly below the surface, see Fig. 2.
X2.1.2 Acalibration run must first be made using a calibration standard of known thermal conductivity, k . This procedure is
r
identical to the procedure for the unknown sample as follows:
X2.1.2.1 k-factor, unknown sample:
Dx
s
k 5 Nf (X2.2)
s s
DT
s
X2.1.2.2 k-factor, known sample:
Dx
r
k 5 Nf (X2.3)
r r
DT
r
X2.1.2.3 Combining the unknown and known samples:
f Dx DT
s s r
k 5 k (X2.4)
s r
f Dx DT
r r s
X2.1.3 If thermocouples are located permanently in the surface adjacent to the sample, then, in accordance with Fig. 3, the DT
obtained by subtracting T and T is not equal to the DT across the sample itself due to contact resistance. (Acorrection factor can
h c
be obtained from the calibration test data.)
X2.1.4 The calibration sample must have a set of thermocouples installed in grooves in the upper and lower surfaces. During
calibration the following results are obtained:
Annual Book of ASTM Standards, Vol 09.02.
Borosilicate No. 7740 has been found
...


Questions, Comments and Discussion
Ask us and Technical Secretary will try to provide an answer. You can facilitate discussion about the standard in here.