ASTM A716-99
(Specification)Standard Specification for Ductile Iron Culvert Pipe
Standard Specification for Ductile Iron Culvert Pipe
SCOPE
1.1 This specification covers 14 to 64-in. ductile-iron culvert pipe centrifugally cast.
1.2 The values stated in inch-pound units are to be regarded as the standard. The values given in parentheses are for information only.
1.3 The following safety hazards caveat pertains only to the test methods portions, Sections 6 and 7, of this specification: This standard does not purport to address all of the safety concerns, if any, associated with its use. It is the responsibility of the user of this standard to establish appropriate safety and health practices and determine the applicability of regulatory limitations prior to use.
General Information
Relations
Standards Content (Sample)
NOTICE: This standard has either been superceded and replaced by a new version or discontinued.
Contact ASTM International (www.astm.org) for the latest information.
Designation: A 716 – 99
Standard Specification for
Ductile Iron Culvert Pipe
This standard is issued under the fixed designation A 716; the number immediately following the designation indicates the year of
original adoption or, in the case of revision, the year of last revision. A number in parentheses indicates the year of last reapproval. A
superscript epsilon (e) indicates an editorial change since the last revision or reapproval.
A
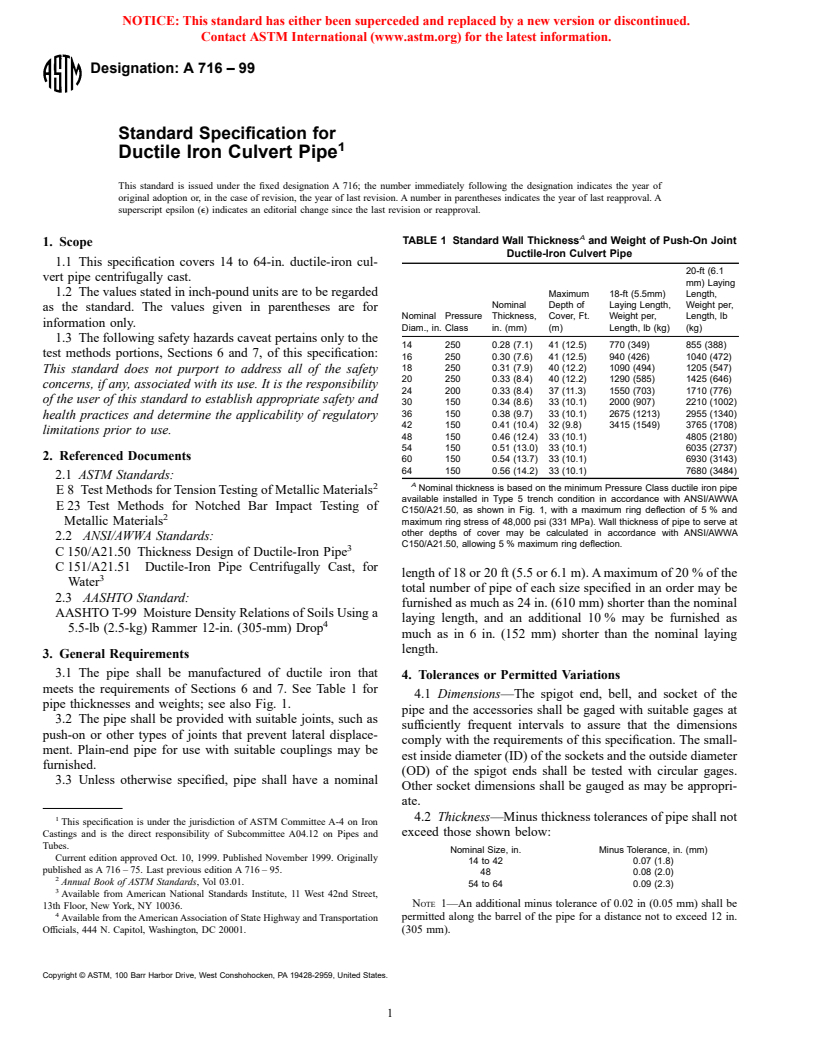
TABLE 1 Standard Wall Thickness and Weight of Push-On Joint
1. Scope
Ductile-Iron Culvert Pipe
1.1 This specification covers 14 to 64-in. ductile-iron cul-
20-ft (6.1
vert pipe centrifugally cast.
mm) Laying
1.2 The values stated in inch-pound units are to be regarded Maximum 18-ft (5.5mm) Length,
Nominal Depth of Laying Length, Weight per,
as the standard. The values given in parentheses are for
Nominal Pressure Thickness, Cover, Ft. Weight per, Length, lb
information only.
Diam., in. Class in. (mm) (m) Length, lb (kg) (kg)
1.3 The following safety hazards caveat pertains only to the
14 250 0.28 (7.1) 41 (12.5) 770 (349) 855 (388)
test methods portions, Sections 6 and 7, of this specification:
16 250 0.30 (7.6) 41 (12.5) 940 (426) 1040 (472)
18 250 0.31 (7.9) 40 (12.2) 1090 (494) 1205 (547)
This standard does not purport to address all of the safety
20 250 0.33 (8.4) 40 (12.2) 1290 (585) 1425 (646)
concerns, if any, associated with its use. It is the responsibility
24 200 0.33 (8.4) 37 (11.3) 1550 (703) 1710 (776)
of the user of this standard to establish appropriate safety and
30 150 0.34 (8.6) 33 (10.1) 2000 (907) 2210 (1002)
36 150 0.38 (9.7) 33 (10.1) 2675 (1213) 2955 (1340)
health practices and determine the applicability of regulatory
42 150 0.41 (10.4) 32 (9.8) 3415 (1549) 3765 (1708)
limitations prior to use.
48 150 0.46 (12.4) 33 (10.1) 4805 (2180)
54 150 0.51 (13.0) 33 (10.1) 6035 (2737)
2. Referenced Documents
60 150 0.54 (13.7) 33 (10.1) 6930 (3143)
64 150 0.56 (14.2) 33 (10.1) 7680 (3484)
2.1 ASTM Standards:
A
Nominal thickness is based on the minimum Pressure Class ductile iron pipe
E 8 Test Methods for Tension Testing of Metallic Materials
available installed in Type 5 trench condition in accordance with ANSI/AWWA
E 23 Test Methods for Notched Bar Impact Testing of
C150/A21.50, as shown in Fig. 1, with a maximum ring deflection of 5 % and
Metallic Materials maximum ring stress of 48,000 psi (331 MPa). Wall thickness of pipe to serve at
other depths of cover may be calculated in accordance with ANSI/AWWA
2.2 ANSI/AWWA Standards:
C150/A21.50, allowing 5 % maximum ring deflection.
C 150/A21.50 Thickness Design of Ductile-Iron Pipe
C 151/A21.51 Ductile-Iron Pipe Centrifugally Cast, for
length of 18 or 20 ft (5.5 or 6.1 m). A maximum of 20 % of the
Water
total number of pipe of each size specified in an order may be
2.3 AASHTO Standard:
furnished as much as 24 in. (610 mm) shorter than the nominal
AASHTO T-99 Moisture Density Relations of Soils Using a
laying length, and an additional 10 % may be furnished as
5.5-lb (2.5-kg) Rammer 12-in. (305-mm) Drop
much as in 6 in. (152 mm) shorter than the nominal laying
length.
3. General Requirements
3.1 The pipe shall be manufactured of ductile iron that
4. Tolerances or Permitted Variations
meets the requirements of Sections 6 and 7. See Table 1 for
4.1 Dimensions—The spigot end, bell, and socket of the
pipe thicknesses and weights; see also Fig. 1.
pipe and the accessories shall be gaged with suitable gages at
3.2 The pipe shall be provided with suitable joints, such as
sufficiently frequent intervals to assure that the dimensions
push-on or other types of joints that prevent lateral displace-
comply with the requirements of this specification. The small-
ment. Plain-end pipe for use with suitable couplings may be
est inside diameter (ID) of the sockets and the outside diameter
furnished.
(OD) of the spigot ends shall be tested with circular gages.
3.3 Unless otherwise specified, pipe shall have a nominal
Other socket dimensions shall be gauged as may be appropri-
ate.
4.2 Thickness—Minus thickness tolerances of pipe shall not
This specification is under the jurisdiction of ASTM Committee A-4 on Iron
exceed those shown below:
Castings and is the direct responsibility of Subcommittee A04.12 on Pipes and
Tubes.
Nominal Size, in. Minus Tolerance, in. (mm)
Current edition approved Oct. 10, 1999. Published November 1999. Originally
14 to 42 0.07 (1.8)
published as A 716 – 75. Last previous edition A 716 – 95.
48 0.08 (2.0)
Annual Book of ASTM Standards, Vol 03.01.
54 to 64 0.09 (2.3)
Available from American National Standards Institute, 11 West 42nd Street,
NOTE 1—An additional minus tolerance of 0.02 in (0.05 mm) shall be
13th Floor, New York, NY 10036.
permitted along the barrel of the pipe for a distance not to exceed 12 in.
Available from the American Association of State Highway and Transportation
Officials, 444 N. Capitol, Washington, DC 20001. (305 mm).
Copyright © ASTM, 100 Barr Harbor Drive, West Conshohocken, PA 19428-2959, United States.
NOTICE: This standard has either been superceded and replaced by a new version or discontinued.
Contact ASTM International (www.astm.org) for the latest information.
A 716
thickness exceeds 0.40 in. (10.2 mm), the impact specimen
may be machined to a nominal thickness of 0.40 in. (10.2 mm).
In all tests, impact values are to be corrected to a standard wall
thickness, t 5 0.40 in. (10.2 mm), by calculation as follows:
s
t
s
Impact value ~corrected!5 3 impact value ~actual!
t
where:
t 5 the thickness of the specimen, in. (mm).
The Charpy test machine anvil shall not be moved to
compensate for the variation of cross-section dimensions of the
test specimen.
6.3.1 Acceptance Value—The corrected acceptance value
for notched impact test specimens shall be a minimum of 7
ft·lbf (9.49 J) for tests conducted at 70 6 10°F (21 6 6°C).
NOTE 1—Pipe is bedded to its centerline in compacted granular
6.4 Sampling—At least one tension specimen shall be taken
material with a minimum of 4 in. (102 mm) under the pipe. Compacted
A during each casting period of approximately 3 h. At least one
granular or select material is used to the top of the pipe. (Material is
70 6 10°F (21 6 6°C) Charpy impact specimen shall be taken
compacted to approximately 90 % Standard Proctor in accordance with
during each operating hour. Specimens shall be selected to
AASHTO Standard T-99.)
A
Loose soil or select material is defined as native soil excavated from properly represent extremes of pipe diameters and wall thick-
the trench, free of rocks, foreign material, and frozen earth.
nesses.
FIG. 1 Type 5 Trench
7. Additional Control Tests by Manufacturer
7.1 An additional low-temperature impact test shall be made
4.3 Weight—The weight of any single pipe shall not be less
from at least 10 % of the sample coupons taken for the required
than the tabulated weight by more than 5 %.
70 6 10°F (21 6 6°C) Charpy impact test specified in 6.4 to
check compliance with a minimum corrected value of 3 ft·lbf
5. Coating
(4.07 J) for tests conducted at −40°F (−40°C). Test specimens
5.1 All pipe shall be coated inside and outside with an
shall be prepared and tested in accordance with 6.3.
asphaltic material approximately 1 mil (0.025 mm) thick. The
7.2 In addition, the manufacturer shall conduct such other
finished coating shall be continuous and smooth, neither brittle
tests as may be necessary to ensure compliance with this
when cold, nor sticky when exposed to the sun, and shall be
specification.
strongly adherent to the pipe.
8. Additional Tests Required by Purchaser
6. Acceptance Tests
8.1 When tests other than those required in this specification
6.1 The standard acceptance tests for the physical charac-
are required by the purchaser, such tests shall be specified in
teristics of the pipe shall be as follows:
the purchaser’s specifications.
6.2 Tension Test—Unless otherwise specified by the pur-
9. Inspection and Certification by Manufacturer
chaser, a tension test specimen shall be cut longitudinally or
circumferentially from the midsection of the pipe wall. In case 9.1 Unless otherwise provided in the purchaser’s specifica-
tions, the manufacturer shall establish the necessary quality-
of dispute, the specimen shall be cut longitudinally. This
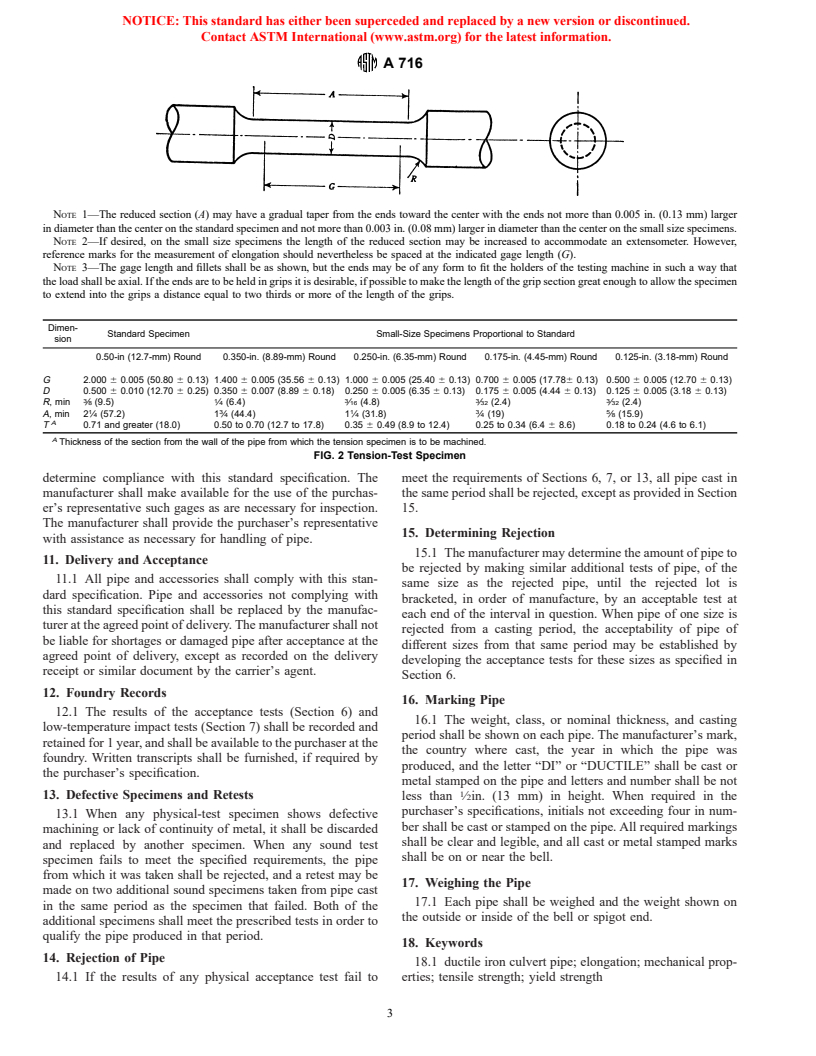
specimen shall be machined and tested in accordance with Fig. control and inspection practice to ensure compliance with this
specification.
2 and Test Methods E 8. The yield strength shall be determined
by the 0.2 % offset, halt-of-pointer, or extension-under-load 9.2 The manufacturer s
...


Questions, Comments and Discussion
Ask us and Technical Secretary will try to provide an answer. You can facilitate discussion about the standard in here.