ASTM D4495-00(2005)
(Test Method)Standard Test Method for Impact Resistance of Poly(Vinyl Chloride) (PVC) Rigid Profiles by Means of a Falling Weight
Standard Test Method for Impact Resistance of Poly(Vinyl Chloride) (PVC) Rigid Profiles by Means of a Falling Weight
SIGNIFICANCE AND USE
The impact strength of PVC profiles relates to suitability for service and to quality of processing. Impact tests are used for quality-control purposes and as an indication that products can withstand handling during assembling, installation, or in service.
Results obtained by use of this test method can be used in two ways:
5.2.1 As the basis for establishing impact-test requirements in product standards, and
5.2.2 To measure the effect of changes in materials or processing.
SCOPE
1.1 This test method covers the determination of the energy required to crack or break rigid poly(vinyl chloride) (PVC) profile under specified conditions of impact by means of a falling weight.
1.2 This test method is able to be used by itself or in conjunction with other methods of measuring PVC product toughness.
1.3 Because of the wide variety of profile sizes and shapes and the wide variety of manufacturing procedures and field abuse, this test method does not correlate universally with all types of abuse. Therefore, correlations must be established as needed.
1.4 The text of this standard references notes and footnotes which provide explanatory material. These notes and footnotes (excluding those in tables and figures) shall not be considered as requirements of this standard.
1.5 The values stated in inch-pound units are to be regarded as the standard.
Note 1--There is no equivalent or similar ISO standard.
1.6 This standard does not purport to address all of the safety concerns, if any, associated with its use. It is the responsibility of the user of this standard to establish appropriate safety and health practices and determine the applicability of regulatory limitations prior to use.
General Information
Relations
Standards Content (Sample)
NOTICE: This standard has either been superseded and replaced by a new version or withdrawn.
Contact ASTM International (www.astm.org) for the latest information
An American National Standard
Designation: D4495 – 00 (Reapproved 2005)
Standard Test Method for
Impact Resistance of Poly(Vinyl Chloride) (PVC) Rigid
Profiles by Means of a Falling Weight
This standard is issued under the fixed designation D4495; the number immediately following the designation indicates the year of
original adoption or, in the case of revision, the year of last revision. A number in parentheses indicates the year of last reapproval. A
superscript epsilon (´) indicates an editorial change since the last revision or reapproval.
1. Scope* D883 Terminology Relating to Plastics
E178 Practice for Dealing With Outlying Observations
1.1 This test method covers the determination of the energy
required to crack or break rigid poly(vinyl chloride) (PVC)
3. Terminology
profile under specified conditions of impact by means of a
3.1 Definitions—Definitions are in accordance with Termi-
falling weight.
nology D883, unless otherwise indicated.
1.2 This test method is able to be used by itself or in
3.2 Definitions of Terms Specific to This Standard:
conjunction with other methods of measuring PVC product
3.2.1 failure— the presence of a brittle failure readily
toughness.
visible by the naked eye, including a sharp crack, split, or
1.3 Because of the wide variety of profile sizes and shapes
shatter in any part of the profile as a result of the impact of the
and the wide variety of manufacturing procedures and field
fallingweight.Failuredoesnotincludeductiletears(wherethe
abuse, this test method does not correlate universally with all
surfaces at the tip of the crack have a greater than 0° angle), or
types of abuse. Therefore, correlations must be established as
ductile breaks (hinged breaks where the cracked part remains
needed.
joined to the unbroken part throughout the length of the
1.4 The text of this standard references notes and footnotes
cracked part or section), (Fig. 1).
which provide explanatory material. These notes and footnotes
3.2.2 mean failure height—the height from which the
(excluding those in tables and figures) shall not be considered
falling weight will cause 50 % of the specimens to fail.
as requirements of this standard.
3.2.3 mean failure energy—energy required to produce
1.5 The values stated in inch-pound units are to be regarded
50 % failures. The product of the weight and mean failure
as the standard.
height.
NOTE 1—There is no equivalent or similar ISO standard.
3.2.4 outlier—an observation that appears to deviate mark-
edly from other members of the sample in which it occurs.
1.6 This standard does not purport to address all of the
safety concerns, if any, associated with its use. It is the
4. Summary of Test Method
responsibility of the user of this standard to establish appro-
4.1 The profile is cut into lengths of at least 6 in. The test
priate safety and health practices and determine the applica-
method establishes the height from which a standard falling
bility of regulatory limitations prior to use.
weight will cause 50 % of the specimens to fail.
2. Referenced Documents
2 5. Significance and Use
2.1 ASTM Standards:
5.1 TheimpactstrengthofPVCprofilesrelatestosuitability
D618 Practice for Conditioning Plastics for Testing
for service and to quality of processing. Impact tests are used
for quality-control purposes and as an indication that products
This test method is under the jurisdiction ofASTM Committee D20 on Plastics
can withstand handling during assembling, installation, or in
and is the direct responsibility of Subcommittee D20.24 on Plastic Building
service.
Products.
5.2 Results obtained by use of this test method can be used
Current edition approved March 1, 2005. Published March 2005. Originally
in two ways:
approved in 1985. Last previous edition approved in 2000 as D4495 – 00. DOI:
10.1520/D4495-00R05.
5.2.1 As the basis for establishing impact-test requirements
For referenced ASTM standards, visit the ASTM website, www.astm.org, or
in product standards, and
contact ASTM Customer Service at service@astm.org. For Annual Book of ASTM
5.2.2 To measure the effect of changes in materials or
Standards volume information, refer to the standard’s Document Summary page on
the ASTM website. processing.
*A Summary of Changes section appears at the end of this standard.
Copyright © ASTM International, 100 Barr Harbor Drive, PO Box C700, West Conshohocken, PA 19428-2959, United States.
D4495 – 00 (2005)
FIG. 1 Types of Breaks
NOTE 3—Noparticularmaterialforthedroptubeisspecified.However,
6. Apparatus
5 3
a cold-drawn seamless steel tubing with an inside diameter of 2 ⁄8 to 2 ⁄4
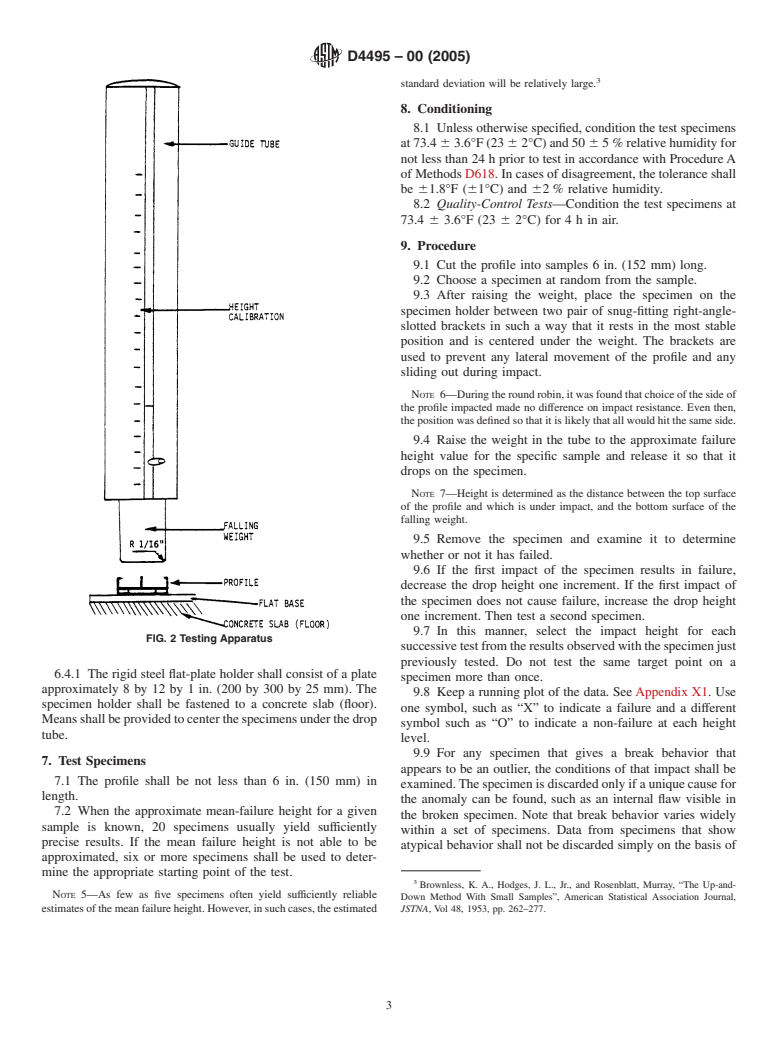
6.1 General—One type of impact tester is illustrated in Fig.
in. (67 to 70 mm) has been found to be satisfactory. It may also be
2.
necessary to provide a protective barrier around the specimen, particularly
6.2 Falling Weight, shall be cylindrical and 2 ⁄2 in. in
for larger sizes of profile, to protect the operator from flying broken
diameter, with a flat-bottom surface that strikes the test
pieces.
specimen.
NOTE 4—The dropped weight may not fall freely if the clearance
between the weight and tube is too large or too small, or if it is restrained
NOTE 2—It is suggested that the striking portion of the weight be made
by a partial vacuum above the weight, such as can be caused by the hold
of scratch-resistant steel to reduce damage to the striking surface. Badly
and release device.
scarred surfaces may affect test results.
6.2.1 The mass of the falling weight shall be 10 6 0.5 lb.
6.3.2 Means shall be provided to hold the weight to be
6.3 Drop Tube, shall be of sufficient length (approximately
dropped at steps of 2 in. (50 mm) for a distance of 2 to 10 ft
12 ft (4 m)) to provide for a fall of at least 10 ft (3 m) and shall
(600 mm to 3 m) above the flat-plate holder, to release the
be mounted so that the lengthwise direction is vertical, as
weightinareproduciblemanner,andtoallowtheweighttofall
measured with a plumb bob or a spirit level at least 2 ft (600
freely.
mm) in length.
6.4 Specimen Holder—The flat plate shall be used as a
6.3.1 Care must be taken to ensure that the weight falls
specimen holder.
freely; it must not “chatter” down the tube.
D4495 – 00 (2005)
standard deviation will be relatively large.
8. Conditioning
8.1 Unless otherwise specified, condition the test specimens
at73.4 63.6°F(23 62°C)and50 65 %relativehumidityfor
not less than 24 h prior to test in accordance with ProcedureA
of Methods D618. In cases of disagreement, the tolerance shall
be 61.8°F (61°C) and 62 % relative humidity.
8.2 Quality-Control Tests—Condition the test specimens at
73.4 6 3.6°F (23 6 2°C) for4hinair.
9. Procedure
9.1 Cut the profile into samples 6 in. (152 mm) long.
9.2 Choose a specimen at random from the sample.
9.3 After raising the weight, place the specimen on the
specimen holder between two pair of snug-fitting right-angle-
slotted brackets in such a way that it rests in the most stable
position and is centered under the weight. The brackets are
used to prevent any lateral movement of the profile and any
sli
...


Questions, Comments and Discussion
Ask us and Technical Secretary will try to provide an answer. You can facilitate discussion about the standard in here.