ASTM E436-03(2008)
(Test Method)Standard Test Method for Drop-Weight Tear Tests of Ferritic Steels
Standard Test Method for Drop-Weight Tear Tests of Ferritic Steels
SIGNIFICANCE AND USE
This test method can be used to determine the appearance of propagating fractures in plain carbon or low-alloy pipe steels (yield strengths less than 825 MPa) over the temperature range where the fracture mode changes from brittle (cleavage or flat) to ductile (shear or oblique).
This test method can serve the following purposes:
For research and development, to study the effect of metallurgical variables such as composition or heat treatment, or of fabricating operations such as welding or forming on the mode of fracture propagation.
For evaluation of materials for service to indicate the suitability of a material for specific applications by indicating fracture propagation behavior at the service temperature(s).
For information or specification purposes, to provide a manufacturing quality control only when suitable correlations have been established with service behavior.
SCOPE
1.1 This test method covers drop-weight tear tests (DWTT) on ferritic steels with thicknesses between 3.18 and 19.1 mm.
1.2 The values stated in SI units are to be regarded as standard. No other units of measurement are included in this standard.
1.3 This standard does not purport to address all of the safety concerns, if any, associated with its use. It is the responsibility of the user of this standard to establish appropriate safety and health practices and determine the applicability of regulatory limitations prior to use.
General Information
Relations
Buy Standard
Standards Content (Sample)
NOTICE: This standard has either been superseded and replaced by a new version or withdrawn.
Contact ASTM International (www.astm.org) for the latest information
Designation:E436 −03(Reapproved 2008)
Standard Test Method for
Drop-Weight Tear Tests of Ferritic Steels
This standard is issued under the fixed designation E436; the number immediately following the designation indicates the year of
original adoption or, in the case of revision, the year of last revision.Anumber in parentheses indicates the year of last reapproval.A
superscript epsilon (´) indicates an editorial change since the last revision or reapproval.
1. Scope 4.2.2 For evaluation of materials for service to indicate the
suitability of a material for specific applications by indicating
1.1 This test method covers drop-weight tear tests (DWTT)
fracture propagation behavior at the service temperature(s).
on ferritic steels with thicknesses between 3.18 and 19.1 mm.
4.2.3 Forinformationorspecificationpurposes,toprovidea
1.2 The values stated in SI units are to be regarded as
manufacturing quality control only when suitable correlations
standard. No other units of measurement are included in this
have been established with service behavior.
standard.
1.3 This standard does not purport to address all of the
5. Apparatus
safety concerns, if any, associated with its use. It is the
5.1 The testing machine shall be either a pendulum type or
responsibility of the user of this standard to establish appro-
a vertical-dropped-weight (Note 1) type. The machine shall
priate safety and health practices and determine the applica-
provide sufficient energy to completely fracture a specimen in
bility of regulatory limitations prior to use.
one impact.
5.1.1 As a guide in the design of the equipment it has been
2. Referenced Documents
found that up to 2712 J of energy may be required to
2.1 ASTM Standards:
completely fracture specimens of steel up to 12.7 mm in
E208Test Method for Conducting Drop-Weight Test to
thickness with tensile strengths to 690 MPa.
Determine Nil-Ductility Transition Temperature of Fer-
ritic Steels NOTE 1—Equipment of the vertical-dropped-weight variety that can be
readily modified to conduct the drop-weight tear test is described in Test
E1823TerminologyRelatingtoFatigueandFractureTesting
Method E208.
NOTE 2—Current pipeline grade steels take more thn 4kJ at design
3. Terminology
temperature of -5°C
3.1 Terminology E1823 is applicable to this test method.
5.2 Thespecimenshallbesupportedinasuitablemannerto
prevent sidewise rotation of the specimen.
4. Significance and Use
5.3 The velocity of the hammer (in either type of testing
4.1 This test method can be used to determine the appear-
machine) shall be not less than 4.88 m/s.
ance of propagating fractures in plain carbon or low-alloy pipe
steels (yield strengths less than 825 MPa) over the temperature
6. Test Specimen
range where the fracture mode changes from brittle (cleavage
or flat) to ductile (shear or oblique).
6.1 The test specimen shall be a 76.2 by 305-mm by
4.2 This test method can serve the following purposes:
full-plate-thickness edge-notch bend specimen employing a
4.2.1 For research and development, to study the effect of pressednotch.Fig.1presentsthedimensionsandtolerancesof
metallurgical variables such as composition or heat treatment,
the specimens. The specimens shall be removed from the
or of fabricating operations such as welding or forming on the material under test by sawing, shearing, or flame cutting, with
mode of fracture propagation.
or without machining.
NOTE3—Ifthespecimenisflamecutitisusuallydifficulttopressinthe
notch unless the heat-affected zone is removed by machining.
This method is under the jurisdiction ofASTM Committee E08 on Fatigue and
Fractureand is the direct responsibility of Subcommittee E08.02 on Standards and
6.2 The notch shall be pressed to the depth shown in Fig. 1
Terminology.
with a sharp tool-steel chisel with an included angle of 45 6
Current edition approved Nov. 1, 2008. Published February 2009. Originally
2°. Machined notches are prohibited.
approved in 1971. Last previous edition approved 2003 as E436 – 03. DOI:
10.1520/E0436-03R08.
NOTE 4—The notch radius obtained with a sharp tool-steel chisel is
For referenced ASTM standards, visit the ASTM website, www.astm.org, or
normally between 0.013 to 0.025 mm. When many specimens are to be
contact ASTM Customer Service at service@astm.org. For Annual Book of ASTM
Standards volume information, refer to the standard’s Document Summary page on tested, it is helpful to use a jig that will guide the chisel and stop it at the
the ASTM website. proper depth.
Copyright © ASTM International, 100 Barr Harbor Drive, PO Box C700, West Conshohocken, PA 19428-2959. United States
E436−03 (2008)
1 3
FIG. 1 Drop-Weight Tear Test Specimens and Support Dimensions and Tolerances (for Specimens ⁄8 to ⁄4 in. in Thickness)
7. Procedure
7.1 Inthetemperaturerangefrom−73to100°Cemploythe
procedure described in 7.1.1 and 7.1.2.
7.1.1 Completely immerse the specimens in a bath of
suitableliquidatatemperaturewithin 61°Cofthedesiredtest
FIG. 2 Fracture Surface Included in Shear-Area Determination
temperature for a minimum time of 15 min prior to testing.
Separate the specimens by a distance at least equal to the
thickness of the specimen. Make provision for circulation of
the bath to assure uniform bath temperature.
NOTE 5—Alternatively, other methods of heating and cooling may be
used, provided they produce equivalent time at temperature of the
specimens.
7.1.2 Remove the specimens from the bath and break as
described herein within a time period of 10-s. If the specimens
FIG. 3 Alternative Shear-Cleavage Fracture Appearance
are held out of the bath longer than 10 s return them unbroken
to the bath for a minimum of 10 min. Do not handle the
specimen in the vicinity of the notch by devices the tempera-
tureofwhichisappreciablydifferentfromthetesttemperature.
one specimen thickness from the edge struck by the hammer.
Fig. 2 illustrates in the cross-hatched area that portion of the
7.2 For temperatures outside of the range specified in 7.1
fracture surface to be considered in the evaluation of the
maintainthespecimentemperatureatthetimeofimpactwithin
percent shear area of the fracture surface.
4°C of the desired test temperature.
NOTE 7—If the specimens are to be preserved for some length of time
7.3 Insert the specimen in the testing machine so that the
afterevaluationoftheshearareaorifaconsiderabletimeelapsesbetween
notchinthespecimenlinesupwiththecenterlineofthetupon
testingandevaluation,thefracturesurfacesshouldbetreatedtokeepthem
the hammer within 1.59 mm. Also, center the notch in the
from corroding.
specimen between the supports on the anvil.
8.3 Occasionallyspecimenswillexhibitthefractureappear-
7.4 Consider tests invalid if the specimen buckles during
ance shown in Fig. 3. On specimens of this type the fracture
impact.
appears to have stopped and started a number of times
exhibiting intermittent regions of shear and cleavage in the
NOTE 6—Buckling has been experienced with specimen thicknesses
midthickness portion of the specimen. The shear area included
less than 4.75 mm.
intheratingofspecimensofthistypeshallbethatshowninthe
8. Specimen Evaluation
cross-hatched area of Fig. 3 (neglect the shear areas in the
8.1 For the purposes of this method, shear-fracture surfaces region of intermittent shear and cleavage fracture in rating the
shall be considered as those having a dull gray silky appear- specimen).
ance which are commonly inclined at an angle to the specimen
8.4 For referee method of determining the percent shear
surface. Cleavage or brittle fractures shall be considered those
area of the fracture surface, measure the cleavage area of the
that are bright and crystalline in appearance and that are
fracture surface with a planimeter on a photograph or optical
perpendicular to the plate surface. The cleavage fractures
projection of the fracture surface. Then divide the cleavage
generally extend from the root of the notch and are surrounded
area by the net area of the specimen included in the rating,
by a region of shear or shear lips on the specimen surface.
expressaspercent,andsubtractfrom100.Alternativemethods
8.2 Evaluate the specimens (Note 7) by determining the more adaptable to routine rating are described in 8.4.1-8.4.3.
percent shear area of the fracture surface neglecting the 8.4.1 Thepercentshearareacanbeevaluatedbycomparing
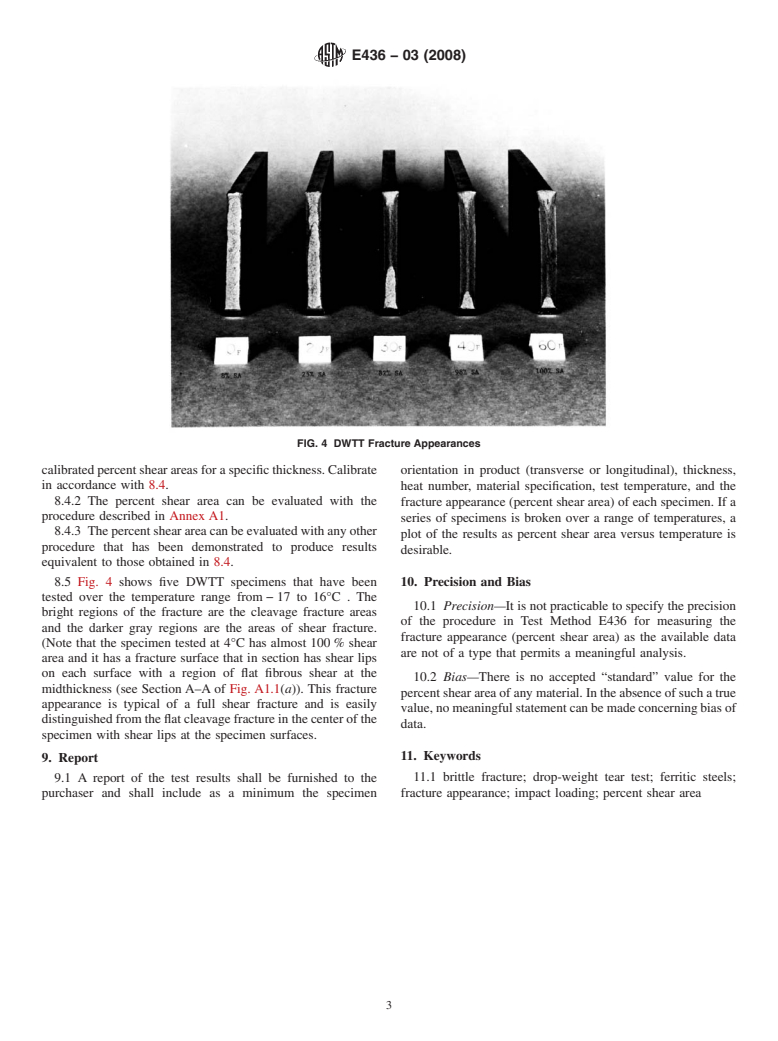
fracture surface for a distance of one spec
...
This document is not anASTM standard and is intended only to provide the user of anASTM standard an indication of what changes have been made to the previous version. Because
it may not be technically possible to adequately depict all changes accurately, ASTM recommends that users consult prior editions as appropriate. In all cases only the current version
of the standard as published by ASTM is to be considered the official document.
Designation:E436–91(Reapproved 1997) Designation: E 436 – 03 (Reapproved 2008)
Standard Test Method for
Drop-Weight Tear Tests of Ferritic Steels
This standard is issued under the fixed designation E436; the number immediately following the designation indicates the year of
original adoption or, in the case of revision, the year of last revision.Anumber in parentheses indicates the year of last reapproval.A
superscript epsilon (´) indicates an editorial change since the last revision or reapproval.
1. Scope
1.1 Thistestmethodcoversdrop-weightteartests(DWTT)onferriticsteelswiththicknessesbetween3.18and19.1mm(0.125
and 0.750 in.). mm.
1.2 The values stated in SI (metric) units are to be regarded as standard. No other units of measurement are included in this
standard.
1.3 This standard does not purport to address all of the safety concerns, if any, associated with its use. It is the responsibility
of the user of this standard to establish appropriate safety and health practices and determine the applicability of regulatory
limitations prior to use.
2. Referenced Documents
2.1 ASTM Standards:
E208 Test Method for Conducting Drop-Weight Test to Determine Nil-Ductility Transition Temperature of Ferritic SteelsTest
Method for Conducting Drop-Weight Test to Determine Nil-Ductility Transition Temperature of Ferritic Steels
E1823 Terminology Relating to Fatigue and Fracture Testing
3. Significance and Use
3.1This test method can be used to determine the appearance of propagating fractures in plain carbon or low-alloy pipe steels
(yield strengths less than 825 MPa or 120000 psi) over the temperature range where the fracture mode changes from brittle
(cleavage or flat) to ductile (shear or oblique).
3.2This test method can serve the following purposes:
3.2.1For research and development, to study the effect of metallurgical variables such as composition or heat treatment, or of
fabricating operations such as welding or forming on the mode of fracture propagation.
3.2.2Forevaluationofmaterialsforservicetoindicatethesuitabilityofamaterialforspecificapplicationsbyindicatingfracture
propagation behavior at the service temperature(s).
3.2.3For information or specification purposes, to provide a manufacturing quality control only when suitable correlations have
been established with service behavior. Terminology
3.1 Terminology E1823 is applicable to this test method.
4. Significance and Use
4.1 This test method can be used to determine the appearance of propagating fractures in plain carbon or low-alloy pipe steels
(yield strengths less than 825 MPa) over the temperature range where the fracture mode changes from brittle (cleavage or flat) to
ductile (shear or oblique).
4.2 This test method can serve the following purposes:
4.2.1 For research and development, to study the effect of metallurgical variables such as composition or heat treatment, or of
fabricating operations such as welding or forming on the mode of fracture propagation.
4.2.2 For evaluation of materials for service to indicate the suitability of a material for specific applications by indicating
fracture propagation behavior at the service temperature(s).
4.2.3 Forinformationorspecificationpurposes,toprovideamanufacturingqualitycontrolonlywhensuitablecorrelationshave
been established with service behavior.
This method is under the jurisdiction of ASTM Committee E-8E08 on Fatigue and Fracture and is the direct responsibility of Subcommittee E08.02 on Standards and
Terminology.
CurrenteditionapprovedAug.15,1991.Nov.1,2008.PublishedOctober1991.February2009.OriginallypublishedasE436–71T.approvedin1971.Lastpreviousedition
approved 2003 as E436 – 74(1986).03.
Annual Book of ASTM Standards, Vol 03.01.
ForreferencedASTMstandards,visittheASTMwebsite,www.astm.org,orcontactASTMCustomerServiceatservice@astm.org.For Annual Book ofASTM Standards
volume information, refer to the standard’s Document Summary page on the ASTM website.
Copyright © ASTM International, 100 Barr Harbor Drive, PO Box C700, West Conshohocken, PA 19428-2959, United States.
E 436 – 03 (2008)
5. Apparatus
4.1The5.1 The testing machine shall be either a pendulum type or a vertical-dropped-weight (Note 1) type. The machine shall
provide sufficient energy to completely fracture a specimen in one impact.
4.1.1As5.1.1 As a guide in the design of the equipment it has been found that up to 2712 J (2000 ft·lbf) of energy may be
required to completely fracture specimens of steel up to 12.7 mm ( ⁄2 in.) in thickness with tensile strengths to 690 MPa (100000
psi).MPa.
NOTE 1—Equipmentofthevertical-dropped-weightvarietythatcanbereadilymodifiedtoconductthedrop-weightteartestisdescribedinTestMethod
E208.
4.2The specimen shall be supported in a suitable manner to prevent sidewise rotation of the specimen.
4.3The velocity of the hammer (in either type of testing machine) shall be not less than 4.88 m/s (16 ft/s).
5.
NOTE 2—Current pipeline grade steels take more thn 4kJ at design temperature of -5°C
5.2 The specimen shall be supported in a suitable manner to prevent sidewise rotation of the specimen.
5.3 The velocity of the hammer (in either type of testing machine) shall be not less than 4.88 m/s.
6. Test Specimen
5.1The6.1 The test specimen shall be a 76.2 by 305-mm (3 by 12-in.) by full-plate-thickness edge-notch bend specimen
employing a pressed notch. Fig. 1 presents the dimensions and tolerances of the specimens.The specimens shall be removed from
the material under test by sawing, shearing, or flame cutting, with or without machining.
NOTE2—If 3—If the specimen is flame cut it is usually difficult to press in the notch unless the heat-affected zone is removed by machining.
5.2The6.2 The notch shall be pressed to the depth shown in Fig. 1 with a sharp tool-steel chisel with an included angle of 45
6 2°. Machined notches are prohibited.
NOTE3—The 4—The notch radius obtained with a sharp tool-steel chisel is normally between 0.013 to 0.025 mm (0.0005 to 0.001 in.). mm. When
many specimens are to be tested, it is helpful to use a jig that will guide the chisel and stop it at the proper depth.
6.7. Procedure
6.17.1 In the temperature range from−73 to 100°C (−100 to+212°F) employ the procedure described in 6.1.17.1.1 and
6.1.27.1.2.
6.1.17.1.1 Completely immerse the specimens in a bath of suitable liquid at a temperature within 61°C (62°F) of the desired
testtemperatureforaminimumtimeof15minpriortotesting.Separatethespecimensbyadistanceatleastequaltothethickness
of the specimen. Make provision for circulation of the bath to assure uniform bath temperature.
NOTE 45—Alternatively, other methods of heating and cooling may be used, provided they produce equivalent time at temperature of the specimens.
6.1.27.1.2 Remove the specimens from the bath and break as described herein within a time period of 10-s. If the specimens
are held out of the bath longer than 10 s return them unbroken to the bath for a minimum of 10 min. Do not handle the specimen
in the vicinity of the notch by devices the temperature of which is appreciably different from the test temperature.
6.2For7.2 For temperatures outside of the range specified in 6.17.1 maintain the specimen temperature at the time of impact
within6 2°Fwithin 4°C of the desired test temperature.
67.3 Insert the specimen in the testing machine so that the notch in the specimen lines up with the centerline of the tup on the
hammer within 1.59 mm ( ⁄16 in.). mm. Also, center the notch in the specimen between the supports on the anvil.
67.4 Consider tests invalid if the specimen buckles during impact.
NOTE5—Buckling has been experienced with specimen thicknesses less than 4.75 mm (0.187 in.).
1 3
FIG. 1 Drop-Weight Tear Test Specimens and Support Dimensions and Tolerances (for Specimens ⁄8 to ⁄4 in. in Thickness)
E 436 – 03 (2008)
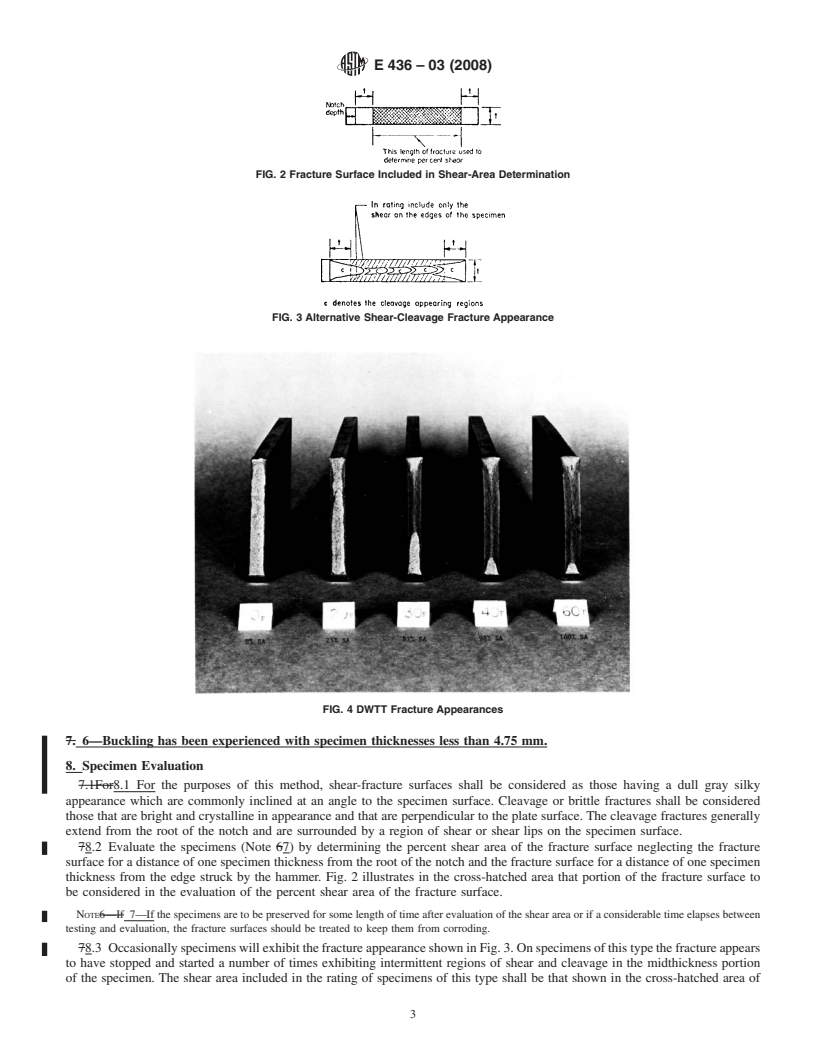
FIG. 2 Fracture Surface Included in Shear-Area Determination
FIG. 3 Alternative Shear-Cleavage Fracture Appearance
FIG. 4 DWTT Fracture Appearances
7. 6—Buckling has been experienced with specimen thicknesses less than 4.75 mm.
8. Specimen Evaluation
7.1For8.1 For the purposes of this method, shear-fracture surfaces shall be considered as those having a dull gray silky
appearance which are commonly inclined at an angle to the specimen surface. Cleavage or brittle fractures shall be considered
those that are bright and crystalline in appearance and that are perpendicular to the plate surface.The cleavage fractures generally
extend from the root of the notch and are surrounded by a region of shear or shear lips on the specimen surface.
78.2 Evaluate the specimens (Note 67) by determining the percent shear area of the fracture surface neglecting the fracture
surface for a distance of one specimen thickness from the root of the notch and the fracture surface for a distance of one specimen
thickness from the edge struck by the hammer. Fig. 2 illustrates in the cross-hatched area that portion of the fracture surface to
be considered in the evaluation of the percent shear area of the fracture surface.
NOTE6—If 7—If the specimens are to be preserved for some length of time after evaluation of the shear area or if a considerable time elapses between
testing and evaluation, the fracture surfaces should be treated to keep them from corroding.
78.3 OccasionallyspecimenswillexhibitthefractureappearanceshowninFig.3.Onspecimensofthistypethefractureappears
to have stopped and started a number
...


Questions, Comments and Discussion
Ask us and Technical Secretary will try to provide an answer. You can facilitate discussion about the standard in here.