ASTM B916-01(2007)
(Test Method)Standard Test Method for Adherence of Porcelain Enamel Coatings to Sheet Metal
Standard Test Method for Adherence of Porcelain Enamel Coatings to Sheet Metal
SIGNIFICANCE AND USE
The measurement of adherence in porcelain enamel systems, such as ground coat, ground coat/cover coat, and direct-on cover-coat enamels, is an important procedure for monitoring process variables in metal preparation, enamel application thickness, steel selection, and enamel selection, as well as assuring the ultimate quality of the finished product.
SCOPE
1.1 The scope of this test method is:
1.1.1 To determine quantitatively the amount of enamel remaining after the porcelain enamel coating specimen has been deformed;
1.1.2 To standardize the deformation parameters for testing adherence of porcelain enamel to sheet metal; and,
1.1.3 To provide a quantitative adherence rating scale for comparison to reference standards.
1.2 This adherence test method is applicable to porcelain enamel coatings on substrates from 18 to 24 gauge (0.0478 to 0.025 in. or from 1.214 to 0.654 mm).
This standard does not purport to address all of the safety concerns, if any, associated with its use. It is the responsibility of the user of this standard to establish appropriate safety and health practices and determine the applicability of regulatory limitations prior to use.
General Information
Relations
Standards Content (Sample)
NOTICE: This standard has either been superseded and replaced by a new version or withdrawn.
Contact ASTM International (www.astm.org) for the latest information
Designation: B916 − 01(Reapproved 2007)
Standard Test Method for
Adherence of Porcelain Enamel Coatings to Sheet Metal
This standard is issued under the fixed designation B916; the number immediately following the designation indicates the year of
original adoption or, in the case of revision, the year of last revision. A number in parentheses indicates the year of last reapproval. A
superscript epsilon (´) indicates an editorial change since the last revision or reapproval.
1. Scope the hemispherical indenter; the die opening size and edge
sharpness; and, the energy of the blow at impact.
1.1 The scope of this test method is:
1.1.1 To determine quantitatively the amount of enamel 3.3 A satisfactory degree of deformation and damage are
remaining after the porcelain enamel coating specimen has obtained if the conditions in 3.2 use the following parameters:
been deformed; 0.50-in. (12.7-mm) diameter hemispherical indenter, 0.75-in.
1.1.2 To standardize the deformation parameters for testing (19.1-mm) diameter bottomless die (lower plunger guide in
adherence of porcelain enamel to sheet metal; and, Fig. 1) with sharp edge, and 80–in./lb (9.03–J) energy at
1.1.3 To provide a quantitative adherence rating scale for impact.
comparison to reference standards.
3.4 Deformation Devices, of other designs may be used
1.2 This adherence test method is applicable to porcelain provided that the parameters in 3.3 are used.
enamel coatings on substrates from 18 to 24 gauge (0.0478 to
3.5 Adherence Reference Standards , see 7.1.
0.025 in. or from 1.214 to 0.654 mm).
1.3 This standard does not purport to address all of the 4. Test Specimens
safety concerns, if any, associated with its use. It is the
4.1 The test specimens shall be flat enameled panels not less
responsibility of the user of this standard to establish appro- 2 2
in size than 4 in. (101.6 mm ). Larger sizes and shapes may be
priate safety and health practices and determine the applica-
used provided that a flat surface can be held firmly against and
bility of regulatory limitations prior to use.
parallel to the lower plunger guide during deformation.
2. Significance and Use
5. Safety Precautions
2.1 The measurement of adherence in porcelain enamel
5.1 During the procedure in 6.1, fine enameled chips may be
systems, such as ground coat, ground coat/cover coat, and
released with some force from the steel surface; therefore, it is
direct-on cover-coat enamels, is an important procedure for
recommended that personnel in the immediate vicinity of the
monitoring process variables in metal preparation, enamel
test wear safety goggles.
application thickness, steel selection, and enamel selection, as
well as assuring the ultimate quality of the finished product.
6. Procedure
6.1 Specimen Deformation—The hammer weight of the
3. Apparatus
suggested drop weight device is 5 lb (2268 g), which requires
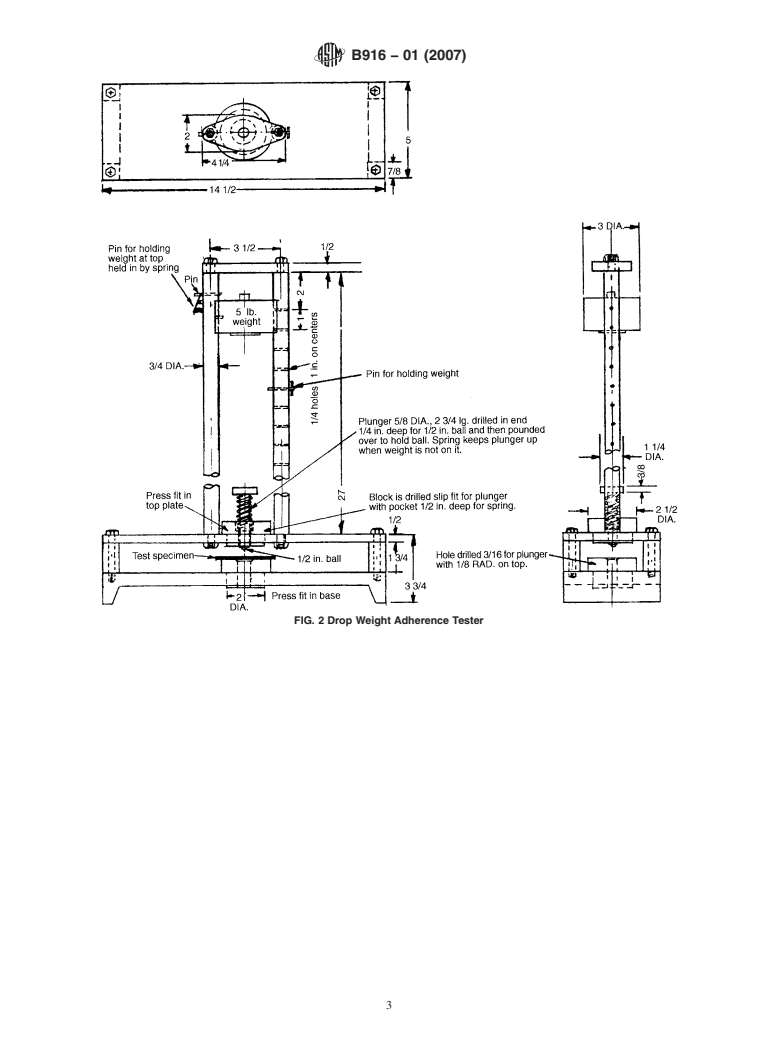
3.1 Drop Weight Deformation Device , see Figs. 1 and 2.
a 16-in. (406.4-mm) drop distance to yield the specified
3.2 The drop weight deformation device as shown in Fig. 1
80-in./lb (9.03-J) energy at impact. The hammer weight of the
shall impart a single impact blow from a hemispherical
drop weight device may range from 2 to 8 lb (907 to 3629 g).
indenter to a coated specimen supported over a sharp-edged
If the hammer weight is within this range, but not 5 lb,
bottomless die. The area of the deformation and the concomi- calculate the drop distance to yield 80 in./lbf of energy at
cant damage to the coating is largely influenced by the size of
impact. The center of the area to be deformed shall be at least
1
1 ⁄ in. (38.1 mm) from the edge of the specimen. If two or
more deformations are made on a single specimen, place them
at least 3 in. (76.2 mm) between centers and average and treat
This test method is under the jurisdiction ofASTM Committee B08 on Metallic
and Inorganic Coatings and is the direct responsibility of Subcommittee B08.12 on
the measurements on them as a single measurement. Raise and
Materials for Porcelain Enamel and Ceramic-Metal Systems.
secure the hammer to obtain the required drop distance. H
...


Questions, Comments and Discussion
Ask us and Technical Secretary will try to provide an answer. You can facilitate discussion about the standard in here.