ASTM F2634-10
(Test Method)Standard Test Method for Laboratory Testing of Polyethylene (PE) Butt Fusion Joints using Tensile-Impact Method
Standard Test Method for Laboratory Testing of Polyethylene (PE) Butt Fusion Joints using Tensile-Impact Method
SIGNIFICANCE AND USE
This test method is designed to impart tensile impact energy to a butt fused plastic pipe specimen, record the energy to fail the specimen and plot the load over time curve of the tensile test. Energy recorded at yield and rupture and the rupture mode (brittle or ductile) are used as criteria in the evaluation of the butt fusion joint. The evaluation of the force/time curve not only makes it possible to compare different butt fusion parameters but also to evaluate the rupture mode of the specimen to determine joint integrity. Each coupon's test results will usually be compared to test results for coupons machined from the base pipe material, un-fused.
These data are also useful for qualitative characterization and for research and development. For many materials, there may be a specification that requires the use of this test method, but with some procedural modifications that take precedence when adhering to the specification. Therefore, it is advisable to refer to that material specification before using this test method.
Tensile properties may vary with specimen preparation and with speed and environment of testing. Consequently, where precise comparative results are desired, these factors must be carefully controlled.
It is realized that a material cannot be tested without also testing the method of preparation of that material. Hence, when comparative tests of materials per se are desired, the greatest care must be exercised to ensure that all specimens are prepared in exactly the same way, unless the test is to include the effects of specimen preparation. While care must be taken to secure the maximum degree of uniformity in details of preparation, treatment, and handling, the exact dimensions of the test specimens are entered into the Data Acquisition System (DAS) before initiating the test.
SCOPE
1.1 This is a tensile impact test method that develops enough tensile impact energy at specific rates of strain to rupture standard tensile impact specimens of butt fused plastic pipe. It is used to determine the quality of PE butt fusion joints made in the field or in qualification testing. It can also be used to determine the optimum butt fusion joining parameters of PE materials.
1.2 This test method is applicable for testing pipe specimens with a diameter 2.37 in. (60.3mm) and larger with a wall thickness from 0.25 in. (6.3 mm) and larger.
Note 1—This test method is similar to ISO 13953.
1.3 The values stated in inch-pound units are to be regarded as standard. The values given in parentheses are mathematical conversions to SI units that are provided for information only and are not considered standard.
1.4 This test method may be used alone or together with other test methods, to evaluate the quality of the butt fused joints. When this test, conducted at laboratory temperatures per 9.2, is combined with the elevated temperature, sustained pressure test in Specification D3035, both the short term and long term strength of the PE butt fusion joint will be verified.
1.5 This standard does not purport to address all of the safety concerns, if any, associated with its use. It is the responsibility of the user of this standard to establish appropriate safety and health practices and determine the applicability of regulatory limitations prior to use.
General Information
Relations
Buy Standard
Standards Content (Sample)
NOTICE: This standard has either been superseded and replaced by a new version or withdrawn.
Contact ASTM International (www.astm.org) for the latest information
Designation: F2634 − 10
StandardTest Method for
Laboratory Testing of Polyethylene (PE) Butt Fusion Joints
1
using Tensile-Impact Method
This standard is issued under the fixed designation F2634; the number immediately following the designation indicates the year of
original adoption or, in the case of revision, the year of last revision. A number in parentheses indicates the year of last reapproval. A
superscript epsilon (´) indicates an editorial change since the last revision or reapproval.
1. Scope* D638 Test Method for Tensile Properties of Plastics
D883 Terminology Relating to Plastics
1.1 This is a tensile impact test method that develops
D2513 Specification for Polyethylene (PE) Gas Pressure
enough tensile impact energy at specific rates of strain to
Pipe, Tubing, and Fittings
rupture standard tensile impact specimens of butt fused plastic
D3035 SpecificationforPolyethylene(PE)PlasticPipe(DR-
pipe. It is used to determine the quality of PE butt fusion joints
PR) Based on Controlled Outside Diameter
made in the field or in qualification testing. It can also be used
E177 Practice for Use of the Terms Precision and Bias in
to determine the optimum butt fusion joining parameters of PE
ASTM Test Methods
materials.
E691 Practice for Conducting an Interlaboratory Study to
1.2 Thistestmethodisapplicablefortestingpipespecimens
Determine the Precision of a Test Method
with a diameter 2.37 in. (60.3mm) and larger with a wall
3
2.2 ISO Standard
thickness from 0.25 in. (6.3 mm) and larger.
ISO 13953 Polyethylene (PE) pipes and fittings - Determi-
NOTE 1—This test method is similar to ISO 13953.
nation of the tensile strength and failure mode of test
pieces from a butt-fused joint
1.3 The values stated in inch-pound units are to be regarded
as standard. The values given in parentheses are mathematical
conversions to SI units that are provided for information only 3. Terminology
and are not considered standard.
3.1 Definitions of Terms Specific to This Standard:
1.4 This test method may be used alone or together with
3.1.1 brittle rupture —Abrittle rupture in a butt fusion joint
other test methods, to evaluate the quality of the butt fused
specimen consists of a clean or nearly clean part between the
joints.Whenthistest,conductedatlaboratorytemperaturesper
joining surfaces resulting in a smooth surface on both sides.
9.2, is combined with the elevated temperature, sustained
(See Fig. 1.)
pressure test in Specification D3035, both the short term and
3.1.2 ductile rupture—Aductileruptureinabuttfusionjoint
long term strength of the PE butt fusion joint will be verified.
specimen consists of either an elongation rupture of the
1.5 This standard does not purport to address all of the
machined pipe outside the joint area (see Fig. 2) or adjacent to
safety concerns, if any, associated with its use. It is the
the butt fusion joint interface but resulting in considerable
responsibility of the user of this standard to establish appro-
material tearing between the pipe end surfaces (see Fig. 3).
priate safety and health practices and determine the applica-
3.1.3 maximum force—the maximum force obtained during
bility of regulatory limitations prior to use.
the test.
2. Referenced Documents
3.1.4 rupture energy—the energy required to rupture the
2
coupon.
2.1 ASTM Standards:
D618 Practice for Conditioning Plastics for Testing
3.1.5 yield point —The point on the force/time curve where
significant plastic deformation begins to occur. For the pur-
poses of this standard, this is defined as occurring at zero slope
1
This test method is under the jurisdiction of ASTM Committee F17 on Plastic
point on the force/time curve.
Piping Systems and is the direct responsibility of Subcommittee F17.40 on Test
Methods.
3.1.6 yield energy —The energy imparted to the coupon by
Current edition approved Dec. 1, 2010. Published January 2011. Originally
the yield point.
approved in 2007. Last previous edition approved in 2007 as F2634 – 07. DOI:
10.1520/F2634-10.
2
For referenced ASTM standards, visit the ASTM website, www.astm.org, or
contact ASTM Customer Service at service@astm.org. For Annual Book of ASTM
3
Standards volume information, refer to the standard’s Document Summary page on Available from International Organization for Standardization (ISO), 1 rue de
the ASTM website. Varembé, Case postale 56, CH-1211, Geneva 20, Switzerland, http://www.iso.ch.
*A Summary of Changes section appears at the end of this standard
Copyright © ASTM International, 100 Barr Harbor Drive, PO Box C700, West Conshohocken, PA 19428-2959. United States
1
---------------------- Page: 1 ----------------------
F2634 − 10
FIG. 1 Brittle Rupture
FIG. 2 Ductile Rupture Outside Fusion Interface
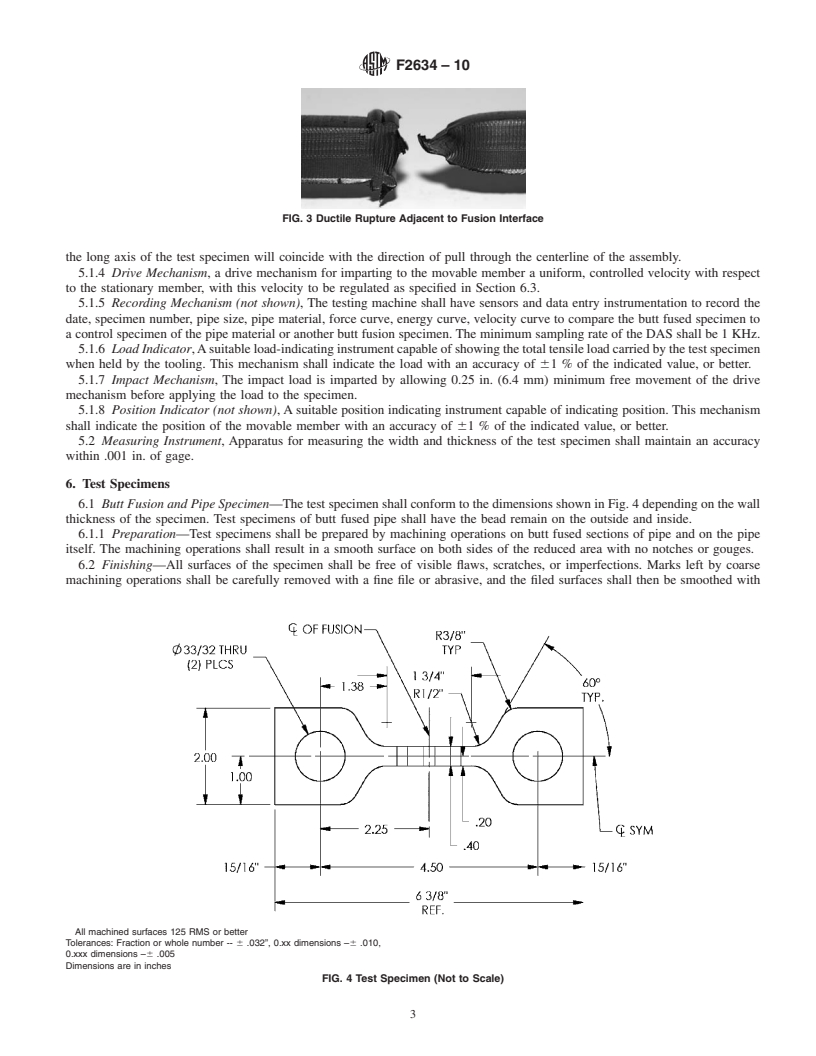
FIG. 3 Ductile Rupture Adjacent to Fusion Interface
3.1.7 average velocity—Theaveragevelocityistheaverage method, but with som
...
This document is not anASTM standard and is intended only to provide the user of anASTM standard an indication of what changes have been made to the previous version. Because
it may not be technically possible to adequately depict all changes accurately, ASTM recommends that users consult prior editions as appropriate. In all cases only the current version
of the standard as published by ASTM is to be considered the official document.
An American National Standard
Designation:F2634–07 Designation:F2634–10
Standard Test Method for
Laboratory Testing of Polyethylene (PE) Butt Fusion Joints
1
using Tensile-Impact Method
This standard is issued under the fixed designation F2634; the number immediately following the designation indicates the year of
original adoption or, in the case of revision, the year of last revision. A number in parentheses indicates the year of last reapproval. A
superscript epsilon (´) indicates an editorial change since the last revision or reapproval.
1. Scope*
1.1 This is a tensile impact test method that develops enough tensile impact energy at specific rates of strain to rupture standard
tensile impact specimens of butt fused plastic pipe. It is used to determine the quality of PE butt fusion joints made in the field
or in qualification testing. It can also be used to determine the optimum butt fusion joining parameters of PE materials.
1.2 This test method is applicable for testing pipe specimens with a diameter 2.37 in. (60.3mm) and larger with a wall thickness
from 0.25 in. (6.3 mm) and larger.
NOTE 1—This test method is similar to ISO 13953.
1.3 The values stated in inch-pound units are to be regarded as standard. The values given in parentheses are mathematical
conversions to SI units that are provided for information only and are not considered standard.
1.4 Thistestmethodmaybeusedaloneortogetherwithothertestmethods,toevaluatethequalityofthebuttfusedjoints.When
this test, conducted at laboratory temperatures per 9.2, is combined with the elevated temperature, sustained pressure test in
Specification D3035, both the short term and long term strength of the PE butt fusion joint will be verified.
1.5 This standard does not purport to address all of the safety concerns, if any, associated with its use. It is the responsibility
of the user of this standard to establish appropriate safety and health practices and determine the applicability of regulatory
limitations prior to use.
2. Referenced Documents
2
2.1 ASTM Standards:
D618 Practice for Conditioning Plastics for Testing
D638 Test Method for Tensile Properties of Plastics
D883 Terminology Relating to Plastics
D2513 Specification for Polyethylene (PE) Gas Pressure Pipe, Tubing, and Fittings
D3035 Specification for Polyethylene (PE) Plastic Pipe (DR-PR) Based on Controlled Outside Diameter Specification for
Polyethylene (PE) Plastic Pipe (DR-PR) Based on Controlled Outside Diameter
E177 Practice for Use of the Terms Precision and Bias in ASTM Test Methods
E691 Practice for Conducting an Interlaboratory Study to Determine the Precision of a Test Method
3
2.2 ISO Standard
ISO 13953 Polyethylene (PE) pipes and fittings - Determination of the tensile strength and failure mode of test pieces from a
butt-fused joint
3. Terminology
3.1 Definitions of Terms Specific to this Standard.
3.1.1 brittle rupture —A brittle rupture in a butt fusion joint specimen consists of a clean or nearly clean part between the
joining surfaces resulting in a smooth surface on both sides. (See Fig. 1.)
3.1.2 ductile rupture —Aductile rupture in a butt fusion joint specimen consists of either an elongation rupture of the machined
1
This test method is under the jurisdiction ofASTM Committee F17 on Plastic Piping Systems and is the direct responsibility of Subcommittee F17.40 on Test Methods.
Current edition approved March 1, 2007. Published March 2007. DOI: 10.1520/F2634-07.
Current edition approved Dec. 1, 2010. Published January 2011. Originally approved in 2007. Last previous edition approved in 2007 as F2634–07. DOI:
10.1520/F2634-10.
2
For referencedASTM standards, visit theASTM website, www.astm.org, or contactASTM Customer Service at service@astm.org. For Annual Book of ASTM Standards
volume information, refer to the standard’s Document Summary page on the ASTM website.
3
Available from International Organization for Standardization (ISO), 1 rue de Varembé, Case postale 56, CH-1211, Geneva 20, Switzerland, http://www.iso.ch.Available
from
*A Summary of Changes section appears at the end of this standard.
Copyright © ASTM International, 100 Barr Harbor Drive, PO Box C700, West Conshohocken, PA 19428-2959, United States.
1
---------------------- Page: 1 ----------------------
F2634–10
FIG. 1 Brittle Rupture
pipe outside the joint area (see Fig. 2) or adjacent to the butt fusion joint interface but resulting in considerable material tearing
between the pipe end surfaces (see Fig. 3).
3.1.3 maximum force—the maximum force obtained during the test.
3.1.4 rupture en
...


Questions, Comments and Discussion
Ask us and Technical Secretary will try to provide an answer. You can facilitate discussion about the standard in here.