ASTM D5619-00(2005)
(Test Method)Standard Test Method for Comparing Metal Removal Fluids Using the Tapping Torque Test Machine
Standard Test Method for Comparing Metal Removal Fluids Using the Tapping Torque Test Machine
SIGNIFICANCE AND USE
The procedures described in this test method can be used to predict more accurately the lubricating properties of a metal removal fluid than previously available laboratory scale tests.
This test method is designed to allow flexibility in the selection of test specimen metal composition, tap alloy or coatings, and machining speeds.
Comparison between various types of fluids can be made, including cutting oils, soluble oils, semi-synthetics, or water soluble synthetics.
SCOPE
1.1 This test method covers a laboratory technique to evaluate the relative performance of metal removal fluids using a non-matrix test protocol using the tapping torque test machine.
1.2 The values stated in SI units are to be regarded as standard. Because the equipment used in this test method is available only in inch-pound units, SI units are omitted when referring to the equipment and the test pieces.
1.3 This test method does not purport to address all of the safety concerns, if any, associated with its use. It is the responsibility of the user of this standard to establish appropriate safety and health practices and determine the applicability of regulatory limitations prior to use.
General Information
Relations
Standards Content (Sample)
NOTICE: This standard has either been superseded and replaced by a new version or withdrawn.
Contact ASTM International (www.astm.org) for the latest information
Designation:D5619–00 (Reapproved 2005)
Standard Test Method for
Comparing Metal Removal Fluids Using the Tapping Torque
Test Machine
This standard is issued under the fixed designation D5619; the number immediately following the designation indicates the year of
original adoption or, in the case of revision, the year of last revision. A number in parentheses indicates the year of last reapproval. A
superscript epsilon (´) indicates an editorial change since the last revision or reapproval.
1. Scope a characteristic BUE, depending on which cutting fluid is
utilized.
1.1 This test method covers a laboratory technique to
Ifacuttingfluidischangedtoanothercuttingfluidduringatest
evaluate the relative performance of metal removal fluids using
sequence, it is necessary to discard the results from at least the
a non-matrix test protocol using the tapping torque test
first test of the new fluid since the previous BUE must be
machine.
abradedormodifiedwiththechemistryofthenewfluidtoform
1.2 The values stated in SI units are to be regarded as
its own characteristic BUE.
standard. Because the equipment used in this test method is
The ideal cutting fluid forms a small, stable BUE that assists in
available only in inch-pound units, SI units are omitted when
the formation of a small curl.
referring to the equipment and the test pieces.
1.3 This standard does not purport to address all of the
3. Summary of Test Method
safety concerns, if any, associated with its use. It is the
3.1 The torque required to tap a thread in a blank specimen
responsibility of the user of this standard to establish appro-
nutwhilelubricatedwithametalremovalfluidismeasuredand
priate safety and health practices and determine the applica-
compared with the torque required to tap a thread in a blank
bility of regulatory limitations prior to use.
specimen nut while lubricated with a reference fluid. See Fig.
2. Terminology 1. The ratio of the average torque values of the reference oil to
the metal removal fluid tested, when using the same tap, is
2.1 Definitions of Terms Specific to This Standard:
expressed as the percent efficiency of the fluid. The efficiency
2.1.1 build-up edge—a triangular deposit that forms adja-
oftwoormorefluidscanbecomparedwhentheaveragetorque
cent to the cutting edge on the face of the tool in a metalwork-
values of the reference fluid on different taps are considered to
ing operation.
be statistically equivalent.
2.1.1.1 Discussion—The high contact pressure between the
cutting edge of the tap and the specimen material results in a
4. Significance and Use
high temperature. The high temperature, the wear debris, the
4.1 The procedures described in this test method can be
high contact pressure, and some of the constituents of the
used to predict more accurately the lubricating properties of a
cutting fluid combine at the cutting edge and form a triangular
metal removal fluid than previously available laboratory scale
deposit, referred to as a built-up edge (BUE). The BUE is
tests.
sustained by the chip curl as it is passed over, and as the BUE
4.2 This test method is designed to allow flexibility in the
grows, it is abraded by the rubbing of the chip curl. Since the
selection of test specimen metal composition, tap alloy or
BUE is located exactly where the curl is generated, it contrib-
coatings, and machining speeds.
utes to the size of the curl; the larger the BUE, the larger the
4.3 Comparison between various types of fluids can be
diameter of the chip curl.Asmall chip curl will flow smoothly
made, including cutting oils, soluble oils, semi-synthetics, or
up the flute of the tap and will not affect the torque. However,
water soluble synthetics.
a large curl will drag and jam in the flute and will contribute to
the tapping torque.
5. Apparatus
If a new tap is utilized, it is necessary to run several tests to
5.1 Test Machine, the tapping torque test machine as
run-in the tap.This process prepares the cutting edge to receive
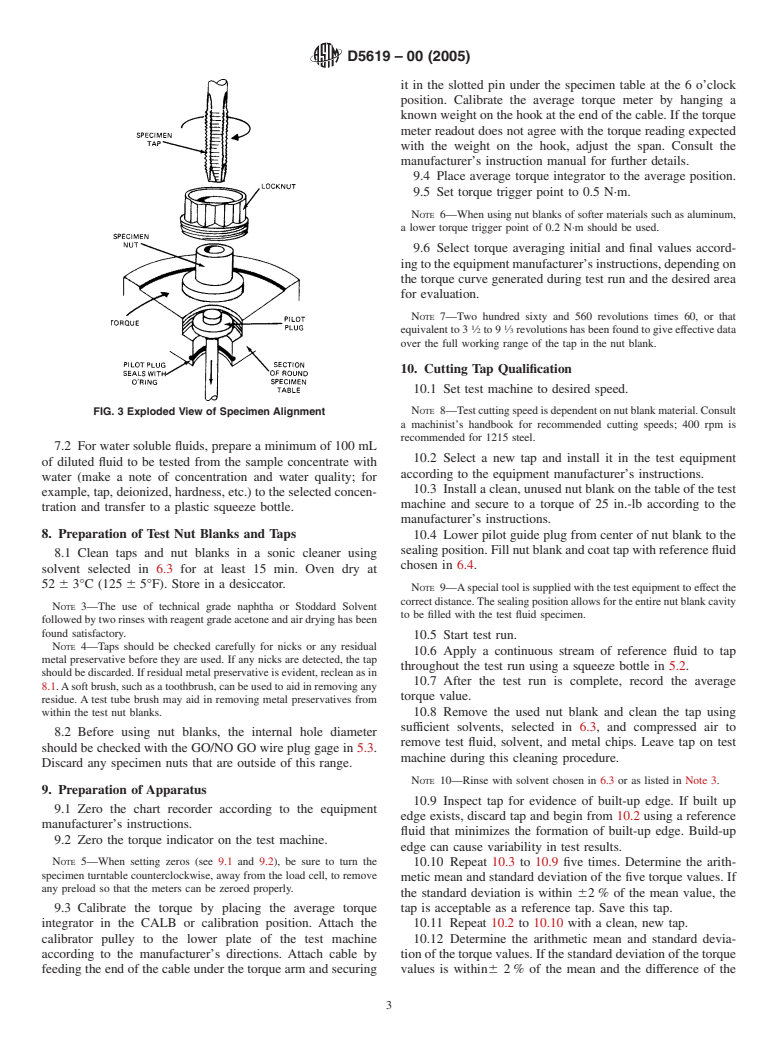
illustrated in Fig. 2 and Fig. 3.
5.2 Plastic Squeeze Bottle, 100 mL or larger.
5.3 GO/NO GO Wire Plug Gage , 0.3360/0.3363 in.
This test method is under the jurisdiction of ASTM Committee D02 on
5.4 Drying Oven, controllable to 52 6 3°C (125 6 5°F).
Petroleum Products and Lubricants and is the direct responsibility of Subcommittee
D02.L0 on Industrial Lubricants.
Current edition approved June 1, 2005. Published August 2005. Originally
approved in 1994. Last previous edition approved in 2000 as D5619–00. DOI: This test method was conducted using apparatus and materials available from
10.1520/D5619-00R05. Falex Corp., 1020 Airpark Dr., Sugar Grove, IL 60554.
Copyright © ASTM International, 100 Barr Harbor Drive, PO Box C700, West Conshohocken, PA 19428-2959, United States.
D5619–00 (2005)
FIG. 1 Tapping Torque Curve (insets show position of tap in specimen blank)
FIG. 2 Falex Tapping Torque Test Machine
SUS) mineral oil containing approximately 5 to 6 % lard has been found
6. Reagents and Materials
to be an effective reference fluid.
6.1 Cutting Nut Blanks, inside diameter of 0.33615 6
6.4 Solvent, safe, nonfilming, nonchlorinated.
0.00015 in. material selected by the user of the test method.
1215 steel alloy is recommended to be used for qualifying taps.
NOTE 2—Each user should select solvents that can meet applicable
6.2 Cutting Tap, 10 by 1.5 mm.
safety standards and still thoroughly clean the test parts. Technical grade
6.3 Reference Fluid, a stable fluid that produces minimal
Naptha or Stoddard Solvent and reagent grade acetone have been found
satisfactory.
buildup edge on tap and yields repeatable test results.
NOTE 1—Any lubricant can be used as the reference fluid. However, it
7. Preparation of Samples
is recommended that the reference fluid not contain additives that will
7.1 For cutting oils and the reference fluid, transfer a
react with metal, such as sulfur, chlorine, or phosphorus containing EP
minimum of 100 mL of the fluid to be tested to a clean plastic
additives, as these could react with the tap during the tap qualification and
potentially bias the results of the test fluid. An ISO Grade 22 (90–100 squeeze bottle.
D5619–00 (2005)
it in the slotted pin under the specimen table at the 6 o’clock
position. Calibrate the average torque meter by hanging a
known weight on the hook at the end of the cable. If the torque
meter readout does not agree with the torque reading expected
with the weight on the hook, adjust the span. Consult the
manufacturer’s instruction manual for further details.
9.4 Place average torque integrator to the average position.
9.5 Set torque trigger point to 0.5 N·m.
NOTE 6—When using nut blanks of softer materials such as aluminum,
a lower torque trigger point of 0.2 N·m should be used.
9.6 Select torque averaging initial and final values accord-
ingtotheequipmentmanufacturer’sinstructions,dependingon
the torque curve generated during test run and the desired area
for evaluation.
NOTE 7—Two hundred sixty and 560 revolutions times 60, or that
1 1
equivalent to 3 ⁄2 to 9 ⁄3 revolutions has been found to give effective data
over the full working range of the tap in the nut blank.
10. Cutting Tap Qualification
10.1 Set test machine to desired speed.
FIG. 3 Exploded View of Specimen Alignment NOTE 8—Testcuttingspeedisdependentonnutblankmaterial.Consult
a machinist’s handbook for recommended cutting speeds; 400 rpm is
recommended for 1215 steel.
7.2 For water soluble fluids, prepare a minimum of 100 mL
10.2 Select a new tap and install it in the test equipment
of diluted fluid to be tested from the sample concentrate with
according to the equipment manufacturer’s instructions.
water (make a note of concentration and water quality; for
10.3 Install a clean, unused nut blank on the table of the test
example, tap, deionized, hardness, etc.) to the selected concen-
machine and secure to a torque of 25 in.-lb according to the
tration and transfer to a plastic squeeze bottle.
manufacturer’s instructions.
8. Preparation of Test Nut Blanks and Taps 10.4 Lower pilot guide plug from center of nut blank to the
sealing position. Fill nut blank and coat tap with reference fluid
8.1 Clean taps and nut blanks in a sonic cleaner using
chosen in 6.4.
solvent selected in 6.3 for at least 15 min. Oven dry at
52 6 3°C (125 6 5°F). Store in a desiccator.
NOTE 9—Aspecial tool is supplied with the test equipment to effect the
correctdistance.Thesealingpositionallowsfortheentirenutblankcavity
NOTE 3—The use of technical grade naphtha or Stoddard Solvent
to be filled with the test fluid specimen.
followed by two rinses with reagent grade acetone and air drying has been
found satisfactory.
10.5 Start test run.
NOTE 4—Taps should be checked carefully for nicks or any residual
10.6 Apply a continuous stream of reference fluid to tap
metal preservative before they are used. If any nicks are detected, the tap
throughout the test run using a squeeze bottle in 5.2.
should be discarded. If residual metal preservative is evident, reclean as in
10.7 After the test run is complete, record the average
8.1.Asoft brush, such as a toothbrush, can be used to aid in removing any
torque value.
residue. A test tube brush may aid in removing metal preservatives from
within the test nut blanks. 10.8 Remove the used nut blank and clean the tap using
sufficient solvents, selected in 6.3, and compressed air to
8.2 Before using nut blanks, the internal hole diameter
remove test fluid, solvent, and metal chips. Leave tap on test
should be checked with the GO/NO GO wire plug gage in 5.3.
machine during this cleaning procedure.
Discard any specimen nuts that are outside of this range.
NOTE 10—Rinse with solvent chosen in 6.3 or as listed in Note 3.
9. Preparation of Apparatus
10.9 Inspect tap for evidence of built-up edge. If built up
9.1 Zero the chart recorder according to the equipment
edge exists, discard tap and begin from 10.2 using a reference
manufacturer’s instructions.
fluid that minimizes the formation of built-up edge. Build-up
9.2 Zero
...


Questions, Comments and Discussion
Ask us and Technical Secretary will try to provide an answer. You can facilitate discussion about the standard in here.